2012 MERCEDES-BENZ SLK ROADSTER heating
[x] Cancel search: heatingPage 125 of 321
X
Convenience closing feature: press and
hold the gbutton until the side win-
dows are closed.
The indicator lamp in the gbutton lights
up. Air-recirculation mode is activated.
X Convenience opening feature: press and
hold the gbutton until the side win-
dows are opened. The side windows move
back to their original positions.
The indicator lamp in the gbutton goes
out .Air-recirculation mode is deactivated.
i If you open the side windows manually
after closing them with the convenience
closing feature, they will remain in this posi-
tion when opened using the convenience
opening feature. Activating/deactivating the residual
heat function
It is possible to make use of the residual heat
of the engine to continue heating the station-
ary vehicle for up to 30 minutes after the
engine has been switched off .The heating
time depends on the temperature that has
been set.
Depending on the equipment level, the con-
trol panel has either the Ìbutton or the
Á button.
i The blower will run at a low speed regard-
less of the airflow setting.
i If you activate the residual heat function
at high temperatures, only the ventilation
will be activated. The blower runs at
medium speed.
X Turn the key to position 0in the ignition
lock or remove it.
X To switch on: press theÌorÁ but-
ton.
The indicator lamp in the ÌorÁ
button lights up. X
To deactivate: press theÌorÁ
button.
The indicator lamp in the ÌorÁ
button goes out.
i Residual heat is deactivated automati-
cally:
R after about 30 minutes
R when the ignition is switched on
R if the battery voltage drops
R if the coolant temperature is too low Adjusting the air vents
Important safety notes
G
WARNING
Very hot or very cold air can flow from the air
vents.T his could cause burns or frostbite to
bare skin in the immediate vicinity of the
vents.K eep bare skin away from these air
outlets. If necessary, direct the airflow away
to a different area of the vehicle interior.
In order to ensure the direct flow of fresh air
through the air vents into the vehicle interior,
please observe the following notes:
R keep the air inlet grille on the bonnet and
in the engine compartment on the front-
passenger side free of blockages, such as
ice, snow or leaves.
R never cover the vents or ventilation grilles
in the vehicle interior.
i You can move the adjuster sfor the air
vents vertically or horizontally, to set the
direction of the airflow.
i Optimal climate control function is ach-
ieved by opening the air vents fully and set-
ting the adjusters to the middle position. 122
Adjusting the air ventsClimate control
Page 126 of 321
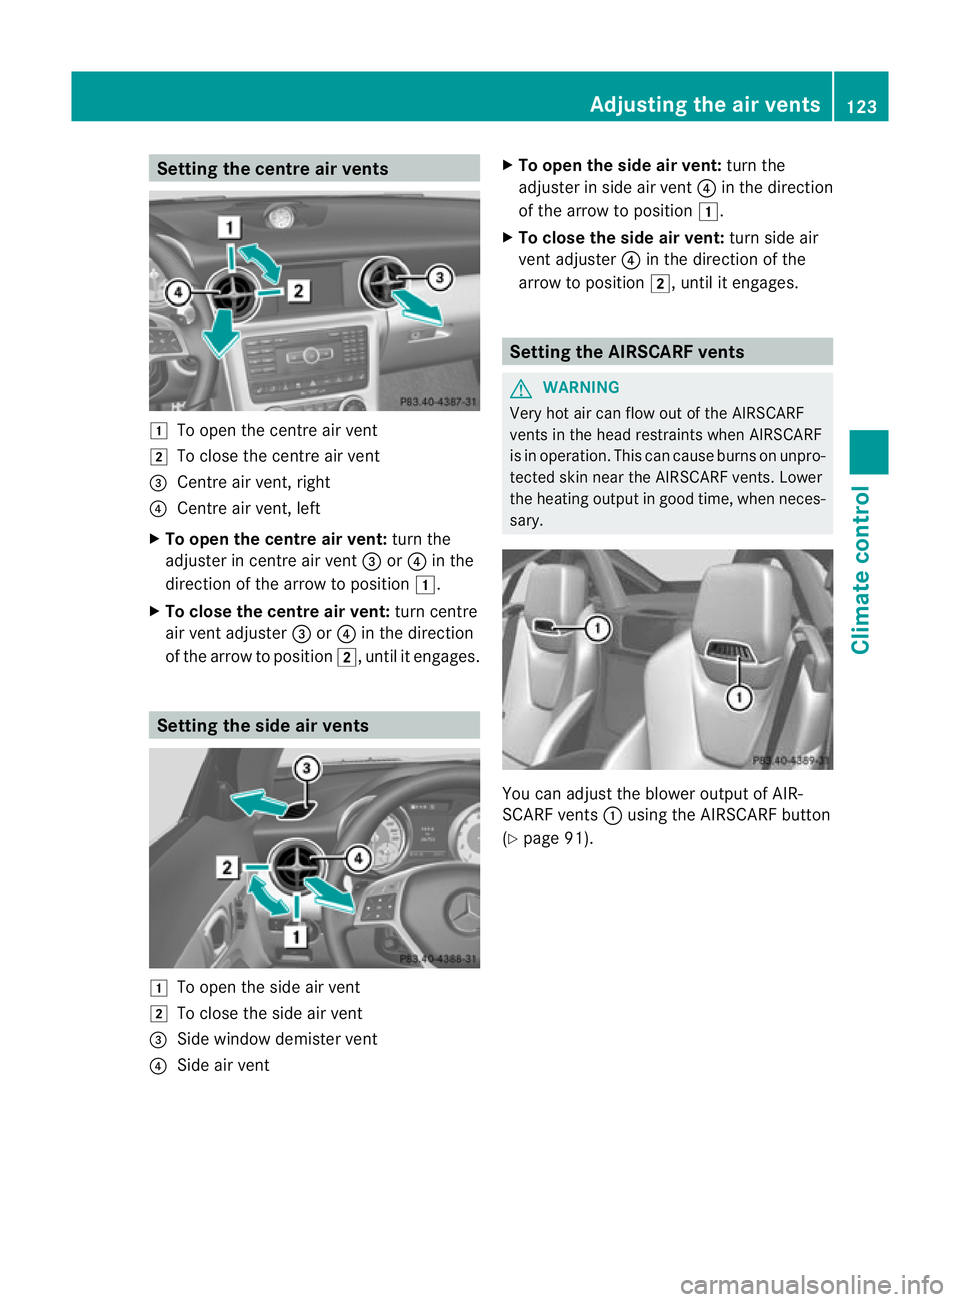
Setting the centre air vents
1
To open the centre air vent
2 To close the centre air vent
= Centre air vent, right
? Centre air vent, left
X To open the centre air vent: turn the
adjuster in centre air vent =or? in the
direction of the arrow to position 1.
X To close the centre air vent: turn centre
air vent adjuster =or? in the direction
of the arrow to position 2, until it engages.Setting the side air vents
1
To open the side air vent
2 To close the side air vent
= Side window demister vent
? Side air vent X
To open the side air vent: turn the
adjuster in side air vent ?in the direction
of the arrow to position 1.
X To close the side air vent: turn side air
vent adjuster ?in the direction of the
arrow to position 2, until it engages. Setting the AIRSCARF vents
G
WARNING
Very hot air can flow out of the AIRSCARF
vents in the head restraints when AIRSCARF
is in operation. This can cause burns on unpro-
tected skin near the AIRSCARF vents. Lower
the heating output in good time, when neces-
sary. You can adjust the blower output of AIR-
SCARF vents
:using the AIRSCARF button
(Y page 91). Adjusting the air vents
123Climate control Z
Page 151 of 321
During braking:
R
a warning tone sounds.
R the Release parking brake message
appears.
R the red !indicator lamp in the instru-
ment cluste rflashes.
When the vehicle has been braked to a stand-
still, the electric parking brake is engaged. Parking up the vehicle
If you leave the vehicle parked up for longer
than four weeks, the battery may be damaged
by exhaustive discharge.
X Disconnect the battery (Y page 274) or
connect it to a trickle charger.
i You can obtain information about trickle
chargers fro maqualified specialist work-
shop.
If you leave the vehicle parked up for longer
than six weeks, the vehicle may suffer dam-
age as a result of lack of use.
X Visit a qualified specialist workshop and
seek advice. Driving tips
General driving tips
Rolling with the engine switched off G
WARNING
Never switch the engine off while the vehicle
is in motion.
There is no power assistance for the steering
and the service brake when the engine is not
running.
You will require considerably more effor tto
steer and brake, and you could therefore lose
control of the vehicle and cause an accident. Short journey
! Vehicles with adiesel particle filter: if
the vehicle is mostly driven for short dis-
tances, it is possible that malfunctions may
occur during the automatic cleaning of the
diesel particle filter. This may lead to fuel
collecting in the engine oil and cause
engine failure. Therefore, if you frequently
drive short distances, you should take a 20
minute trip on a motorway or rural road at
least every 500km. Brakes
Important safety notes G
WARNING
Do not change down for additional engine
braking on a slippery road surface. This could
cause the drive wheels to lose their grip and
the vehicle could skid. G
WARNING
Make sure that other road users are not
endangered by your braking.
Downhill gradients On long and steep downhill gradients, espe-
cially if the vehicle is laden, you must shift to
a lower gear in good tim eor, on vehicles with
automatic transmission, select shift range 1,
2 or 3.
i This also applies if you have activated
cruise control, SPEEDTRONIC or DIS-
TRONIC PLUS.
This will use the braking effect of the engine,
so less braking will be required to maintain
the speed. This relieves the load on the brake
system and prevents the brakes from over-
heating and wearing too quickly. 148
Driving tipsDriving and parking
Page 154 of 321
Slippery road surfaces
G
WARNING
Do not shift down for additional engine brak-
ing on a slippery road surface. This could
cause the drive wheels to lose their grip and
the vehicle could skid.
You should drive particularly carefully on slip-
pery road surfaces. Avoid sudden accelera-
tion, steering and braking manoeuvres.
If the vehicle threatens to skid or cannot be
stopped when moving at low speed:
X Vehicles with manual transmission:
shift to neutral.
X Vehicles with automatic transmission:
shift the transmission to position N.
X Try to bring the vehicle under control by
using corrective steering.
i For more information on driving with
snow chains, see (Y page 289). Driving systems
Cruise control
Important safety notes Cruise control maintains a constant road
speed for you. It brakes automatically in order
to avoid exceeding the set speed. On long and
steep downhill gradients, especially if the
vehicle is laden, you must shift to a lower gear
in time. On vehicles with automatic transmis-
sion, select shift range 1,2or 3.B y doing so,
you will make use of th ebraking effect of the
engine. This relieves the loadont he brake
system and prevents the brakes from over-
heating and wearing too quickly. G
WARNING
Do not change down for additional engine
braking on a slippery road surface. This could
cause the drive wheels to lose their grip and
the vehicle could skid. Use cruise control only if road and traffic con-
ditions make it appropriate to maintain a
steady speed for a prolonged period. You can
store any road speed above 30 km/h. G
WARNING
Cruise control cannot take account of road
and traffic conditions.
Always pay attention to traffic conditions
even when cruise control is activated.
Cruise control is only an aid designed to assist
driving. You are responsible for the vehicle's
speed and for braking in good time. G
WARNING
Do not use cruise control
R in traffic conditions that do not allow you to
drive at a constant speed (e.g. heavy traffic
or winding roads). You may otherwise
cause an accident.
R on slippery roads. The drive wheels may
lose their grip when braking or accelerating
and the vehicle may skid.
R when there is low visibility, e.g. due to fog,
heavy rain or snow.
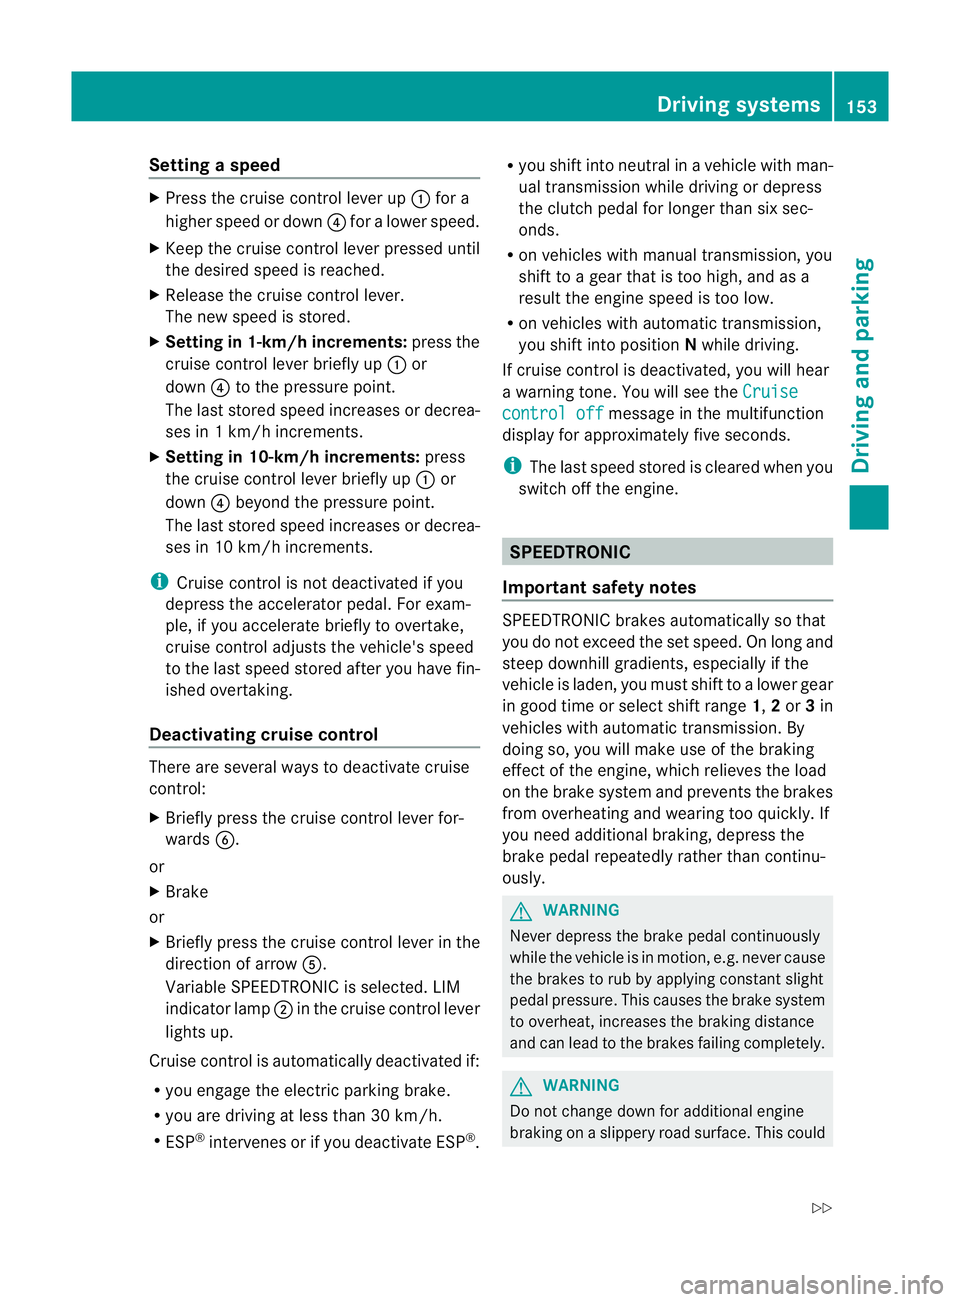
Cruise control lever You can operate cruise control and variable
SPEEDTRONIC with the cruise control lever.
The LIM indicator lamp on the cruise control
lever indicates which system you have selec-
ted:
R
LIM indicator lamp off: cruise control is
selected.
R LIM indicator lamp on: variable SPEED-
TRONIC is selected. Driving systems
151Driving and parking Z
Page 156 of 321
Setting
aspeed X
Press the cruise control lever up :for a
highe rspeed or down ?for a lower speed.
X Keep the cruise control lever pressed until
the desired speed is reached.
X Release the cruise control lever.
The new speed is stored.
X Setting in 1-km/h increments: press the
cruise control lever briefly up :or
down ?to the pressure point.
The last stored speed increases or decrea-
ses in 1 km/h increments.
X Setting in 10-km/h increments: press
the cruise control lever briefly up :or
down ?beyond the pressure point.
The last stored speed increases or decrea-
ses in 10 km/h increments.
i Cruise control is not deactivated if you
depress the accelerator pedal. For exam-
ple, if you accelerate briefly to overtake,
cruise control adjusts the vehicle's speed
to the last speed stored after you have fin-
ished overtaking.
Deactivating cruise control There are several ways to deactivate cruise
control:
X Briefly press the cruise control lever for-
wards B.
or
X Brake
or
X Briefly press the cruise control lever in the
direction of arrow A.
Variable SPEEDTRONIC is selected. LIM
indicator lamp ;in the cruise contro llever
lights up.
Cruise control is automatically deactivated if:
R you engage the electric parking brake.
R you are driving at less than 30 km/h.
R ESP ®
intervenes or if you deactivate ESP ®
. R
you shift into neutral in a vehicle with man-
ual transmission while driving or depress
the clutch pedal for longer than six sec-
onds.
R on vehicles with manual transmission, you
shift to a gear that is too high, and as a
result the engine speed is too low.
R on vehicles with automatic transmission,
you shift into position Nwhile driving.
If cruise control is deactivated, you will hear
a warning tone. You will see the Cruise control off message in the multifunction
display for approximately five seconds.
i The last speed stored is cleared when you
switch off the engine. SPEEDTRONIC
Important safety notes SPEEDTRONIC brakes automatically so that
you do not exceed the set speed. On long and
steep downhill gradients, especially if the
vehicle is laden, you must shift to a lower gear
in good time or select shift range
1,2or 3in
vehicles with automatic transmission .By
doing so, you will make use of the braking
effec tofthe engine, which relieves the load
on the brake system and prevents the brakes
from overheating and wearing too quickly. If
you need additional braking, depress the
brake pedal repeatedly rather than continu-
ously. G
WARNING
Never depress the brake pedal continuously
while the vehicle is in motion, e.g. never cause
the brakes to rub by applying constant slight
pedal pressure. This causes the brake system
to overheat, increases the braking distance
and can lead to the brakes failing completely. G
WARNING
Do not change down for additional engine
braking on a slippery road surface. This could Driving systems
153Driving and parking
Z
Page 159 of 321
Permanent SPEEDTRONIC
You can use the on-board computer to limit
the speed permanently to avalue between
160 km/h(e.g. for driving on winter tyres) and
the maximum speed ( Ypage 193).
Shortly before the store dspeed is reached, it
appears in the multifunction display.
Permanent SPEEDTRONIC remains active,
even if variable SPEEDTRONIC is deactivated.
You cannot exceed the stored limit speed,
even if you depress the accelerator pedal
beyond the pressure point (kickdown). DISTRONIC PLUS
Important safety notes DISTRONIC PLUS regulates the speed and
automatically helps you maintain the dis-
tance to the vehicle detected in front. DIS-
TRONIC PLUS brakes automatically so that
the set speed is not exceeded.
On long and steep downhill gradients, espe-
cially if the vehicle is laden, you must select
shift range
1,2or 3in good time. By doing
so, you will make use of the braking effec tof
the engine .This relieves the load on the brake
system and prevents the brakes from over-
heating and wearing too quickly.
If DISTRONIC PLUS detects a slower-moving
vehicle in front, your vehicle is braked in order
to maintain the preset distance to the vehicle
in front. G
WARNING
Do not change down for additional engine
braking on a slippery road surface. This could
cause the drive wheels to lose their grip and
the vehicle could skid. G
WARNING
DISTRONIC PLUS is only an aid designed to
assist driving. The driver remains fully respon-
sible for the vehicle's distance from other
vehicles, the vehicle's speed and for braking
in good time. DISTRONIC PLUS does not react in particular
to:
R
pedestrians
R stationary obstacles on the road, e.g. stop-
ped or parked vehicles
R oncoming and crossing traffic
DISTRONIC PLUS may not detect narrow vehi-
cles driving in front,e .g. motorcycles, or vehi-
cles driving on a different line. Therefore,
always pay attention to traffic conditions even
when DISTRONIC PLUS is activated. Other-
wise, you may fail to recognise dangers in
time, cause an accident and injure yourself
and others. G
WARNING
DISTRONIC PLUS cannot take account of road
and traffic conditions. If DISTRONIC doe snot
recognise or no longer recognises the vehicle
in front, do not activate DISTRONIC or, if it is
already active, deactivate it. This is especially
the case:
R before corners
R on filter lanes
R when changing to a lane with faster moving
traffic
R in complex driving situations or where lanes
are diverted, e.g. at roadworks on a motor-
way
DISTRONIC PLUS otherwise maintains the
current speed set by you or accelerates up to
the set speed.
DISTRONIC PLUS cannot take account of
weather conditions. Deactivate, or do not
activate, DISTRONIC PLUS:
R if the roads are slippery, snow-covered or
icy. The wheels could lose their grip when
braking or accelerating. The vehicle could
start to skid.
R if the sensors are dirty or there is poor vis-
ibility, e.g. due to snow, rain or fog. Dis-
tance control may be impaired.
Always pay attention to traffic conditions
even when DISTRONIC PLUS is activated. 156
Driving systemsDriving and parking
Page 244 of 321
Make sure that children travelling in the vehi-
cle are not able to injure themselves on the
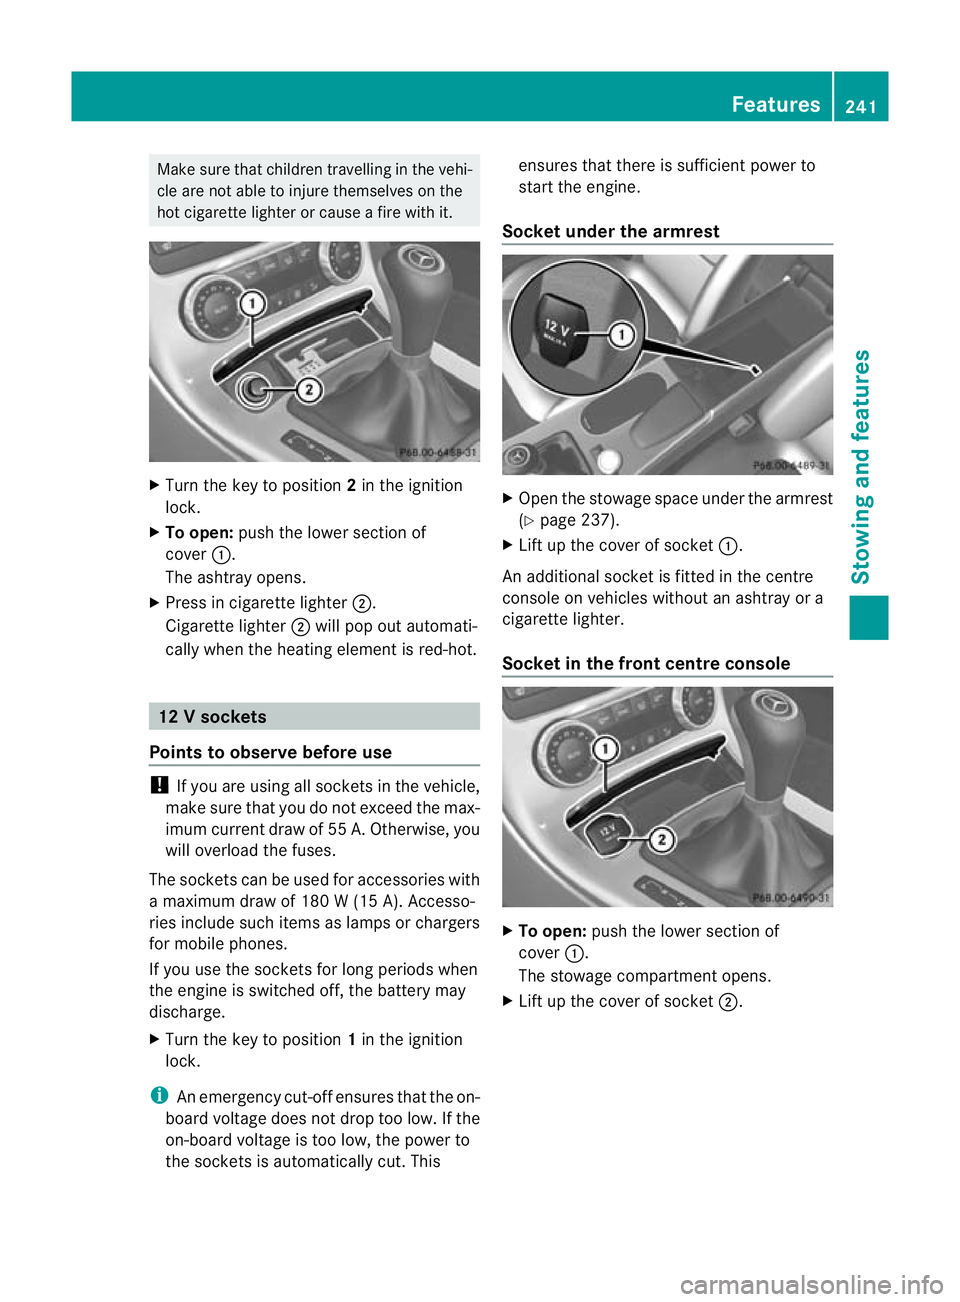
hot cigarette lighter or cause a fire with it. X
Turn the key to position 2in the ignition
lock.
X To open: push the lower section of
cover :.
The ashtray opens.
X Press in cigarette lighter ;.
Cigarette lighter ;will pop out automati-
cally when the heating element is red-hot. 12
Vsockets
Points to observe before use !
If you are using all sockets in the vehicle,
make sure that you do no texceed the max-
imu mcurren tdraw of 55 A. Otherwise, you
will overload the fuses.
The sockets can be used for accessories with
a maximum draw of 180 W (15 A). Accesso-
ries include such items as lamps or chargers
for mobile phones.
If you use the sockets for long periods when
the engine is switched off, the battery may
discharge.
X Turn the key to position 1in the ignition
lock.
i An emergency cut-off ensures that the on-
board voltage does not drop too low.Ift he
on-board voltage is too low, the power to
the sockets is automatically cut. This ensures that there is sufficient power to
start the engine.
Socket under the armrest X
Open the stowage space under the armrest
(Y page 237).
X Lift up the cover of socket :.
An additional socket is fitted in the centre
console on vehicles without an ashtray or a
cigarette lighter.
Socket in the front centre console X
To open: push the lower section of
cover :.
The stowage compartmento pens.
X Lift up the cover of socket ;. Features
241Stowing and features Z
Page 257 of 321
Care of the exterior
Automatic car wash G
WARNING
Braking efficiency is reduced after washing
the vehicle .This could cause an accident. For
this reason, following a car wash, drive with
particular care until the brakes are dry. G
WARNING
The vehicle is braked when the HOLD function
or DISTRONIC PLUS is activated. Therefore,
deactivate the HOLD function and DISTRONIC
PLUS before the vehicle is washed in an auto-
matic car wash.
You can wash the vehicle in an automatic car
wash from the very start.
! Lock the vehicle when washing it in an
automatic car wash. The vehicle could oth-
erwise be damaged.
! We recommend automatic car washes
with an adjustable 15
high-pressure pre-
cleaning program. In car washes that use
high water pressures, there is a danger that
a small quantity of water may leak into the
vehicle.
Wash off excess dirt before cleaning the vehi-
cle in an automatic car wash.
! Make sure that the automatic transmis-
sion is in position Nwhen washing your
vehicle in a tow-through car wash. The vehi-
cle could be damaged if the transmission is
in another position.
! Make sure that:
R the side windows and roof are com-
pletely closed.
R the blower for the ventilation/heating is
switched off (OFF button is depressed/
airflow control is turned to position 0).
R the windscreen wiper switch is at posi-
tion 0. The vehicle could otherwise be damaged.
After using an automatic car wash, wipe off
wax from the windscreen and the wiper
blades. This will prevent smears and reduce
wiping noises caused by residue on the wind-
screen.
Washing by hand In some countries, washing by hand is only
allowed at specially equipped washing bays.
Observe the legal requirements for each indi-
vidual country.
X Do not use hot water and do not wash the
vehicle in direct sunlight.
X Use a soft sponge to clean.
X Use a mild cleaning agent, such as a car
shampoo approved by Mercedes-Benz.
X Thoroughly hose down the vehicle with a
gentle jet of water.
X Do not point the water jet directly towards
the air inlet.
X Use plenty of water and rinse out the
sponge frequently.
X Rinse the vehicle with clean water and dry
thoroughly with a chamois.
X Do not let the cleaning agent dry on the
paintwork.
When using the vehicle in winter, remove all
traces of road salt deposits carefully and as
soon as possible.
High-pressure cleaning equipment G
WARNING
Do not use high-pressure cleaners with circu-
lar-jet nozzles (dirt grinders) to clean your
vehicle, in particular the tyres. You could oth-
erwise damage the tyres and cause an acci-
dent.
! Always maintain a distance of at least
30 cm between the vehicle and the high-
pressure cleaner nozzle. Information about
15 In accordance with the specifications for Cabrioletp rograms.254
CareMaintenance and care