2012 MERCEDES-BENZ SLK ROADSTER fuel
[x] Cancel search: fuelPage 137 of 321
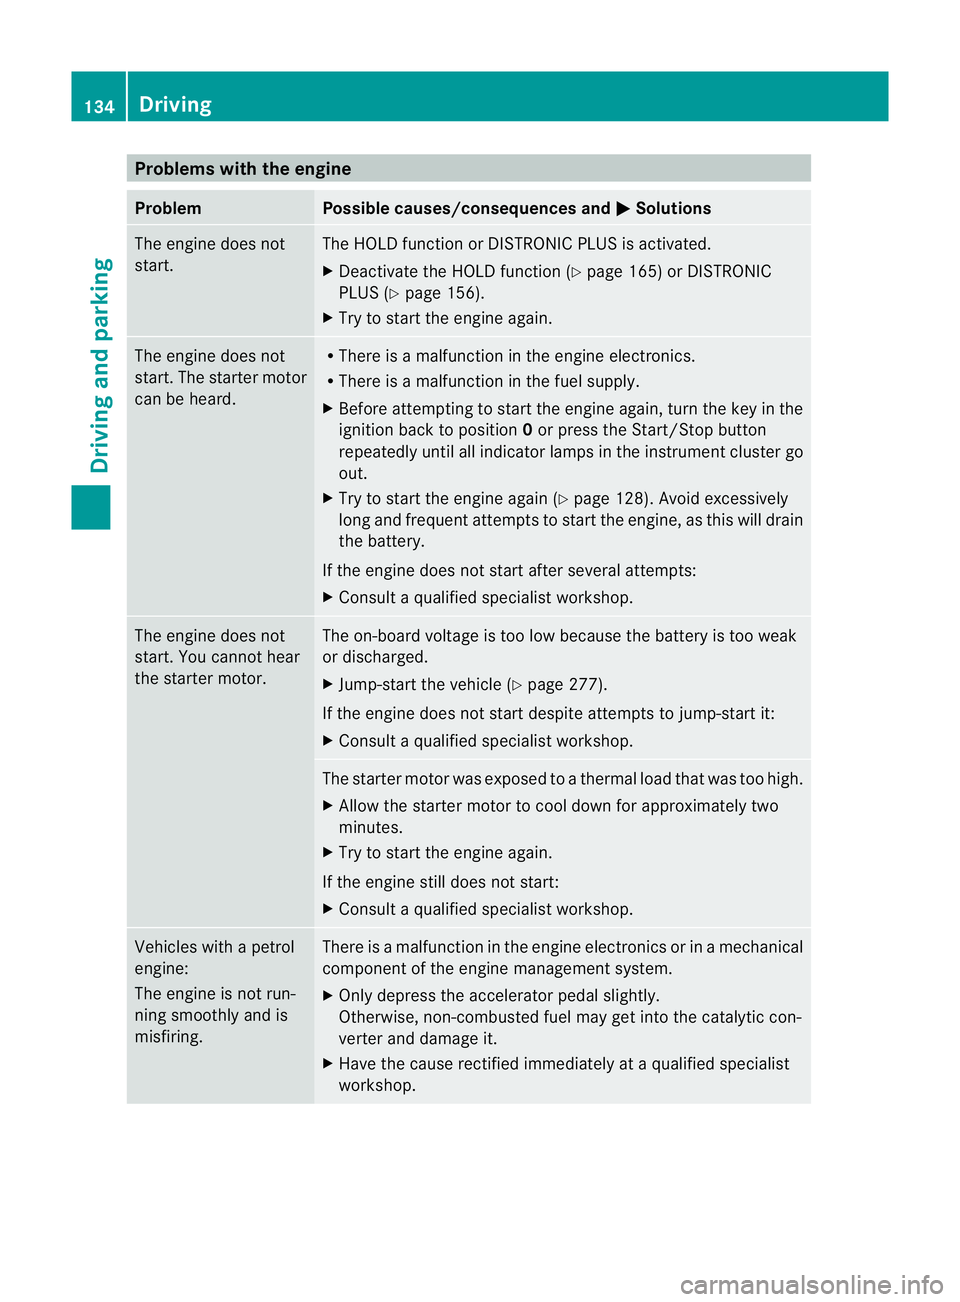
Problems with the engine
Problem Possible causes/consequences and
M Solutions
The engine does not
start. The HOLD function or DISTRONIC PLUS is activated.
X
Deactivate the HOLD function (Y page 165) or DISTRONIC
PLUS (Y page 156).
X Try to start the engine again. The engine does not
start. The starter motor
can be heard. R
There is a malfunction in the engine electronics.
R There is a malfunction in the fuel supply.
X Before attempting to start the engine again, turn the key in the
ignition back to position 0or press the Start/Stop button
repeatedly until all indicator lamps in the instrumen tcluster go
out.
X Try to start the engine again (Y page 128). Avoid excessively
long and frequent attempts to start the engine, as this will drain
the battery.
If the engine does not start after several attempts:
X Consult a qualified specialist workshop. The engine does not
start. You cannot hear
the starter motor. The on-board voltage is too low because the battery is too weak
or discharged.
X
Jump-star tthe vehicle (Y page 277).
If the engine does not start despite attempts to jump-start it:
X Consult a qualified specialist workshop. The starter motor was exposed to a thermal load that was too high.
X
Allow the starter motor to cool down for approximately two
minutes.
X Try to start the engine again.
If the engine still does not start:
X Consult a qualified specialist workshop. Vehicles with a petrol
engine:
The engine is not run-
ning smoothly and is
misfiring. There is a malfunction in the engine electronics or in a mechanical
component of the engine management system.
X
Only depress the accelerator pedal slightly.
Otherwise, non-combusted fuel may get into the catalytic con-
verter and damage it.
X Have the cause rectified immediately at a qualified specialist
workshop. 134
DrivingDriving and parking
Page 141 of 321
R
the positio nofthe accelerator pedal
R the road speed Driving tips
Accelerator pedal position Your style of driving influences how the auto-
matic transmission shifts gear:
R
little throttle: early upshifts
R more throttle: late upshifts
Double-clutch function When shifting down, the double-clutch func-
tion is active regardless of the currently selec-
ted drive program. The double-clutch function
reduces load change reactions and is condu-
cive to a sporty driving style. The sound gen-
erated by the double-clutchf
unction depends
on the drive program selected.
Kickdown Use kickdown for maximum acceleration.
X
Depress the accelerato rpedal beyond the
pressure point.
The transmission shifts to a lower gear
depending on the engine speed.
X Ease off the accelerator pedal once the
desired speed is reached.
The automatic transmission shifts back up. Program selector button
General notes The program selector button allows you to
choose between differen tdriving character-
istics. Example
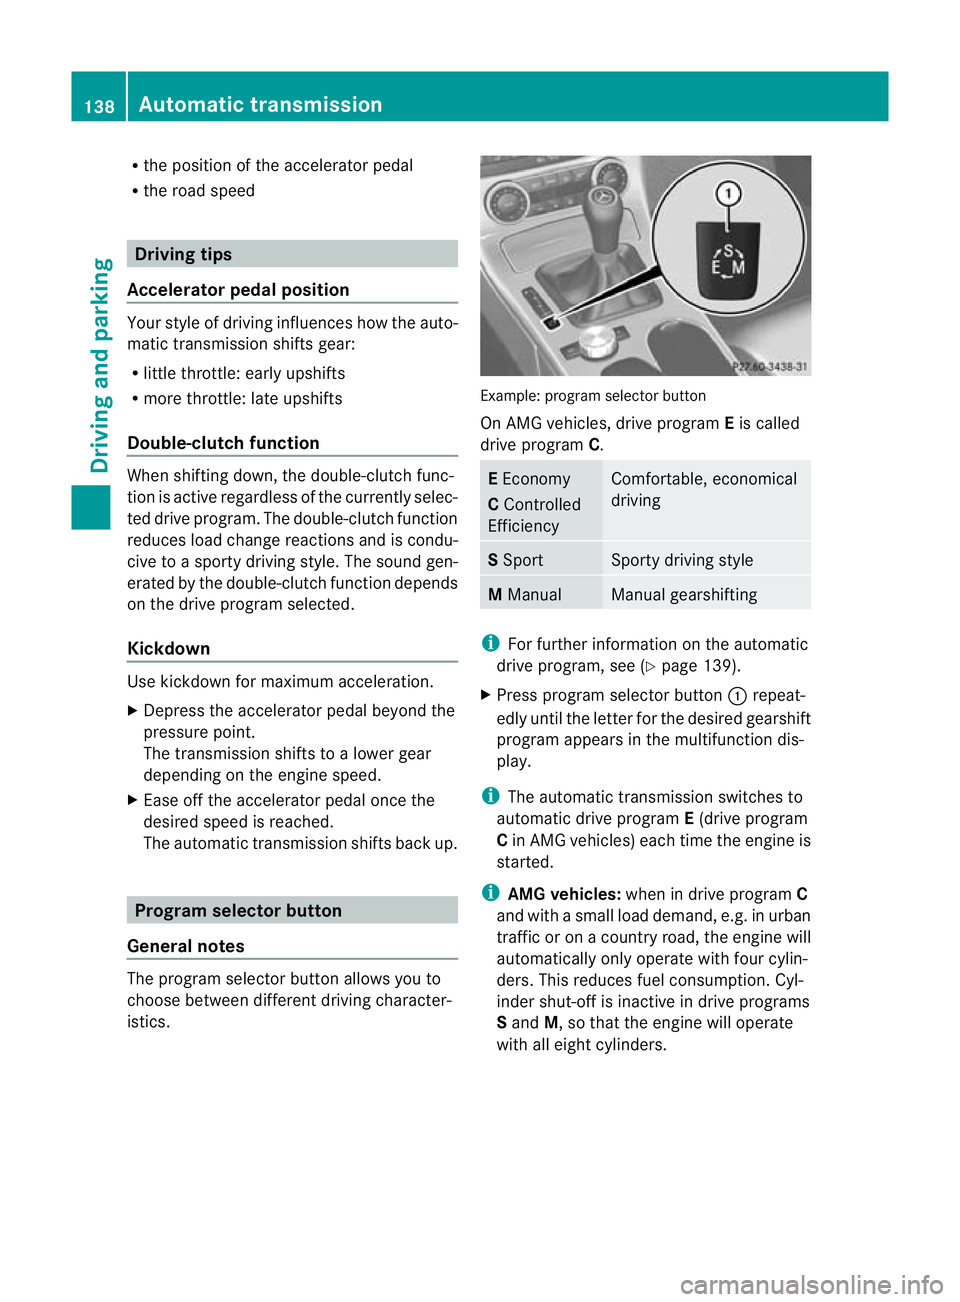
:program selector button
On AMG vehicles, drive program Eis called
drive program C. E
Economy
C Controlled
Efficiency Comfortable, economical
driving
S
Sport Sporty driving style
M
Manual Manual gearshifting
i
For further information on the automatic
drive program, see (Y page 139).
X Press progra mselecto rbutton :repeat-
edly until the lette rfor the desired gearshift
program appears in the multifunction dis-
play.
i The automatic transmission switches to
automatic drive program E(drive program
C in AMG vehicles) each time the engine is
started.
i AMG vehicles: when in drive program C
and with a small load demand, e.g. in urban
traffic or on a country road, the engine will
automatically only operate with four cylin-
ders. This reduces fuel consumption. Cyl-
inder shut-off is inactive in drive programs
S and M, so that the engine will operate
with all eight cylinders. 138
Automatic transmissionDriving and parking
Page 142 of 321
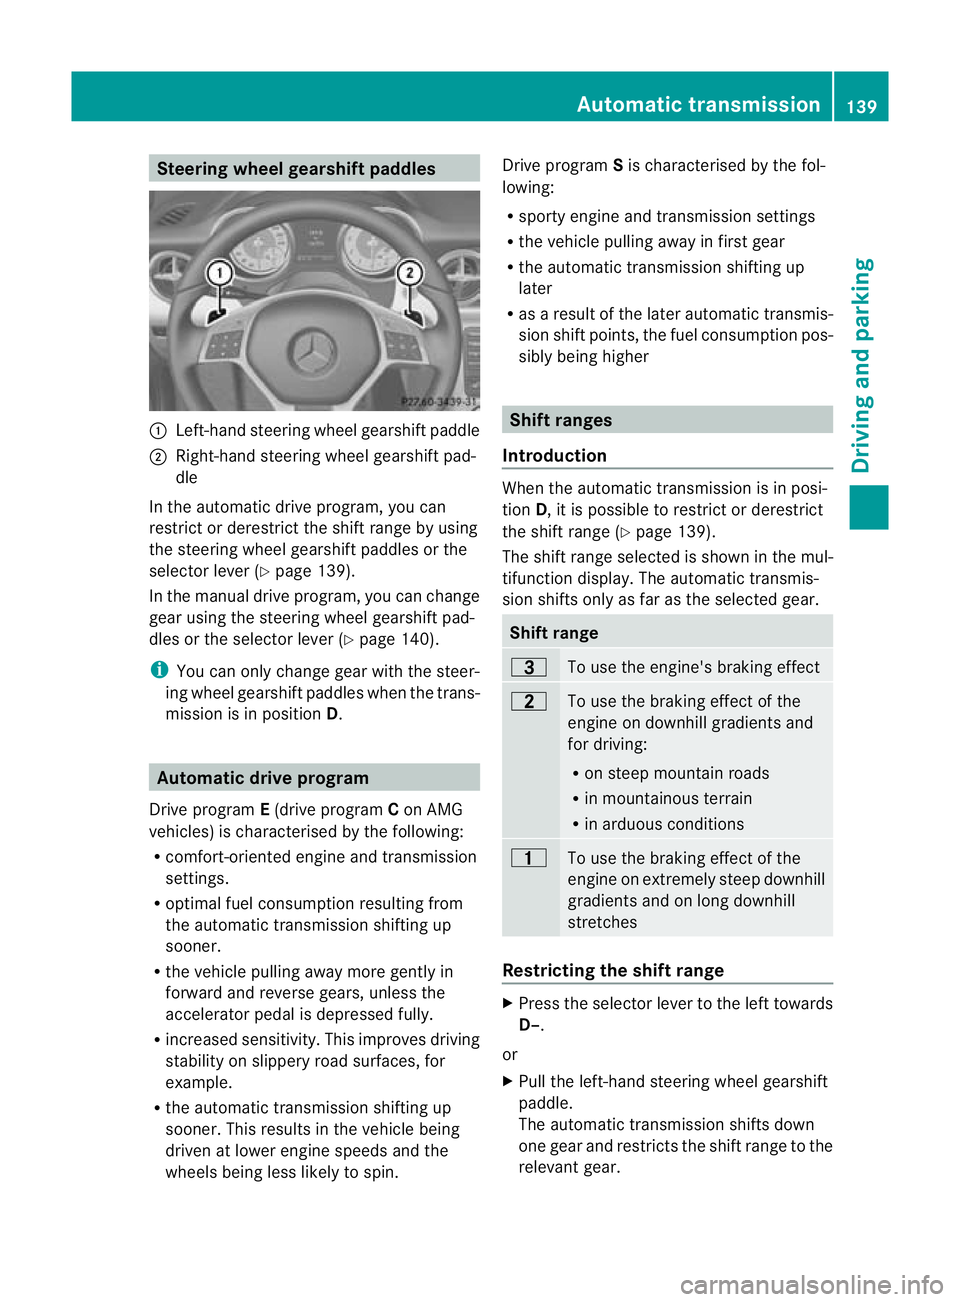
Steering wheel gearshift paddles
:
Left-hand steering wheel gearshift paddle
; Right-hand steering wheel gearshift pad-
dle
In the automatic drive program, you can
restrict or derestrict the shift range by using
the steering wheel gearshift paddles or the
selector lever (Y page 139).
In the manual drive program, you can change
gear using the steering wheel gearshift pad-
dles or the selector lever (Y page 140).
i You can only change gear with the steer-
ing wheel gearshift paddles when the trans-
mission is in position D.Automatic drive program
Drive program E(drive program Con AMG
vehicles) is characterised by the following:
R comfort-oriented engine and transmission
settings.
R optimal fuel consumption resulting from
the automatic transmission shifting up
sooner.
R the vehicle pulling away more gently in
forward and reverse gears, unless the
accelerator pedal is depressed fully.
R increased sensitivity. This improves driving
stability on slippery road surfaces, for
example.
R the automatic transmission shifting up
sooner. This results in the vehicle being
driven at lower engine speeds and the
wheels being less likely to spin. Drive program
Sis characterised by the fol-
lowing:
R sporty engine and transmission settings
R the vehicle pulling away in first gear
R the automatic transmission shifting up
later
R as a result of the later automatic transmis-
sion shift points, the fuel consumption pos-
sibly being higher Shift ranges
Introduction When the automatic transmission is in posi-
tion
D, it is possible to restrictord erestrict
the shift range (Y page 139).
The shift range selected is shown in the mul-
tifunction display. The automatic transmis-
sion shifts only as far as the selected gear. Shift range
=
To use the engine's brakin
geffect 5
To use the braking effect of the
engine on downhill gradients and
for driving:
R
on steep mountai nroads
R in mountainous terrain
R in arduous conditions 4
To use the braking effect of the
engine on extremely steep downhill
gradients and on long downhill
stretches
Restricting the shift range
X
Press the selector lever to the left towards
D–.
or
X Pull the left-hand steerin gwheel gearshift
paddle.
The automatic transmission shifts down
one gear and restricts the shift range to the
relevant gear. Automatic transmission
139Driving and parking Z
Page 143 of 321
i
If the engine exceeds the maximum
engine speed when shifting down, the auto-
matic transmission protects against engine
damage by not shifting down.
i If the maximum engine speed for the shift
range is reached and you continue to accel-
erate, the automatic transmission shifts up
in order to prevent the engine from over-
revving, even if the shift range is restricted.
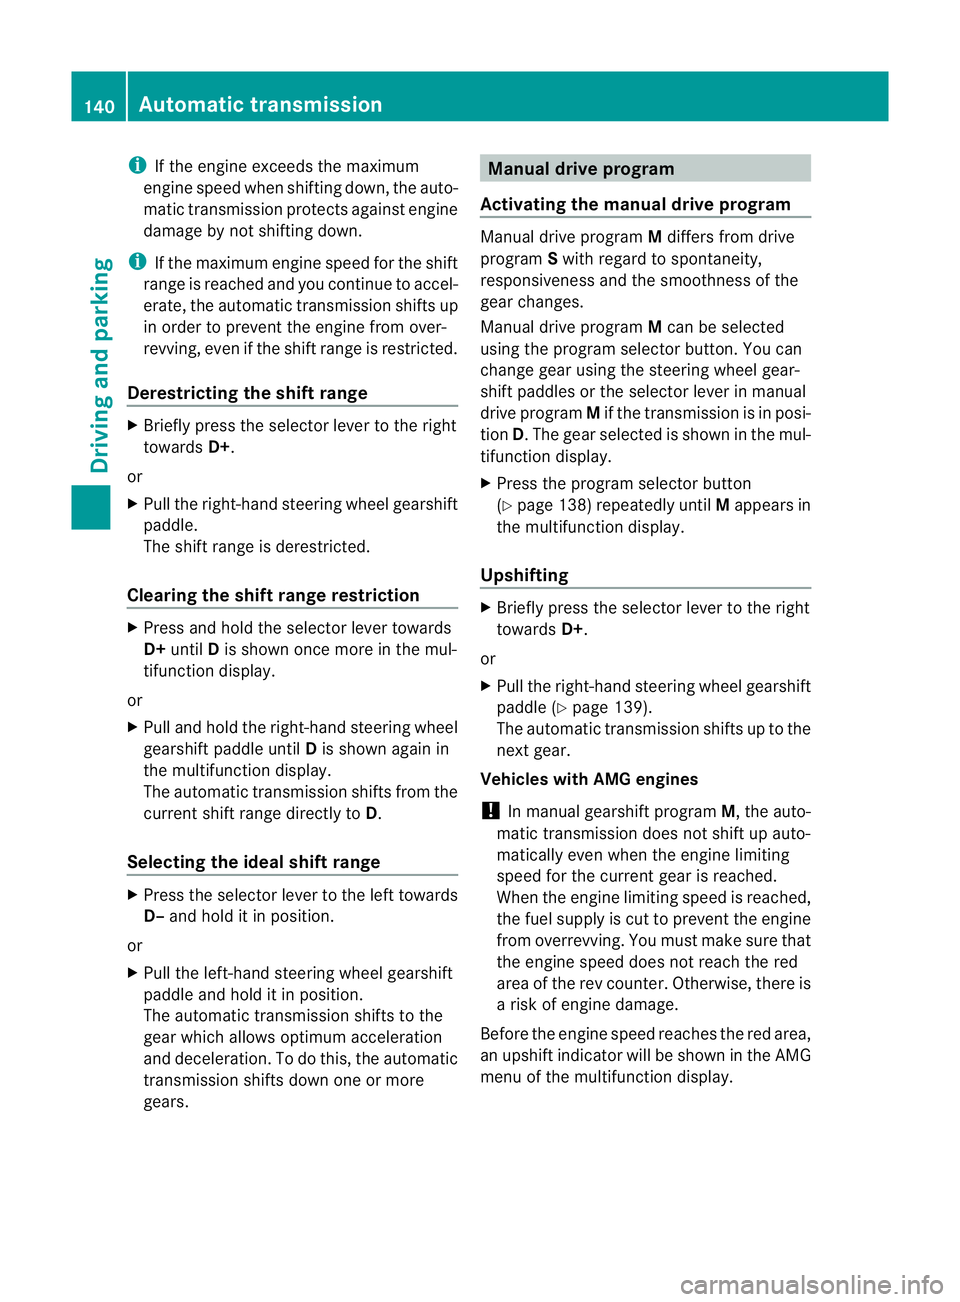
Derestricting the shift range X
Briefly press the selector lever to the right
towards D+.
or
X Pull the right-hand steering wheel gearshift
paddle.
The shift range is derestricted.
Clearing the shift range restriction X
Press and hold the selector lever towards
D+ until Dis shown once more in the mul-
tifunction display.
or
X Pull and hold the right-hand steering wheel
gearshift paddle until Dis shown again in
the multifunction display.
The automatic transmission shifts from the
current shift range directly to D.
Selecting the ideal shift range X
Press the selector lever to the left towards
D– and hold it in position.
or
X Pull the left-hand steering wheel gearshift
paddle and hold it in position.
The automatic transmission shifts to the
gear which allows optimum acceleration
and deceleration. To do this, the automatic
transmission shifts down one or more
gears. Manual drive program
Activating the manual drive program Manual drive program
Mdiffers from drive
program Swith regard to spontaneity,
responsiveness and the smoothness of the
gear changes.
Manual drive program Mcan be selected
using the program selector button. You can
change gear using the steering wheel gear-
shift paddles or the selector lever in manual
drive program Mif the transmission is in posi-
tion D.The gear selected is shown in the mul-
tifunction display.
X Press the program selector button
(Y page 138) repeatedly until Mappears in
the multifunction display.
Upshifting X
Briefly press the selector lever to the right
towards D+.
or
X Pull the right-hand steering wheel gearshift
paddle (Y page 139).
The automatic transmission shifts up to the
next gear.
Vehicles with AMG engines
! In manual gearshift program M, the auto-
matic transmission does not shift up auto-
matically even when the engine limiting
speed for the current gear is reached.
When the engine limiting speed is reached,
the fuel supply is cut to prevent the engine
from overrevving. You must make sure that
the engine speed does not reach the red
area of the rev counter. Otherwise, there is
a risk of engine damage.
Before the engine speed reaches the red area,
an upshift indicator will be shown in the AMG
menu of the multifunction display. 140
Automatic transmissionDriving and parking
Page 145 of 321
Problems with the transmission
Problem Possible causes/consequences and
M Solutions
The transmission has
problems shifting gear. The transmission is losing oil.
X
Have the transmission checked at a qualified specialist work-
shop immediately. The acceleration ability
is deteriorating.
The transmission no
longer changes gear. The transmission is in emergency mode.
It is only possible to shift into
secondgear and reverse gear.
X Stop.
X Shift the transmission to position P.
X Switch off the engine.
X Wait at least 10seconds before restarting the engine.
X Shift the transmission to position Dor R.
If D is selected, the transmission shifts into secondgear; ifRis
selected, the transmission shifts into reverse gear.
X Have the transmission checked at a qualified specialist work-
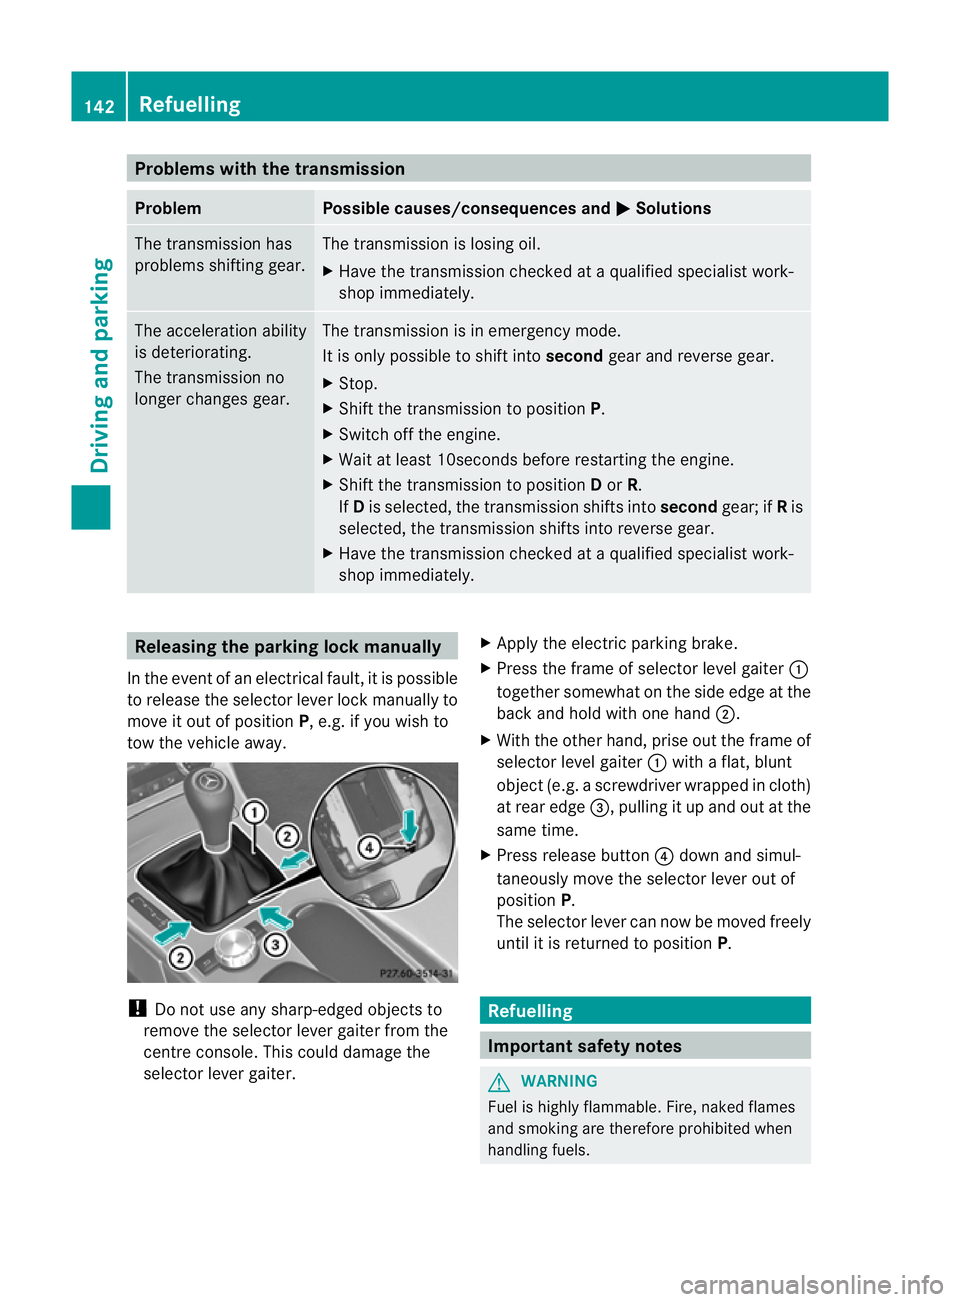
shop immediately. Releasing the parking lock manually
In the event of an electrical fault, it is possible
to release the selector lever lock manually to
move it out of position P, e.g. if you wish to
tow the vehicle away. !
Do not use any sharp-edged objects to
remove the selector lever gaiter from the
centre console. This could damage the
selector lever gaiter. X
Apply the electric parking brake.
X Press the frame of selector level gaiter :
together somewhat on the side edge at the
back and hold with one hand ;.
X With the other hand, prise out the frame of
selector level gaiter :with a flat, blunt
object (e.g. a screwdriver wrapped in cloth)
at rear edge =, pulling it up and out at the
same time.
X Press release button ?down and simul-
taneously move the selector lever out of
position P.
The selector lever can now be moved freely
until it is returned to position P. Refuelling
Important safety notes
G
WARNING
Fuel is highly flammable. Fire, naked flames
and smoking are therefore prohibited when
handling fuels. 142
RefuellingDriving and parking
Page 146 of 321
Switch off the engine before refuelling.
G
WARNING
Avoid contact with fuels.
It is hazardous to your health if your skin
comes into direct contact with fuels or you
breathe in fuel vapours. G
WARNING
Do not use petrol to refuel a diesel tank. Never
mix diesel with petrol .Doing so could damage
the fuel system and the engine. The vehicle
could also catch fire.
! Do not use petrol to refuel vehicles with a
diesel engine. Do not use diesel to refuel
vehicles with a petrol engine. Even small
amounts of the wrong fuel result in damage
to the fuel system and the engine.
! Do not switch on the ignition if you acci-
dentally refuel with the wrong fuel. Other-
wise, the fuel will enter the fuel lines. Notify
a qualified specialist workshop and have
the fuel tank and fuel lines drained com-
pletely.
! Overfilling the fuel tank could damage the
fuel system.
! Take care not to spill any fuel on painted
surfaces. You could otherwise damage the
paintwork.
! Use a filter when adding fuel from a fuel
can. The fuel lines and/or the diesel injec-
tion system could otherwise be blocked by
particles from the fuel can.
Further information on fuel and on fuel grades
can be found in the "Fuel" section
(Y page 303). Refuelling
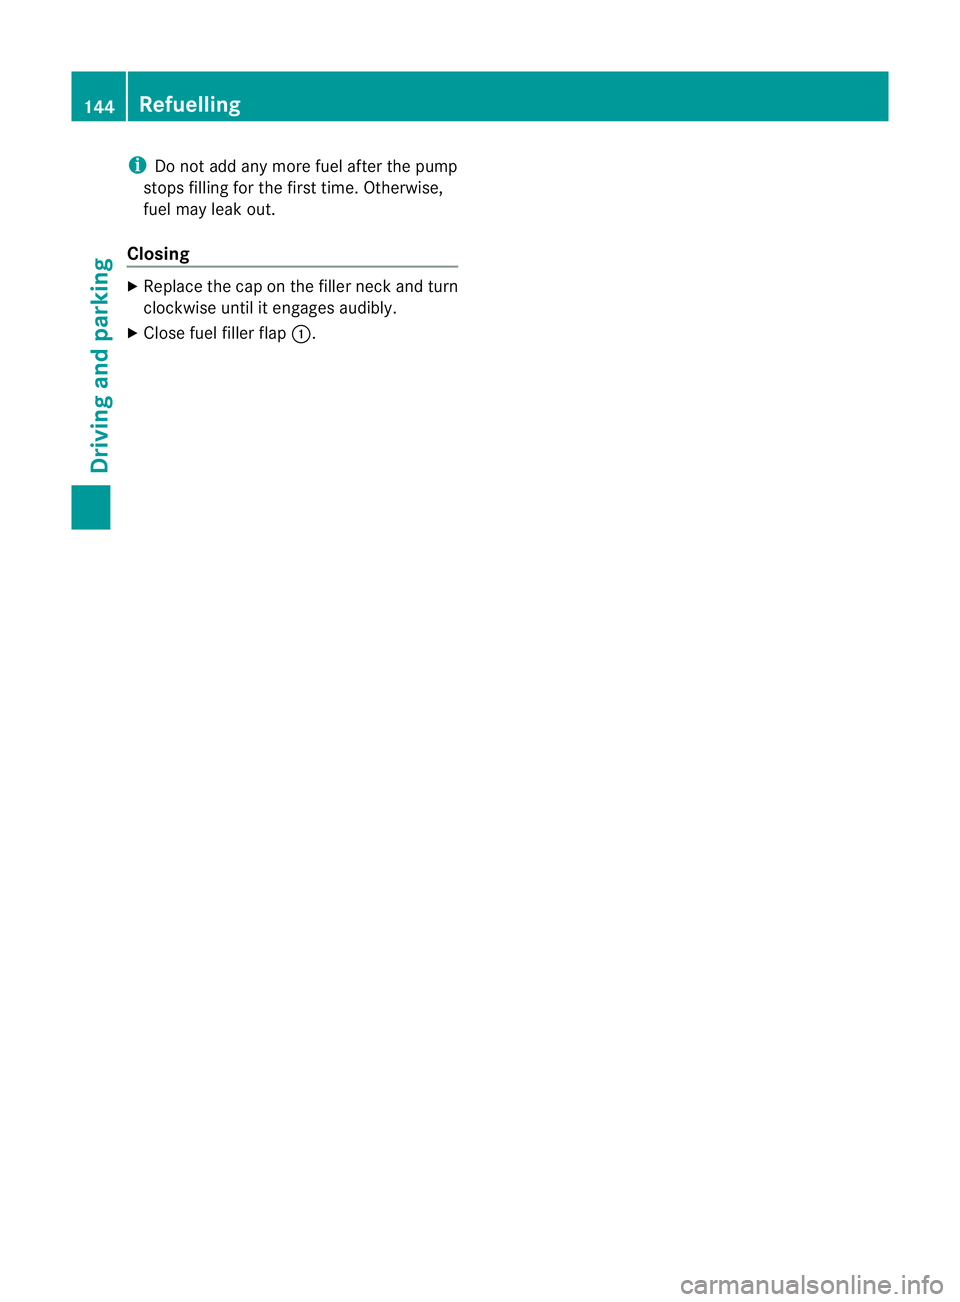
Fuel filler flap :
Fuel filler flap
; To insert the fuel filler cap
= Tyre pressure table
? Fuel type
The fuel filler flap is unlocked or locked auto-
matically when you open or close the vehicle
with the key or using KEYLESS-GO.
The position of the fuel filler cap is displayed
8 in the instrument cluster. The arrow
next to the filling pump indicates the side of
the vehicle.
Opening X
Switch off the engine.
X Remove the key from the ignition lock.
X KEYLESS-GO: open the driver’s door.
This corresponds to key position 0: "key
removed".
The driver’s door can be closed again.
X Press the fuel filler flap in marked area :.
Fuel filler flap :swings up.
X Turn the fuel filler flap anti-clockwise and
remove it.
X Insert the fuel filler cap into the holder
bracket on the inside of filler flap ;.
X Completely insert the filler neck of the fuel
pump nozzle into the tank and refuel.
X Only fill the tank until the pump nozzle
switches off. Refuelling
143Driving and parking Z
Page 147 of 321
i
Do not add any more fuel after the pump
stops filling for the first time. Otherwise,
fuel may leak out.
Closing X
Replace the cap on the fille rneck and turn
clockwise until it engages audibly.
X Close fuel filler flap :.144
RefuellingDriving and parking
Page 148 of 321
Problems with the fuel and fuel tank
Problem Possible causes/consequences and
M Solutions
Fuel is leaking from the
vehicle.
G
Risk of explosion or fire
The fuel line or the fuel tank is faulty.
X Turn the key to position 0in the ignition lock immediately and
remove it (Y page 127).
X Do not restart the engine under any circumstances.
X Consult a qualified specialist workshop. The engine does not
start. The fuel tank of a vehicle with a diesel engine has been run com-
pletely dry.
X
Refuel the vehicle with at least 5litres of diesel.
X Turn the ignition on for around 10 seconds(Y page 127).
X Start the engine continuously for up to 10 seconds until it runs
smoothly.
or
X Start the engine using the touch-star tfunction .To do this, turn
the key to position 3in the ignition lock and then release it
immediately (Y page 127).
If the engine does not start:
X Turn the ignition on again for approximately
10 seconds(Y page 127).
X Start the engine again continuously for up to 10 seconds until
it runs smoothly.
or
X Start the engine again via the touch-start function.
If the engine does not start after three attempts:
X Consult a qualified specialist workshop. The fuel filler flap can-
not be opened. The fuel filler flap cannot be unlocked using the button on the key.
or
The key battery is discharged.
X
Unlock the vehicle using the emergency key element
(Y page 68). The fuel filler flap is unlocked, but the opening mechanism is jam-
med.
X
Consult a qualified specialist workshop. Refuelling
145Driving and parking Z