2012 MERCEDES-BENZ SLK-CLASS ROADSTER window
[x] Cancel search: windowPage 86 of 336
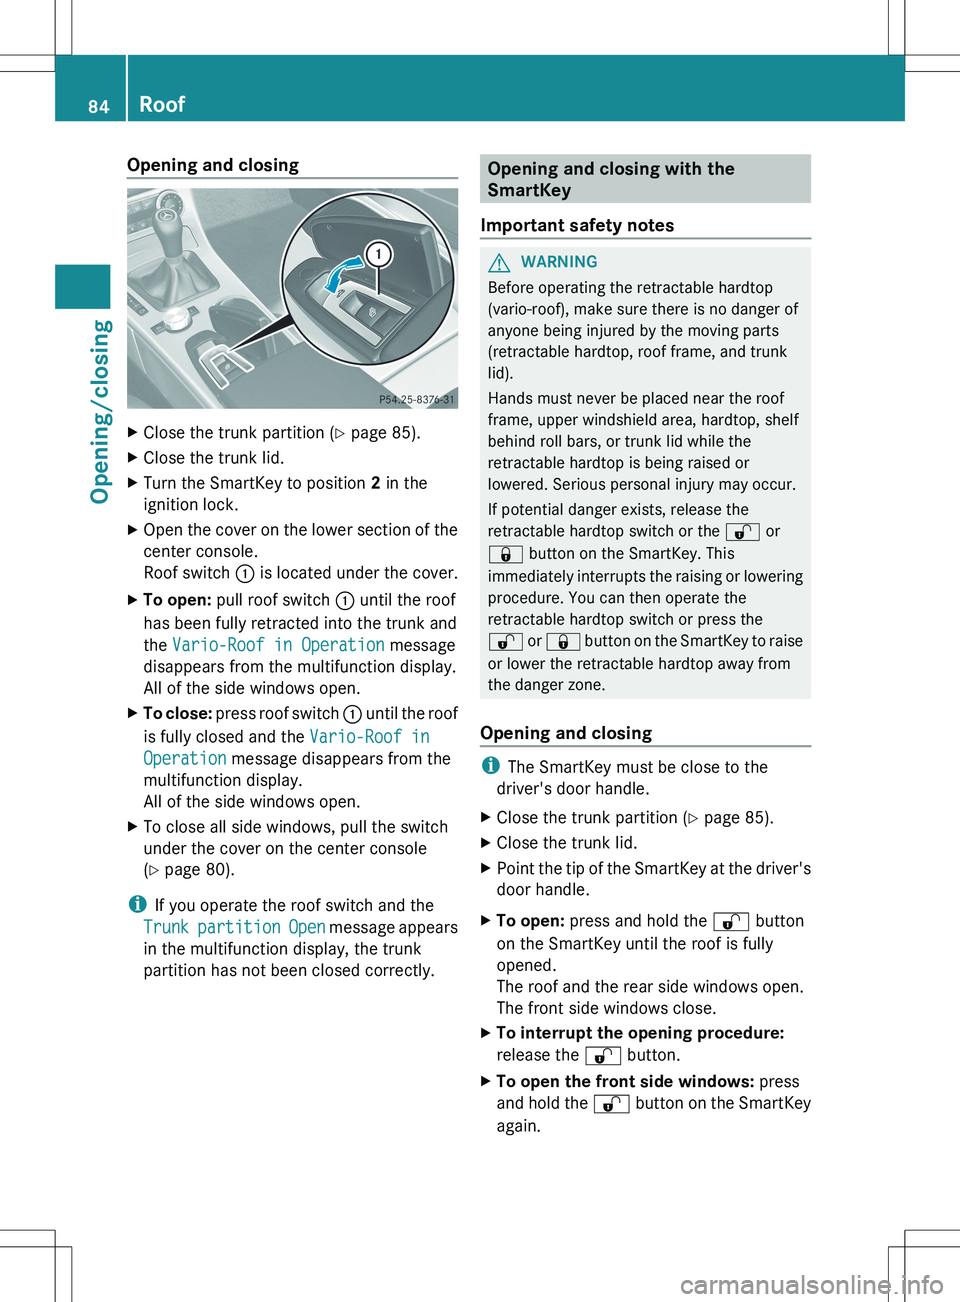
Opening and closingXClose the trunk partition (Y page 85).XClose the trunk lid.XTurn the SmartKey to position 2 in the
ignition lock.XOpen the cover on the lower section of the
center console.
Roof switch : is located under the cover.XTo open: pull roof switch : until the roof
has been fully retracted into the trunk and
the Vario-Roof in Operation message
disappears from the multifunction display.
All of the side windows open.XTo close: press roof switch : until the roof
is fully closed and the Vario-Roof in
Operation message disappears from the
multifunction display.
All of the side windows open.XTo close all side windows, pull the switch
under the cover on the center console
( Y page 80).
i
If you operate the roof switch and the
Trunk partition Open message appears
in the multifunction display, the trunk
partition has not been closed correctly.
Opening and closing with the
SmartKey
Important safety notesGWARNING
Before operating the retractable hardtop
(vario-roof), make sure there is no danger of
anyone being injured by the moving parts
(retractable hardtop, roof frame, and trunk
lid).
Hands must never be placed near the roof
frame, upper windshield area, hardtop, shelf
behind roll bars, or trunk lid while the
retractable hardtop is being raised or
lowered. Serious personal injury may occur.
If potential danger exists, release the
retractable hardtop switch or the % or
& button on the SmartKey. This
immediately interrupts the raising or lowering
procedure. You can then operate the
retractable hardtop switch or press the
% or & button on the SmartKey to raise
or lower the retractable hardtop away from
the danger zone.
Opening and closing
i The SmartKey must be close to the
driver's door handle.
XClose the trunk partition ( Y page 85).XClose the trunk lid.XPoint the tip of the SmartKey at the driver's
door handle.XTo open: press and hold the % button
on the SmartKey until the roof is fully
opened.
The roof and the rear side windows open.
The front side windows close.XTo interrupt the opening procedure:
release the % button.XTo open the front side windows: press
and hold the % button on the SmartKey
again.84RoofOpening/closing
Page 87 of 336
XTo close: press and hold the & button
on the SmartKey until the roof is fully
closed.
The roof and the side windows close.XTo interrupt the closing procedure:
release the & button.
i
When the roof is closed and the trunk
partition is open, the roof cannot be
opened using the SmartKey functions.
Instead, all side windows open or close
simultaneously ( Y page 80). Additionally,
the Trunk partition Open message
appears in the multifunction display.
Locking the roof again
GWARNING
Stop the vehicle in a safe location or as soon
as it is safe to do so and lock the retractable
hardtop before continuing to drive. You could
otherwise endanger yourself and others.
The roof is not locked when:
R the K symbol and the Vario-Roof in
Operation / Retractable Roof in
Operation message appear in the
multifunction display
R the K symbol and the Retractable
Roof Not Open/Close Completely
appear in the multifunction display and a
warning tone is heard
R you hear a warning tone for up to ten
seconds when pulling away or while driving.
You can lock the roof again if it is not locked
fully.
XStop the vehicle immediately, paying
attention to road and traffic conditions.XMake sure that the SmartKey is in position
2 in the ignition lock.XPress the roof switch ( Y page 84).Trunk partition
General notes
The trunk partition can be used to cover
luggage and loads in the trunk.
! To avoid damaging the roof or luggage
when folding back the roof, you should:
R only load the trunk to below the trunk
partition
R not place any objects on or in front of the
trunk partition
R not place any objects on the cover
behind the roll bars
R not allow the cargo to push the trunk
partition upwards
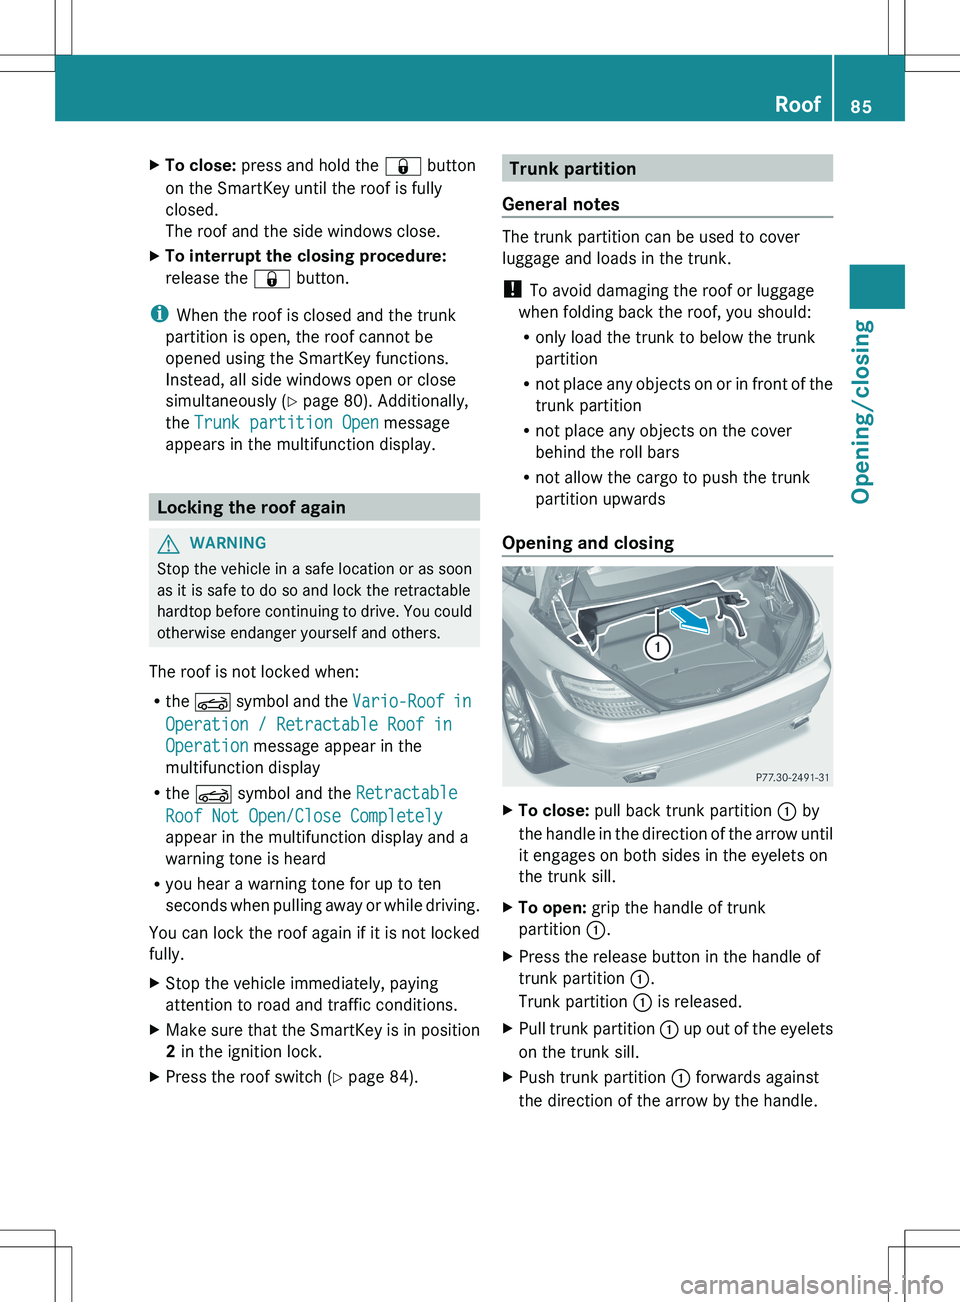
Opening and closing
XTo close: pull back trunk partition : by
the handle in the direction of the arrow until
it engages on both sides in the eyelets on
the trunk sill.XTo open: grip the handle of trunk
partition :.XPress the release button in the handle of
trunk partition :.
Trunk partition : is released.XPull trunk partition : up out of the eyelets
on the trunk sill.XPush trunk partition : forwards against
the direction of the arrow by the handle.Roof85Opening/closingZ
Page 98 of 336
Problems with the seat heating
The seat heating has switched itself off
prematurely. The vehicle's electrical system
voltage is too low because too many electrical
consumers are switched on.
XSwitch off electrical consumers that you do
not need, such as the rear window
defroster or interior lighting.XOnce the battery is sufficiently charged,
switch on the seat heating again.
AIRSCARF
Switching on/off
GWARNING
Very hot air can flow out of the AIRSCARF
vents in the head restraints when AIRSCARF
is in operation. This can cause burns on
unprotected skin near the AIRSCARF vents.
Lower the heating output in good time, when
necessary.
The AIRSCARF function warms the head and
neck area of vehicle occupants with warm air.
The warm air flows out of the holes in the head
restraints.
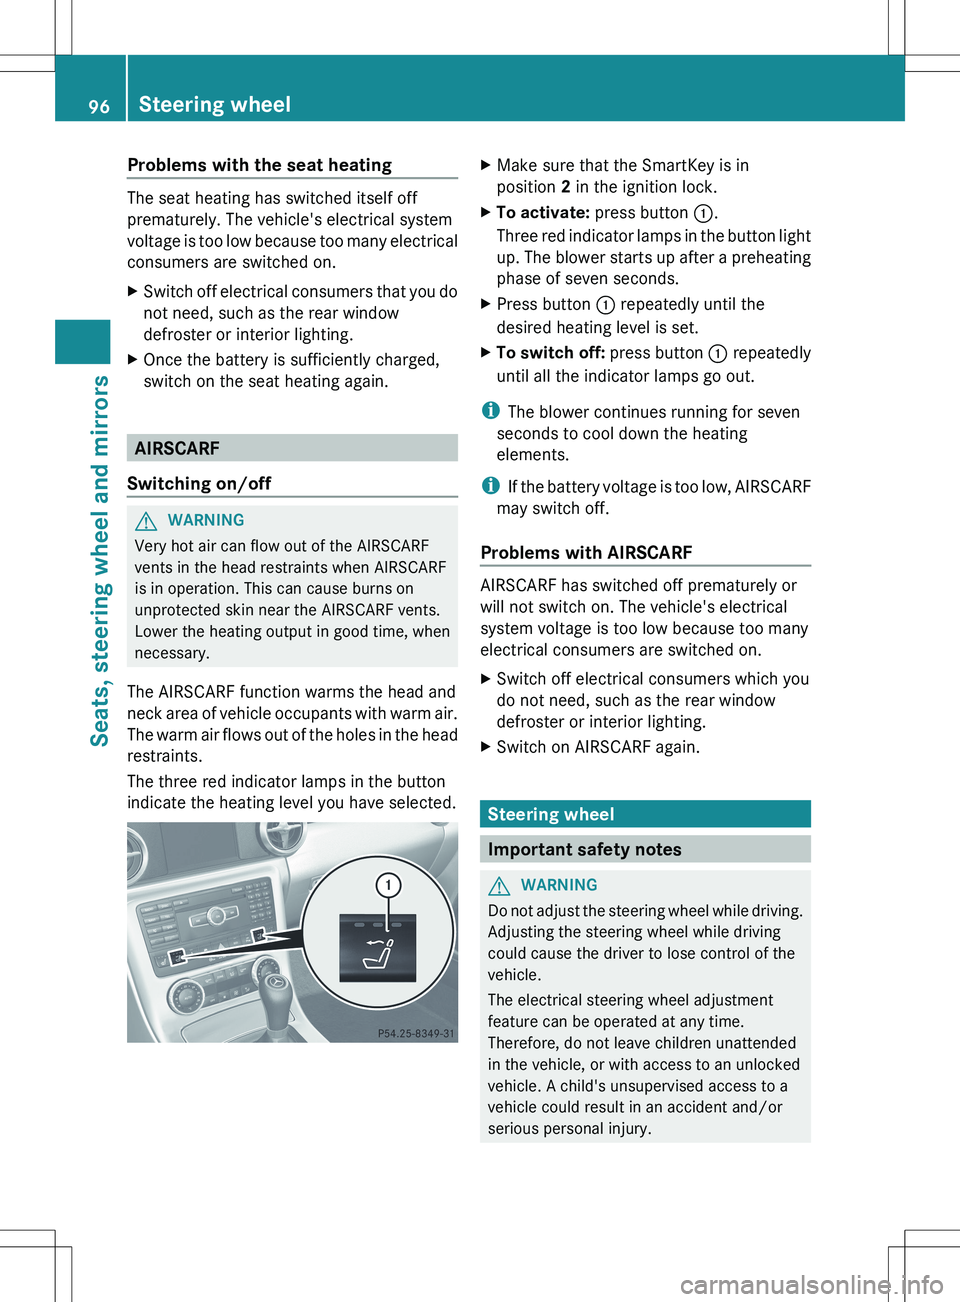
The three red indicator lamps in the button
indicate the heating level you have selected.
XMake sure that the SmartKey is in
position 2 in the ignition lock.XTo activate: press button :.
Three red indicator lamps in the button light
up. The blower starts up after a preheating
phase of seven seconds.XPress button : repeatedly until the
desired heating level is set.XTo switch off: press button : repeatedly
until all the indicator lamps go out.
i The blower continues running for seven
seconds to cool down the heating
elements.
i If the battery voltage is too low, AIRSCARF
may switch off.
Problems with AIRSCARF
AIRSCARF has switched off prematurely or
will not switch on. The vehicle's electrical
system voltage is too low because too many
electrical consumers are switched on.
XSwitch off electrical consumers which you
do not need, such as the rear window
defroster or interior lighting.XSwitch on AIRSCARF again.
Steering wheel
Important safety notes
GWARNING
Do not adjust the steering wheel while driving.
Adjusting the steering wheel while driving
could cause the driver to lose control of the
vehicle.
The electrical steering wheel adjustment
feature can be operated at any time.
Therefore, do not leave children unattended
in the vehicle, or with access to an unlocked
vehicle. A child's unsupervised access to a
vehicle could result in an accident and/or
serious personal injury.
96Steering wheelSeats, steering wheel and mirrors
Page 101 of 336
The exterior mirrors are automatically heated
if the rear window defroster is switched on
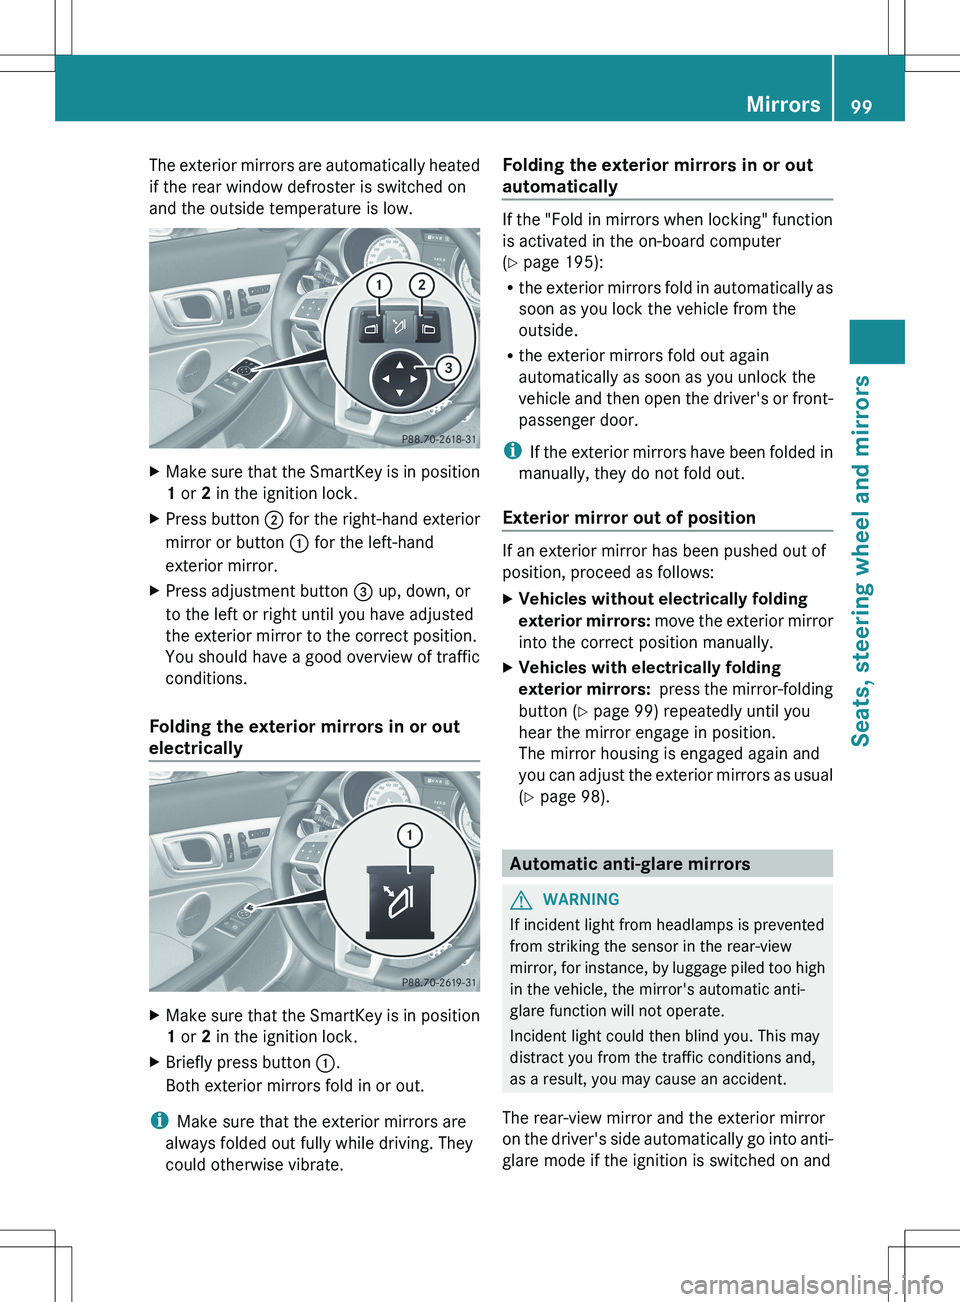
and the outside temperature is low.XMake sure that the SmartKey is in position
1 or 2 in the ignition lock.XPress button ; for the right-hand exterior
mirror or button : for the left-hand
exterior mirror.XPress adjustment button = up, down, or
to the left or right until you have adjusted
the exterior mirror to the correct position.
You should have a good overview of traffic
conditions.
Folding the exterior mirrors in or out
electrically
XMake sure that the SmartKey is in position
1 or 2 in the ignition lock.XBriefly press button :.
Both exterior mirrors fold in or out.
i Make sure that the exterior mirrors are
always folded out fully while driving. They
could otherwise vibrate.
Folding the exterior mirrors in or out
automatically
If the "Fold in mirrors when locking" function
is activated in the on-board computer
( Y page 195):
R the exterior mirrors fold in automatically as
soon as you lock the vehicle from the
outside.
R the exterior mirrors fold out again
automatically as soon as you unlock the
vehicle and then open the driver's or front-
passenger door.
i If the exterior mirrors have been folded in
manually, they do not fold out.
Exterior mirror out of position
If an exterior mirror has been pushed out of
position, proceed as follows:
XVehicles without electrically folding
exterior mirrors: move the exterior mirror
into the correct position manually.XVehicles with electrically folding
exterior mirrors: press the mirror-folding
button ( Y page 99) repeatedly until you
hear the mirror engage in position.
The mirror housing is engaged again and
you can adjust the exterior mirrors as usual
( Y page 98).
Automatic anti-glare mirrors
GWARNING
If incident light from headlamps is prevented
from striking the sensor in the rear-view
mirror, for instance, by luggage piled too high
in the vehicle, the mirror's automatic anti-
glare function will not operate.
Incident light could then blind you. This may
distract you from the traffic conditions and,
as a result, you may cause an accident.
The rear-view mirror and the exterior mirror
on the driver's side automatically go into anti-
glare mode if the ignition is switched on and
Mirrors99Seats, steering wheel and mirrorsZ
Page 118 of 336
Useful information
i This Operator's Manual describes all
models and all standard and optional
equipment of your vehicle available at the
time of publication of the Operator's
Manual. Country-specific differences are
possible. Please note that your vehicle may
not be equipped with all features
described. This also applies to safety-
related systems and functions.
i Please read the information on qualified
specialist workshops ( Y page 23).
Overview of climate control systems
Important safety notes
GWARNING
Severe conditions (e.g. strong air pollution)
may require replacement of the filter before
its scheduled replacement interval. A clogged
filter will reduce the air volume to the interior
and the windows could fog up, impairing
visibility and endangering you and others.
Have a blocked filter replaced at a Mercedes-
Benz Center as soon as possible.
GWARNING
Follow the recommended settings for heating
and cooling given on the following pages.
Otherwise, the windows could fog up,
impairing visibility and endangering you and
others.
The air-conditioning system/automatic
climate control controls the temperature and
the humidity of the vehicle interior and filters
undesirable substances from the air.
The air-conditioning system/automatic
climate control is only operational when the
engine is running. 7
The system only works
optimally when the side windows and the roof
are closed.
i Ventilate the vehicle for a brief period
during warm weather. This will speed up the
cooling process and the desired vehicle
interior temperature will be reached more
quickly.
i The integrated filter can filter out most
particles of dust and completely filters out
pollen. A clogged filter reduces the amount
of air supplied to the vehicle interior. For
this reason, you should always observe the
interval for replacing the filter, which is
specified in the Maintenance Booklet. As it
depends on environmental conditions, e.g.
heavy air pollution, the interval may be
shorter than stated in the Maintenance
Booklet.7 The residual heat function can only be activated/deactivated when the ignition is switched off.116Overview of climate control systemsClimate control
Page 119 of 336
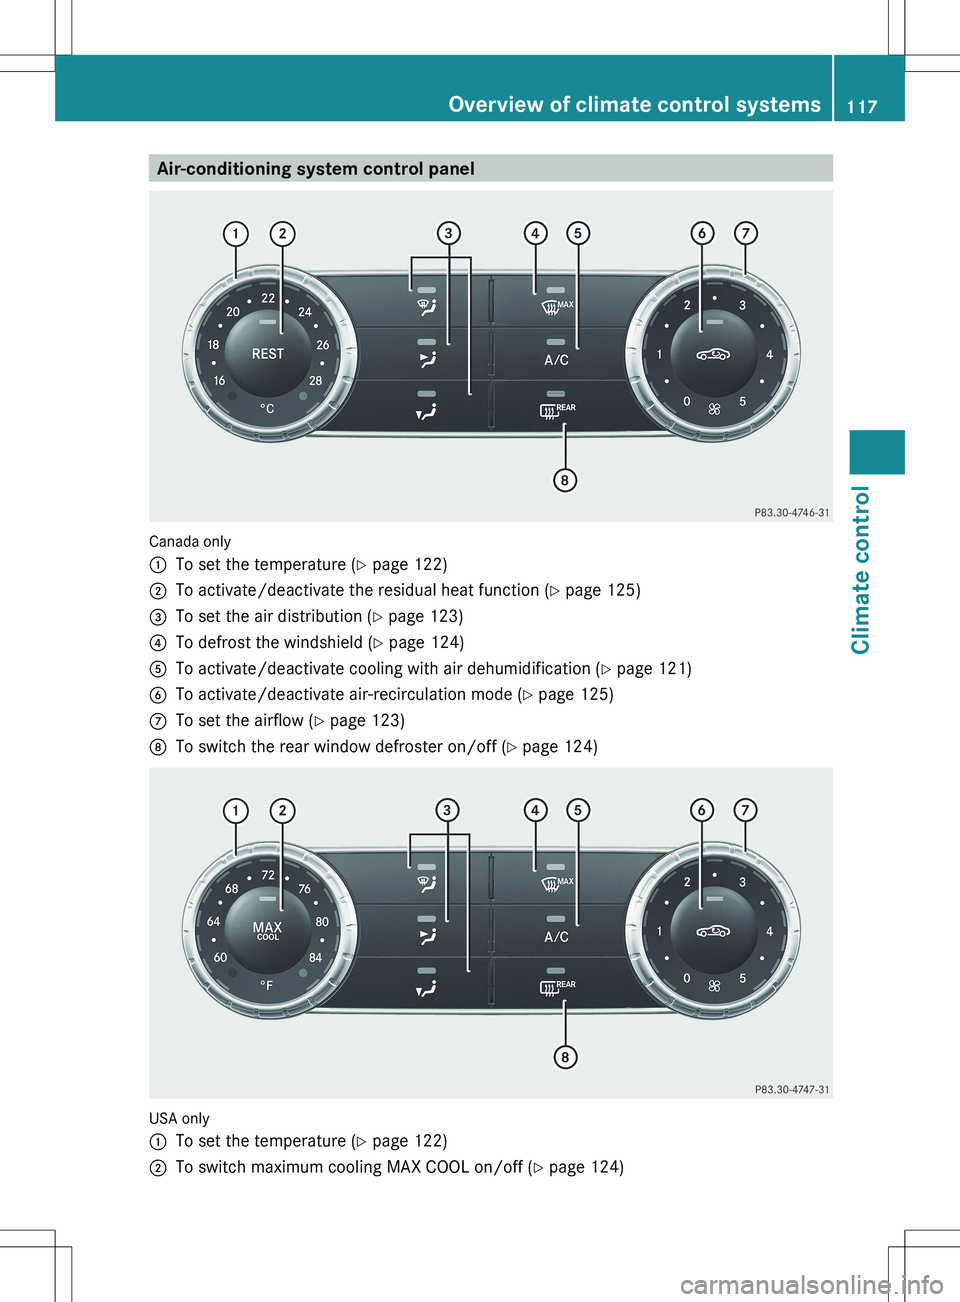
Air-conditioning system control panel
Canada only
:To set the temperature (Y page 122);To activate/deactivate the residual heat function ( Y page 125)=To set the air distribution ( Y page 123)?To defrost the windshield ( Y page 124)ATo activate/deactivate cooling with air dehumidification ( Y page 121)BTo activate/deactivate air-recirculation mode ( Y page 125)CTo set the airflow ( Y page 123)DTo switch the rear window defroster on/off ( Y page 124)
USA only
:To set the temperature ( Y page 122);To switch maximum cooling MAX COOL on/off ( Y page 124)Overview of climate control systems117Climate controlZ
Page 120 of 336
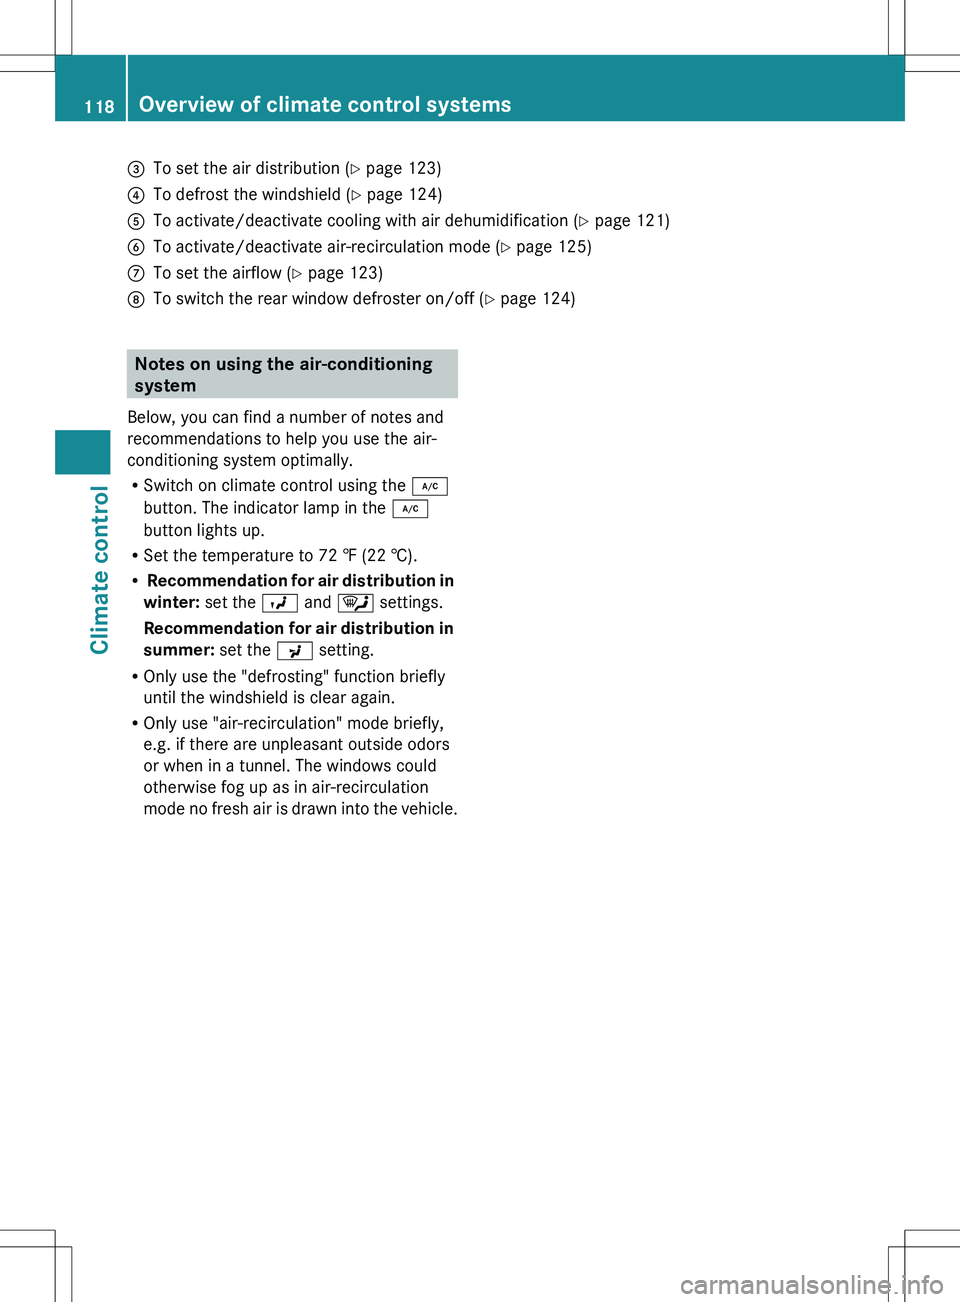
=To set the air distribution (Y page 123)?To defrost the windshield ( Y page 124)ATo activate/deactivate cooling with air dehumidification ( Y page 121)BTo activate/deactivate air-recirculation mode ( Y page 125)CTo set the airflow ( Y page 123)DTo switch the rear window defroster on/off ( Y page 124)Notes on using the air-conditioning
system
Below, you can find a number of notes and
recommendations to help you use the air-
conditioning system optimally.
R Switch on climate control using the ¿
button. The indicator lamp in the ¿
button lights up.
R Set the temperature to 72 ‡ (22 †).
R Recommendation for air distribution in
winter: set the O and ¯ settings.
Recommendation for air distribution in
summer: set the P setting.
R Only use the "defrosting" function briefly
until the windshield is clear again.
R Only use "air-recirculation" mode briefly,
e.g. if there are unpleasant outside odors
or when in a tunnel. The windows could
otherwise fog up as in air-recirculation
mode no fresh air is drawn into the vehicle.118Overview of climate control systemsClimate control
Page 121 of 336
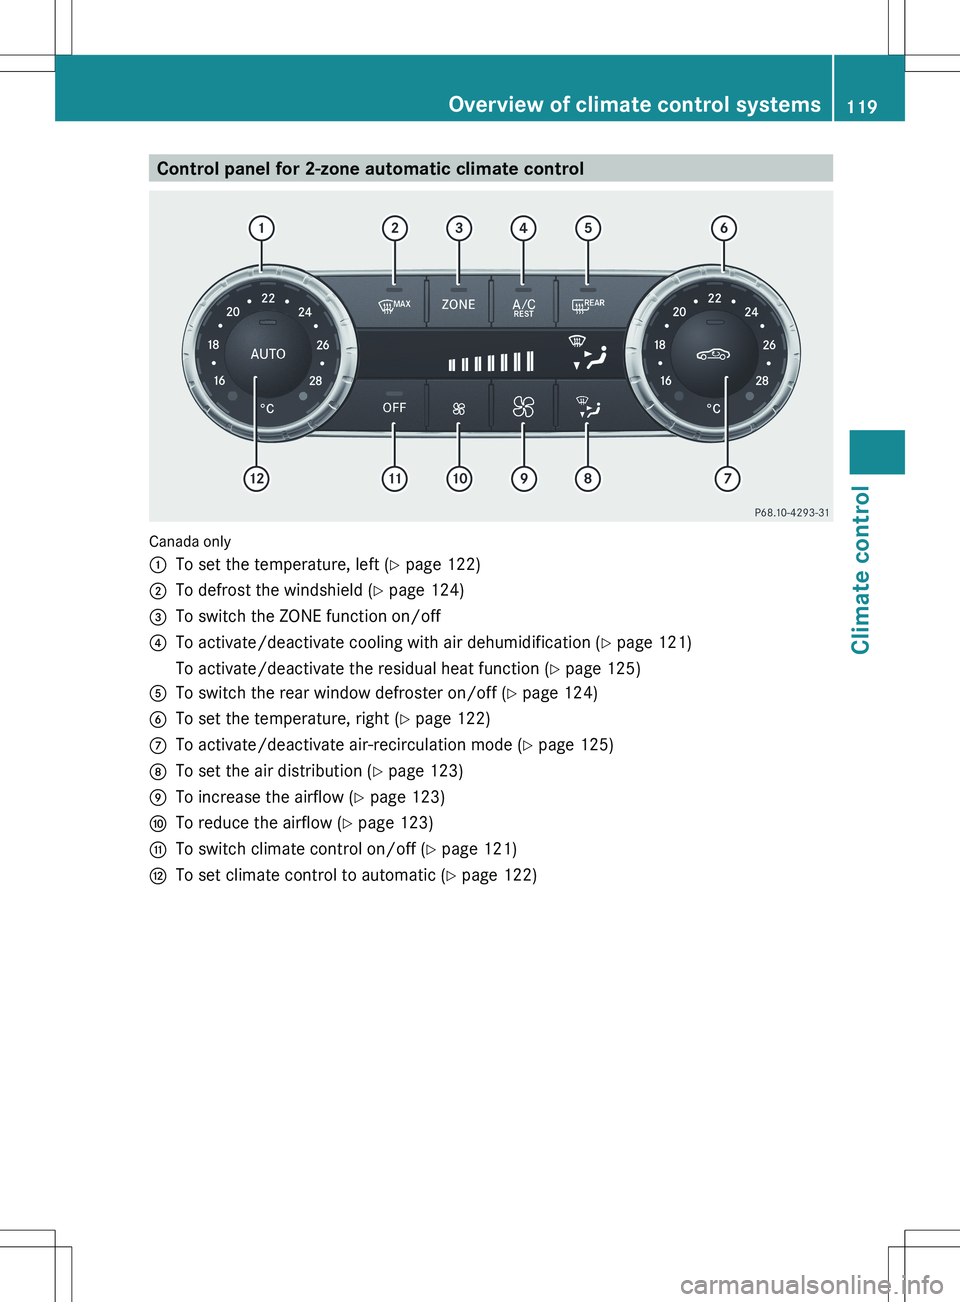
Control panel for 2-zone automatic climate control
Canada only
:To set the temperature, left (Y page 122);To defrost the windshield ( Y page 124)=To switch the ZONE function on/off?To activate/deactivate cooling with air dehumidification ( Y page 121)To activate/deactivate the residual heat function ( Y page 125)ATo switch the rear window defroster on/off ( Y page 124)BTo set the temperature, right ( Y page 122)CTo activate/deactivate air-recirculation mode ( Y page 125)DTo set the air distribution ( Y page 123)ETo increase the airflow ( Y page 123)FTo reduce the airflow ( Y page 123)GTo switch climate control on/off ( Y page 121)HTo set climate control to automatic ( Y page 122)Overview of climate control systems119Climate controlZ