2012 MERCEDES-BENZ SLK-CLASS ROADSTER tire size
[x] Cancel search: tire sizePage 298 of 336
RDo not drive with tires which have too little
tread depth, as this significantly reduces
the traction on wet roads (hydroplaning).
R Replace the tires after six years at the
latest, regardless of wear. This also applies
to the spare wheel/emergency spare
wheel.
The service life of tires depends on the
following factors amongst other things:
R driving style
R tire pressure
R distance covered
MOExtended tires (tires with run-flat
properties)
MOExtended tires (tires with run-flat
properties) allow you to continue driving your
vehicle even if one or more tires are entirely
deflated.
MOExtended tires may be used only in
conjunction with the activated tire pressure
loss warning system or the activated tire
pressure monitoring system and only on
wheels specifically tested by Mercedes-Benz.
Notes on driving with MOExtended tires in the
event of a flat tire can be found in the
"Breakdown assistance" section
( Y page 281).
Winter operation
Please bear the following in mind
Have your vehicle winterproofed at a qualified
specialist workshop at the onset of winter.
Observe the notes in the "Changing a wheel"
section ( Y page 315).
Driving with summer tires
At temperatures below 45 ‡ (+7 †), the
elasticity of summer tires and therefore also
the traction and braking capability are
reduced considerably. Mount M+S tires on
your vehicle. Using summer tires at very cold
temperatures could cause cracks to form,
thereby damaging the tires permanently.
Mercedes-Benz cannot accept responsibility
for this type of damage.
M+S tires
At temperatures below 45 ‡ (+7 †), use
winter tires or all-season tires. Both types of
tire are identified by the M+S marking.
Only winter tires bearing the i snowflake
symbol in addition to the M+S marking
provide the best possible grip in wintry road
conditions. Only these tires will allow driving
safety systems such as ABS and ESP ®
to
function optimally in winter. These tires have
been developed specifically for driving in
snow.
Use M+S tires of the same make and tread on
all wheels to maintain safe handling
characteristics.
GWARNING
M+S tires with a tire tread depth of less than
ã in (4 mm) are not suitable for use in winter
and do not provide sufficient traction. There
is a risk of an accident.
M+S tires with a tread depth of less than ã
in (4 mm) must be replaced immediately.
Always observe the maximum permissible
speed specified for the M+S tires you have
mounted.
When you have mounted M+S tires:
XCheck the tire pressures ( Y page 301).XVehicles for USA: restart the tire pressure
monitor ( Y page 301).
Drive no faster than 50 mph (80 km/h) with
the spare wheel or emergency spare wheel
mounted.
GWARNING
The wheel or tire size as well as the tire type
of the spare wheel or emergency spare wheel
and the wheel to be replaced may differ.
296Winter operationWheels and tires
Page 299 of 336
Mounting an emergency spare wheel may
severely impair the driving characteristics.
There is a risk of an accident.
To avoid hazardous situations:
R adapt your driving style accordingly and
drive carefully.
R never install more than one spare wheel or
emergency spare wheel that differs in size.
R only use a spare wheel or emergency spare
wheel of a different size briefly.
R do not switch ESP ®
off.
R have a spare wheel or emergency spare
wheel of a different size replaced at the
nearest qualified specialist workshop.
Observe that the wheel and tire dimensions
as well as the tire type must be correct.
Snow chains
For safety reasons, Mercedes-Benz
recommends that you only use snow chains
that have been specially approved for your
vehicle by Mercedes-Benz, or are of a
corresponding standard of quality.
! On some tire sizes there is not enough
space for snow chains. To avoid damage to
the vehicle or tires, observe the "Wheel and
tire combinations" section under "Tires and
wheels".
R only use snow chains when driving on roads
completely covered by snow. Do not
exceed the maximum permissible speed of
30 mph (50 km/h). Remove the snow
chains as soon as possible if you are driving
on roads that are no longer snow-covered.
R local regulations may restrict the use of
snow chains. Observe the appropriate
regulations if you wish to mount snow
chains.
R snow chains may not be mounted on the
emergency spare wheel.
If you intend to mount snow chains, please
bear the following points in mind:
R snow chains may not be mounted on all
wheel/tire combinations. Permitted
wheel/tire combinations ( Y page 316).
R mount snow chains only in pairs and only
on the rear wheels. Observe the
manufacturer's mounting instructions.
! If snow chains are mounted on the front
wheels, the snow chains could grind
against the bodywork or components of the
chassis. This could result in damage to the
vehicle or the tires.
! Vehicles with steel wheels: if you wish
to mount snow chains on steel wheels,
make sure that you remove the respective
wheels' hubcaps first. The hubcaps may
otherwise be damaged.
i You may wish to deactivate
ESP ®
(Y page 58) when pulling away with
snow chains mounted. This way you can
allow the wheels to spin in a controlled
manner, achieving an increased driving
force (cutting action).
Tire pressure
Tire pressure specifications
GWARNING
Tires with tire pressures that are too low or
too high are associated with the following
hazards:
R they can burst, in particular if the vehicle is
heavily laden or when driven at high
speeds.
R the tires can wear excessively and/or
unevenly, which can severely impair tire
traction.
R the driving, steering and braking
characteristics may be severely impaired.
There is a risk of accident.
Tire pressure297Wheels and tiresZ
Page 300 of 336
Follow recommended tire inflation pressures
and check the pressure of all the tires
including the spare wheel:
R monthly, at least
R if the load changes
R before beginning a long journey
R under different operating conditions, e.g.
off-road driving
If necessary, correct the tire pressure.
The recommended tire pressures for the tires
mounted at the factory can be found on the
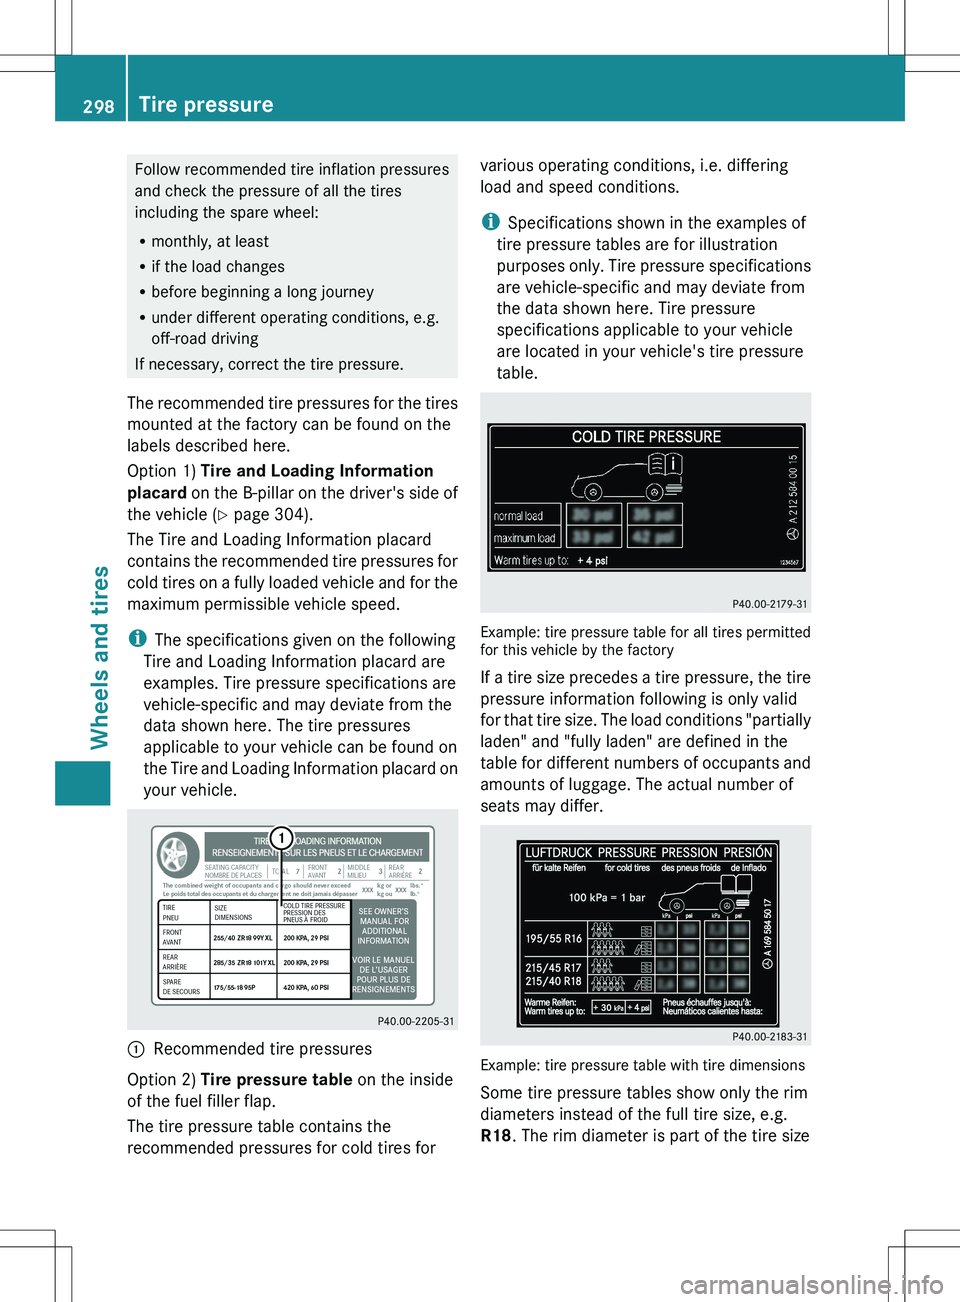
labels described here.Option 1) Tire and Loading Information
placard on the B-pillar on the driver's side of
the vehicle ( Y page 304).
The Tire and Loading Information placard
contains the recommended tire pressures for
cold tires on a fully loaded vehicle and for the
maximum permissible vehicle speed.
i The specifications given on the following
Tire and Loading Information placard are
examples. Tire pressure specifications are
vehicle-specific and may deviate from the
data shown here. The tire pressures
applicable to your vehicle can be found on
the Tire and Loading Information placard on
your vehicle.
:Recommended tire pressuresOption 2) Tire pressure table on the inside
of the fuel filler flap.
The tire pressure table contains the
recommended pressures for cold tires forvarious operating conditions, i.e. differing
load and speed conditions.
i Specifications shown in the examples of
tire pressure tables are for illustration
purposes only. Tire pressure specifications
are vehicle-specific and may deviate from
the data shown here. Tire pressure
specifications applicable to your vehicle
are located in your vehicle's tire pressure
table.
Example: tire pressure table for all tires permitted
for this vehicle by the factory
If a tire size precedes a tire pressure, the tire
pressure information following is only valid
for that tire size. The load conditions "partially
laden" and "fully laden" are defined in the
table for different numbers of occupants and
amounts of luggage. The actual number of
seats may differ.
Example: tire pressure table with tire dimensions
Some tire pressure tables show only the rim
diameters instead of the full tire size, e.g.
R18 . The rim diameter is part of the tire size
298Tire pressureWheels and tires
Page 304 of 336
on the driver's door B-pillar or the tire
pressure label on the inside of the fuel filler
flap. If your vehicle has tires of a different size
than the size indicated on the Tire and Loading
Information placard or the tire pressure label,
you should determine the proper tire pressure
for those tires.
As an added safety feature, your vehicle has
been equipped with a tire pressure monitoring
system (TPMS) that illuminates a low tire
pressure telltale when one or more of your
tires are significantly underinflated.
Accordingly, when the low tire pressure
telltale illuminates, you should stop and check
your tires as soon as possible, and inflate
them to the proper pressure. Driving on a
significantly underinflated tire causes the tire
to overheat and can lead to tire failure.
Underinflation also reduces fuel efficiency
and tire tread life, and may affect the vehicle's
handling and stopping ability.
Please note that the TPMS is not a substitute
for proper tire maintenance, and it is the
driver's responsibility to maintain correct tire
pressure, even if underinflation has not
reached the level to trigger illumination of the
TPMS low tire pressure telltale.
Your vehicle has also been equipped with a
TPMS malfunction indicator to indicate if the
system is not operating properly. The TPMS
malfunction indicator is combined with the
low tire pressure telltale. When the system
detects a malfunction, the warning lamp will
flash for approximately a minute and then
remain continuously illuminated. This
sequence will be repeated every time the
vehicle is started as long as the malfunction
exists.
When the malfunction indicator is illuminated,
the system may not be able to detect or signal
low tire pressure as intended. TPMS
malfunctions may occur for a variety of
reasons, including the installation of
incompatible replacement or alternate tires
or wheels on the vehicle that prevent the
TPMS from functioning properly. Always
check the TPMS malfunction telltale afterreplacing one or more tires or wheels on your
vehicle to ensure that the replacement or
alternate tires and wheels allow the TPMS to
continue to function properly.
i If the tire pressure monitor is
malfunctioning, it may take more than ten
minutes for the tire pressure warning lamp
to inform you of the malfunction by flashing
for approximately one minute and then
remaining lit.
When the malfunction has been rectified,
the tire pressure warning lamp goes out
after a few minutes of driving.
Information on tire pressures is displayed in
the multifunction display. After a few minutes
of driving, the current tire pressure of each
tire is shown in the multifunction display.
i The tire pressure values indicated by the
on-board computer may differ from those
measured at a gas station with a pressure
gauge. The tire pressures shown by the on-
board computer refer to those measured at
sea level. At high altitudes, the tire pressure
values indicated by a pressure gauge are
higher than those shown by the on-board
computer. In this case, do not reduce the
tire pressures.
i The operation of the tire pressure monitor
can be affected by interference from radio
transmitting equipment (e.g. radio
headphones, two-way radios) that may be
being operated in or near the vehicle.
i This device complies with part 15 of the
FCC Rules. Operation is subject to the
following two conditions:
1. This device may not cause harmful
interference, and
2. this device must accept any interference
received, including interference that may
cause undesired operation of the device.
Any unauthorized modification to this
device could void the user’s authority to
operate the equipment.302Tire pressureWheels and tires
Page 306 of 336
displayed after driving a few
minutes message.XPress the : button.
The Use Current Pressures as New
Reference Values message appears in
the multifunction display.
If you wish to confirm the restart:
XPress the a button.
The Tire Press. Monitor Restarted
message appears in the multifunction
display.
After driving for a few minutes, the system
checks whether the current tire pressures
are within the specified range. The new tire
pressures are then accepted as reference
values and monitored.
If you wish to cancel the restart:
XPress the % button.
The tire pressure values stored at the last
restart will continue to be monitored.
Loading the vehicle
Instruction labels for tires and loads
GWARNING
Overloaded tires can overheat, causing a
blowout. Overloaded tires can also impair the
steering and driving characteristics and lead
to brake failure. There is a risk of accident.
Observe the load rating of the tires. The load
rating must be at least half of the GAWR of
your vehicle. Never overload the tires by
exceeding the maximum load.
Two instruction labels on your vehicle show
the maximum possible load.
(1)The Tire and Loading Information placard
is on the B-pillar on the driver's side. The
Tire and Loading Information placard
shows the maximum permissible number
of occupants and the maximum
permissible vehicle load. It also contains
details of the tire sizes andcorresponding pressures for tires
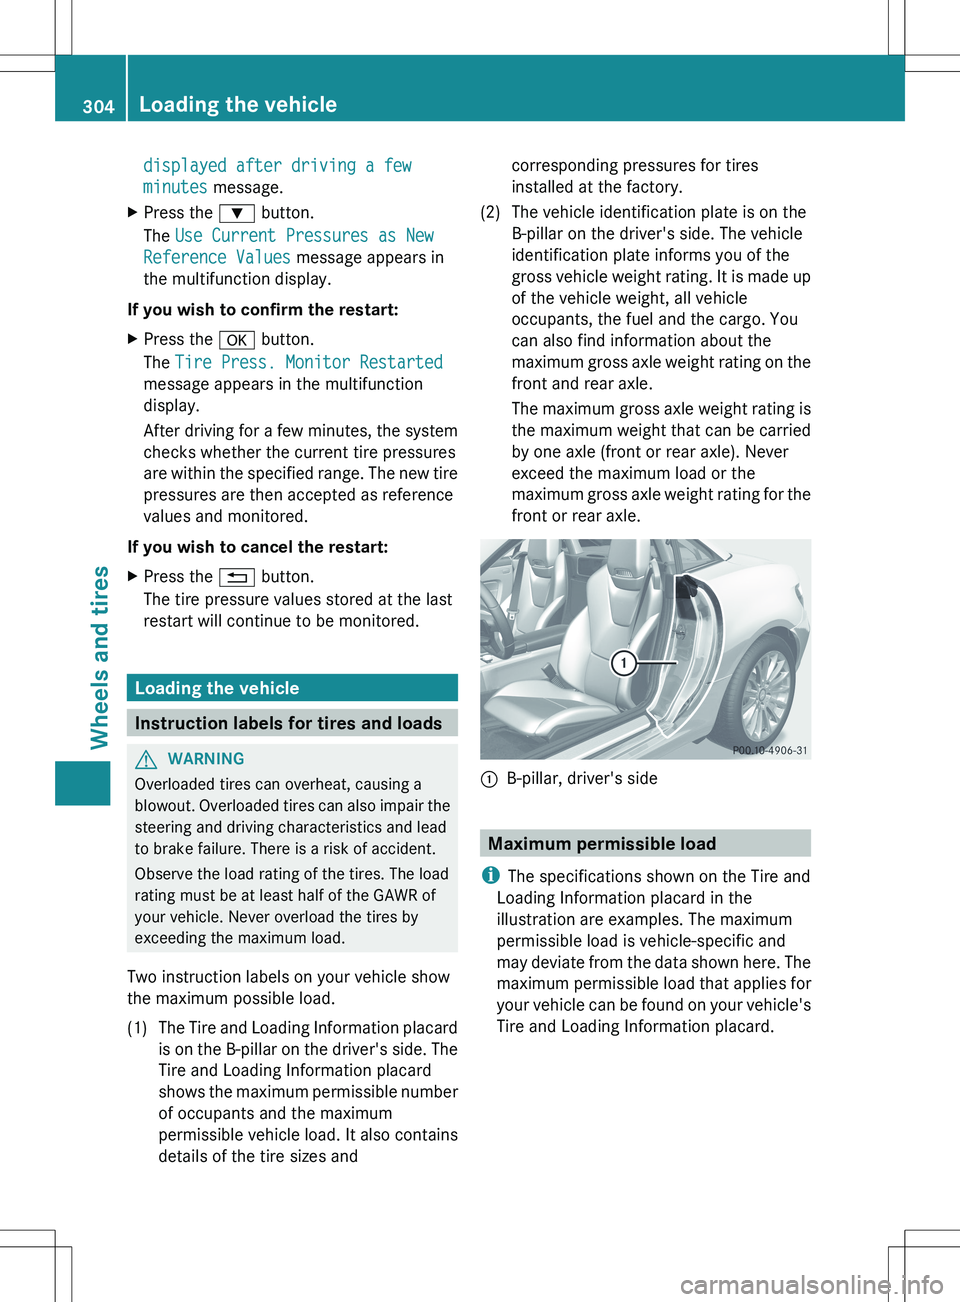
installed at the factory.(2)The vehicle identification plate is on the
B-pillar on the driver's side. The vehicle
identification plate informs you of the
gross vehicle weight rating. It is made up
of the vehicle weight, all vehicle
occupants, the fuel and the cargo. You
can also find information about the
maximum gross axle weight rating on the
front and rear axle.
The maximum gross axle weight rating is
the maximum weight that can be carried
by one axle (front or rear axle). Never
exceed the maximum load or the
maximum gross axle weight rating for the
front or rear axle.:B-pillar, driver's side
Maximum permissible load
i The specifications shown on the Tire and
Loading Information placard in the
illustration are examples. The maximum
permissible load is vehicle-specific and
may deviate from the data shown here. The
maximum permissible load that applies for
your vehicle can be found on your vehicle's
Tire and Loading Information placard.
304Loading the vehicleWheels and tires
Page 308 of 336
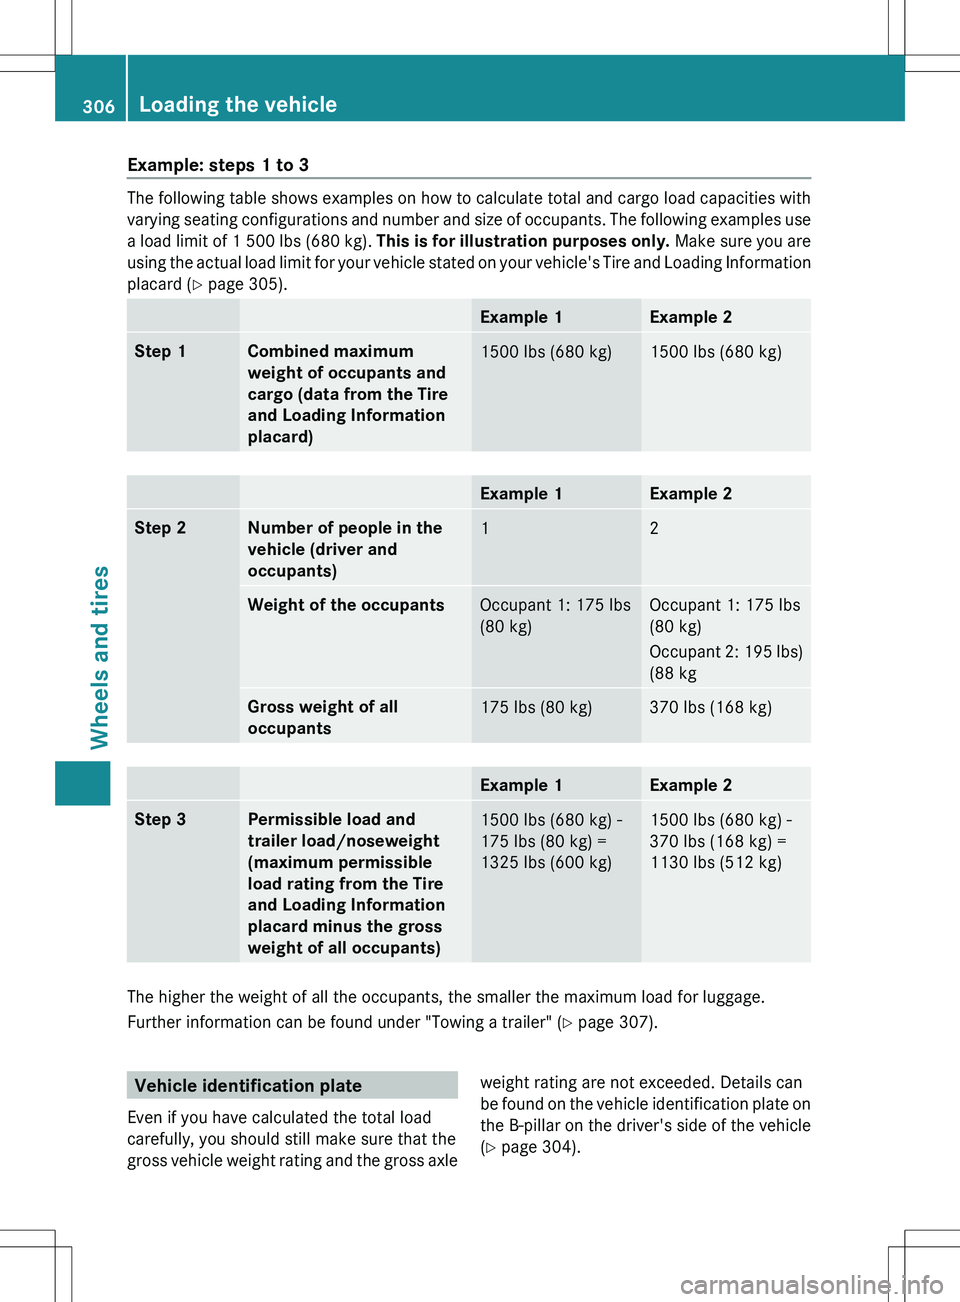
Example: steps 1 to 3
The following table shows examples on how to calculate total and cargo load capacities with
varying seating configurations and number and size of occupants. The following examples use
a load limit of 1 500 lbs (680 kg). This is for illustration purposes only. Make sure you are
using the actual load limit for your vehicle stated on your vehicle's Tire and Loading Information
placard ( Y page 305).
Example 1Example 2Step 1Combined maximum
weight of occupants and
cargo (data from the Tire
and Loading Information
placard)1500 lbs (680 kg)1500 lbs (680 kg)Example 1Example 2Step 2Number of people in the
vehicle (driver and
occupants)12Weight of the occupantsOccupant 1: 175 lbs
(80 kg)Occupant 1: 175 lbs
(80 kg)
Occupant 2: 195 lbs)
(88 kgGross weight of all
occupants175 lbs (80 kg)370 lbs (168 kg)Example 1Example 2Step 3Permissible load and
trailer load/noseweight
(maximum permissible
load rating from the Tire
and Loading Information
placard minus the gross
weight of all occupants)1500 lbs (680 kg) -
175 lbs (80 kg) =
1325 lbs (600 kg)1500 lbs (680 kg) -
370 lbs (168 kg) =
1130 lbs (512 kg)
The higher the weight of all the occupants, the smaller the maximum load for luggage.
Further information can be found under "Towing a trailer" ( Y page 307).
Vehicle identification plate
Even if you have calculated the total load
carefully, you should still make sure that the
gross vehicle weight rating and the gross axleweight rating are not exceeded. Details can
be found on the vehicle identification plate on
the B-pillar on the driver's side of the vehicle
( Y page 304).306Loading the vehicleWheels and tires
Page 311 of 336
represent higher levels of performance on the
laboratory test wheel than the minimum
required by law.
Tire labeling
Tire labeling overview
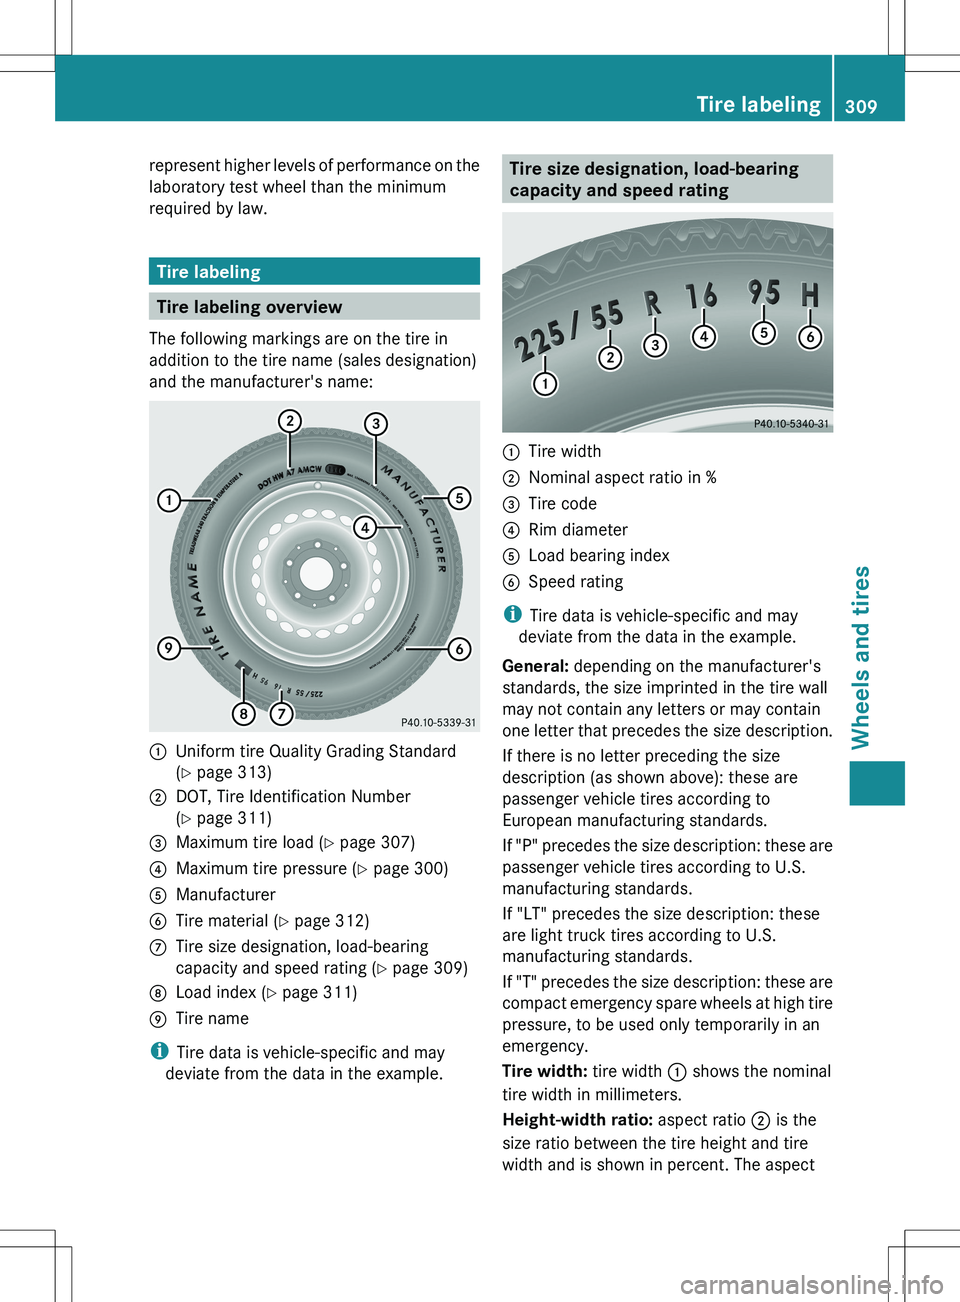
The following markings are on the tire in
addition to the tire name (sales designation)
and the manufacturer's name:
:Uniform tire Quality Grading Standard
( Y page 313);DOT, Tire Identification Number
( Y page 311)=Maximum tire load ( Y page 307)?Maximum tire pressure ( Y page 300)AManufacturerBTire material ( Y page 312)CTire size designation, load-bearing
capacity and speed rating ( Y page 309)DLoad index ( Y page 311)ETire name
i
Tire data is vehicle-specific and may
deviate from the data in the example.
Tire size designation, load-bearing
capacity and speed rating:Tire width;Nominal aspect ratio in %=Tire code?Rim diameterALoad bearing indexBSpeed rating
i Tire data is vehicle-specific and may
deviate from the data in the example.
General: depending on the manufacturer's
standards, the size imprinted in the tire wall
may not contain any letters or may contain
one letter that precedes the size description.
If there is no letter preceding the size
description (as shown above): these are
passenger vehicle tires according to
European manufacturing standards.
If "P" precedes the size description: these are
passenger vehicle tires according to U.S.
manufacturing standards.
If "LT" precedes the size description: these
are light truck tires according to U.S.
manufacturing standards.
If "T" precedes the size description: these are
compact emergency spare wheels at high tire
pressure, to be used only temporarily in an
emergency.
Tire width: tire width : shows the nominal
tire width in millimeters.
Height-width ratio: aspect ratio ; is the
size ratio between the tire height and tire
width and is shown in percent. The aspect
Tire labeling309Wheels and tiresZ
Page 312 of 336
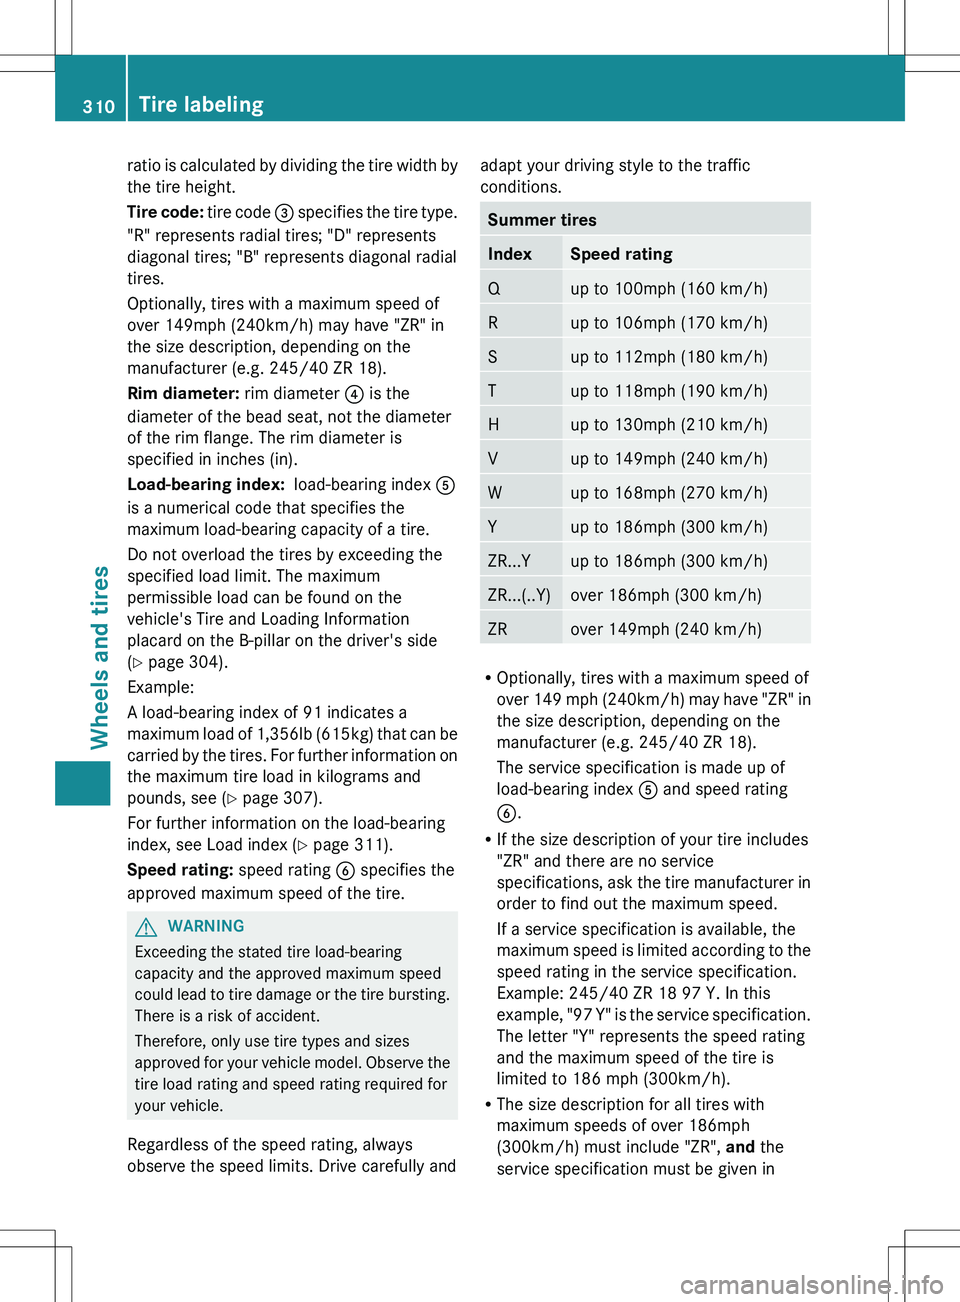
ratio is calculated by dividing the tire width by
the tire height.
Tire code: tire code = specifies the tire type.
"R" represents radial tires; "D" represents
diagonal tires; "B" represents diagonal radial
tires.
Optionally, tires with a maximum speed of
over 149mph (240km/h) may have "ZR" in
the size description, depending on the
manufacturer (e.g. 245/40 ZR 18).
Rim diameter: rim diameter ? is the
diameter of the bead seat, not the diameter
of the rim flange. The rim diameter is
specified in inches (in).
Load-bearing index: load-bearing index A
is a numerical code that specifies the
maximum load-bearing capacity of a tire.
Do not overload the tires by exceeding the
specified load limit. The maximum
permissible load can be found on the
vehicle's Tire and Loading Information
placard on the B-pillar on the driver's side
( Y page 304).
Example:
A load-bearing index of 91 indicates a
maximum load of 1,356lb (615 kg) that can be
carried by the tires. For further information on
the maximum tire load in kilograms and
pounds, see ( Y page 307).
For further information on the load-bearing
index, see Load index ( Y page 311).
Speed rating: speed rating B specifies the
approved maximum speed of the tire.GWARNING
Exceeding the stated tire load-bearing
capacity and the approved maximum speed
could lead to tire damage or the tire bursting.
There is a risk of accident.
Therefore, only use tire types and sizes
approved for your vehicle model. Observe the
tire load rating and speed rating required for
your vehicle.
Regardless of the speed rating, always
observe the speed limits. Drive carefully and
adapt your driving style to the traffic
conditions.Summer tiresIndexSpeed ratingQup to 100mph (160 km/h)Rup to 106mph (170 km/h)Sup to 112mph (180 km/h)Tup to 118mph (190 km/h)Hup to 130mph (210 km/h)Vup to 149mph (240 km/h)Wup to 168mph (270 km/h)Yup to 186mph (300 km/h)ZR...Yup to 186mph (300 km/h)ZR...(..Y)over 186mph (300 km/h)ZRover 149mph (240 km/h)
R Optionally, tires with a maximum speed of
over 149 mph ( 240km/h) may have "ZR" in
the size description, depending on the
manufacturer (e.g. 245/40 ZR 18).
The service specification is made up of
load-bearing index A and speed rating
B .
R If the size description of your tire includes
"ZR" and there are no service
specifications, ask the tire manufacturer in
order to find out the maximum speed.
If a service specification is available, the
maximum speed is limited according to the
speed rating in the service specification.
Example: 245/40 ZR 18 97 Y. In this
example, "97 Y" is the service specification.
The letter "Y" represents the speed rating
and the maximum speed of the tire is
limited to 186 mph (300km/h).
R The size description for all tires with
maximum speeds of over 186mph
(300km/h) must include "ZR", and the
service specification must be given in
310Tire labelingWheels and tires