2012 MERCEDES-BENZ SLK-CLASS ROADSTER change time
[x] Cancel search: change timePage 112 of 336
If your vehicle is equipped with Xenon bulbs,
you can recognize this by the following: the
cone of light from the Xenon bulbs moves
from the top to the bottom and back again
when you start the engine. For this to be
observed, the lights must be switched on
before starting the engine.
Bulbs and lamps are an important aspect of
vehicle safety. You must therefore make sure
that these function correctly at all times.
Have the headlamp setting checked regularly.
Other bulbs
There are bulbs other than the Xenon bulbs
that you cannot replace. Replace only the
bulbs listed (Y page 110). Have the bulbs that
you cannot replace yourself changed at a
qualified specialist workshop.
If you require assistance changing bulbs,
consult a qualified specialist workshop.
Do not touch the glass tube of new bulbs with
your bare hands. Even minor contamination
can burn into the glass surface and reduce
the service life of the bulbs. Always use a lint-
free cloth or only touch the base of the bulb
when installing.
Only use bulbs of the correct type.
If the new bulb still does not light up, consult
a qualified specialist workshop.
Bulbs and lamps are an important aspect of
vehicle safety. You must therefore make sure
that these function correctly at all times.
Have the headlamp setting checked regularly.
GWARNING
Bulbs and lamps can become very hot. For
this reason, allow them to cool down before
changing them. Otherwise, you could burn
yourself when you touch them.
Keep bulbs out of the reach of children.
Otherwise, they could, for example, damage
the bulbs and injure themselves.
Never use a bulb which has been dropped.
Such a bulb may explode and injure you.
Halogen bulbs are pressurized and could
explode when you change them, especially if
they are very hot. You should therefore wear
eye protection and gloves when you are
changing them.
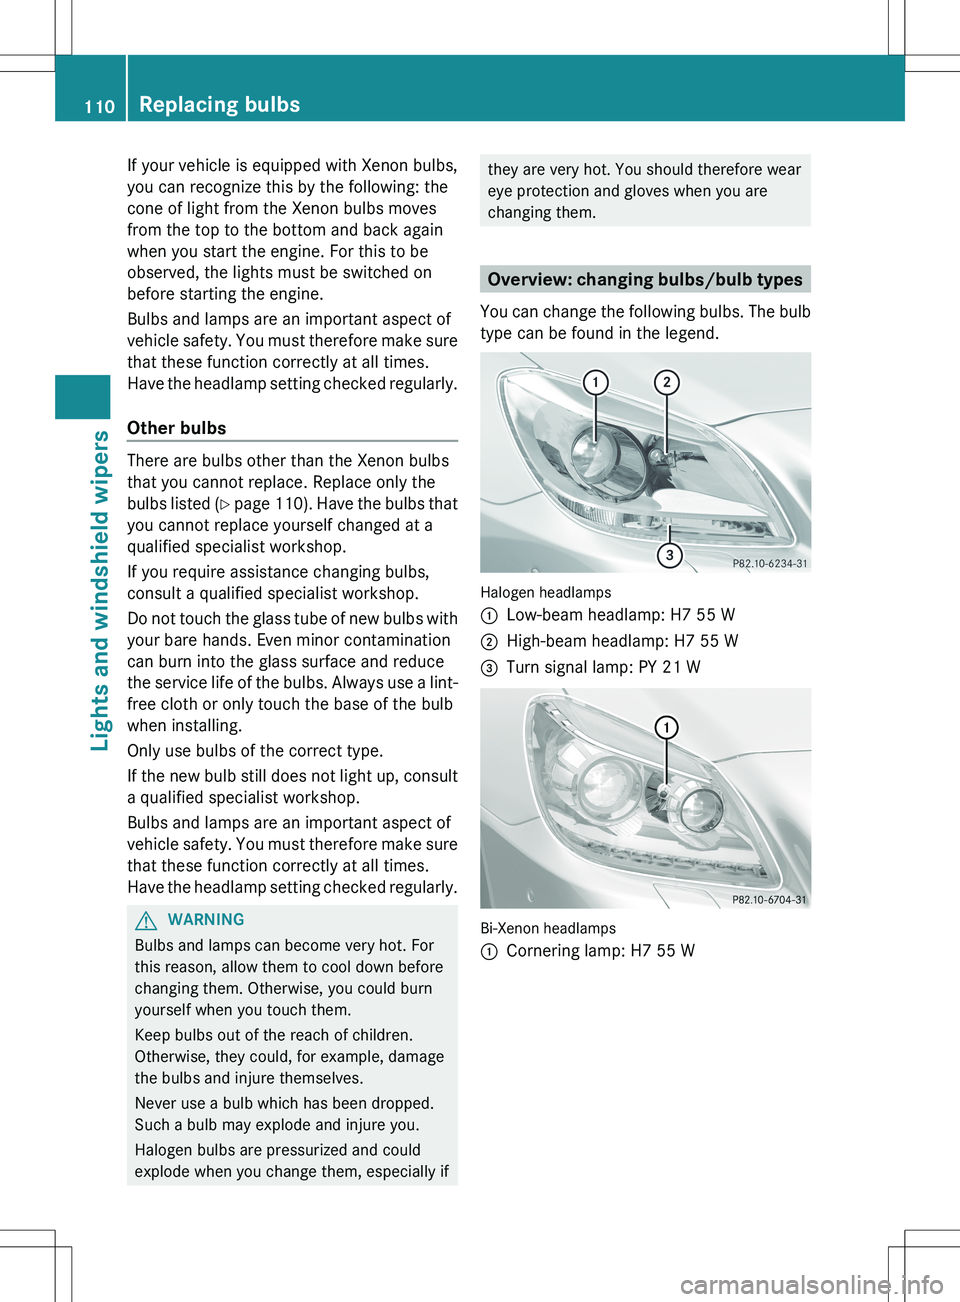
Overview: changing bulbs/bulb types
You can change the following bulbs. The bulb
type can be found in the legend.
Halogen headlamps
:Low-beam headlamp: H7 55 W;High-beam headlamp: H7 55 W=Turn signal lamp: PY 21 W
Bi-Xenon headlamps
:Cornering lamp: H7 55 W110Replacing bulbsLights and windshield wipers
Page 124 of 336
Activating/deactivatingXTo switch on: press the ¿ or Á
button.
The indicator lamp in the ¿ or Á
button comes on.XTo deactivate: press the ¿ or Á
button.
The indicator lamp in the ¿ or Á
button goes off. The cooling with air
dehumidification function has a delayed
switch-off feature.
Problems with the cooling with air
dehumidification function
If the ¿ or Á button is pressed, the
indicator lamp in the button flashes three
times or stays off. You can no longer switch
on the cooling with air dehumidification
function.
XConsult a qualified specialist workshop.
Setting climate control to automatic
GWARNING
If you switch off the cooling function, the
vehicle will not be cooled when weather
conditions are warm. The windows can fog up
more quickly. Window fogging may impair
visibility and endanger you and others.
The "automatic climate control" function is
only available in conjunction with automatic
climate control.
In automatic mode, the set temperature is
maintained automatically at a constant level.
The system automatically regulates the
temperature of the dispensed air, the airflow
and the air distribution.
Automatic mode will achieve optimal
operation if cooling with air dehumidification
is also activated. If desired, cooling with air
dehumidification can be deactivated.
XTurn the SmartKey to position 2 in the
ignition lock.XSet the desired temperature.XTo activate: press the à button.
The indicator lamp in the à button lights
up. Automatic air distribution and airflow
are activated.XTo switch off: press the _ button.
or
XPress the I or K button.
The indicator lamp in the à button goes
out.
Setting the temperature
Air-conditioning system
XTurn the SmartKey to position 2 in the
ignition lock.XTo increase/reduce: turn
thumbwheel : clockwise or counter-
clockwise ( Y page 117).
Only change the temperature setting in
small increments. Start at 72 ‡ (22 † ).
Dual-zone automatic climate control
Different temperatures can be set for the
driver's and front-passenger sides.
XTurn the SmartKey to position 2 in the
ignition lock.XTo increase/reduce: turn controls : and
B (Y page 119) clockwise or counter-
clockwise.
Only change the temperature setting in
small increments. Start at 72 ‡ (22 † ).122Operating the climate control systemsClimate control
Page 132 of 336
Useful information
i This Operator's Manual describes all
models and all standard and optional
equipment of your vehicle available at the
time of publication of the Operator's
Manual. Country-specific differences are
possible. Please note that your vehicle may
not be equipped with all features
described. This also applies to safety-
related systems and functions.
i Please read the information on qualified
specialist workshops ( Y page 23).
Breaking-in notes
The first 1,000miles (1,500 km)
The more you look after the engine when it is
new, the more satisfied you will be with its
performance in the future.
R You should therefore drive at varying
vehicle and engine speeds for the first
1,000miles (1,500km).
R Avoid heavy loads, e.g. driving at full
throttle, during this period.
R Change gear in good time, before the
tachometer needle is Ô of the way to the
red area of the tachometer.
R Do not manually shift to a lower gear to
brake the vehicle.
Vehicles with automatic transmission:
R Ideally, for the first 1,000 miles (1,500km)
drive in drive program C.
R Do not manually shift to a lower gear to
brake the vehicle.
R If possible, do not depress the accelerator
pedal past the point of resistance
(kickdown).
R Only select shift ranges 3, 2 or 1 when
driving slowly, e.g. in mountainous terrain.
After 1,000 miles (1,500km), you can
increase the engine speed gradually and bring
the vehicle up to full speed.
Additional breaking-in notes for AMG
vehicles:
R do not drive faster than 85 mph
(140 km/h) for the first 1,000 miles
(1,500 km).
R only allow the engine to reach a maximum
engine speed of 4,500 rpm briefly.
R change gear in good time.
i You should also observe these breaking-
in notes if the engine or parts of the drive
train on your vehicle have been replaced.
i Always observe the respective speed
limits.
AMG vehicles with rear axle locking
differential
Your vehicle is equipped with a self-locking
differential on the rear axle. To improve the
protection of the differential on the rear axle,
change the oil after a break-in distance of
2,000 miles (3,000 km). This oil change
extends the service life of the differential.
Have the oil change carried out at a qualified
specialist workshop.
Driving
Important safety notes
GWARNING
Make sure absolutely no objects are
obstructing the pedals' range of movement.
Keep the driver's footwell clear of all
obstacles. If there are any floormats or
carpets in the footwell, make sure the pedals
still have sufficient clearance.
During sudden driving or braking maneuvers
the objects could get caught between the
pedals. You could then no longer brake or
accelerate. This could lead to accidents and
injury.
130DrivingDriving and parking
Page 135 of 336
Do not run the engine in confined areas (such
as a garage) which are not properly ventilated.
If you think that exhaust gas fumes are
entering the vehicle while driving, have the
cause determined and corrected
immediately. If you must drive under these
conditions, drive only with at least one
window fully open at all times.
! Do not depress the accelerator pedal
when starting the engine.
General information
i AMG vehicles: the exhaust flap of the
exhaust system will be checked after every
cold start. A resulting noise can be heard
during this process.
i During a cold start, the engine runs at
higher speeds to enable the catalytic
converter to reach its operating
temperature. The sound of the engine may
change during this time.
Manual transmission
XDepress the brake pedal and keep it
depressed.XFully depress the clutch pedal.XShift to neutral N.
i
You can only start the engine when the
clutch pedal is fully depressed.
Automatic transmission
XShift the transmission to position P.
The transmission position display in the
multifunction display shows P.
i
You can also start the engine when the
transmission is in position N.
Starting procedure with the SmartKey
i To start the engine using the SmartKey
instead of KEYLESS-GO, pull the Start/
Stop button out of the ignition lock.
XTurn the SmartKey to position 3 in the
ignition lock (Y page 131) and release it as
soon as the engine is running.
Using KEYLESS-GO to start the engine
GWARNING
As long as the SmartKey is in your vehicle, the
vehicle can be started. Therefore, never leave
children unattended in the vehicle, as they
could otherwise accidentally start the engine.
When leaving the vehicle, always take the
SmartKey with you and lock the vehicle. Do
not leave children unattended in the vehicle,
or with access to an unlocked vehicle. A
child's unsupervised access to a vehicle could
result in an accident and/or serious personal
injury.
i The Start/Stop button can be used to
start the vehicle manually without inserting
the SmartKey into the ignition lock. The
Start/Stop button must be inserted into
the ignition lock and the SmartKey must be
in the vehicle. This mode for starting the
engine operates independently of the ECO
start/stop automatic engine start function.
XDepress the brake pedal and keep it
depressed.XPress the Start/Stop button ( Y page 131)
once.
The engine starts.
Pulling away
Manual transmission
XDepress the brake pedal and keep it
depressed.XFully depress the clutch pedal.XShift to either first gear or reverse gear R.XRelease the electric parking brake
( Y page 150).Driving133Driving and parkingZ
Page 136 of 336
XRelease the brake pedal.XSlowly release the clutch pedal and gently
depress the accelerator pedal.
! Change gear in good time and avoid
spinning the wheels. You could otherwise
damage the vehicle.
i The vehicle locks centrally once you have
pulled away. The locking knobs in the doors
drop down.
You can open the doors from the inside at
any time.
You can also deactivate the automatic
locking feature ( Y page 193).
Automatic transmission
GWARNING
It is dangerous to shift the automatic
transmission out of parking position P or
neutral position N if the engine speed is
higher than idle speed. If your foot is not firmly
on the brake pedal, the vehicle could
accelerate quickly forward or in reverse. You
could lose control of the vehicle and hit
someone or something. Only shift into gear
when the engine is idling normally and when
your right foot is firmly on the brake pedal.
i It is only possible to shift the transmission
from position P to the desired position if
you depress the brake pedal. Only then is
the selector lever lock released.
XDepress the brake pedal and keep it
depressed.XShift the transmission to position D or R.XRelease the brake pedal.XCarefully depress the accelerator pedal.
The electric parking brake ( Y page 150) is
automatically released.
The red F (USA only) or ! (Canada
only) indicator lamp in the instrument
cluster goes out.i The vehicle locks centrally once you have
pulled away. The locking knobs in the doors
drop down.
You can open the doors from the inside at
any time.
You can also deactivate the automatic
locking feature .
i Upshifts take place at higher engine
speeds after a cold start. This helps the
catalytic converter to reach its operating
temperature more quickly.
Hill start assist
Hill start assist helps you when pulling away
forwards or in reverse on an uphill gradient.
It holds the vehicle for a short time after you
have removed your foot from the brake pedal.
This gives you enough time to move your foot
from the brake pedal to the accelerator pedal
and to depress it before the vehicle begins to
roll.
GWARNING
Never leave the vehicle when it is held by hill
start assist. After approximately one second,
hill start assist will no longer brake your
vehicle and it could roll away.
XTake your foot off the brake pedal.
i Once you have taken your foot off the
brake pedal, the vehicle is held for around
one second.
XPull away.
Hill start assist will not function if:
R you are pulling away on a level road or on
a downhill gradient.
R on vehicles with automatic transmission,
the transmission is in position N.
R the electric parking brake is applied.
R ESP ®
is malfunctioning.
134DrivingDriving and parking
Page 148 of 336
Problems with the transmissionProblemPossible causes/consequences and M SolutionsThe transmission has
problems shifting gear.The transmission is losing oil.XHave the transmission checked at a qualified specialist
workshop immediately.The acceleration ability
is deteriorating.
The transmission no
longer changes gear.The transmission is in emergency mode.
It is only possible to shift into second gear and reverse gear.XStop the vehicle.XShift the transmission to position P.XSwitch off the engine.XWait at least 10seconds before restarting the engine.XShift the transmission to position D or R.
If D is selected, the transmission shifts into second gear; if R is
selected, the transmission shifts into reverse gear.XHave the transmission checked at a qualified specialist
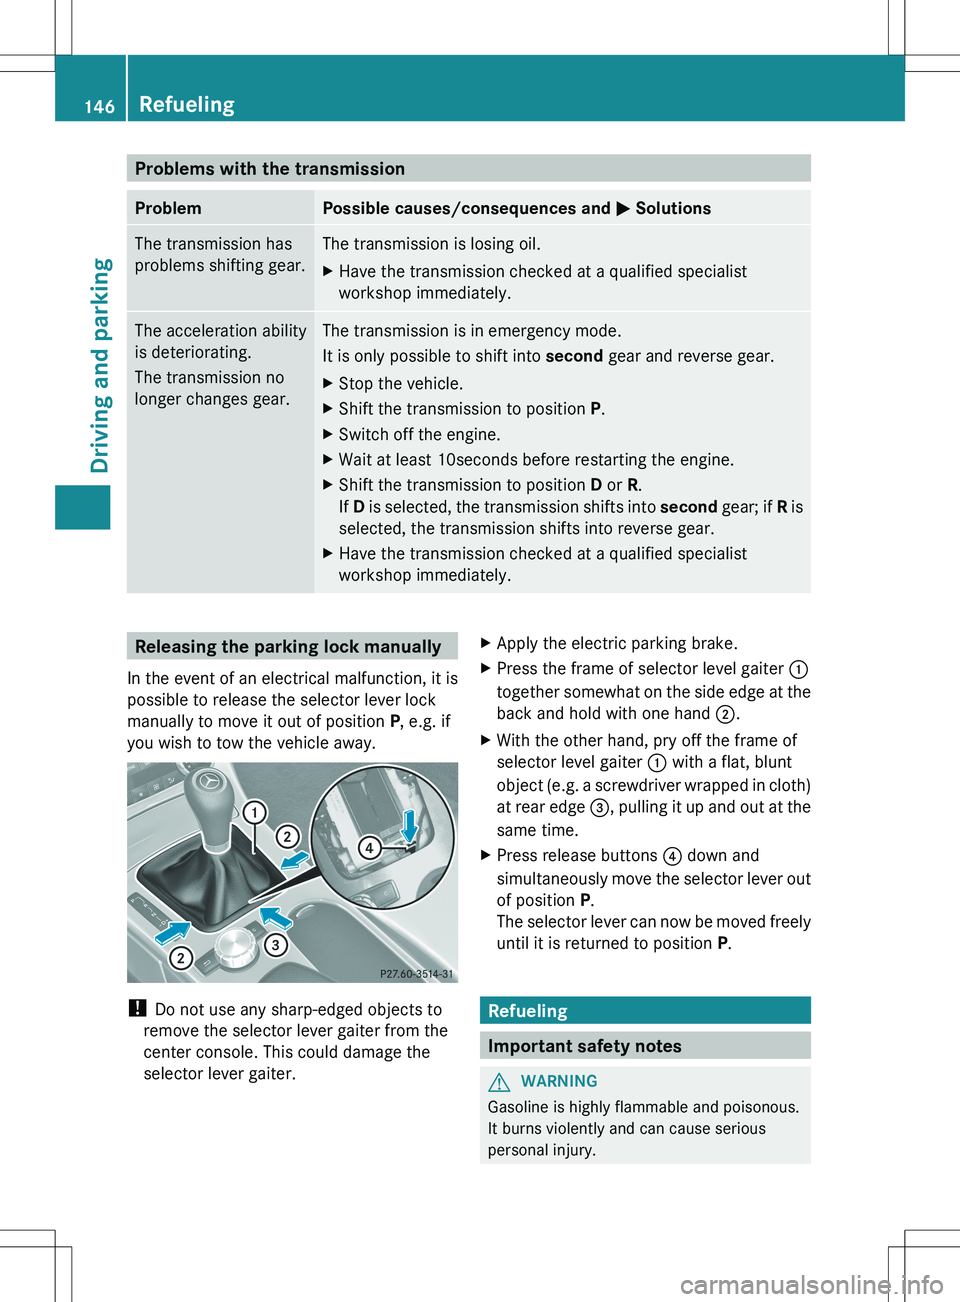
workshop immediately.Releasing the parking lock manually
In the event of an electrical malfunction, it is
possible to release the selector lever lock
manually to move it out of position P, e.g. if
you wish to tow the vehicle away.
! Do not use any sharp-edged objects to
remove the selector lever gaiter from the
center console. This could damage the
selector lever gaiter.
XApply the electric parking brake.XPress the frame of selector level gaiter :
together somewhat on the side edge at the
back and hold with one hand ;.XWith the other hand, pry off the frame of
selector level gaiter : with a flat, blunt
object (e.g. a screwdriver wrapped in cloth)
at rear edge =, pulling it up and out at the
same time.XPress release buttons ? down and
simultaneously move the selector lever out
of position P.
The selector lever can now be moved freely
until it is returned to position P.
Refueling
Important safety notes
GWARNING
Gasoline is highly flammable and poisonous.
It burns violently and can cause serious
personal injury.
146RefuelingDriving and parking
Page 155 of 336
Exhaust checkGWARNING
Inhalation of exhaust gas is hazardous to your
health. All exhaust gas contains carbon
monoxide (CO), and inhaling it can cause
unconsciousness and possible death.
Do not run the engine in confined areas (such
as a garage) which are not properly ventilated.
If you think that exhaust gas fumes are
entering the vehicle while driving, have the
cause determined and corrected
immediately. If you must drive under these
conditions, drive only with at least one
window fully open at all times.
Certain engine systems are designed to keep
the level of poisonous components in exhaust
fumes within legal limits.
These systems only work at peak efficiency if
they are serviced exactly in accordance with
the manufacturer's specifications. For this
reason, all work on the engine should only be
carried out by qualified and authorized
Mercedes-Benz technicians.
The engine settings must not be changed
under any circumstances. Furthermore, all
specific service work must be carried out at
regular intervals and in accordance with the
Mercedes-Benz service requirements. Details
can be found in the Maintenance Booklet.
Brakes
Important safety notes
GWARNING
On slippery road surfaces, never downshift in
order to obtain braking action. This could
result in drive wheel slip and reduced vehicle
control. Your vehicle's ABS will not prevent
this type of loss of control.
GWARNING
Make sure that you do not endanger other
road users when you apply the brakes.
Downhill gradients
! On long and steep gradients, you must
reduce the load on the brakes by shifting
early to a lower gear. This allows you to take
advantage of the engine braking effect and
helps avoid overheating and excessive
wear of the brakes.
When you take advantage of the engine
braking effect, a drive wheel may not turn
for some time, e.g. on a slippery road
surface. This could cause damage to the
drive train. This type of damage is not
covered by the Mercedes-Benz warranty.
Heavy and light loads
GWARNING
Depressing the brake pedal constantly results
in excessive and premature wear to the brake
pads.
It may also cause the brakes to overheat,
seriously impairing their effectiveness. It may
then not be possible to stop the vehicle in
sufficient time to avoid an accident.
If the brakes have been subjected to a heavy
load, do not stop the vehicle immediately, but
drive on for a short while. This allows the
airflow to cool the brakes more quickly.
Wet roads
GWARNING
After driving in heavy rain for some time
without applying the brakes or through water
deep enough to wet brake components, the
first braking action may be somewhat
reduced. You have to depress the brake pedal
more firmly. Maintain a safe distance from
vehicles in front.
After driving on a wet road or having the
vehicle washed, brake firmly while paying
attention to the traffic conditions. This will
warm up the brake discs, thereby drying them
more quickly and protecting them against
corrosion.
Driving tips153Driving and parkingZ
Page 158 of 336
control. Your vehicle's ABS will not prevent
this type of loss of control.
Drive particularly carefully on slippery road
surfaces. Avoid sudden acceleration, steering
and braking maneuvers. Do not use cruise
control.
If the vehicle threatens to skid or cannot be
stopped when moving at low speed:XVehicles with manual transmission:
shift to neutral.XVehicles with automatic transmission:
shift the transmission to position N.
i
For more information on driving with
snow chains, see ( Y page 297).
GWARNING
Make sure that you do not endanger other
road users when you apply the brakes.
Driving systems
Cruise control
Important safety notes
Cruise control maintains a constant road
speed for you. It brakes automatically in order
to avoid exceeding the set speed. You must
select a low gear in good time on long and
steep downhill gradients, especially if the
vehicle is laden. Select shift range 1, 2 or 3
on vehicles with automatic transmission in
order to use the engine's braking effect,
which relieves the load on the brake system
and prevents the brakes from overheating
and wearing too quickly.
Use cruise control only if road and traffic
conditions make it appropriate to maintain a
steady speed for a prolonged period. You can
store any road speed above 20 mph
(30 km/h).
GWARNING
The cruise control is a convenience system
designed to assist the driver during vehicle
operation. The driver is and must always
remain responsible for the vehicle's speed
and for safe brake operation.
Only use the cruise control if the road, traffic,
and weather conditions make it advisable to
travel at a constant speed.
R The use of the cruise control can be
dangerous on winding roads or in heavy
traffic because conditions do not allow safe
driving at a constant speed.
R The use of the cruise control can be
dangerous on slippery roads. Rapid
changes in tire traction can result in wheel
spin and loss of control.
R Deactivate the cruise control when driving
in fog.
The "Resume" function should only be
operated if the driver is fully aware of the
previously set speed and wishes to resume
this particular preset speed.
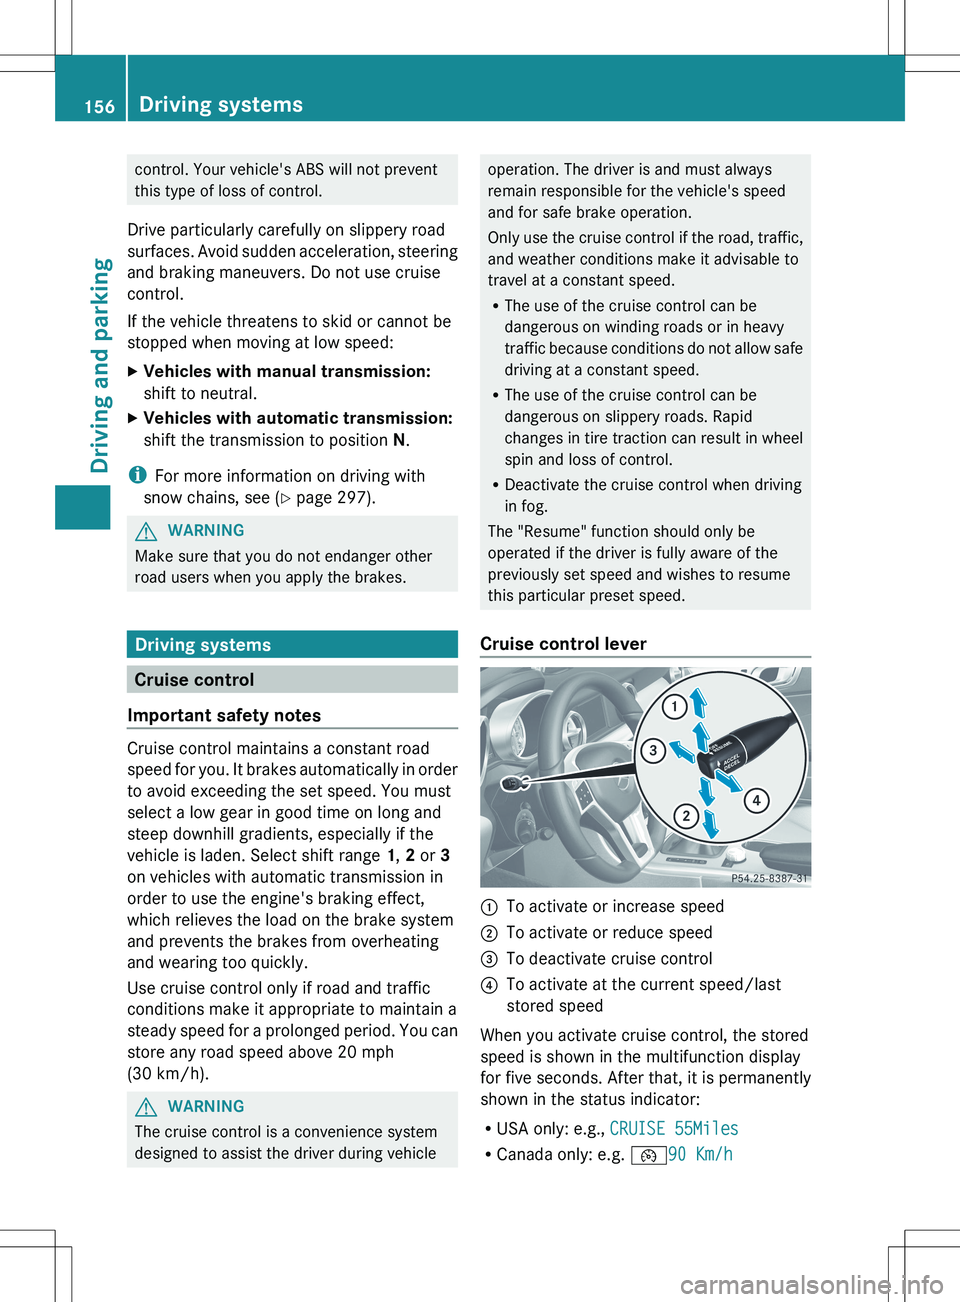
Cruise control lever:To activate or increase speed;To activate or reduce speed=To deactivate cruise control?To activate at the current speed/last
stored speed
When you activate cruise control, the stored
speed is shown in the multifunction display
for five seconds. After that, it is permanently
shown in the status indicator:
R USA only: e.g., CRUISE 55Miles
R Canada only: e.g. ¯90 Km/h
156Driving systemsDriving and parking