2012 MERCEDES-BENZ SLK-CLASS ROADSTER engine
[x] Cancel search: enginePage 183 of 336
Coolant temperature displayGWARNING
Driving when your engine is overheated can
cause some fluids which may have leaked into
the engine compartment to catch fire. You
could be seriously burned.
Steam from an overheated engine can cause
serious burns which can occur just by opening
the engine hood. Stay away from the engine
if you see or hear steam coming from it.
Stop the vehicle in a safe location away from
other traffic. Turn off the engine, get out of the
vehicle and do not stand near the vehicle until
the engine has cooled down.
The coolant temperature gauge is in the
instrument cluster on the right-hand side.
Under normal operating conditions and with
the specified coolant level, the coolant
temperature may rise to 248 ‡ (120 †).
! A display message is shown if the coolant
temperature is too high.
If the coolant temperature is over
248 ‡(120 †), do not continue driving. The
engine will otherwise be damaged.
Tachometer
The red band in the tachometer indicates the
engine's overrevving range.
! Do not drive in the overrevving range, as
this could damage the engine.
The fuel supply is interrupted to protect the
engine when the red band is reached.
Outside temperature display
The outside temperature display is in the
multifunction display ( Y page 183).
GWARNING
The outside temperature indicator is not
designed to serve as an ice-warning device
and is therefore unsuitable for that purpose.
Indicated temperatures just above the
freezing point do not guarantee that the road
surface is free of ice. The road may still be icy,
especially in wooded areas or on bridges.
Changes in the outside temperature are
displayed after a short delay.
Speedometer with segments
The segments in the speedometer indicate
which speed range is available.
Cruise control ( Y page 156) activated:
The segments light up from the stored speed
to the maximum speed.
DISTRONIC PLUS ( Y page 158) activated:
One or two segments in the set speed range
light up.
DISTRONIC PLUS detects a vehicle in front:
The segments between the speed of the
vehicle in front and the stored speed light up.
Operating the on-board computer
Overview
The on-board computer is activated as soon
as you turn the SmartKey to position 1 in the
ignition lock.
You can control the multifunction display and
the settings in the on-board computer using
the buttons on the multifunction steering
wheel.
Displays and operation181On-board computer and displaysZ
Page 194 of 336
XPress the : or 9 button to select the
Display Unit Speed-/Odometer:
function.
You will see the selected setting: km or
miles .XPress the a button to save the setting.
Switching the additional speedometer on
or off
Only vehicles with manual transmission have
this function.
The Additional Speedometer function
allows you to choose whether the status area
of the multifunction display shows the speed
in km/h (USA) or mph (Canada) instead of the
outside temperature.
XPress the = or ; button on the
steering wheel to select the Settings
menu.XPress the : or 9 button to select the
Instr. cluster submenu.XPress the a button to confirm.XPress the : or 9 button to select the
Additional Speedometer function.
You will see the selected setting: On or
Off .XPress the a button to save the setting.
Selecting the permanent display function
Only vehicles with automatic transmission
have this function.
The Permanent Display: function allows
you to choose whether the multifunction
display always shows the outside
temperature or the speed in km/h (USA) or
mph (Canada).
XPress the = or ; button on the
steering wheel to select the Settings
menu.XPress the : or 9 button to select the
Instr. cluster submenu.XPress the a button to confirm.XPress the : or 9 button to select the
Permanent display function.
You will see the selected setting Outside
Temperature or Speedometer [km/h]: .XPress the a button to save the setting.
Lights
Switching the daytime running lamps on/
off
This function is not available in Canada.
If you have activated the Daytime Running
Lights: function and the light switch is in the
c or à position, the daytime running
lamps are switched on automatically when
the engine is running.
Depending on the ambient light, the following
will additionally light up:
R low-beam headlamps
R parking lamps
R tail lamps
R license plate lamp
R side marker lamps
XPress the = or ; button on the
steering wheel to select the Settings
menu.XPress the : or 9 button to select the
Light submenu.XPress the a button to confirm.XPress the : or 9 button to select the
Daytime running lights function.
You will see the selected setting: on or
off .XPress the a button to save the setting.
Setting the brightness of the ambient
lighting
XPress the = or ; button on the
steering wheel to select the Settings
menu.XPress the : or 9 button to select the
Lights submenu.XPress the a button to confirm.192Menus and submenusOn-board computer and displays
Page 195 of 336
XPress the : or 9 button to select
Ambient light .
You will see the selected setting.XPress the a button to confirm.XPress the : or 9 button to adjust the
brightness to any level from Off to Level
5 (bright).XPress the a or % button to save the
setting.
Activating/deactivating surround
lighting and exterior lighting delayed
switch-off
If you have activated the Lighting: function
and the light switch is in the c or Ã
position, the following functions are active
when it is dark:
R Surround lighting: the exterior lighting
remains lit for 40 seconds after unlocking
with the key. The exterior lighting switches
off when you open the driver's door.
R Exterior lighting delayed switch-off: the
exterior lighting remains lit for 60 seconds
after the engine is switched off. If you close
all the doors, the exterior lighting goes off
after 15 seconds.
If you activate the Surround lighting:
function, the following light up depending on
the vehicle's equipment:
R parking lamps
R front fog lamps
R low-beam headlamps
R daytime running lamps
R side marker lamps
XPress the = or ; button on the
steering wheel to select the Sett. menu.XPress the : or 9 button to select the
Lights submenu.XPress the a button to confirm.XPress the : or 9 button to select the
Locator Lighting function.
You will see the selected setting: on or
off .XPress the a button to save the setting.Deactivating delayed switch-off of the
exterior lighting temporarily:XBefore leaving the vehicle, turn the
SmartKey to position 0 in the ignition lock.XTurn the SmartKey to position 2 in the
ignition lock and back to position 0.
The exterior lighting delayed switch-off is
deactivated.
Delayed switch-off of the exterior lighting is
reactivated the next time you start the
engine.
Activating/deactivating the interior
lighting delayed switch-off
If you activate the Interior lighting
delay sw. off function, the interior lighting
remains on for 20seconds after you remove
the key from the ignition lock.
XPress the = or ; button on the
steering wheel to select the Settings
menu.XPress the : or 9 button to select the
Light submenu.XPress the a button to confirm.XPress the : or 9 button to select the
Interior lighting delay sw. off:
function.
You will see the selected setting: on or
off .XPress the a button to save the setting.
Vehicle
Activating/deactivating the automatic
door locking mechanism
If you select the Automatic Door Lock:
function, the vehicle is centrally locked above
a speed of around 9 mph (15km/h).
i For further information on the automatic
locking feature, see ( Y page 75).
Menus and submenus193On-board computer and displaysZ
Page 197 of 336
XPress the = or ; button on the
steering wheel to select the Sett. menu.XPress the : or 9 button to select the
Convenience submenu.XPress a to confirm.XPress the : or 9 button to select the
Belt Adjustment function.
You will see the selected setting: on or
off .XPress the a button to save the setting.
Switching the fold-in mirrors when
locking feature is on/off
If you switch on the Fold Mirrors in when
Locking function, the exterior mirrors fold in
when you lock the vehicle. If you unlock the
vehicle and then open a door, the exterior
mirrors fold out again.
If you have switched the function on and you
fold the exterior mirrors in using the button
on the door (Y page 99), they will not fold out
automatically. The exterior mirrors can then
only be folded out using the button on the
door.
XPress the = or ; button on the
steering wheel to select the Settings
menu.XPress the : or 9 button to select the
Convenience submenu.XPress the a button to confirm.XPress the : or 9 button to select the
Fold mirrors in when locking:
function.
You will see the selected setting: Enabled
or Disabled .XPress the a button to save the setting.
Restoring the factory settings
For safety reasons, the Daytime Running
Lights: function in the Lights submenu is
only reset when the vehicle is stationary.
XPress the = or ; button on the
steering wheel to select the Sett. menu.XPress the : or 9 button to select the
Factory Setting submenu.XPress the a button to confirm.
The Reset All Settings? message
appears.XPress the : or 9 button to select
No or Yes .XPress the a button to confirm the
selection.
If you select Yes, the multifunction display
shows a confirmation message.
AMG menu in AMG vehicles
AMG displays
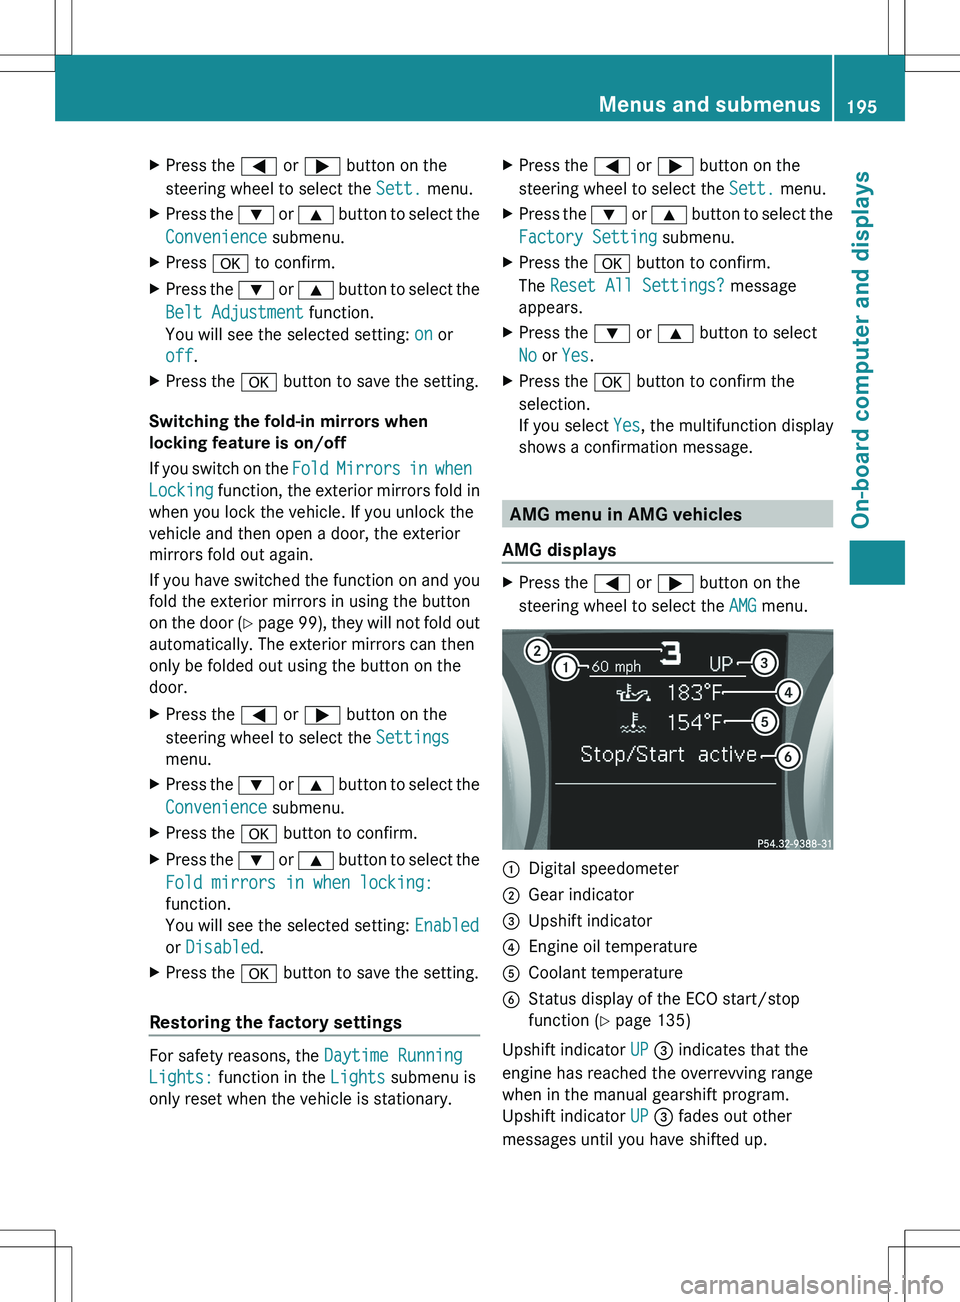
XPress the = or ; button on the
steering wheel to select the AMG menu.:Digital speedometer;Gear indicator=Upshift indicator?Engine oil temperatureACoolant temperatureBStatus display of the ECO start/stop
function ( Y page 135)
Upshift indicator UP = indicates that the
engine has reached the overrevving range
when in the manual gearshift program.
Upshift indicator UP = fades out other
messages until you have shifted up.
Menus and submenus195On-board computer and displaysZ
Page 198 of 336
When the engine temperature is below
80 †, the oil temperature gauge flashes.
Avoid driving at full engine output during this
time.
SETUP
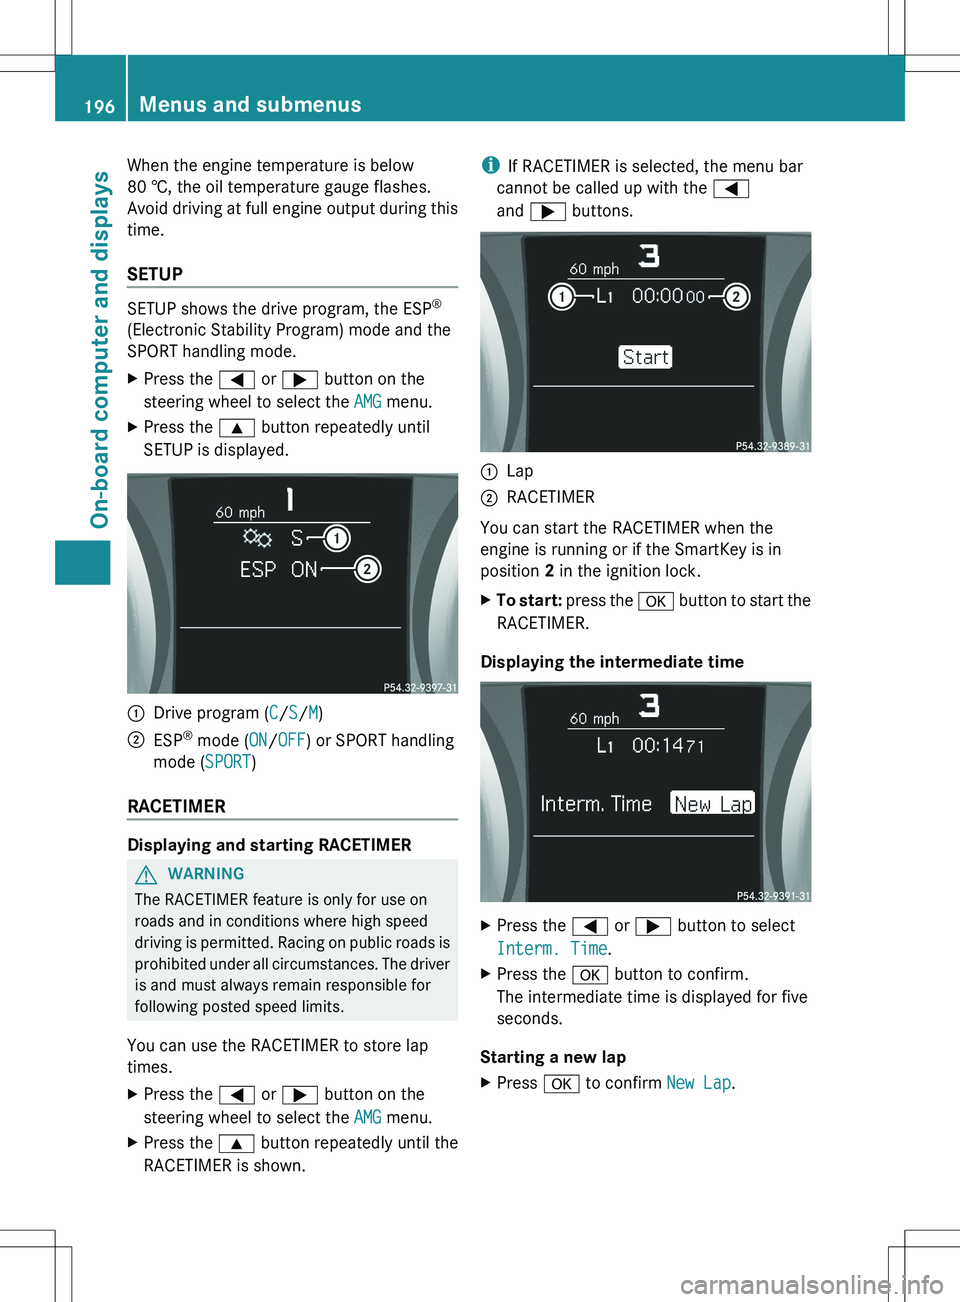
SETUP shows the drive program, the ESP ®
(Electronic Stability Program) mode and the
SPORT handling mode.
XPress the = or ; button on the
steering wheel to select the AMG menu.XPress the 9 button repeatedly until
SETUP is displayed.:Drive program ( C/ S/ M);ESP ®
mode ( ON/OFF ) or SPORT handling
mode ( SPORT)
RACETIMER
Displaying and starting RACETIMER
GWARNING
The RACETIMER feature is only for use on
roads and in conditions where high speed
driving is permitted. Racing on public roads is
prohibited under all circumstances. The driver
is and must always remain responsible for
following posted speed limits.
You can use the RACETIMER to store lap
times.
XPress the = or ; button on the
steering wheel to select the AMG menu.XPress the 9 button repeatedly until the
RACETIMER is shown.i If RACETIMER is selected, the menu bar
cannot be called up with the =
and ; buttons.:Lap;RACETIMER
You can start the RACETIMER when the
engine is running or if the SmartKey is in
position 2 in the ignition lock.
XTo start: press the a button to start the
RACETIMER.
Displaying the intermediate time
XPress the = or ; button to select
Interm. Time .XPress the a button to confirm.
The intermediate time is displayed for five
seconds.
Starting a new lap
XPress a to confirm New Lap.196Menus and submenusOn-board computer and displays
Page 199 of 336
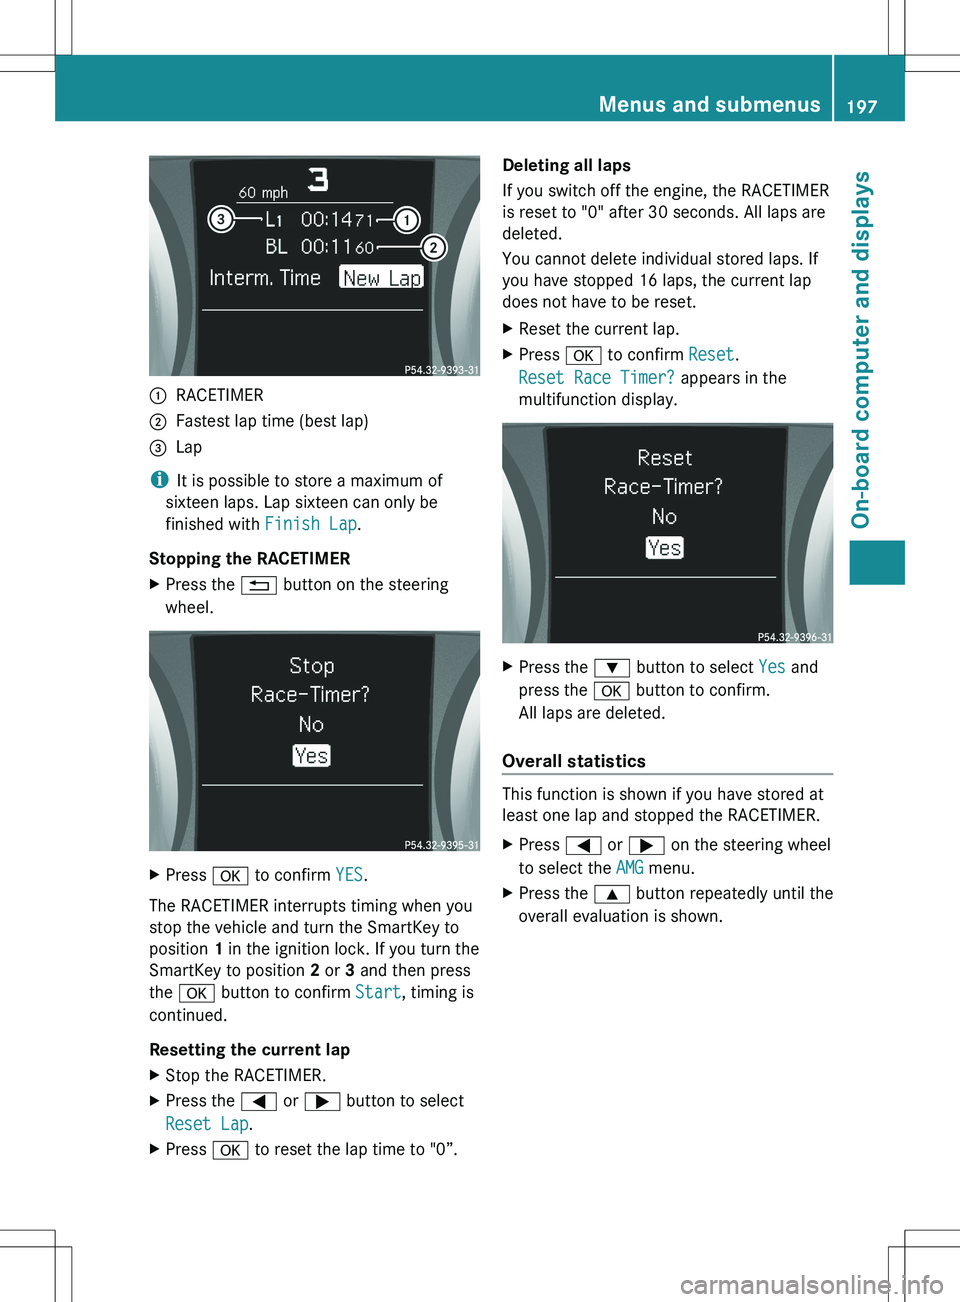
:RACETIMER;Fastest lap time (best lap)=Lap
iIt is possible to store a maximum of
sixteen laps. Lap sixteen can only be
finished with Finish Lap.
Stopping the RACETIMER
XPress the % button on the steering
wheel.XPress a to confirm YES.
The RACETIMER interrupts timing when you
stop the vehicle and turn the SmartKey to
position 1 in the ignition lock. If you turn the
SmartKey to position 2 or 3 and then press
the a button to confirm Start, timing is
continued.
Resetting the current lap
XStop the RACETIMER.XPress the = or ; button to select
Reset Lap .XPress a to reset the lap time to "0”.Deleting all laps
If you switch off the engine, the RACETIMER
is reset to "0" after 30 seconds. All laps are
deleted.
You cannot delete individual stored laps. If
you have stopped 16 laps, the current lap
does not have to be reset.XReset the current lap.XPress a to confirm Reset.
Reset Race Timer? appears in the
multifunction display.XPress the : button to select Yes and
press the a button to confirm.
All laps are deleted.
Overall statistics
This function is shown if you have stored at
least one lap and stopped the RACETIMER.
XPress = or ; on the steering wheel
to select the AMG menu.XPress the 9 button repeatedly until the
overall evaluation is shown.Menus and submenus197On-board computer and displaysZ
Page 207 of 336

Display messagesPossible causes/consequences and M SolutionsThe yellow ! warning lamp lights up. If you manually apply or
release the electric parking brake, the red F (USA
only)/ ! (Canada only) indicator lamp flashes.
The electric parking brake is malfunctioning. It is not possible to
apply the electric parking brake manually.XVehicles with manual transmission: switch off the ignition.
The electric parking brake is applied automatically.
You can release the electric parking brake using the automatic
emergency release ( Y page 150).XVehicles with automatic transmission: shift the transmission
to P as the electric parking brake is not being applied
automatically.XVisit a qualified specialist workshop.
i If you do not wish the electric parking brake to be applied,
leave the ignition switched on, e.g. when washing the vehicle in
an automatic car wash or when having the vehicle towed.
Exception: when having the vehicle towed with the rear axle
raised ( Y page 287).
F (USA
only) ! (Canada
only)
Pkg Brake
InoperativeThe yellow ! warning lamp lights up. The red F (USA
only)/ ! (Canada only) indicator lamp flashes for about ten
seconds after the electric parking brake has been applied or
released. It then goes out or remains lit.
The electric parking brake is malfunctioning, e.g. because of
overvoltage or undervoltage.XRemove the cause for the overvoltage or undervoltage, e.g. by
charging the battery or restarting the engine.XEngage or release the electric parking brake.
If it remains impossible to apply or release the electric parking
brake:
XSwitch off the ignition and turn it back on.XEngage or release the electric parking brake.
If the electric parking brake still cannot be released:
XConsult a qualified specialist workshop.Display messages205On-board computer and displaysZ
Page 208 of 336
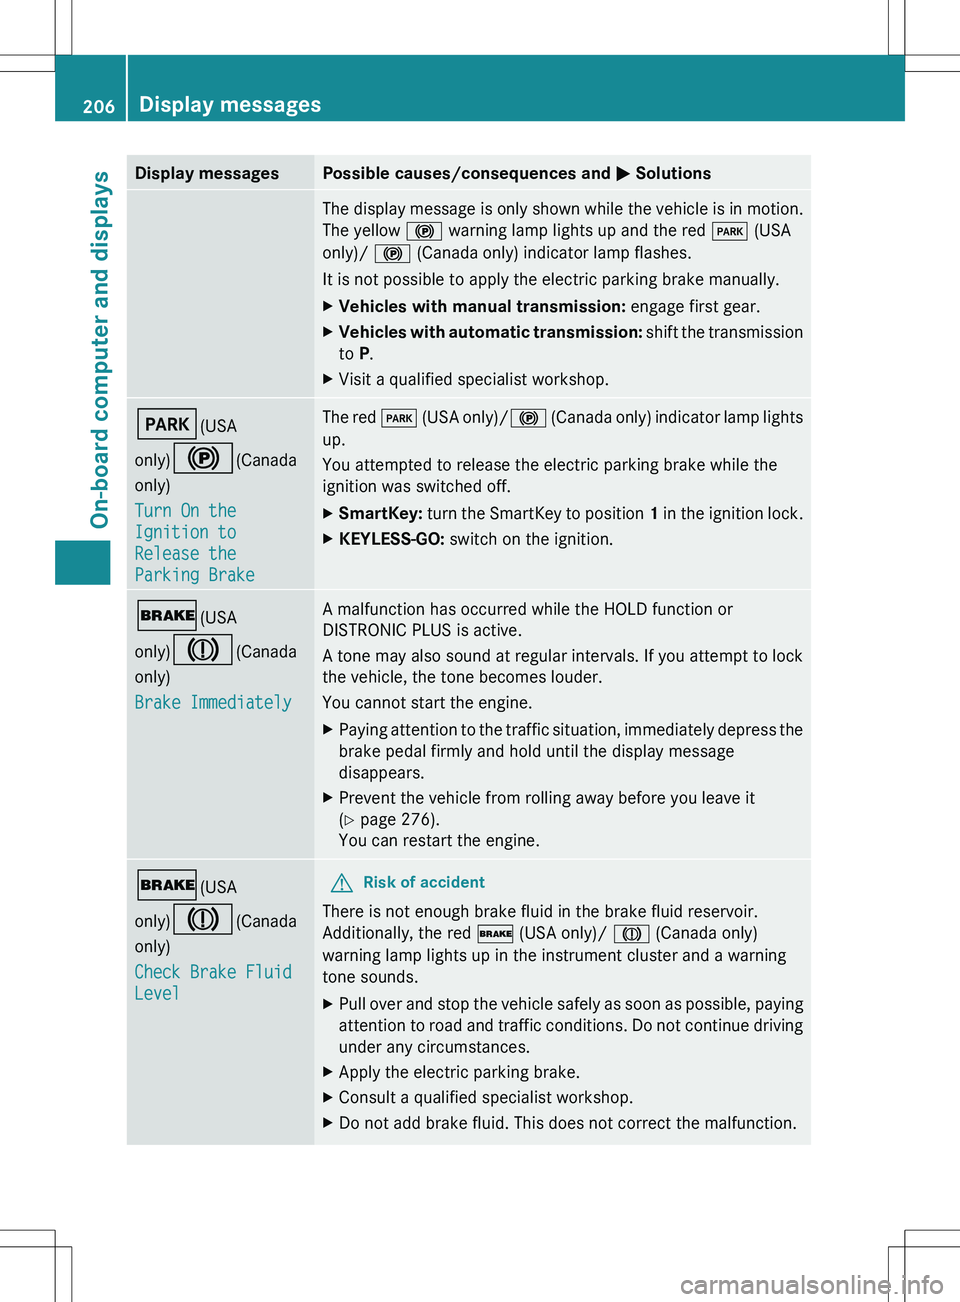
Display messagesPossible causes/consequences and M SolutionsThe display message is only shown while the vehicle is in motion.
The yellow ! warning lamp lights up and the red F (USA
only)/ ! (Canada only) indicator lamp flashes.
It is not possible to apply the electric parking brake manually.XVehicles with manual transmission: engage first gear.XVehicles with automatic transmission: shift the transmission
to P.XVisit a qualified specialist workshop.F (USA
only) ! (Canada
only)
Turn On the
Ignition to
Release the
Parking BrakeThe red F (USA only)/ ! (Canada only) indicator lamp lights
up.
You attempted to release the electric parking brake while the
ignition was switched off.XSmartKey: turn the SmartKey to position 1 in the ignition lock.XKEYLESS-GO: switch on the ignition.$(USA
only) J (Canada
only)
Brake ImmediatelyA malfunction has occurred while the HOLD function or
DISTRONIC PLUS is active.
A tone may also sound at regular intervals. If you attempt to lock
the vehicle, the tone becomes louder.
You cannot start the engine.XPaying attention to the traffic situation, immediately depress the
brake pedal firmly and hold until the display message
disappears.XPrevent the vehicle from rolling away before you leave it
( Y page 276).
You can restart the engine.$ (USA
only) J (Canada
only)
Check Brake Fluid
LevelGRisk of accident
There is not enough brake fluid in the brake fluid reservoir.
Additionally, the red $ (USA only)/ J (Canada only)
warning lamp lights up in the instrument cluster and a warning
tone sounds.
XPull over and stop the vehicle safely as soon as possible, paying
attention to road and traffic conditions. Do not continue driving
under any circumstances.XApply the electric parking brake.XConsult a qualified specialist workshop.XDo not add brake fluid. This does not correct the malfunction.206Display messagesOn-board computer and displays