2012 MERCEDES-BENZ S-CLASS SEDAN start stop button
[x] Cancel search: start stop buttonPage 329 of 536

XTurn DEF refill bottle = counter-clockwise
and remove it.XPlace DEF filler cap ; on the filler neck and
turn it clockwise.XInsert DEF cap : as shown and turn it
clockwise as far as it will go.XPlace the "Minispare" emergency spare
wheel in the emergency spare wheel well
above the DEF tank.XInsert the "Minispare" emergency spare
wheel fastening and tighten clockwise.XFold the trunk floor down.XClose the trunk lid.XDrive faster than 10 mph (16 km/h).
The Check Additive See Operator's
Manual message goes out after
approximately one minute.
i If the Check Additive See
Operator's Manual message remains
shown in the multifunction display, add an
additional bottle of DEF.
Further information on DEF ( Y page 527).
Parking
Important safety notes
GWARNING
Do not park this vehicle in areas where
combustible materials can come into contact
with the hot exhaust system. Combustible
materials, such as grass, hay or leaves could
be ignited by the hot exhaust system and
cause a vehicle fire. Do not park the vehicle
on dry grassland or harvested grain fields.
Unintended vehicle movement can cause
serious personal injury or damage to the
vehicle or the vehicle drivetrain. To reduce
such risks, always do the following before
turning off the engine and leaving the vehicle:
R keep your right foot on the brake pedal.
R engage the electric parking brake.
R shift the automatic transmission into park
position P.
R slowly release the brake pedal.
R when parked on an incline, always turn the
front wheels towards the road curb.
R turn the SmartKey in the ignition lock to
position 0 and remove the SmartKey from
the ignition lock, or press the KEYLESS-GO
Start/Stop button.
R take the SmartKey with you and lock the
vehicle when leaving.
Switching off the engine
Important safety notes
GWARNING
Do not turn off the engine before the vehicle
has come to a complete stop. With the engine
not running, there is no power assistance for
the brake and steering systems. In this case,
it is important to keep in mind that a
considerably higher degree of effort is
necessary to brake and steer the vehicle.
GWARNING
Keep in mind that turning off the engine alone
only will shift the automatic transmission into
neutral position N automatically.
Always shift the automatic transmission into
park position P before turning off the engine.
Otherwise the vehicle could roll away which
could result in an accident and/or serious
personal injury.
Parking327Driving and parkingZ
Page 330 of 536
iIf you cannot turn off the engine as
described here, see "Engine emergency
stop" ( Y page 490).
Vehicles with automatic transmissionXApply the electric parking brake.XShift the transmission to position P.
Using the SmartKey
XTurn the SmartKey to position 0 in the
ignition lock and remove it.
The immobilizer is activated.
i If you turn off the engine with the
SmartKey and then remove it from the
ignition lock or open a front door, the
automatic transmission shifts to P
automatically.
Using KEYLESS-GO
XPress the Start/Stop button (Y page 307).
The engine stops and all the indicator
lamps in the instrument cluster go out.
i When the driver's door is closed, this
corresponds to SmartKey position 1. When
the driver's door is open, it corresponds to
SmartKey position 0 or "SmartKey
removed".
i If you use the Start/Stop button to switch
off the engine, the automatic transmission
shifts to N automatically. If you then open
the driver's or front-passenger door, the
automatic transmission shifts to P.
i In an emergency, the engine can be
turned off while the vehicle is in motion by
pressing and holding the Start/Stop button
for 3 seconds. This function operates
independently from the ECO start/stop
automatic engine switch-off function.
Electric parking brake
General informationGWARNING
When leaving the vehicle, always remove the
SmartKey from the starter switch, take it with
you, and lock the vehicle. Do not leave
children unattended in the vehicle, or with
access to an unlocked vehicle. Children could
release the parking brake and/or shift the
automatic transmission out of park position
P , either of which could result in an accident
and/or serious personal injury.
Applying/releasing manually
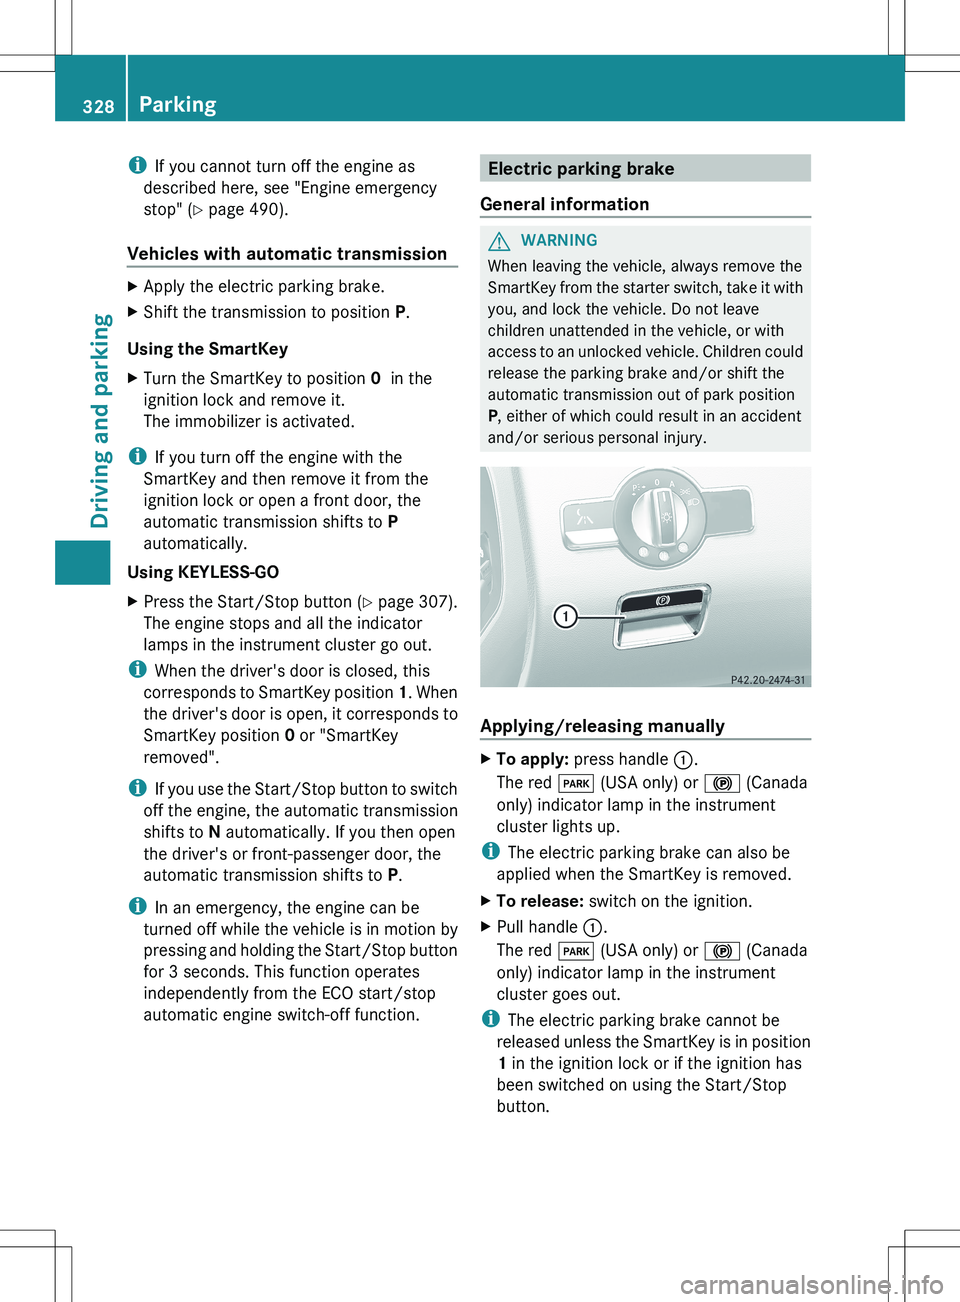
XTo apply: press handle :.
The red F (USA only) or ! (Canada
only) indicator lamp in the instrument
cluster lights up.
i The electric parking brake can also be
applied when the SmartKey is removed.
XTo release: switch on the ignition.XPull handle :.
The red F (USA only) or ! (Canada
only) indicator lamp in the instrument
cluster goes out.
i The electric parking brake cannot be
released unless the SmartKey is in position
1 in the ignition lock or if the ignition has
been switched on using the Start/Stop
button.
328ParkingDriving and parking
Page 334 of 536

Limited braking performance on salt-
treated roadsGWARNING
The layer of salt on the brake discs and the
brake pads/linings may cause a delay in the
braking effect, resulting in a significantly
longer braking distance, which could lead to
an accident.
To avoid this danger, you should:
R occasionally brake carefully, without
putting other road users at risk, when you
are driving on salted roads. This helps to
remove any salt that may have started to
build up on the brake discs and the brake
pads/linings.
R maintain a greater distance to the vehicle
ahead and drive with particular care.
R carefully apply the brakes at the end of a
trip and immediately after commencing a
new trip, so that salt residues are removed
from the brake discs.
Servicing the brakes
! If the red brake warning lamp lights up in
the instrument cluster and you hear a
warning tone while the engine is running,
the brake fluid level may be too low.
Observe additional warning messages in
the multifunction display.
The brake fluid level may be too low due to
brake pad wear or leaking brake lines.
Have the brake system checked
immediately. This work should be carried
out at a qualified specialist workshop.
All checks and maintenance work on the
brake system must be carried out at a
qualified specialist workshop. Consult a
qualified specialist workshop to arrange this.
Have brake pads installed and brake fluid
replaced at a qualified specialist workshop.
GWARNING
If brake pads or brake fluid other than those
recommended are used, the braking
properties of the vehicle can be degraded to
an extent that safe braking is substantially
impaired. This could result in an accident.
! Vehicles with 4MATIC: function or
performance tests may only be carried out
on a 2-axle dynamometer. If you are
planning to have the vehicle tested on such
a dynamometer, contact an authorized
Mercedes-Benz Center to obtain further
information first. Otherwise, you could
damage the drive train or the brake system.
! Vehicles with 4MATIC: as the ESP®
system operates automatically, the engine
and the ignition must be switched off
(SmartKey in position 0 or 1 in the ignition
lock or Start/Stop button in position 0 or
1 ) when the electric parking brake is being
tested on a brake dynamometer.
Braking maneuvers triggered automatically
by ESP ®
may seriously damage the brake
system.
! Vehicles with 4MATIC: as the ESP®
system operates automatically, the engine
and the ignition system must be switched
off (SmartKey in position 0 or 1 in the
ignition lock or Start/Stop button in
position 0 or 1) when:
R testing the electric parking brake on a
brake dynamometer.
R you intend to have the vehicle towed with
one of the axles raised.
Braking maneuvers triggered automatically
by ESP ®
may seriously damage the brake
system.
If your brake system is subject only to
moderate loads, you should test the
functionality of your brakes at regular
intervals by pressing firmly on the brake pedal
at high speeds. This improves the grip of the
brake pads.GWARNING
Make sure that you do not endanger other
road users when you apply the brakes.
332Driving tipsDriving and parking
Page 384 of 536
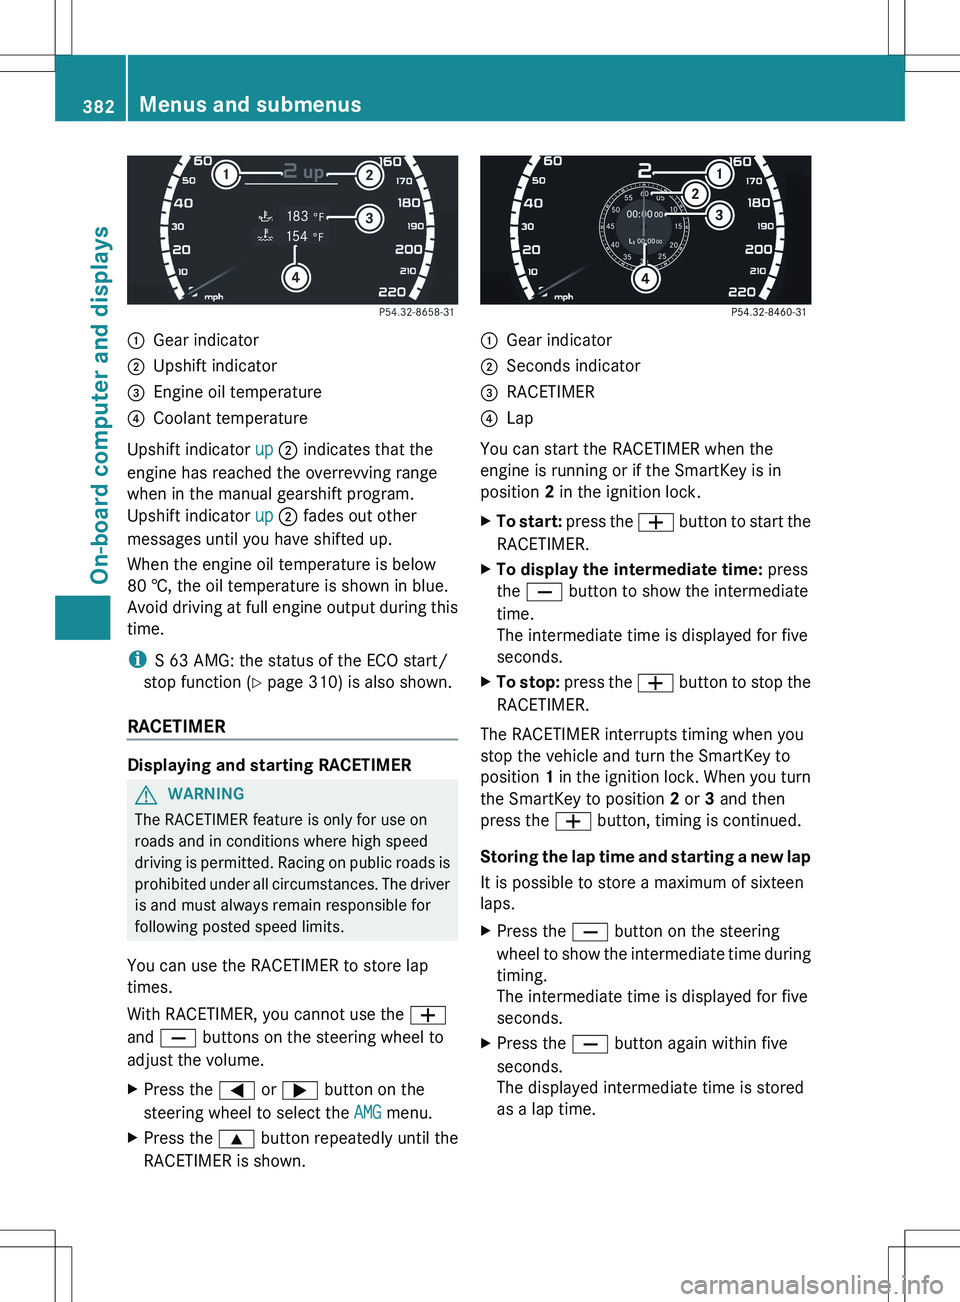
:Gear indicator;Upshift indicator=Engine oil temperature?Coolant temperature
Upshift indicator up ; indicates that the
engine has reached the overrevving range
when in the manual gearshift program.
Upshift indicator up ; fades out other
messages until you have shifted up.
When the engine oil temperature is below
80 †, the oil temperature is shown in blue.
Avoid driving at full engine output during this
time.
i S 63 AMG: the status of the ECO start/
stop function ( Y page 310) is also shown.
RACETIMER
Displaying and starting RACETIMER
GWARNING
The RACETIMER feature is only for use on
roads and in conditions where high speed
driving is permitted. Racing on public roads is
prohibited under all circumstances. The driver
is and must always remain responsible for
following posted speed limits.
You can use the RACETIMER to store lap
times.
With RACETIMER, you cannot use the W
and X buttons on the steering wheel to
adjust the volume.
XPress the = or ; button on the
steering wheel to select the AMG menu.XPress the 9 button repeatedly until the
RACETIMER is shown.:Gear indicator;Seconds indicator=RACETIMER?Lap
You can start the RACETIMER when the
engine is running or if the SmartKey is in
position 2 in the ignition lock.
XTo start: press the W button to start the
RACETIMER.XTo display the intermediate time: press
the X button to show the intermediate
time.
The intermediate time is displayed for five
seconds.XTo stop: press the W button to stop the
RACETIMER.
The RACETIMER interrupts timing when you
stop the vehicle and turn the SmartKey to
position 1 in the ignition lock. When you turn
the SmartKey to position 2 or 3 and then
press the W button, timing is continued.
Storing the lap time and starting a new lap
It is possible to store a maximum of sixteen
laps.
XPress the X button on the steering
wheel to show the intermediate time during
timing.
The intermediate time is displayed for five
seconds.XPress the X button again within five
seconds.
The displayed intermediate time is stored
as a lap time.382Menus and submenusOn-board computer and displays
Page 385 of 536
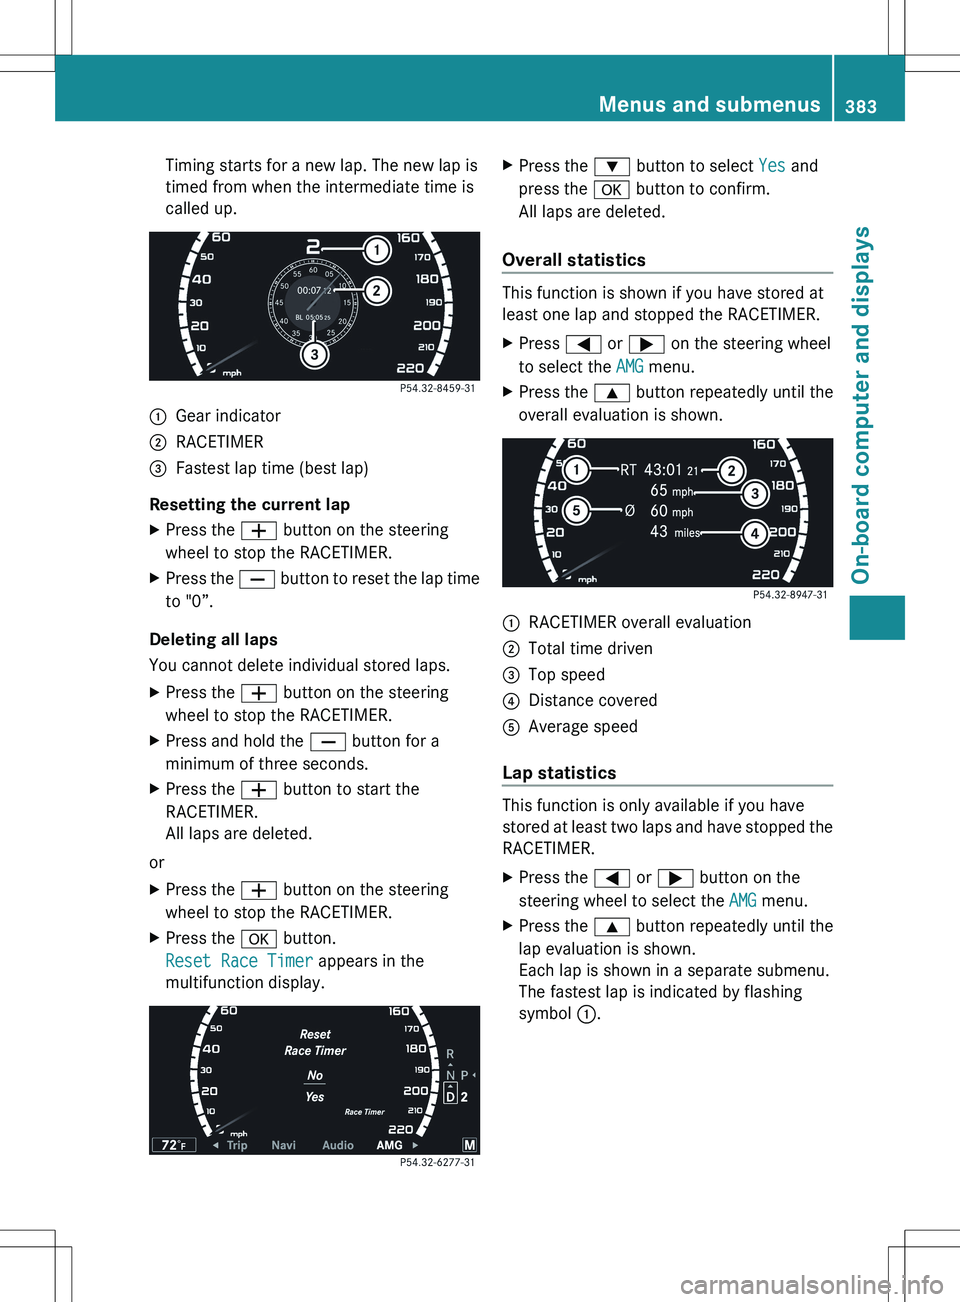
Timing starts for a new lap. The new lap is
timed from when the intermediate time is
called up.:Gear indicator;RACETIMER=Fastest lap time (best lap)
Resetting the current lap
XPress the W button on the steering
wheel to stop the RACETIMER.XPress the X button to reset the lap time
to "0”.
Deleting all laps
You cannot delete individual stored laps.
XPress the W button on the steering
wheel to stop the RACETIMER.XPress and hold the X button for a
minimum of three seconds.XPress the W button to start the
RACETIMER.
All laps are deleted.
or
XPress the W button on the steering
wheel to stop the RACETIMER.XPress the a button.
Reset Race Timer appears in the
multifunction display.XPress the : button to select Yes and
press the a button to confirm.
All laps are deleted.
Overall statistics
This function is shown if you have stored at
least one lap and stopped the RACETIMER.
XPress = or ; on the steering wheel
to select the AMG menu.XPress the 9 button repeatedly until the
overall evaluation is shown.:RACETIMER overall evaluation;Total time driven=Top speed?Distance coveredAAverage speed
Lap statistics
This function is only available if you have
stored at least two laps and have stopped the
RACETIMER.
XPress the = or ; button on the
steering wheel to select the AMG menu.XPress the 9 button repeatedly until the
lap evaluation is shown.
Each lap is shown in a separate submenu.
The fastest lap is indicated by flashing
symbol :.Menus and submenus383On-board computer and displaysZ
Page 387 of 536
While the on-board computer reads in the SIM
card:
R you can dial a telephone number from the
redial list ( Calls Dialed list).
R you can dial a telephone number from the
telephone book stored in COMAND.
R the multifunction display shows the
Reading data... display message below
the phone book entries.
When the multifunction display shows the
Updating data... display message,
COMAND has finished importing data. The
multifunction display then shows all the
phone book entries in COMAND and the
mobile phone.XPress the = or ; button on the
steering wheel to select the Telephone
menu.XPress the 9, : or a button to call
up the phone book.XPress the 9 or : button to select the
desired name.
To scroll rapidly, press and hold the :
or 9 button for longer than one second.
After skipping eight entries, the rapid scroll
speeds up.
Rapid scrolling stops when you release the
button or reach the end of the list.XIf only one telephone number is stored
for a name: press the 6 or a button
to start dialing.
or
XIf there is more than one number for a
particular name: press the 6 or a
button to display the numbers.XPress the 9 or : button to select the
number you want to dial.XPress the 6 or a button to start
dialing.
or
XIf you do not want to make a call: press
the ~ or % button.Redialing
The on-board computer saves the last names
or numbers dialed in the redial memory
( Calls Dialed list).
XPress the = or ; button on the
steering wheel to select the Telephone
menu.XPress the 6 button to switch to the
redial memory.XPress the 9 or : button to select the
desired name or number.
To scroll rapidly, press and hold the :
or 9 button for longer than one second.XPress the 6 or a button to start
dialing.
or
XIf you do not want to make a call: press
the ~ or % button.
Assistance menu
Showing the distance display
This function is only available with
DISTRONIC PLUS.
XPress the = or ; button on the
steering wheel to select the DriveAssist
menu.XPress the 9 or : button to select
Distance Display .XPress a.
The DISTRONIC PLUS distance display
( Y page 343) appears in the multifunction
display.Menus and submenus385On-board computer and displaysZ
Page 462 of 536
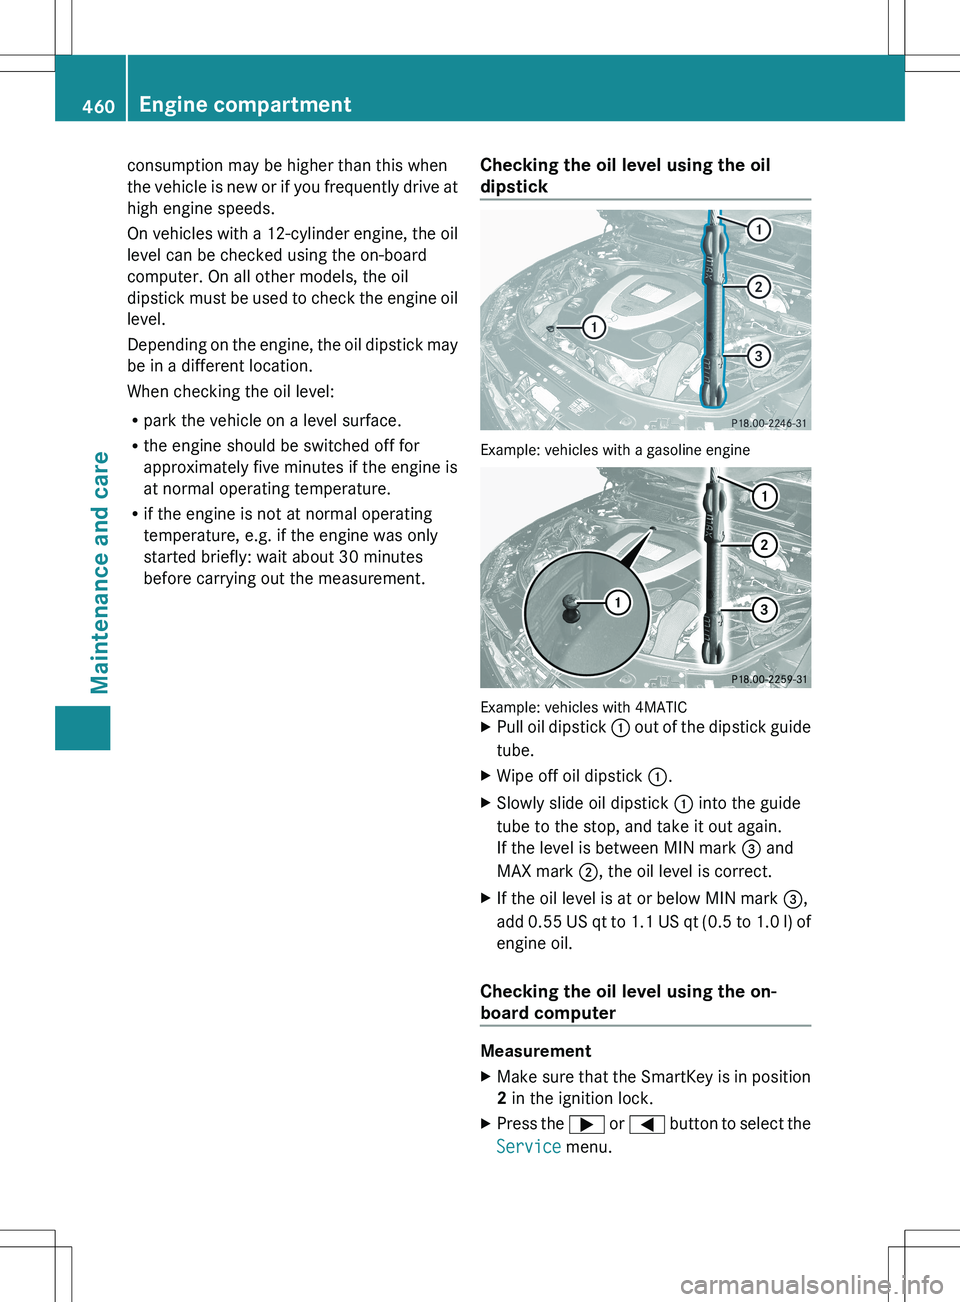
consumption may be higher than this when
the vehicle is new or if you frequently drive at
high engine speeds.
On vehicles with a 12-cylinder engine, the oil
level can be checked using the on-board
computer. On all other models, the oil
dipstick must be used to check the engine oil
level.
Depending on the engine, the oil dipstick may
be in a different location.
When checking the oil level:
R park the vehicle on a level surface.
R the engine should be switched off for
approximately five minutes if the engine is
at normal operating temperature.
R if the engine is not at normal operating
temperature, e.g. if the engine was only
started briefly: wait about 30 minutes
before carrying out the measurement.Checking the oil level using the oil
dipstick
Example: vehicles with a gasoline engine
Example: vehicles with 4MATIC
XPull oil dipstick : out of the dipstick guide
tube.XWipe off oil dipstick :.XSlowly slide oil dipstick : into the guide
tube to the stop, and take it out again.
If the level is between MIN mark = and
MAX mark ;, the oil level is correct.XIf the oil level is at or below MIN mark =,
add 0.55 US qt to 1.1 US qt ( 0.5 to 1.0 l) of
engine oil.
Checking the oil level using the on-
board computer
Measurement
XMake sure that the SmartKey is in position
2 in the ignition lock.XPress the ; or = button to select the
Service menu.460Engine compartmentMaintenance and care
Page 466 of 536
XPark the vehicle on a level surface.
Only check the coolant level when the
vehicle is on a level surface and the engine
has cooled down.XTurn the SmartKey to position 2 in the
ignition lock ( Y page 307).
On vehicles with KEYLESS-GO, press the
Start/Stop button twice ( Y page 307).XCheck the coolant temperature display in
the instrument cluster.
The coolant temperature must be below
158 ‡ (70 †).XTurn the SmartKey to position
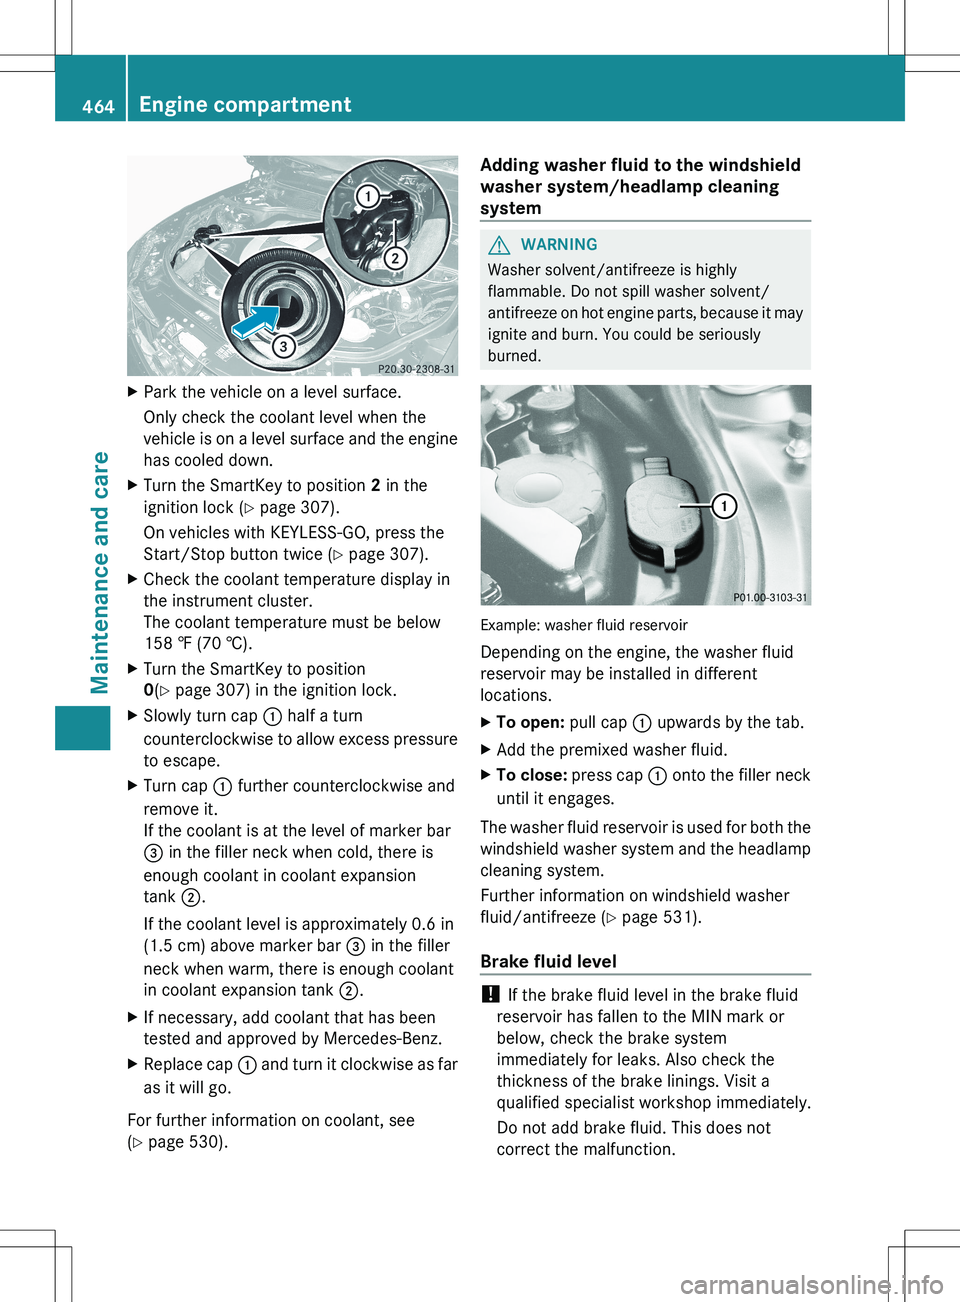
0 (Y page 307) in the ignition lock.XSlowly turn cap : half a turn
counterclockwise to allow excess pressure
to escape.XTurn cap : further counterclockwise and
remove it.
If the coolant is at the level of marker bar
= in the filler neck when cold, there is
enough coolant in coolant expansion
tank ;.
If the coolant level is approximately 0.6 in
(1.5 cm) above marker bar = in the filler
neck when warm, there is enough coolant
in coolant expansion tank ;.XIf necessary, add coolant that has been
tested and approved by Mercedes-Benz.XReplace cap : and turn it clockwise as far
as it will go.
For further information on coolant, see
( Y page 530).
Adding washer fluid to the windshield
washer system/headlamp cleaning
systemGWARNING
Washer solvent/antifreeze is highly
flammable. Do not spill washer solvent/
antifreeze on hot engine parts, because it may
ignite and burn. You could be seriously
burned.
Example: washer fluid reservoir
Depending on the engine, the washer fluid
reservoir may be installed in different
locations.
XTo open: pull cap : upwards by the tab.XAdd the premixed washer fluid.XTo close: press cap : onto the filler neck
until it engages.
The washer fluid reservoir is used for both the
windshield washer system and the headlamp
cleaning system.
Further information on windshield washer
fluid/antifreeze ( Y page 531).
Brake fluid level
! If the brake fluid level in the brake fluid
reservoir has fallen to the MIN mark or
below, check the brake system
immediately for leaks. Also check the
thickness of the brake linings. Visit a
qualified specialist workshop immediately.
Do not add brake fluid. This does not
correct the malfunction.
464Engine compartmentMaintenance and care