2012 MERCEDES-BENZ S-CLASS SEDAN phone
[x] Cancel search: phonePage 129 of 536
For example, the "Navi" function can be used
from the driver's side while the "Video"
function is used on the front-passenger side.
Use the remote control to operate COMAND
from the front-passenger side with
SPLITVIEW.
Please bear the following in mind
R Your vehicle may be equipped with
SPLITVIEW, depending on its date of
production. The use of SPLITVIEW is
currently not permitted in the following
states: AL, AZ, CO, IL, LA, MA, MD, NH, PA,
VA, VT, WA, WI, and WV or in the Canadian
provinces of Manitoba, Newfoundland,
New Brunswick, and Prince Edward Island.
It is the driver's responsibility to observe
ALL regional legally prescribed regulations.
If your vehicle is registered in a state or
province in which SPLITVIEW is not
approved, this function must be
deactivated. Please contact an authorized
specialist dealer to check whether
SPLITVIEW is approved in your state or
province.
R Volume adjustment for the cordless
headphones can be carried out on the
headphones. Before putting on the
headphones, make sure that the volume
has not been set too high.
R The remote control can be used for the
volume adjustment of corded headphones.
R You can only use media from the driver's
and front-passenger sides separately if the
media are from different sources. Example:
on the driver's side, an audio CD is being
played by the DVD changer. This means
that on the front-passenger side, the DVD
changer cannot be used to play a different
disc type, for instance a video DVD.
However, other media can be used at the
same time on the front-passenger side,
including radio, memory card, MUSIC
REGISTER, Media Interface, USB or AUX.
R If you use the same medium on both sides,
settings for this medium can be carried out
from either side.R There must be intervisibility between the
headphones and the display so that
COMAND can optimally transmit music and
speech via the infrared signal on the front-
passenger's headphones. For this reason,
please also observe that the headphones
have left and right sides, and use them
correctly.
R Only entertainment functions, i.e. audio
and video, can be used separately via
SPLITVIEW.
R The multifunction steering wheel can only
be used for functions which relate to the
driver's side.
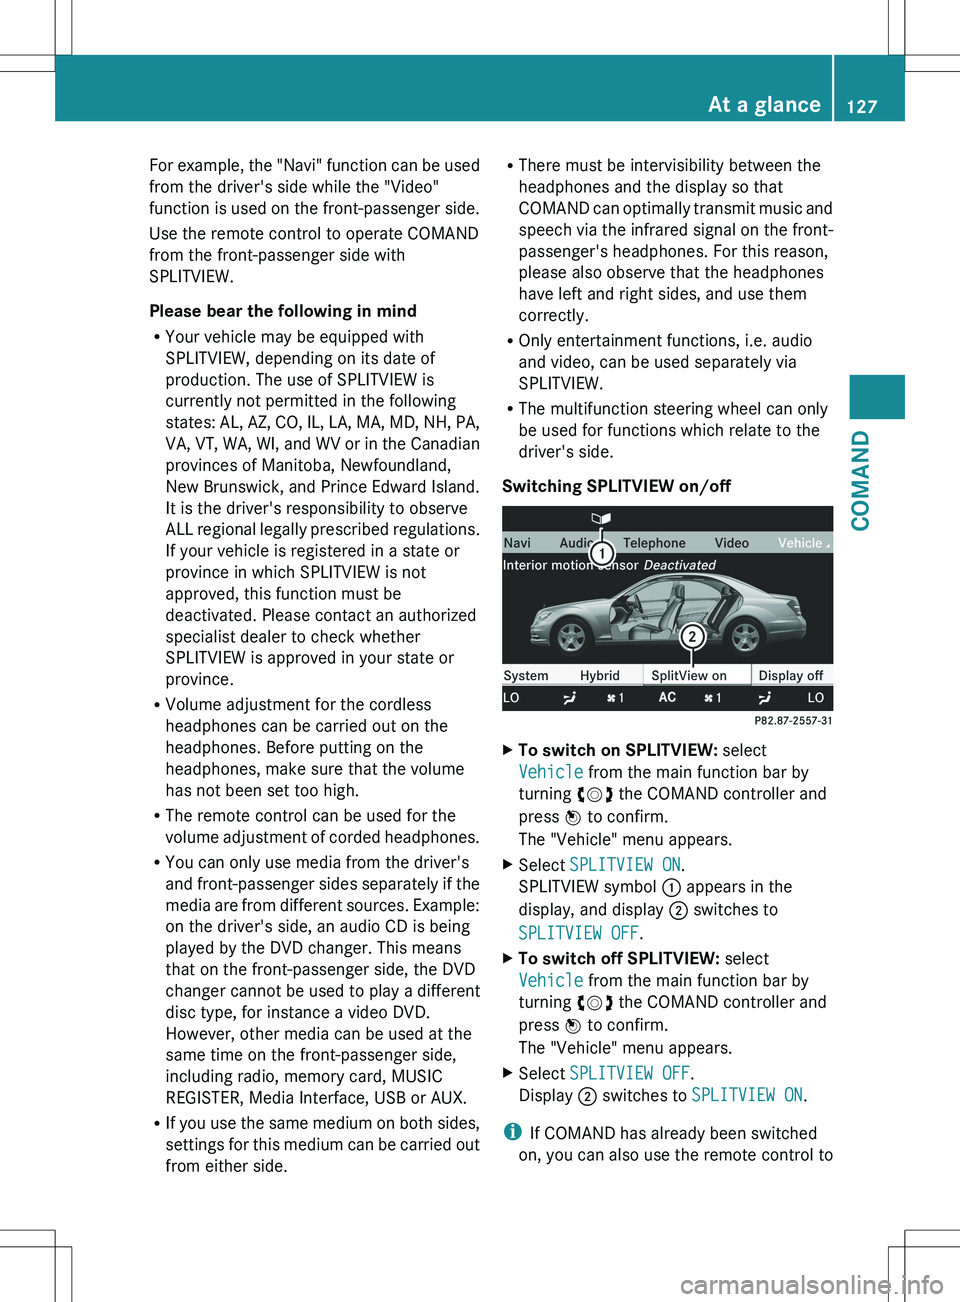
Switching SPLITVIEW on/offXTo switch on SPLITVIEW: select
Vehicle from the main function bar by
turning cVd the COMAND controller and
press W to confirm.
The "Vehicle" menu appears.XSelect SPLITVIEW ON .
SPLITVIEW symbol : appears in the
display, and display ; switches to
SPLITVIEW OFF .XTo switch off SPLITVIEW: select
Vehicle from the main function bar by
turning cVd the COMAND controller and
press W to confirm.
The "Vehicle" menu appears.XSelect SPLITVIEW OFF .
Display ; switches to SPLITVIEW ON .
i
If COMAND has already been switched
on, you can also use the remote control to
At a glance127COMANDZ
Page 130 of 536

switch SPLITVIEW on and off
( Y page 129).
The SPLITVIEW screen remains on for
approximately 30 minutes after the SmartKey
has been turned to position 0 in the ignition
lock. After this time or after the SmartKey has
been removed, the settings on the front-
passenger side are saved for approximately
30 minutes longer. After this period,
reactivation on the front-passenger side
means that the settings from the driver's side
will be used.
Cordless headphones for the front
passenger
There are different cordless headphones for
the front passenger and the rear
compartment.
The cordless headphones for the front
passenger can be identified by SPLITVIEW
symbol : on the headband.
The cordless headphones for the front
passenger cannot be used in the rear
compartment. Equally, the headphones for
the rear compartment cannot be used by the
front passenger.
Swiveling the COMAND display and
setting the brightness
You can swivel the COMAND display 5
. The
buttons are located beside the COMAND
display.
Swiveling:To swivel the display to the left;To swivel the display to the right
Setting the brightness
:Brightness of the instrument cluster
lighting;Brightness of the COMAND display
Brighter or dimmer:
XTurn control : or ; clockwise or counter-
clockwise.
i If Night View Assist Plus is activated, only
the brightness of the multifunction display
is adjusted with control :.
Display design
When the default settings are selected, the
display automatically switches between day
design and night design.
You can change these settings using
COMAND ( Y page 147).
5
Not with SPLITVIEW.128At a glanceCOMAND
Page 131 of 536

Cleaning instructions
! Do not touch the COMAND display. The
display has a very sensitive high-gloss
surface; there is a risk of scratching. If you
have to clean the screen, however, use a
mild cleaning agent and a soft, lint-free
cloth.
The display must be switched off and have
cooled down before you start cleaning. Clean
the display screen, when necessary, with a
commercially available microfiber cloth and
cleaning agent for TFT/LCD displays. Then,
dry the surface with a dry microfiber cloth.
Avoid using alcoholic thinners, gasoline or
abrasive cleaning agents. These could
damage the display surface. Do not apply
pressure to the display surface when cleaning
it, as this could cause irreversible damage.
Remote control
Overview
You can use the remote control to operate the
COMAND display, SPLITVIEW and either one
of the rear-compartment screens.
:To switch the screen on/off (Rear Seat
Entertainment System only);To switch the button lighting on/off=To select the screen for remote control
operation ( COMAND, SPLITVIEW , L
REAR and REAR R can be selected)?To select a menu or menu itemATo confirm a selection or settingBMuteCTo adjust the volume (for corded
headphones only)DCOMAND: to set the station, skip track,
fast forward/rewind, for example. Rear
Seat Entertainment System: skip track,
fast forward/rewindECOMAND: to select a station from
presets, select a track, enter directly,
enter a phone number, for example. Rear
Seat Entertainment System: to select a
track, enter directlyFTo exit a menu (back)XPoint the remote control at the
corresponding screen and execute the
functions by pressing the corresponding
buttons.
i The remote control's function may be
restricted depending on the angle at which
it is pointed at the respective screen.
Selecting the screen for the remote
control
XTurn thumbwheel = until the desired
display is highlighted in the window.
Switching the screen on/off (Rear Seat
Entertainment System only)
If the SmartKey is in the ignition lock in
position 0 or 1 or if the SmartKey is not in the
ignition lock, the rear screens will switch off
after 30 minutes. Before the screens switch
off, they show a message to this effect.
You can switch the screens back on.
However, this will discharge the starter
battery.
At a glance129COMANDZ
Page 132 of 536

XPoint the remote control at the rear-
compartment screen which has been
selected for remote operation.XPress button : on the remote control.
The respective rear screen switches on or
off.
i You can only switch the screens on using
the remote control if the ignition is
switched on.
Switching the button lighting on/off
XPress button ; on the remote control.
Depending on the previous status, the
button lighting is switched on or off.
i If you do not use the remote control for
about 15 seconds, the button lighting
switches off automatically.
Mute
XPress button B on the remote control.
The sound is switched on/off.
Adjusting the volume
This function is available for SPLITVIEW and
for the Rear Seat Entertainment System in
conjunction with corded headphones.
XPress one of buttons C on the remote
control.
The volume of the currently selected audio
or video source changes.
For COMAND, you can also adjust the
volume for phone calls and navigation
messages.
Selecting a menu/menu item and
confirming your selection
XPress the =;9: buttons to
select the menu/menu item and press the
9 button to confirm.130At a glanceCOMAND
Page 133 of 536
Functions with the E and F button
You can use the remote control to execute the same functions as the COMAND control panel.
ModeFunctionAudio modeSelects a station using the station search function ( Y page 216)Selects a track by skipping to a track ( Y page 229)Fast forward/rewind ( Y page 230)Video modeSelects a scene or chapter (video DVD mode) ( Y page 247)Fast-forward/rewind (video DVD mode) ( Y page 247)
Functions of the number keypad
You can use the remote control to execute the same functions as the COMAND control panel.
ModeFunctionAudio modeSelects stations via the station presets ( Y page 216)Sets stations by entering the frequency manually ( Y page 217)Stores stations manually ( Y page 217)Selects a track ( Y page 229)Selects a data medium via the media list ( Y page 228)Telephone modeTelephone number entry ( Y page 204)Character entryEnters characters (direct entry) ( Y page 134)Operating COMAND
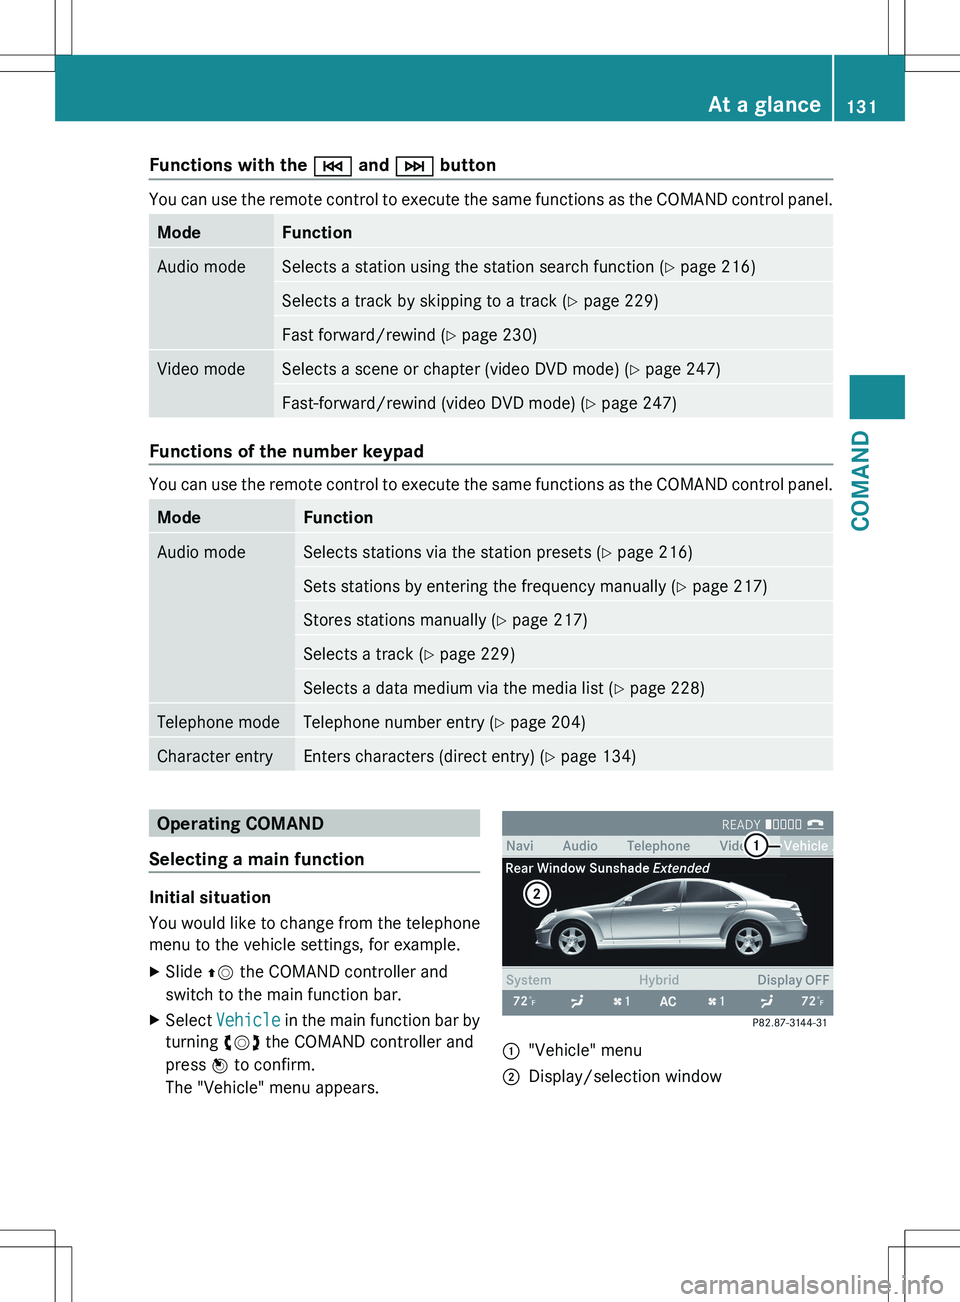
Selecting a main function
Initial situation
You would like to change from the telephone
menu to the vehicle settings, for example.
XSlide ZV the COMAND controller and
switch to the main function bar.XSelect Vehicle in the main function bar by
turning cVd the COMAND controller and
press W to confirm.
The "Vehicle" menu appears.:"Vehicle" menu;Display/selection windowAt a glance131COMANDZ
Page 134 of 536

Calling up the menu of a main function:To call up the audio menu;Main function bar
If one of the main functions navigation, audio,
telephone or video is switched on,
triangle : appears next to the entry. You can
now select an associated menu.
The following example illustrates how to call
up the audio menu.
XPress the R function button.
or
XSelect Audio in the main function bar by
sliding ZV the COMAND controller and
press W to confirm.
The Audio menu appears.:Current audio operating mode;Main function bar=Audio menu
The # dot indicates the current audio mode.
XSelect another audio mode, e.g. Radio, by
turning cVd the COMAND controller and
press W to confirm.Selecting a menu item
The following example describes how to
select a station from the station presets in
radio mode.
XPress the R function button.XSelect Presets by sliding VÆ and turning
cVd the COMAND controller and press
W to confirm.
The station preset memory appears.:Selection barXSelect a station by turning cVd the
COMAND controller and press W to
confirm.
The station is set.
Example of operation
Initial situation
You would like to switch from the vehicle
function to the radio function and select a
station from the station list, for example.
The following operating example describes
how to:
R call up the audio function
R switch on radio mode
R set a station.
132At a glanceCOMAND
Page 136 of 536
You can enter the characters using either the
character bar or the number keypad. In the
selection list, you select an entry to copy it to
the address entry menu.
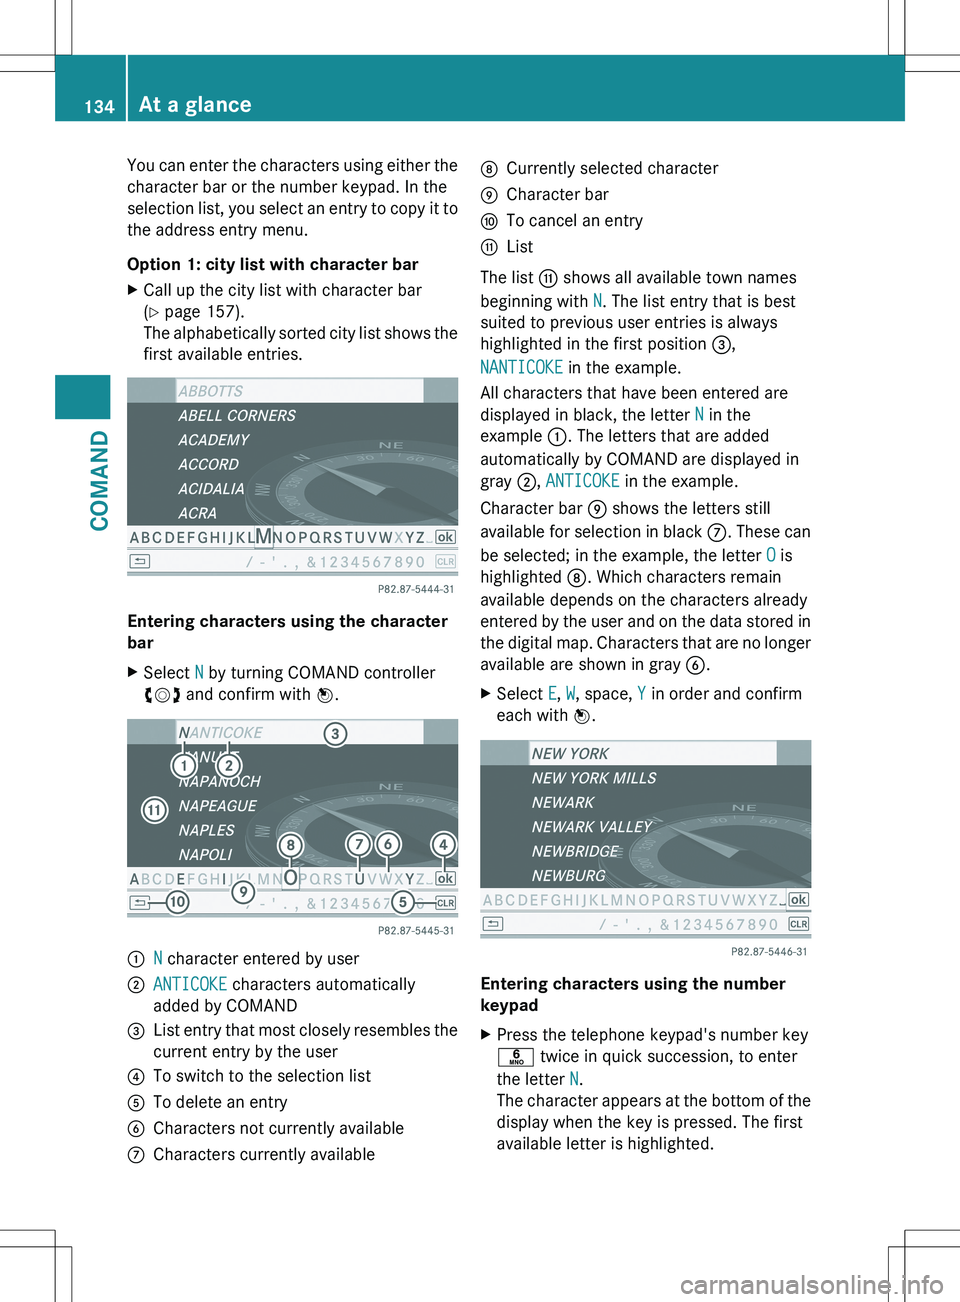
Option 1: city list with character barXCall up the city list with character bar
( Y page 157).
The alphabetically sorted city list shows the
first available entries.
Entering characters using the character
bar
XSelect N by turning COMAND controller
cVd and confirm with W.:N character entered by user;ANTICOKE characters automatically
added by COMAND=List entry that most closely resembles the
current entry by the user?To switch to the selection listATo delete an entryBCharacters not currently availableCCharacters currently availableDCurrently selected characterECharacter barFTo cancel an entryGList
The list G shows all available town names
beginning with N. The list entry that is best
suited to previous user entries is always
highlighted in the first position =,
NANTICOKE in the example.
All characters that have been entered are
displayed in black, the letter N in the
example :. The letters that are added
automatically by COMAND are displayed in
gray ;, ANTICOKE in the example.
Character bar E shows the letters still
available for selection in black C. These can
be selected; in the example, the letter O is
highlighted D. Which characters remain
available depends on the characters already
entered by the user and on the data stored in
the digital map. Characters that are no longer
available are shown in gray B.
XSelect E, W , space, Y in order and confirm
each with W.
Entering characters using the number
keypad
XPress the telephone keypad's number key
p twice in quick succession, to enter
the letter N.
The character appears at the bottom of the
display when the key is pressed. The first
available letter is highlighted.134At a glanceCOMAND
Page 138 of 536
iYou will find further information in the
"Destination entry" section ( Y page 157).
Entering characters in the address and
the phone book
Introduction
The following section describes how to enter
characters in the phone book/address book
when creating a new entry.
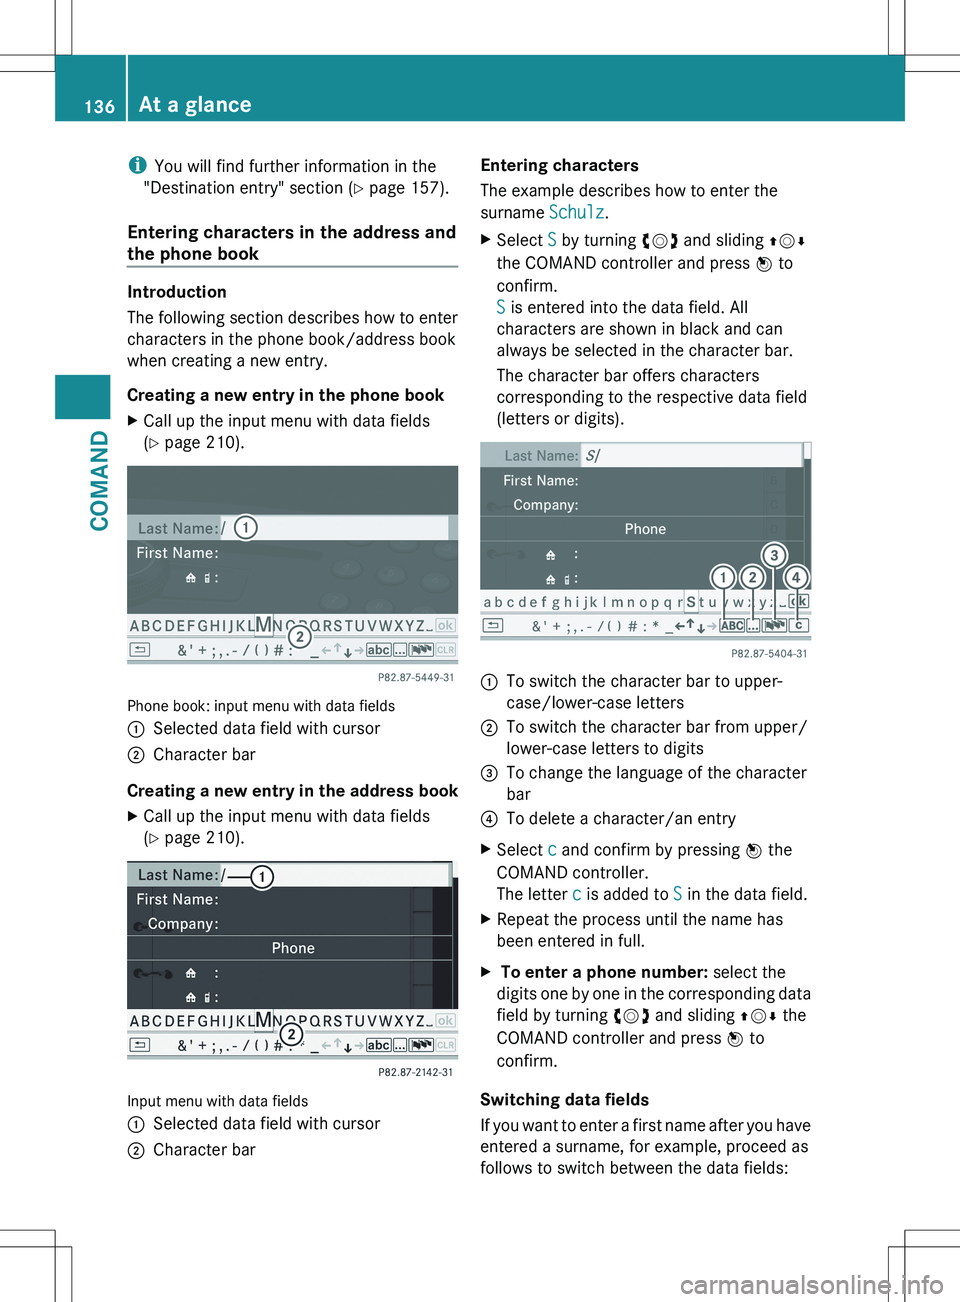
Creating a new entry in the phone book
XCall up the input menu with data fields
( Y page 210).
Phone book: input menu with data fields
:Selected data field with cursor;Character bar
Creating a new entry in the address book
XCall up the input menu with data fields
( Y page 210).
Input menu with data fields
:Selected data field with cursor;Character barEntering characters
The example describes how to enter the
surname Schulz.XSelect S by turning cVd and sliding ZVÆ
the COMAND controller and press W to
confirm.
S is entered into the data field. All
characters are shown in black and can
always be selected in the character bar.
The character bar offers characters
corresponding to the respective data field
(letters or digits).:To switch the character bar to upper-
case/lower-case letters;To switch the character bar from upper/
lower-case letters to digits=To change the language of the character
bar?To delete a character/an entryXSelect c and confirm by pressing W the
COMAND controller.
The letter c is added to S in the data field.XRepeat the process until the name has
been entered in full.X To enter a phone number: select the
digits one by one in the corresponding data
field by turning cVd and sliding ZVÆ the
COMAND controller and press W to
confirm.
Switching data fields
If you want to enter a first name after you have
entered a surname, for example, proceed as
follows to switch between the data fields:
136At a glanceCOMAND