2012 MERCEDES-BENZ S-CLASS SEDAN language
[x] Cancel search: languagePage 213 of 536
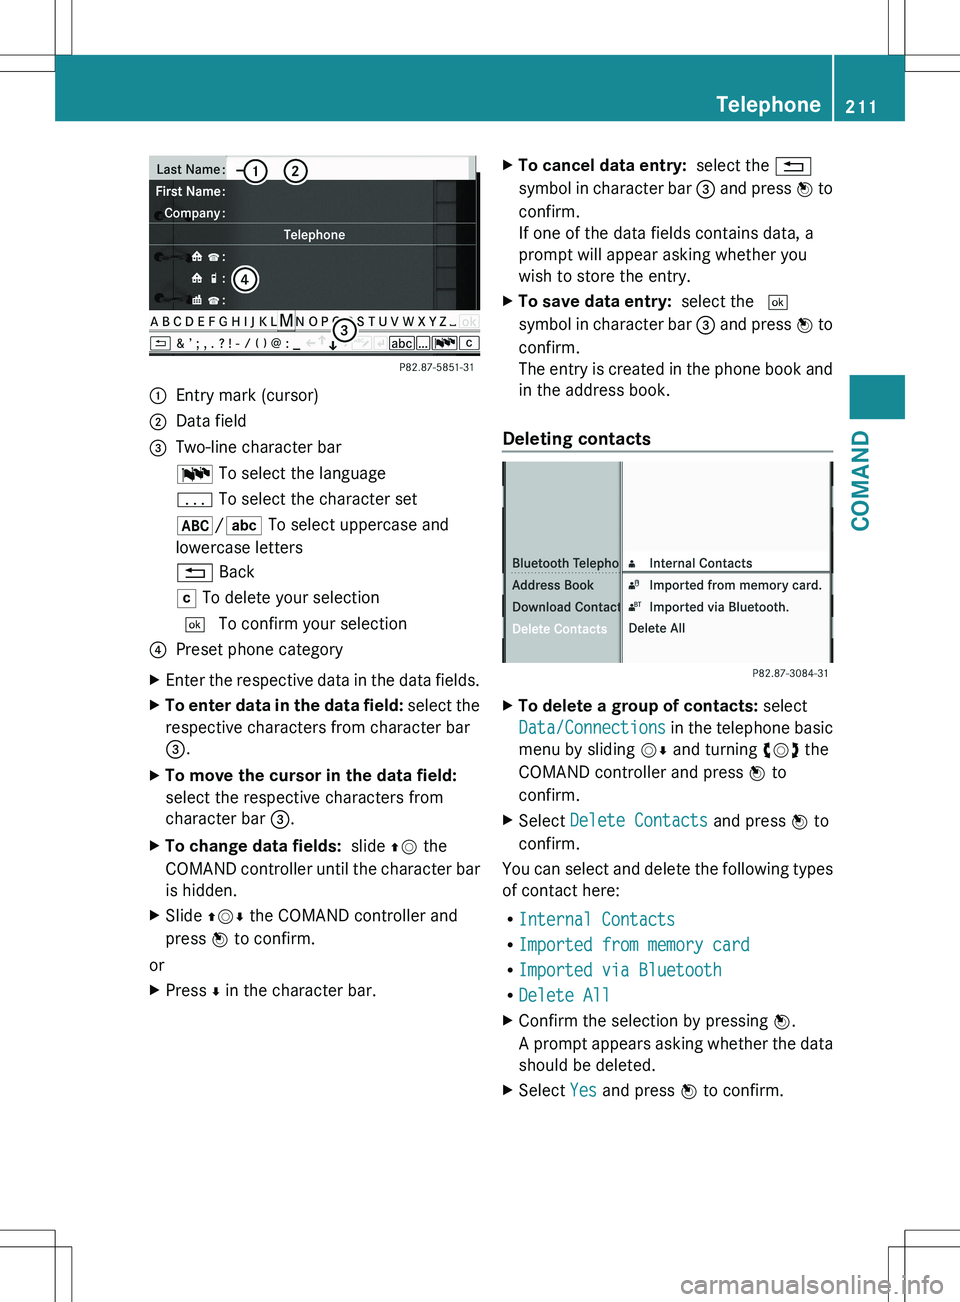
:Entry mark (cursor);Data field=Two-line character barB To select the languagep To select the character set*/E To select uppercase and
lowercase letters% BackF To delete your selection¬ To confirm your selection?Preset phone categoryXEnter the respective data in the data fields.XTo enter data in the data field: select the
respective characters from character bar
= .XTo move the cursor in the data field:
select the respective characters from
character bar =.XTo change data fields: slide ZV the
COMAND controller until the character bar
is hidden.XSlide ZVÆ the COMAND controller and
press W to confirm.
or
XPress Æ in the character bar.XTo cancel data entry: select the %
symbol in character bar = and press W to
confirm.
If one of the data fields contains data, a
prompt will appear asking whether you
wish to store the entry.XTo save data entry: select the ¬
symbol in character bar = and press W to
confirm.
The entry is created in the phone book and
in the address book.
Deleting contacts
XTo delete a group of contacts: select
Data/Connections in the telephone basic
menu by sliding VÆ and turning cVd the
COMAND controller and press W to
confirm.XSelect Delete Contacts and press W to
confirm.
You can select and delete the following types
of contact here:
R Internal Contacts
R Imported from memory card
R Imported via Bluetooth
R Delete All
XConfirm the selection by pressing W.
A prompt appears asking whether the data
should be deleted.XSelect Yes and press W to confirm.Telephone211COMANDZ
Page 244 of 536

Playing back the contents of a category
or folderXSelect the category or folder by turning
cVd the COMAND controller.XPress W the COMAND controller for longer
than two seconds.
The content of the category or folder
selected is played in accordance with the
playback option ( Y page 242) selected.
Alphabetical track selection
iPod ®
and MP3 players
This function is available for alphabetically
sorted categories and folders. This function
is not available for albums or playlists, for
example.
XSelect a category, e.g. Artists, by turning
cVd the COMAND controller and press
W to confirm.
The available artists are displayed.XPress the corresponding number key once
or several times to select the first letter of
the artist's name (e.g. for an artist
beginning with the letter "C", press number
key l three times).
The available letters are listed at the lower
edge of the display.
After a message, the first entry in the list
which matches the letter entered is
highlighted.
i If no corresponding entry exists, the last
entry corresponding to a previous letter is
highlighted instead.
i For iPods ®
and MP3 players, the quality
of the search results is highly dependent on
the version and language variant of the
software (e.g. iTunes ®
version) used to
populate the device.
USB mass storage device
This function is available for alphabetically
sorted directories. This function is not
available for albums or playlists, for example.
XIn a directory, press the corresponding
number key once or several times to select
the first letter of the artist's name (e.g. for
an artist beginning with the letter "C", press
number key l three times).
The available letters are listed at the lower
edge of the display.
If the directory only contains folders,
COMAND searches for folders. After a
message, the first entry which matches the
letter entered is shown at the top of the list.
If no entry matches the entered letter, the
first item in the list is the last entry to
correspond to a selection.
Selecting an active partition (USB mass
storage devices only)
You can select this function for USB mass
storage devices when the storage device is
partitioned. Up to four partitions (primary or
logical; FAT format) are supported.
i The Windows formatting program
supports FAT partitioning up to 32 GB as
standard.
XSelect Media Interface in the basic
display by sliding VÆ and turning cVd the
COMAND controller and press W to
confirm.XSelect Select Active Partition and
press W to confirm.
Playback options
The following options are available:
R Normal Track Sequence
Normal track sequence: you hear the
tracks in their normal order (e.g. numerical
or alphabetical).
R Random Tracks
All the tracks on the medium are played in
random order.
R Category Mix or Random Folder (for USB
devices if Folder has been selected)
242AudioCOMAND
Page 250 of 536

It may also be possible to select the scene/
chapter from within the menu stored on the
DVD.XTo skip forwards or back: turn cVd or
slide XVY the COMAND controller.
The control menu (Y page 246) appears for
approximately eight seconds.XOn the multifunction steering wheel:
switch on video DVD mode in COMAND
( Y page 246).XUse the = or ; button to select the
Audio menu.XPress 9 or : to select a scene/
chapter.
If you press and hold 9 or : for an
extended period, rapid scroll begins.
Selecting a film/title
This function is only available if the DVD is
divided into several films/tracks. If the DVD
contains several films, these can be selected
directly. A film can be selected either when
the DVD is being played back or when it is
stopped.
The film can also be selected from the menu
on the DVD itself.
XPress W the COMAND controller to show
the menu.XSelect DVD-V by turning cVd the COMAND
controller and press W to confirm.XSelect DVD Functions and press W to
confirm.
A menu appears.XSelect Title Selection by turning cVd
the COMAND controller and press W to
confirm.XSelect a film/title and press W to confirm.
DVD menu
Calling up the DVD menu
The DVD menu is the menu stored on the DVD
itself. It is structured in various ways
according to the individual DVD and permits
certain actions and settings.
In the case of multi-language DVDs, for
example, you can set the language in the DVD
menu.
XPress W the COMAND controller to show
the menu.XSelect DVD-V in the menu by turning cVd
the COMAND controller and press W to
confirm.XSelect DVD Functions and press W to
confirm.XSelect Menu and press W to confirm.
The DVD menu appears.
Selecting menu items in the DVD menu
XSelect a menu item by sliding ZVÆ or
turning XVY the COMAND controller and
press W to confirm.
The menu appears.
i Menu items that cannot be selected are
grayed out.
XTo reconfirm your selection: confirm
Select by pressing W.248VideoCOMAND
Page 251 of 536
COMAND executes the action.
Make a selection from the further options,
if necessary.
COMAND then switches back to the DVD
menu.
i Depending on the DVD, it is possible that
the Back (to the movie) , Play , Stop ,
C , D or Go up menu item may not
be operative or operative only at certain
points of the DVD. To indicate this, the
K symbol is shown in the display.
Stopping a film or skipping to the
beginning or end of a scene
XSelect any menu item from the DVD menu.
The menu appears.XTo stop the film: select the Stop menu
item and press W to confirm.XTo skip to the end of a scene: select the
D menu item and press W to confirm.XTo skip to the beginning of a scene:
select the C menu item and press W to
confirm.
Moving up one level in the DVD menu
XPress the % back button.
or
XSelect the corresponding menu item in the
DVD menu and press W the COMAND
controller to confirm.
or
XSelect any menu item in the DVD menu and
press W the COMAND controller to
confirm.XSelect Go up and press W to confirm.
Back to the film
XPress the % back button repeatedly
until you see the movie.
or
XSelect the corresponding menu item from
the DVD menu.XSelect the Back (to the movie) menu
item in the menu and press W to confirm.Setting the language and audio format
This function is not available on all DVDs. If it
is available, you can set the DVD menu
language, the audio language or the audio
format. The number of settings is determined
by the DVD content. It is possible that the
settings may also be accessed in the DVD
menu ( Y page 248).
XPress W the COMAND controller to show
the menu.XSelect DVD-V in the menu by turning cVd
the COMAND controller and press W to
confirm.XSelect DVD Functions and press W to
confirm.XSelect Audio Language and press W to
confirm.
In both cases, a menu appears after a few
seconds. The # dot in front of an entry
indicates the currently selected language.XSelect a setting by turning cVd the
COMAND controller and press W to
confirm.XTo exit the menu: slide XVY the COMAND
controller.
Subtitles and camera angle
These functions are not available on all DVDs.
The number of subtitle languages and camera
angles available depends on the content of
the DVD. It is possible that the settings may
also be accessed in the DVD menu
( Y page 248).
XPress W the COMAND controller to show
the menu.XSelect DVD-V in the menu by turning cVd
the COMAND controller and press W to
confirm.Video249COMANDZ
Page 255 of 536
XTo set operation via the main
loudspeakers: press the R function
button on the center console once or twice.XSelect Audio by sliding ZV the COMAND
controller and press W to confirm.
The Audio menu appears.XSelect Rear by turning cVd the COMAND
controller and press W to confirm.
i
The headphones' volume setting does not
affect the main loudspeakers.
Adjusting the sound settings
You can select the sound settings in the audio
CD/DVD/MP3, video DVD and AUX modes.
XSwitch on an audio operating mode (e.g.
audio CD mode).XSelect Treble or Bass using
the :=; buttons on the remote
control and press the 9 button to confirm.
An adjustment scale appears.XSelect a setting using the 9:
buttons and press the 9 button to confirm.
Multiple users
Simultaneous use of the rear-
compartment disc drive
The two rear-compartment screens can be
operated almost entirely independently from
one another. However, there can be a conflict
in some menus if the two screens are used
simultaneously.
If the rear-compartment disc drive is being
used for both screens simultaneously,
selecting certain menus or settings on one of
the screens also affects the other screen.
The following functions affect both screens:
R changing playback options
R selecting a track (from a track list or folder)
R using the play, pause and stop functions
R fast forwarding/rewinding or scrolling
R calling up the DVD menu and navigating
within it
R setting the language, subtitles and camera
angle
R calling up interactive DVD content
The following functions affect only one
screen:
R audio and video functions as well as picture
settings
R switching between full screen and the
menu
Switching between operating modes
When you exit an operating mode (e.g. audio
CD mode), the current setting is saved. If you
call up this operating mode again later, there
are two possibilities:
R the operating mode has been changed on
the other screen.
R the operating mode has not been changed.
In the first case, the operating mode appears
as it is on the other screen.
In the second case, the setting appears on the
screen as it was when you last exited the
operating mode.
Picture settings
Overview
You can select these settings in video DVD
and AUX mode. Instructions for AUX mode
are detailed later ( Y page 263).
Adjusting the brightness, contrast and
color
XSwitch on video DVD mode ( Y page 246).XTo show the menu: press the 9 button
on the remote control.
or
XSelect Menu while the navigation menu
( Y page 246) is shown and press the 9
button to confirm.XIn both cases, select Video DVD using
the :=; buttons and press the
9 button to confirm.Rear Seat Entertainment System253COMANDZ
Page 256 of 536

XSelect Brightness , Contrast , Color or
Auto using the 9: buttons and
press 9 to confirm.
An adjustment scale appears.XSelect a setting using the 9:
buttons and press the 9 button to confirm.
Changing the picture format
XTo show the menu: press the 9 button
on the remote control.
or
XSelect Menu while the navigation menu
( Y page 246) is shown and press the 9
button to confirm.XSelect Video DVD using
the :=; buttons and press the
9 button to confirm.
The ä symbol in front of the Auto, 16:9
Optimized , 4:3 or Widescreen menu item
indicates the format currently set.XSelect a format using the 9:
buttons and press the 9 button to confirm.
System settings
Note
You can adjust almost all system settings
individually for each screen without affecting
the other screen. You make these settings
using the remote control.
Selecting the display language
XSelect System using the 9=;
buttons on the remote control and press
the 9 button to confirm.
You see the system menu on the selected
rear screen.XSelect Settings using the : button
and confirm with the 9 button.XSelect Language using the 9:
buttons and press the 9 button to confirm.
The list of languages appears. The # dot
indicates the current setting.XSelect a language using the 9:
buttons and press the 9 button to confirm.
The Rear Seat Entertainment System
activates the respective language.
Switching the display design
XSelect Settings using the : button
and confirm with the 9 button.XSelect Day Mode , Night Mode or
Automatic using the 9: buttons
and press the 9 button to confirm.
The ä icon indicates the current setting.DesignExplanationDay ModeThe display is set
permanently to day
design.Night ModeThe display is set
permanently to night
design.AutomaticThe display design
changes depending on
the vehicle instrument
cluster illumination.254Rear Seat Entertainment SystemCOMAND
Page 264 of 536
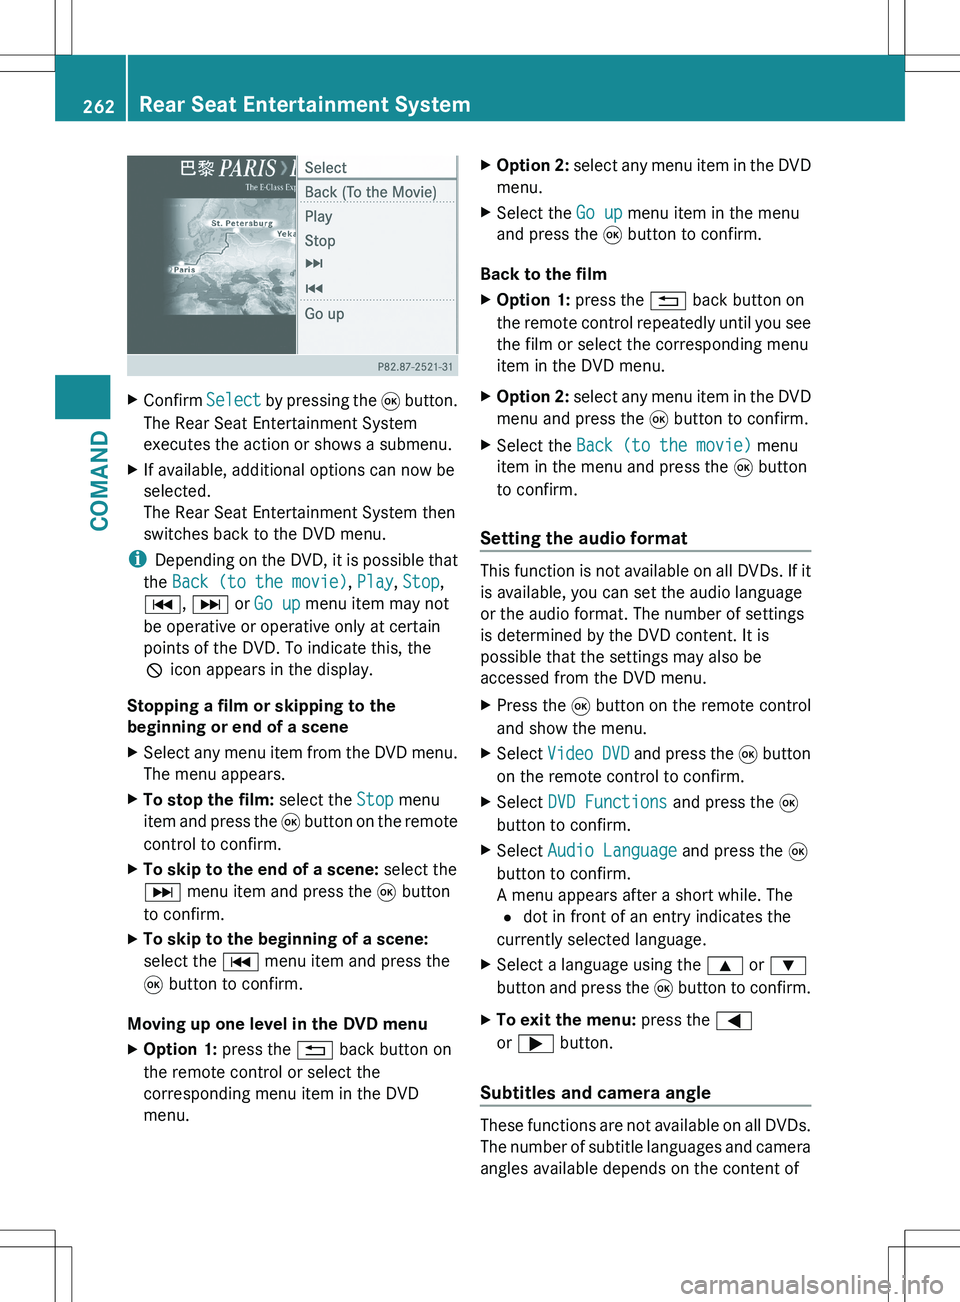
XConfirm Select by pressing the 9 button.
The Rear Seat Entertainment System
executes the action or shows a submenu.XIf available, additional options can now be
selected.
The Rear Seat Entertainment System then
switches back to the DVD menu.
i Depending on the DVD, it is possible that
the Back (to the movie) , Play , Stop ,
C , D or Go up menu item may not
be operative or operative only at certain
points of the DVD. To indicate this, the
K icon appears in the display.
Stopping a film or skipping to the
beginning or end of a scene
XSelect any menu item from the DVD menu.
The menu appears.XTo stop the film: select the Stop menu
item and press the 9 button on the remote
control to confirm.XTo skip to the end of a scene: select the
D menu item and press the 9 button
to confirm.XTo skip to the beginning of a scene:
select the C menu item and press the
9 button to confirm.
Moving up one level in the DVD menu
XOption 1: press the % back button on
the remote control or select the
corresponding menu item in the DVD
menu.XOption 2: select any menu item in the DVD
menu.XSelect the Go up menu item in the menu
and press the 9 button to confirm.
Back to the film
XOption 1: press the % back button on
the remote control repeatedly until you see
the film or select the corresponding menu
item in the DVD menu.XOption 2: select any menu item in the DVD
menu and press the 9 button to confirm.XSelect the Back (to the movie) menu
item in the menu and press the 9 button
to confirm.
Setting the audio format
This function is not available on all DVDs. If it
is available, you can set the audio language
or the audio format. The number of settings
is determined by the DVD content. It is
possible that the settings may also be
accessed from the DVD menu.
XPress the 9 button on the remote control
and show the menu.XSelect Video DVD and press the 9 button
on the remote control to confirm.XSelect DVD Functions and press the 9
button to confirm.XSelect Audio Language and press the 9
button to confirm.
A menu appears after a short while. The
# dot in front of an entry indicates the
currently selected language.XSelect a language using the 9 or :
button and press the 9 button to confirm.XTo exit the menu: press the =
or ; button.
Subtitles and camera angle
These functions are not available on all DVDs.
The number of subtitle languages and camera
angles available depends on the content of
262Rear Seat Entertainment SystemCOMAND