2012 MERCEDES-BENZ S-CLASS SEDAN glove box
[x] Cancel search: glove boxPage 245 of 536
The tracks in the currently active category
or folder, including any subfolders, are
played in random order.
i For USB devices, the random playlists
offer a maximum of 300 tracks chosen at
random.XTo select a playback option: select
Media Interface in the basic display by
sliding VÆ and turning cVd the COMAND
controller and press W to confirm.
The options list appears. The # dot
indicates the option selected.XSelect an option and press W to confirm.
Separate USB connection
In addition to the USB connection on the
Media Interface, there is another USB
connection in the glove box. This connection
can also be used to play audio files.
Electrical consumption at this connection
must not exceed a continuous current of
500 mA. If the electrical consumption is
higher, use a separate source to provide
power for the USB device (e.g.
12 V power supply).
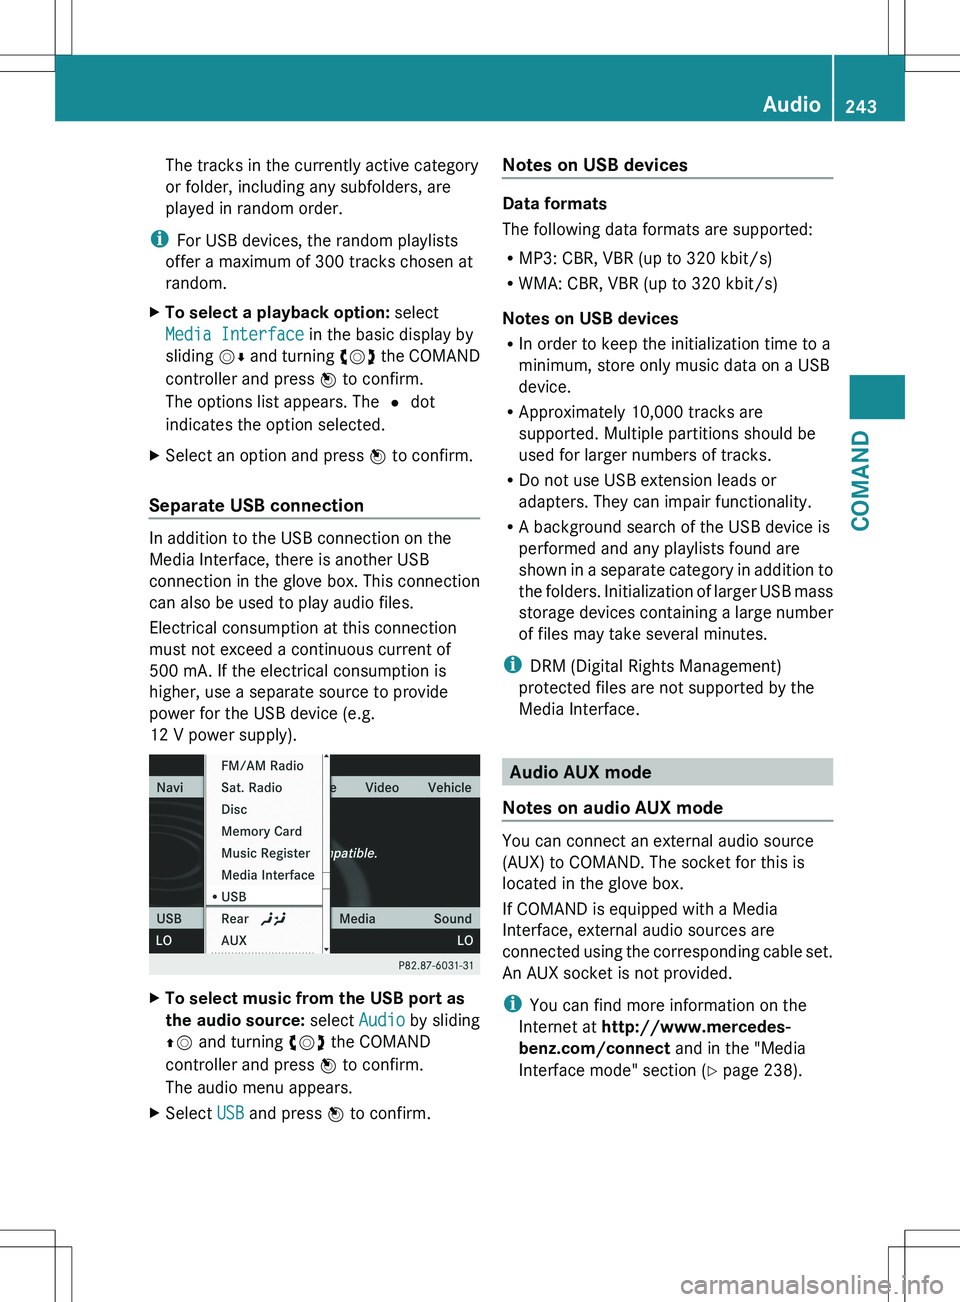
XTo select music from the USB port as
the audio source: select Audio by sliding
ZV and turning cVd the COMAND
controller and press W to confirm.
The audio menu appears.XSelect USB and press W to confirm.Notes on USB devices
Data formats
The following data formats are supported:
R MP3: CBR, VBR (up to 320 kbit/s)
R WMA: CBR, VBR (up to 320 kbit/s)
Notes on USB devices
R In order to keep the initialization time to a
minimum, store only music data on a USB
device.
R Approximately 10,000 tracks are
supported. Multiple partitions should be
used for larger numbers of tracks.
R Do not use USB extension leads or
adapters. They can impair functionality.
R A background search of the USB device is
performed and any playlists found are
shown in a separate category in addition to
the folders. Initialization of larger USB mass
storage devices containing a large number
of files may take several minutes.
i DRM (Digital Rights Management)
protected files are not supported by the
Media Interface.
Audio AUX mode
Notes on audio AUX mode
You can connect an external audio source
(AUX) to COMAND. The socket for this is
located in the glove box.
If COMAND is equipped with a Media
Interface, external audio sources are
connected using the corresponding cable set.
An AUX socket is not provided.
i You can find more information on the
Internet at http://www.mercedes-
benz.com/connect and in the "Media
Interface mode" section ( Y page 238).
Audio243COMANDZ
Page 252 of 536
XSelect DVD Functions and press W to
confirm.XSelect Subtitles or Camera angle and
press W to confirm.
In both cases, a menu appears. The # dot
in front of an entry indicates the current
setting.XSelect a setting by turning cVd the
COMAND controller and press W to
confirm.XTo exit the menu: slide XVY the COMAND
controller.
Interactive content
DVDs can contain interactive content (e.g. a
video game). In a video game, for example,
you may be able to influence events by
selecting and triggering actions. The type and
number of actions depend on the DVD.
XSelect an action by sliding ZVÆ or XVY the
COMAND controller and press W to
execute it.
A menu appears and the first entry,
Select , is highlighted.XPress W the COMAND controller.
AUX video mode
AUX jacks
An external video source (video AUX) can be
connected to COMAND via the media
interface (Y page 238) using the AUX jacks in
the glove box.
i In vehicles with a rear view camera, the
video AUX jack cannot be used for external
video sources.
Switching to video AUX modeXSelect Video in the main function bar by
sliding ZV and turning cVd the COMAND
controller and press W to confirm.
If video AUX mode was the last mode
selected, it will now be active.
If another video source is switched on, you
can now switch to video AUX mode in the
video menu.XSelect Video and press W to confirm.XSelect AUX and press W to confirm.
The video AUX menu appears. You will hear
and see the content of the external video
source if it is connected and switched to
playback.
For details on how to operate the external
video source, see the respective device's
operating instructions.
Showing/hiding the menu
XTo show: press W the COMAND
controller.XTo hide: slide ZV the COMAND controller
and confirm Full screen by pressing W.
Volume and sound settings
You will find details on volume ( Y page 138)
and sound ( Y page 139) settings in the "At a
glance" section.
GWARNING
External video sources may have different
volumes, which can mean that system
messages such as traffic announcements and
navigation system announcements are much
louder. If necessary, please deactivate the
system messages or adjust their volume
manually.
i In some cases, the volume of the AUX
device may be quieter or louder, or the
usual maximum possible volume cannot be
reached. On some devices, it is possible to
adjust the volume separately. In this case,
start at a medium volume and increase it
250VideoCOMAND
Page 279 of 536
XSelect Setting by sliding ZVÆ or turning
cVd the COMAND controller and press
W to confirm.
Massage function (PULSE)
The massage function helps you to prevent
muscle tension on long journeys.
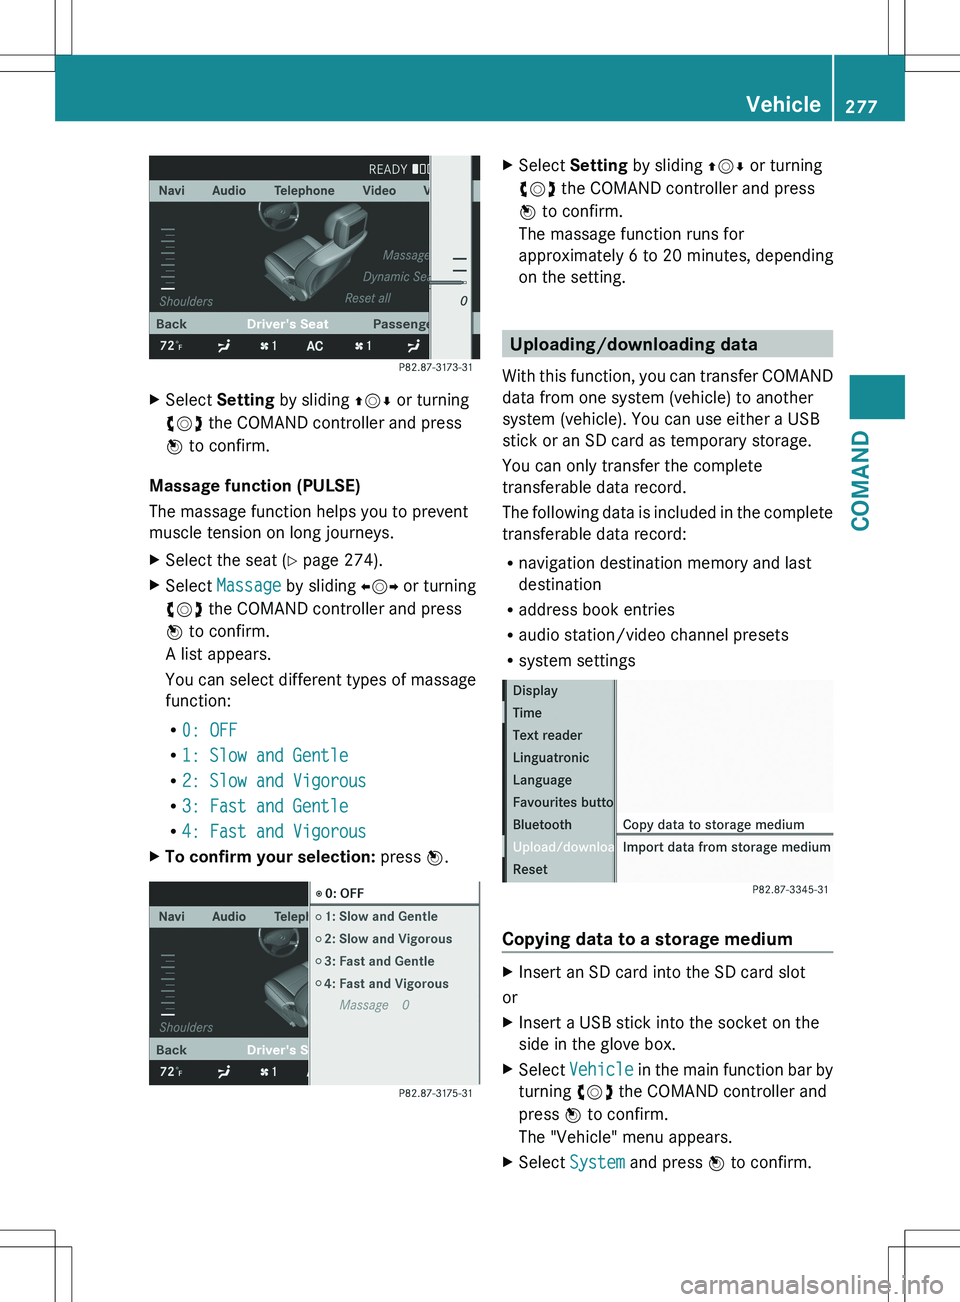
XSelect the seat ( Y page 274).XSelect Massage by sliding XVY or turning
cVd the COMAND controller and press
W to confirm.
A list appears.
You can select different types of massage
function:
R 0: OFF
R 1: Slow and Gentle
R 2: Slow and Vigorous
R 3: Fast and Gentle
R 4: Fast and VigorousXTo confirm your selection: press W.XSelect Setting by sliding ZVÆ or turning
cVd the COMAND controller and press
W to confirm.
The massage function runs for
approximately 6 to 20 minutes, depending
on the setting.
Uploading/downloading data
With this function, you can transfer COMAND
data from one system (vehicle) to another
system (vehicle). You can use either a USB
stick or an SD card as temporary storage.
You can only transfer the complete
transferable data record.
The following data is included in the complete
transferable data record:
R navigation destination memory and last
destination
R address book entries
R audio station/video channel presets
R system settings
Copying data to a storage medium
XInsert an SD card into the SD card slot
or
XInsert a USB stick into the socket on the
side in the glove box.XSelect Vehicle in the main function bar by
turning cVd the COMAND controller and
press W to confirm.
The "Vehicle" menu appears.XSelect System and press W to confirm.Vehicle277COMANDZ
Page 305 of 536
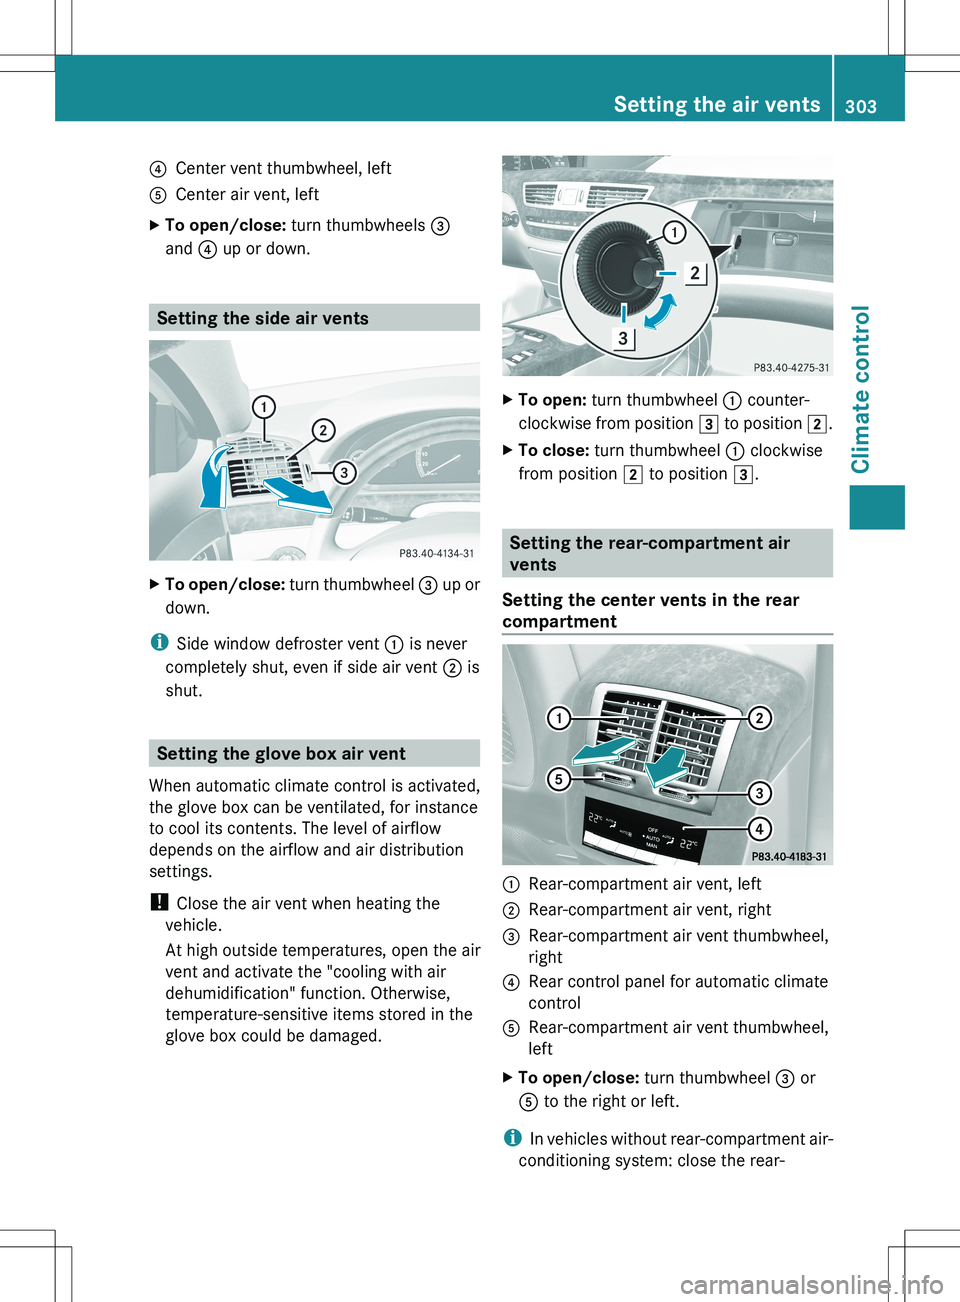
?Center vent thumbwheel, leftACenter air vent, leftXTo open/close: turn thumbwheels =
and ? up or down.
Setting the side air vents
XTo open/close: turn thumbwheel = up or
down.
i Side window defroster vent : is never
completely shut, even if side air vent ; is
shut.
Setting the glove box air vent
When automatic climate control is activated,
the glove box can be ventilated, for instance
to cool its contents. The level of airflow
depends on the airflow and air distribution
settings.
! Close the air vent when heating the
vehicle.
At high outside temperatures, open the air
vent and activate the "cooling with air
dehumidification" function. Otherwise,
temperature-sensitive items stored in the
glove box could be damaged.
XTo open: turn thumbwheel : counter-
clockwise from position 3 to position 2.XTo close: turn thumbwheel : clockwise
from position 2 to position 3.
Setting the rear-compartment air
vents
Setting the center vents in the rear
compartment
:Rear-compartment air vent, left;Rear-compartment air vent, right=Rear-compartment air vent thumbwheel,
right?Rear control panel for automatic climate
controlARear-compartment air vent thumbwheel,
leftXTo open/close: turn thumbwheel = or
A to the right or left.
i
In vehicles without rear-compartment air-
conditioning system: close the rear-
Setting the air vents303Climate controlZ
Page 436 of 536
Useful information
i This Operator's Manual describes all
models and all standard and optional
equipment of your vehicle available at the
time of publication of the Operator's
Manual. Country-specific differences are
possible. Please note that your vehicle may
not be equipped with all features
described. This also applies to safety-
related systems and functions.
i Please read the information on qualified
specialist workshops ( Y page 31).
Loading guidelines
GWARNING
Always fasten items being carried as securely
as possible. Use cargo tie-down rings and
fastening materials appropriate for the weight
and size of the load.
In an accident, during hard braking or sudden
maneuvers, loose items will be thrown around
inside the vehicle. This can cause injury to
vehicle occupants unless the items are
securely fastened in the vehicle.
To help avoid personal injury during a collision
or sudden maneuver, exercise care when
transporting cargo. Do not pile luggage or
cargo higher than the seat backrests.
The trunk is the preferred place to carry
objects.
Never drive a vehicle with the trunk open.
Deadly carbon monoxide (CO) gases may
enter vehicle interior resulting in
unconsciousness and death.
The handling characteristics of a laden
vehicle are dependent on the distribution of
the load within the vehicle. For this reason,
you should observe the following notes when
transporting a load:
R when transporting a load, never exceed the
maximum permissible gross vehicle weight
or the gross axle weight rating of the
vehicle (including occupants). The values
are specified on the vehicle identification
plate on the B-pillar of the driver's door.
R position heavy loads as far forwards as
possible and as low down in the trunk as
possible.
R the load must not protrude above the upper
edge of the seat backrests.
R always place the load against the rear seat
backrests.
R always place the load behind unoccupied
seats if possible.
R secure the load with sufficiently strong and
wear-resistant tie-downs. Pad sharp edges
for protection.
Stowage areas
Stowage space
Important safety notes
GWARNING
To help avoid personal injury during a collision
or sudden maneuver, exercise care when
storing objects in the vehicle. Put luggage or
cargo in the trunk if possible.
Do not pile luggage or cargo higher than the
seat backrests.
Keep compartment lids closed. This will help
to prevent stored objects from being thrown
about and injuring vehicle occupants during
R braking
R vehicle maneuvers
R an accident
Stowage compartments in the front
Glove box
i Depending on the vehicle's equipment,
you will find the following installed in the
glove box: an audio and video AUX jack, a
USB socket or Media Interface, a universal
interface for portable audio equipment, e.g.
for an iPod or USB device, and a bracket for
434Stowage areasStowage and features
Page 437 of 536
a remote control (see the COMAND section
in this Operator's Manual).
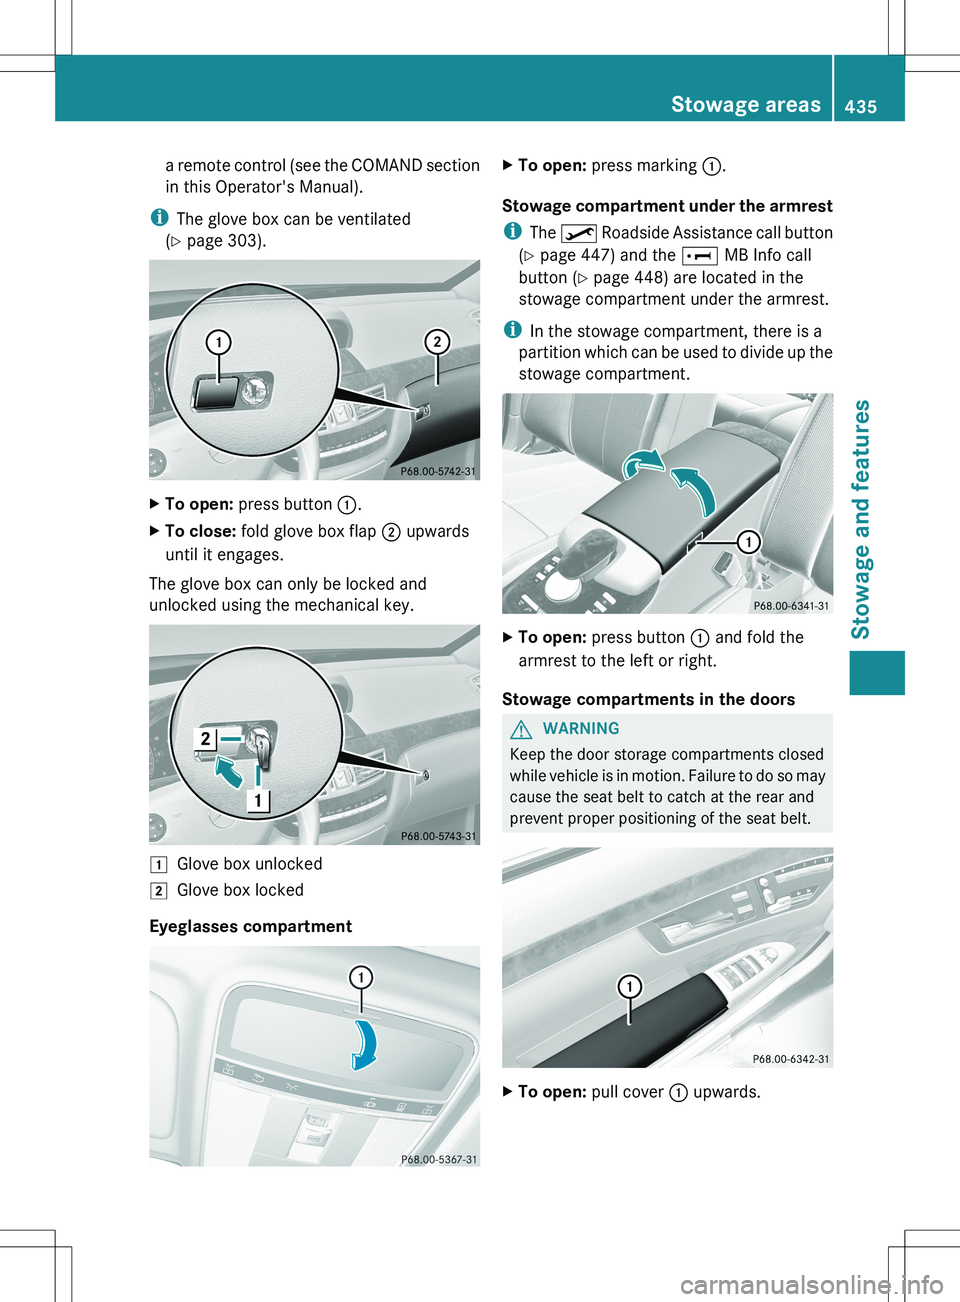
i The glove box can be ventilated
( Y page 303).XTo open: press button :.XTo close: fold glove box flap ; upwards
until it engages.
The glove box can only be locked and
unlocked using the mechanical key.
1Glove box unlocked2Glove box locked
Eyeglasses compartment
XTo open: press marking :.
Stowage compartment under the armrest
i The º Roadside Assistance call button
( Y page 447) and the E MB Info call
button ( Y page 448) are located in the
stowage compartment under the armrest.
i In the stowage compartment, there is a
partition which can be used to divide up the
stowage compartment.
XTo open: press button : and fold the
armrest to the left or right.
Stowage compartments in the doors
GWARNING
Keep the door storage compartments closed
while vehicle is in motion. Failure to do so may
cause the seat belt to catch at the rear and
prevent proper positioning of the seat belt.
XTo open: pull cover : upwards.Stowage areas435Stowage and featuresZ
Page 446 of 536
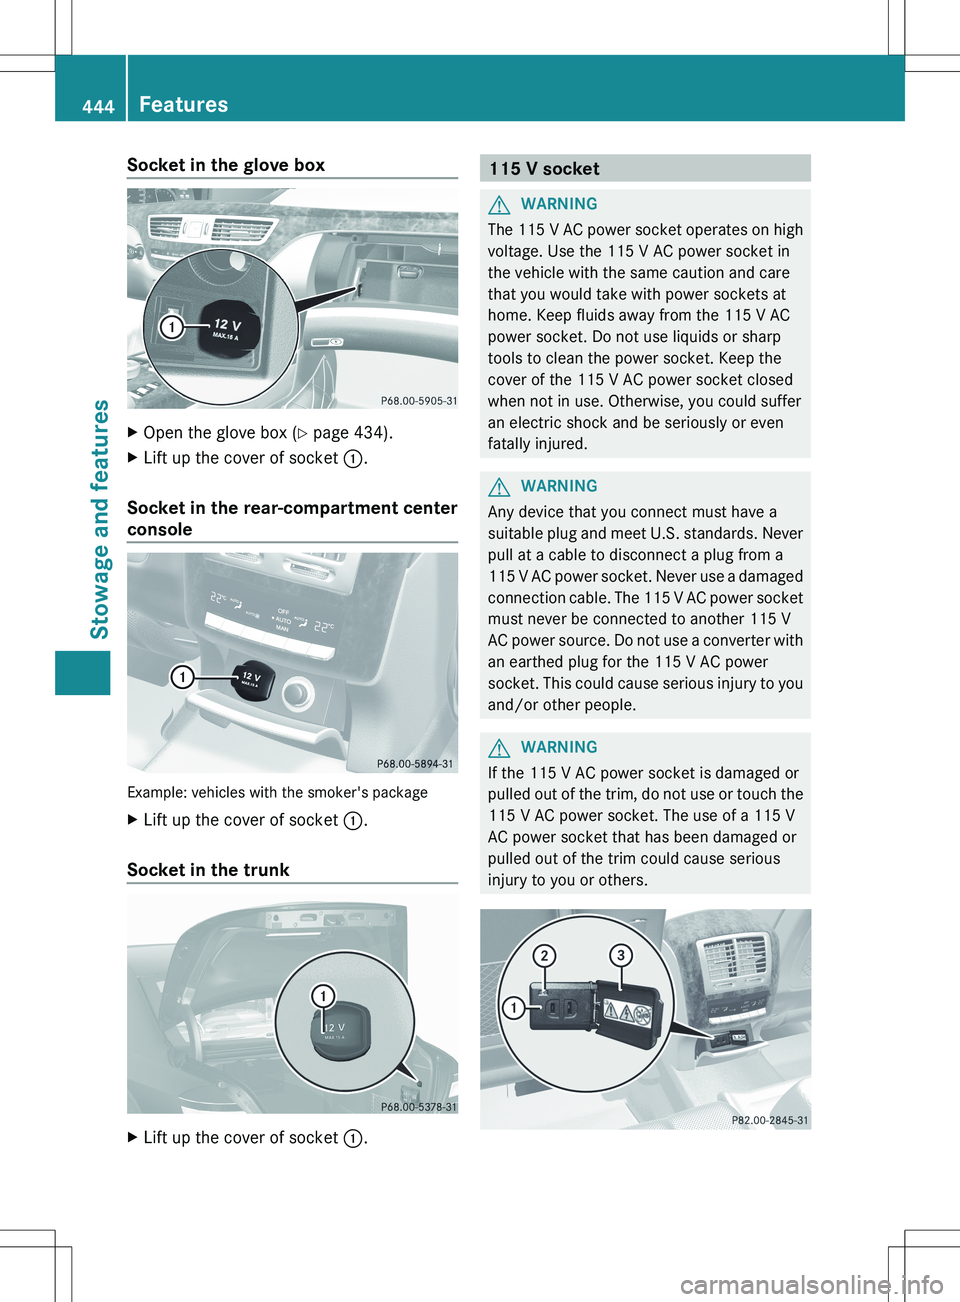
Socket in the glove boxXOpen the glove box (Y page 434).XLift up the cover of socket :.
Socket in the rear-compartment center
console
Example: vehicles with the smoker's package
XLift up the cover of socket :.
Socket in the trunk
XLift up the cover of socket :.115 V socketGWARNING
The 115 V AC power socket operates on high
voltage. Use the 115 V AC power socket in
the vehicle with the same caution and care
that you would take with power sockets at
home. Keep fluids away from the 115 V AC
power socket. Do not use liquids or sharp
tools to clean the power socket. Keep the
cover of the 115 V AC power socket closed
when not in use. Otherwise, you could suffer
an electric shock and be seriously or even
fatally injured.
GWARNING
Any device that you connect must have a
suitable plug and meet U.S. standards. Never
pull at a cable to disconnect a plug from a
115 V AC power socket. Never use a damaged
connection cable. The 115 V AC power socket
must never be connected to another 115 V
AC power source. Do not use a converter with
an earthed plug for the 115 V AC power
socket. This could cause serious injury to you
and/or other people.
GWARNING
If the 115 V AC power socket is damaged or
pulled out of the trim, do not use or touch the
115 V AC power socket. The use of a 115 V
AC power socket that has been damaged or
pulled out of the trim could cause serious
injury to you or others.
444FeaturesStowage and features