2012 MERCEDES-BENZ S-CLASS SEDAN brake light
[x] Cancel search: brake lightPage 285 of 536
Combination switch
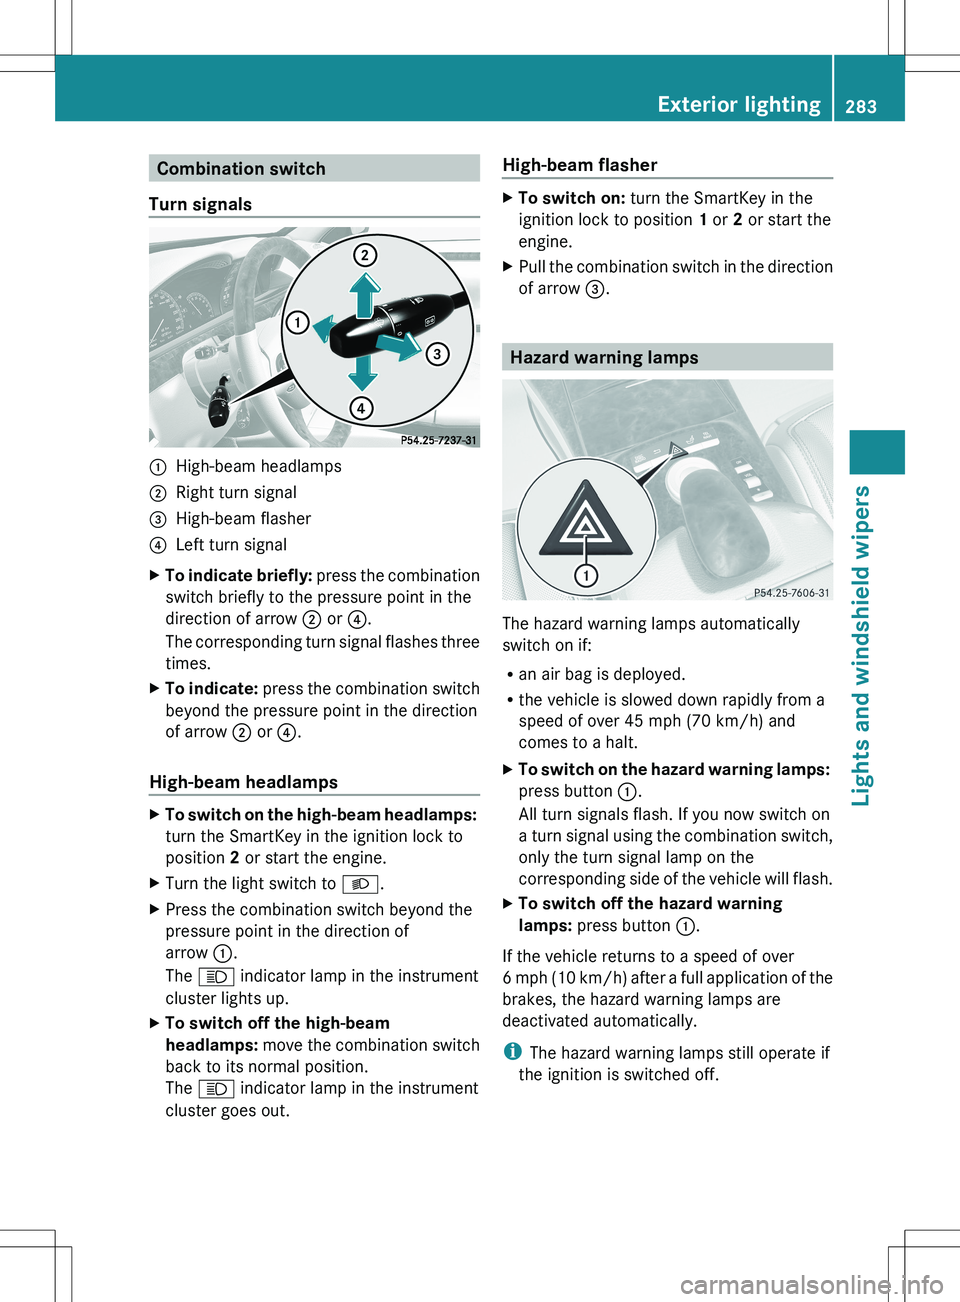
Turn signals:High-beam headlamps;Right turn signal=High-beam flasher?Left turn signalXTo indicate briefly: press the combination
switch briefly to the pressure point in the
direction of arrow ; or ?.
The corresponding turn signal flashes three
times.XTo indicate: press the combination switch
beyond the pressure point in the direction
of arrow ; or ?.
High-beam headlamps
XTo switch on the high-beam headlamps:
turn the SmartKey in the ignition lock to
position 2 or start the engine.XTurn the light switch to L.XPress the combination switch beyond the
pressure point in the direction of
arrow :.
The K indicator lamp in the instrument
cluster lights up.XTo switch off the high-beam
headlamps: move the combination switch
back to its normal position.
The K indicator lamp in the instrument
cluster goes out.High-beam flasherXTo switch on: turn the SmartKey in the
ignition lock to position 1 or 2 or start the
engine.XPull the combination switch in the direction
of arrow =.
Hazard warning lamps
The hazard warning lamps automatically
switch on if:
R an air bag is deployed.
R the vehicle is slowed down rapidly from a
speed of over 45 mph (70 km/h) and
comes to a halt.
XTo switch on the hazard warning lamps:
press button :.
All turn signals flash. If you now switch on
a turn signal using the combination switch,
only the turn signal lamp on the
corresponding side of the vehicle will flash.XTo switch off the hazard warning
lamps: press button :.
If the vehicle returns to a speed of over
6 mph (10 km/h) after a full application of the
brakes, the hazard warning lamps are
deactivated automatically.
i The hazard warning lamps still operate if
the ignition is switched off.
Exterior lighting283Lights and windshield wipersZ
Page 292 of 536
Hold the windshield wiper arm firmly when
you change the wiper blade. If you release
the windshield wiper arm without a wiper
blade and it falls onto the windshield, the
windshield may be damaged by the force of
the impact.
Mercedes-Benz recommends that you have
the wiper blades replaced by a qualified
specialist workshop, e.g. at an authorized
Mercedes-Benz Center.
! Always position the windshield wiper
arms vertically before folding them away
from the windshield. By doing so, you will
avoid damage to the hood.
! To avoid damaging the wiper blades,
make sure that you touch only the wiper
arm of the wiper.
Changing the windshield wiper blades
Moving the wiper blades to a vertical
position
Vehicles without KEYLESS-GO
XTurn the SmartKey to position 1 or 2 in the
ignition lock.XSet the windshield wipers to
position °.XWhen the wiper arms have reached a
vertical position, turn the SmartKey to
position 0 and remove it from the ignition
lock.
Vehicles with KEYLESS-GO
XSwitch off the engine.XRemove your foot from the brake pedal.XSet the windshield wipers to
position °.XPress the Start/Stop button repeatedly
until the windshield wipers start.XWhen the wiper arms have reached a
vertical position, press the Start/Stop
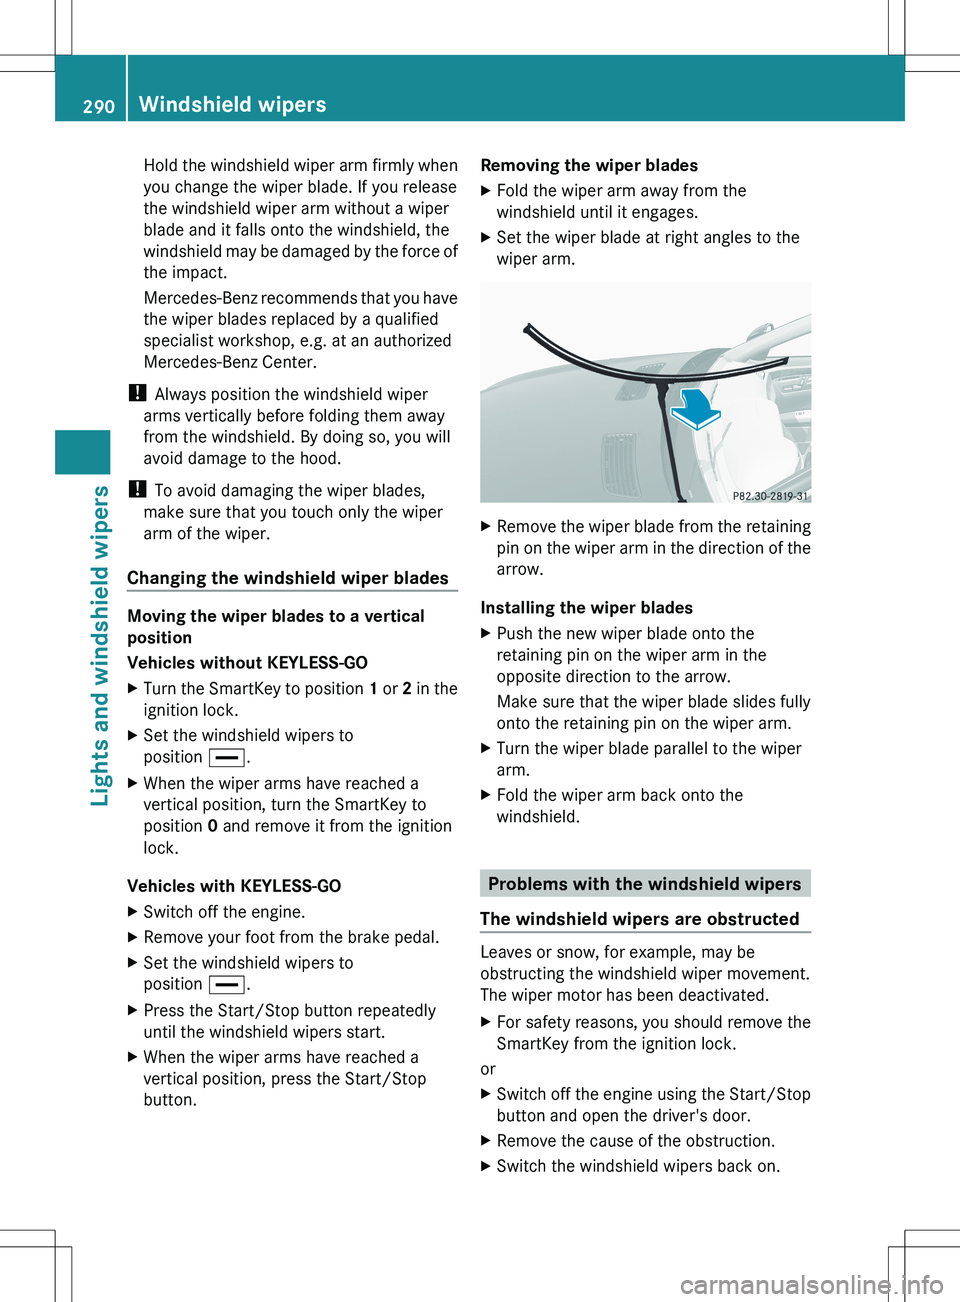
button.Removing the wiper bladesXFold the wiper arm away from the
windshield until it engages.XSet the wiper blade at right angles to the
wiper arm.XRemove the wiper blade from the retaining
pin on the wiper arm in the direction of the
arrow.
Installing the wiper blades
XPush the new wiper blade onto the
retaining pin on the wiper arm in the
opposite direction to the arrow.
Make sure that the wiper blade slides fully
onto the retaining pin on the wiper arm.XTurn the wiper blade parallel to the wiper
arm.XFold the wiper arm back onto the
windshield.
Problems with the windshield wipers
The windshield wipers are obstructed
Leaves or snow, for example, may be
obstructing the windshield wiper movement.
The wiper motor has been deactivated.
XFor safety reasons, you should remove the
SmartKey from the ignition lock.
or
XSwitch off the engine using the Start/Stop
button and open the driver's door.XRemove the cause of the obstruction.XSwitch the windshield wipers back on.290Windshield wipersLights and windshield wipers
Page 311 of 536
General information
iVehicles with a gasoline engine: the
engine runs at a higher engine speed during
a cold start so that the catalytic converter
can reach operating temperature more
quickly. The sound of the engine may
change during this time.
Automatic transmission
XShift the transmission to position P.
The transmission position display in the
multifunction display shows P.
i
You can also start the engine when the
transmission is in position N.
Starting procedure with the SmartKey
i To start the engine using the SmartKey
instead of KEYLESS-GO, pull the Start/
Stop button out of the ignition lock.
XTo start a gasoline engine: turn the
SmartKey to position 3 in the ignition lock
( Y page 307) and release it as soon as the
engine is running.XTo start a diesel engine: turn the
SmartKey to position 2 in the ignition lock
( Y page 307).
The % preglow indicator lamp in the
instrument cluster lights up.XWhen the % preglow indicator lamp
goes out, turn the SmartKey to position 3
( Y page 307) and release it as soon as the
engine is running.
i You can start the engine without preglow
if the engine is warm.
Using KEYLESS-GO to start the engine
GWARNING
As long as the SmartKey is in your vehicle, the
vehicle can be started. Therefore, never leave
children unattended in the vehicle, as they
could otherwise accidentally start the engine.
When leaving the vehicle, always take the
SmartKey with you and lock the vehicle. Do
not leave children unattended in the vehicle,
or with access to an unlocked vehicle. A
child's unsupervised access to a vehicle could
result in an accident and/or serious personal
injury.
i The Start/Stop button can be used to
start the vehicle manually without inserting
the SmartKey into the ignition lock. The
Start/Stop button must be inserted into
the ignition lock and the SmartKey must be
in the vehicle. This mode for starting the
engine operates independently of the ECO
start/stop automatic engine start function.XDepress the brake pedal and keep it
depressed.XTo start a gasoline engine: press the
Start/Stop button ( Y page 307) once.
The engine starts.XTo start a diesel engine: press the Start/
Stop button ( Y page 307) once.
Preglow is activated and the engine starts.
i If the engine is warm, the preglow time is
shortened.
Pulling away
Automatic transmission
GWARNING
It is dangerous to shift the automatic
transmission out of parking position P or
neutral position N if the engine speed is
higher than idle speed. If your foot is not firmly
on the brake pedal, the vehicle could
accelerate quickly forward or in reverse. You
could lose control of the vehicle and hit
someone or something. Only shift into gear
when the engine is idling normally and when
your right foot is firmly on the brake pedal.
i It is only possible to shift the transmission
from position P to the desired position if
you depress the brake pedal. Only then is
Driving309Driving and parkingZ
Page 330 of 536
iIf you cannot turn off the engine as
described here, see "Engine emergency
stop" ( Y page 490).
Vehicles with automatic transmissionXApply the electric parking brake.XShift the transmission to position P.
Using the SmartKey
XTurn the SmartKey to position 0 in the
ignition lock and remove it.
The immobilizer is activated.
i If you turn off the engine with the
SmartKey and then remove it from the
ignition lock or open a front door, the
automatic transmission shifts to P
automatically.
Using KEYLESS-GO
XPress the Start/Stop button (Y page 307).
The engine stops and all the indicator
lamps in the instrument cluster go out.
i When the driver's door is closed, this
corresponds to SmartKey position 1. When
the driver's door is open, it corresponds to
SmartKey position 0 or "SmartKey
removed".
i If you use the Start/Stop button to switch
off the engine, the automatic transmission
shifts to N automatically. If you then open
the driver's or front-passenger door, the
automatic transmission shifts to P.
i In an emergency, the engine can be
turned off while the vehicle is in motion by
pressing and holding the Start/Stop button
for 3 seconds. This function operates
independently from the ECO start/stop
automatic engine switch-off function.
Electric parking brake
General informationGWARNING
When leaving the vehicle, always remove the
SmartKey from the starter switch, take it with
you, and lock the vehicle. Do not leave
children unattended in the vehicle, or with
access to an unlocked vehicle. Children could
release the parking brake and/or shift the
automatic transmission out of park position
P , either of which could result in an accident
and/or serious personal injury.
Applying/releasing manually
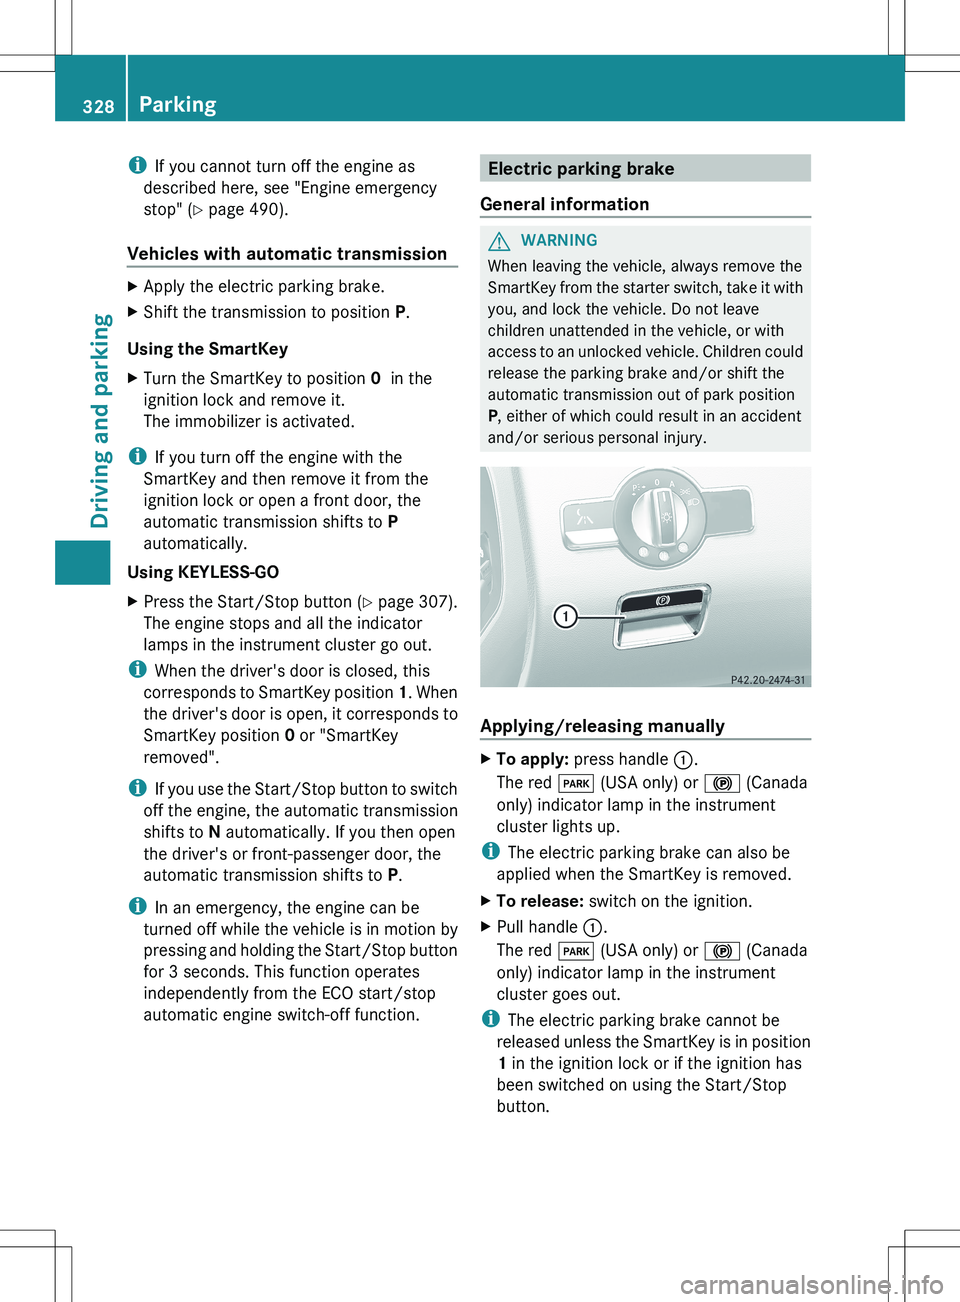
XTo apply: press handle :.
The red F (USA only) or ! (Canada
only) indicator lamp in the instrument
cluster lights up.
i The electric parking brake can also be
applied when the SmartKey is removed.
XTo release: switch on the ignition.XPull handle :.
The red F (USA only) or ! (Canada
only) indicator lamp in the instrument
cluster goes out.
i The electric parking brake cannot be
released unless the SmartKey is in position
1 in the ignition lock or if the ignition has
been switched on using the Start/Stop
button.
328ParkingDriving and parking
Page 331 of 536
Engaging the electric parking brake
automatically
The electric parking brake is automatically
applied if HOLD or DISTRONIC PLUS brakes
the vehicle until it is stationary and at least
one of the following conditions is fulfilled:
R the engine is switched off.
R the driver's door is open and the seat belt
is not fastened.
R the hood is released.
R the trunk lid is opened while the automatic
transmission is in position R.
R the vehicle is stationary for a lengthy
period.
The red F (USA only) or ! (Canada
only) indicator lamp in the instrument cluster
lights up.
i In addition to the electric parking brake,
P may also be engaged automatically.
Releasing the electric parking brake
automatically
The electric parking brake is released
automatically when the following conditions
are simultaneously fulfilled:
R the engine is running.
R the automatic transmission is in position
D or R.
R the hood is closed.
R your seat belt is fastened.
R you depress the accelerator pedal.
If the automatic transmission is in position
R , the trunk lid must be closed.
If your seat belt is not fastened, the following
conditions must be fulfilled to automatically
release the electric parking brake:
R the driver's door is closed.
R you have shifted out of position P or you
have previously driven faster than 3 km/h.
R you have shifted out of position P or you
have previously driven faster than 2 mph
(3km/h).
Emergency braking
The vehicle can also be braked during an
emergency by using the electric parking
brake.
XWhile driving, push handle : of the electric
parking brake ( Y page 328).
i
The vehicle is braked as long as you keep
the handle of the electric parking brake
pressed. The longer the electric parking
brake handle is depressed, the greater the
braking force.
During braking:
R a warning tone sounds.
R the Please Release Parking Brake
message appears.
R the red F (USA only) or ! (Canada
only) indicator lamp in the instrument
cluster lights up.
When the vehicle has been braked to a
standstill, the electric parking brake is
engaged.
Parking the vehicle for a long period
If you leave the vehicle parked for longer than
four weeks, the battery may be damaged by
exhaustive discharge.
XConnect a trickle charger.
i You can obtain information about trickle
chargers from a qualified specialist
workshop.
If you leave the vehicle parked for longer than
six weeks, the vehicle may suffer damage as
a result of lack of use.
XVisit a qualified specialist workshop and
seek advice.Parking329Driving and parkingZ
Page 333 of 536
Exhaust checkGWARNING
Inhalation of exhaust gas is hazardous to your
health. All exhaust gas contains carbon
monoxide (CO), and inhaling it can cause
unconsciousness and possible death.
Do not run the engine in confined areas (such
as a garage) which are not properly ventilated.
If you think that exhaust gas fumes are
entering the vehicle while driving, have the
cause determined and corrected
immediately. If you must drive under these
conditions, drive only with at least one
window fully open at all times.
Certain engine systems are designed to keep
the level of poisonous components in exhaust
fumes within legal limits.
These systems only work at peak efficiency if
they are serviced exactly in accordance with
the manufacturer's specifications. For this
reason, all work on the engine should only be
carried out by qualified and authorized
Mercedes-Benz technicians.
The engine settings must not be changed
under any circumstances. Furthermore, all
specific service work must be carried out at
regular intervals and in accordance with the
Mercedes-Benz service requirements. Details
can be found in the Maintenance Booklet.
Brakes
Important safety notes
GWARNING
On slippery road surfaces, never downshift in
order to obtain braking action. This could
result in drive wheel slip and reduced vehicle
control. Your vehicle's ABS will not prevent
this type of loss of control.
GWARNING
Make sure that you do not endanger other
road users when you apply the brakes.
Downhill gradients
! On long and steep gradients, you must
reduce the load on the brakes by shifting
early to a lower gear. This allows you to take
advantage of the engine braking effect and
helps avoid overheating and excessive
wear of the brakes.
When you take advantage of the engine
braking effect, a drive wheel may not turn
for some time, e.g. on a slippery road
surface. This could cause damage to the
drive train. This type of damage is not
covered by the Mercedes-Benz warranty.
Heavy and light loads
GWARNING
Depressing the brake pedal constantly results
in excessive and premature wear to the brake
pads.
It may also cause the brakes to overheat,
seriously impairing their effectiveness. It may
then not be possible to stop the vehicle in
sufficient time to avoid an accident.
If the brakes have been subjected to a heavy
load, do not stop the vehicle immediately, but
drive on for a short while. This allows the
airflow to cool the brakes more quickly.
Wet roads
GWARNING
After driving in heavy rain for some time
without applying the brakes or through water
deep enough to wet brake components, the
first braking action may be somewhat
reduced. You have to depress the brake pedal
more firmly. Maintain a safe distance from
vehicles in front.
After driving on a wet road or having the
vehicle washed, brake firmly while paying
attention to the traffic conditions. This will
warm up the brake discs, thereby drying them
more quickly and protecting them against
corrosion.
Driving tips331Driving and parkingZ
Page 334 of 536

Limited braking performance on salt-
treated roadsGWARNING
The layer of salt on the brake discs and the
brake pads/linings may cause a delay in the
braking effect, resulting in a significantly
longer braking distance, which could lead to
an accident.
To avoid this danger, you should:
R occasionally brake carefully, without
putting other road users at risk, when you
are driving on salted roads. This helps to
remove any salt that may have started to
build up on the brake discs and the brake
pads/linings.
R maintain a greater distance to the vehicle
ahead and drive with particular care.
R carefully apply the brakes at the end of a
trip and immediately after commencing a
new trip, so that salt residues are removed
from the brake discs.
Servicing the brakes
! If the red brake warning lamp lights up in
the instrument cluster and you hear a
warning tone while the engine is running,
the brake fluid level may be too low.
Observe additional warning messages in
the multifunction display.
The brake fluid level may be too low due to
brake pad wear or leaking brake lines.
Have the brake system checked
immediately. This work should be carried
out at a qualified specialist workshop.
All checks and maintenance work on the
brake system must be carried out at a
qualified specialist workshop. Consult a
qualified specialist workshop to arrange this.
Have brake pads installed and brake fluid
replaced at a qualified specialist workshop.
GWARNING
If brake pads or brake fluid other than those
recommended are used, the braking
properties of the vehicle can be degraded to
an extent that safe braking is substantially
impaired. This could result in an accident.
! Vehicles with 4MATIC: function or
performance tests may only be carried out
on a 2-axle dynamometer. If you are
planning to have the vehicle tested on such
a dynamometer, contact an authorized
Mercedes-Benz Center to obtain further
information first. Otherwise, you could
damage the drive train or the brake system.
! Vehicles with 4MATIC: as the ESP®
system operates automatically, the engine
and the ignition must be switched off
(SmartKey in position 0 or 1 in the ignition
lock or Start/Stop button in position 0 or
1 ) when the electric parking brake is being
tested on a brake dynamometer.
Braking maneuvers triggered automatically
by ESP ®
may seriously damage the brake
system.
! Vehicles with 4MATIC: as the ESP®
system operates automatically, the engine
and the ignition system must be switched
off (SmartKey in position 0 or 1 in the
ignition lock or Start/Stop button in
position 0 or 1) when:
R testing the electric parking brake on a
brake dynamometer.
R you intend to have the vehicle towed with
one of the axles raised.
Braking maneuvers triggered automatically
by ESP ®
may seriously damage the brake
system.
If your brake system is subject only to
moderate loads, you should test the
functionality of your brakes at regular
intervals by pressing firmly on the brake pedal
at high speeds. This improves the grip of the
brake pads.GWARNING
Make sure that you do not endanger other
road users when you apply the brakes.
332Driving tipsDriving and parking
Page 335 of 536
You can find a description of Brake Assist
(BAS) on ( Y page 74) or of BAS PLUS on
( Y page 74).
High-performance brake system for
AMG vehicles
The high-performance brake system is
installed only on the S 63 AMG and S 65 AMG.
GWARNING
New vehicle brake pads and discs, and
replacement brake pads and discs may take
several hundred miles of driving until they
provide optimum braking efficiency. Until that
time, you may need to use increased brake
pedal pressure while braking. Please be aware
of this and adjust your driving and braking
accordingly during this break-in period.
Excessive high-demand braking will cause
correspondingly high brake wear. Please be
attentive to the brake warning lamp in the
instrument cluster and brake condition
messages in the multifunction display.
Especially for high performance driving, it is
important to maintain and have the brake
system checked regularly.
The high-performance brake system is
designed for heavy loads. This may lead to
noise when braking. This will depend on:
R speed
R braking force
R environmental conditions, such as
temperature and humidity
The wear of individual components of the
brake system, such as the brake pads/linings
or brake discs, depends on the individual
driving style and operating conditions.
For this reason, it is impossible to state a
mileage that will be valid under all
circumstances. An aggressive driving style
will lead to high wear. You can obtain further
information about this from your authorized
Mercedes-Benz Center.
Driving on wet roads
Hydroplaning
If water has accumulated to a certain depth
on the road surface, there is a danger of
hydroplaning occurring, even if:
R you drive at low speeds.
R the tires have adequate tread depth.
For this reason, in the event of heavy rain or
in conditions in which hydroplaning can
occur, you must drive in the following
manner:
R lower your speed.
R avoid ruts.
R brake carefully.
Driving on flooded roads
! Do not drive through flooded areas.
Check the depth of any water before driving
through it. Drive slowly through standing
water. Otherwise, water may enter the
vehicle interior or the engine compartment.
This can damage the electronic
components in the engine or the automatic
transmission. Water can also be drawn in
by the engine's air suction nozzles and this
can cause engine damage.
Winter driving
Important safety notes
GWARNING
If the vehicle becomes trapped in snow,
ensure that snow is kept away from the
exhaust pipe and from around the vehicle as
long as the engine is running. Otherwise,
poisonous carbon monoxide (CO) may enter
the vehicle, resulting in loss of consciousness
and even death.
To assure sufficient fresh air ventilation, open
a window slightly on the side of the vehicle
not facing the wind.
Driving tips333Driving and parkingZ