2012 MERCEDES-BENZ GLK SUV radio
[x] Cancel search: radioPage 311 of 381
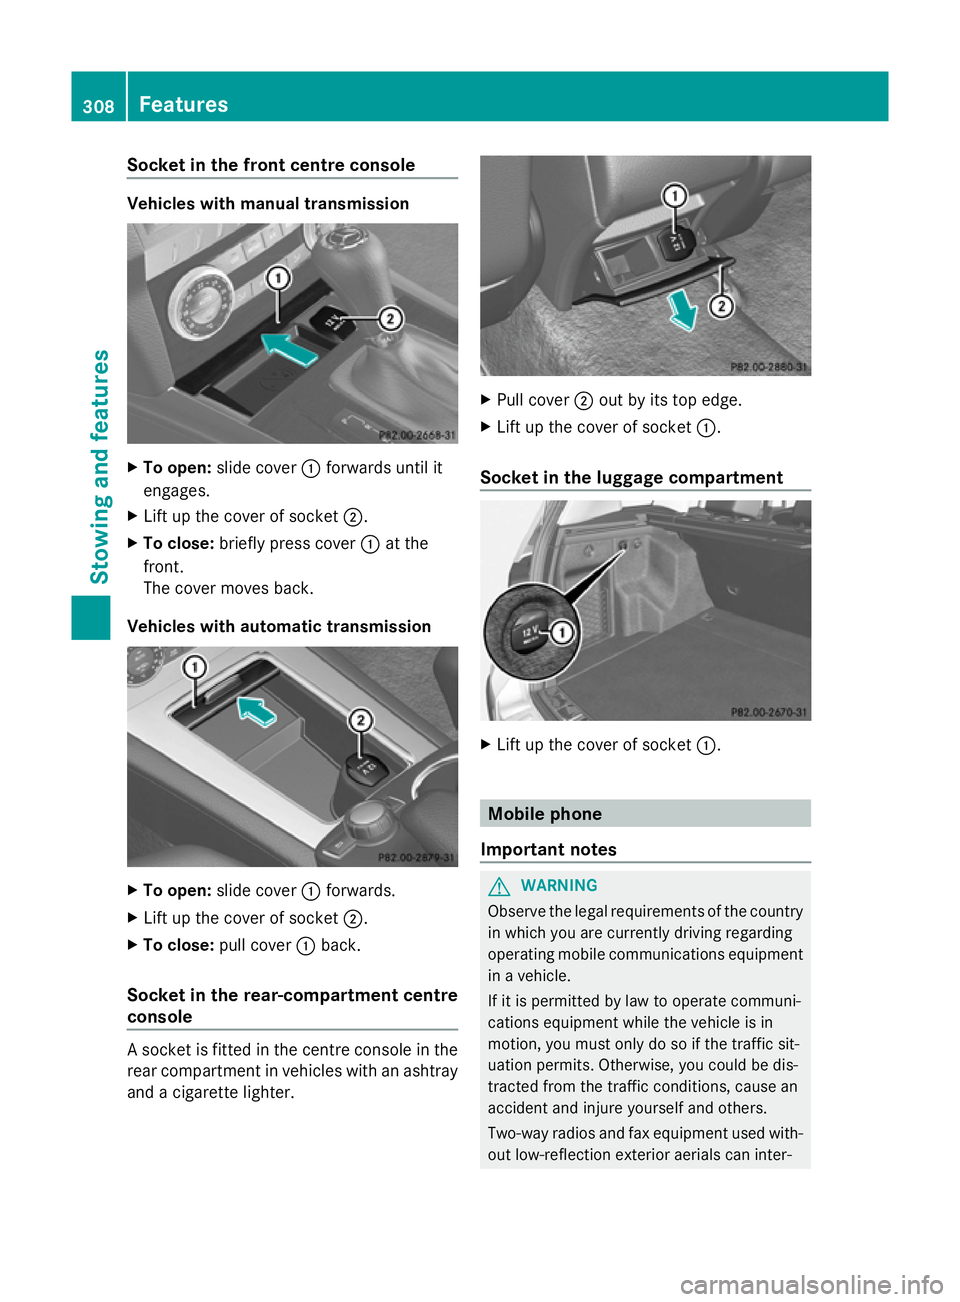
Socket in the front centre console
Vehicles with manual transmission
X
To open: slide cover :forwards until it
engages.
X Lift up the cover of socket ;.
X To close: briefly press cover :at the
front.
The cover moves back.
Vehicles with automatic transmission X
To open: slide cover :forwards.
X Lift up the cover of socket ;.
X To close: pull cover :back.
Socket in the rear-compartment centre
console A socket is fitted in the centre console in the
rear compartment in vehicles with an ashtray
and a cigarette lighter. X
Pull cover ;out by its top edge.
X Lift up the cover of socket :.
Socket in the luggage compartment X
Lift up the cover of socket :. Mobile phone
Important notes G
WARNING
Observe the legal requirements of the country
in which you are currently driving regarding
operating mobile communications equipment
in a vehicle.
If it is permitted by law to operate communi-
cations equipment while the vehicle is in
motion, you must only do so if the traffic sit-
uation permits. Otherwise, you could be dis-
tracted from the traffic conditions, cause an
accident and injure yourself and others.
Two-way radios and fax equipment used with-
out low-reflection exterior aerials can inter- 308
FeaturesStowing and features
Page 313 of 381
i
When using a bracket connected to the
mobile phone via Bluetooth ®
and you wish
to proceed with a call:
Switch to private mode before removing
the key from the ignition lock. Otherwise, it
may take up to 20seconds before the
mobile phone disconnects from the sys-
tem. Only then can the telephone call con-
tinue.
Information on the necessary steps for set-
ting up "private mode" can be found in the
separate mobile phone operating instruc-
tions.
i Not all mobile phones support "private
mode".
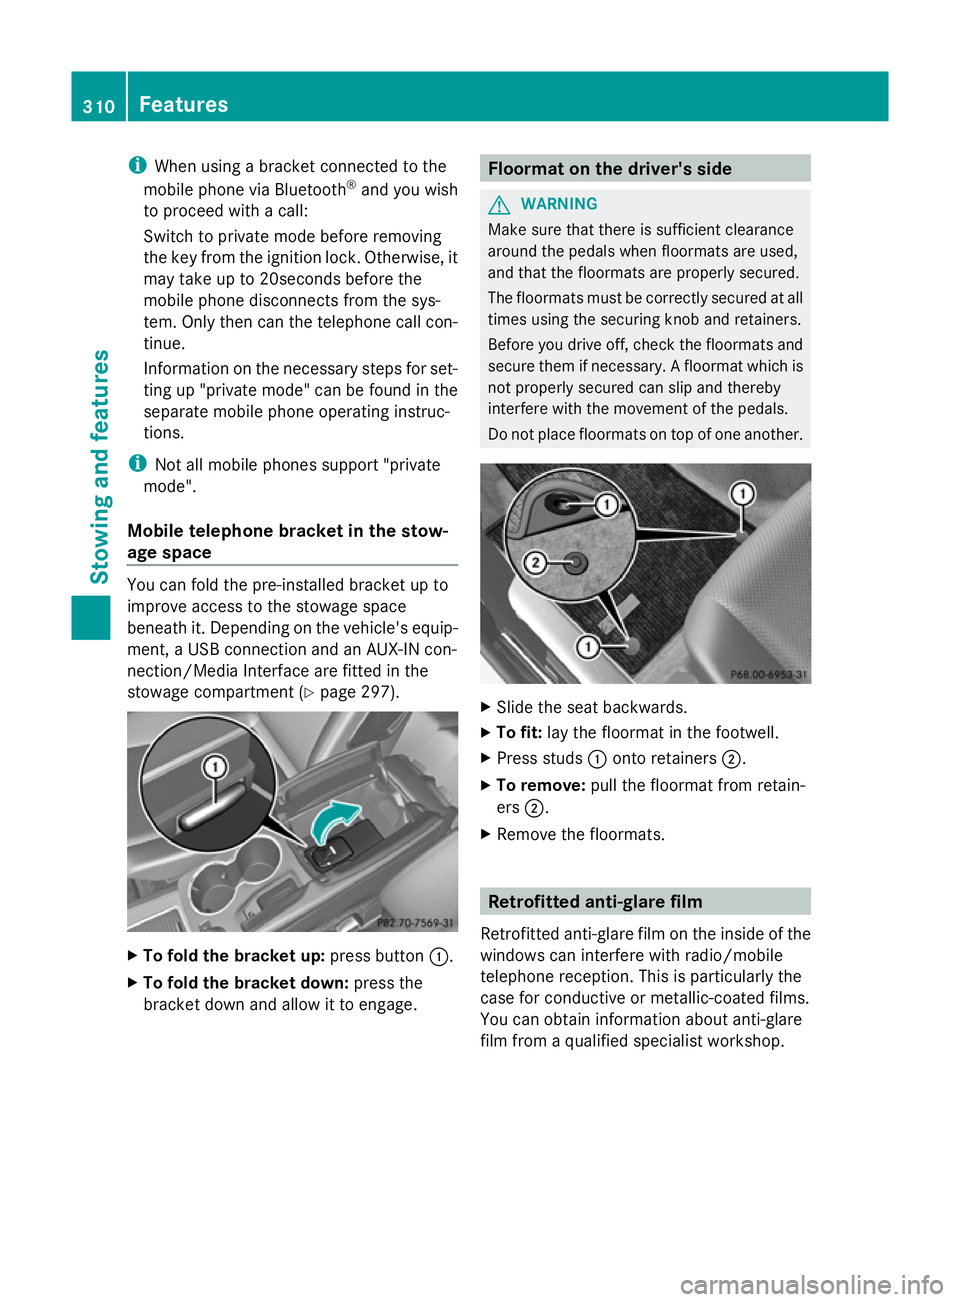
Mobile telephone bracket in the stow-
age space You can fold the pre-installed bracket up to
improve access to the stowage space
beneath it. Depending on the vehicle's equip-
ment, a USB connection and an AUX-IN con-
nection/Media Interface are fitted in the
stowage compartment (Y page 297).X
To fold the bracket up: press button:.
X To fold the bracket down: press the
bracket down and allow it to engage. Floormat on the driver's side
G
WARNING
Make sure that there is sufficient clearance
around the pedals when floormats are used,
and that the floormats are properly secured.
The floormats must be correctly secured at all
times using the securing knob and retainers.
Before you drive off, check the floormats and
secure them if necessary. A floormat which is
not properly secured can slip and thereby
interfere with the movement of the pedals.
Do not place floormats on top of one another. X
Slide the seat backwards.
X To fit: lay the floormat in the footwell.
X Press studs :onto retainers ;.
X To remove: pull the floormat from retain-
ers ;.
X Remove the floormats. Retrofitted anti-glare film
Retrofitted anti-glare film on the inside of the
windows can interfere with radio/mobile
telephone reception. This is particularly the
case for conductive or metallic-coated films.
You can obtain information about anti-glare
film from a qualified specialist workshop. 310
FeaturesStowing and features
Page 344 of 381
Jump-starting
G
WARNING
There is a risk of acid burns when jump-starting a vehicle due to the gases which escape from
the battery. Do not lean over the battery while the engine is being jump-started. G
WARNING
Gases escaping from the battery during jump-starting may cause minor explosions. Avoid cre-
ating sparks. Keep naked flames away from the battery, and do not smoke.
Comply with safety precautions when handling batteries. You will find these under "Battery (vehi-
cle)" in the index. G
WARNING
Non-combusted fuel can collect in the exhaust system and ignite. There is a risk of fire. Avoid
repeated and lengthy starting attempts.
! Vehicles with a petrol engine: avoid repeated and lengthy starting attempts. Otherwise,
the non-combusted fuel may damage the catalytic converter.
Do not use a rapid-charging device to start the vehicle. If your vehicle's battery is discharged,
the engine can be jump-started from another vehicle or from a second battery using jump
leads. Observe the following points:
R the battery is not accessible in all vehicles. If the other vehicle's battery is not accessible,
jump-start the vehicle using a second battery or a jump-starting device.
R vehicles with a petrol engine: only jump-start the vehicle when the engine and exhaust
system are cold.
R do not start the engine if the battery is frozen. Let the battery thaw first.
R jump-starting may only be performed from batteries with a nominal voltage of 12 V.
R only use jump leads that have a sufficient cross-section and insulated terminal clamps.
R if the battery is fully discharged, leave the battery that is being used to jump-start connected
for a few minutes before attempting to start. This charges the empty battery a little.
R make sure that the two vehicles do not touch.
Make sure that:
R the jump leads are not damaged.
R bare parts of the terminal clamp do not come into contact with other metal parts while the
jump leads are connected to the battery.
R the jump leads cannot come into contact with parts such as the V-belt pulley or the fan.
These parts move when the engine is started and while it is running.
X Firmly depress the parking brake.
X Manual transmission: engage neutral.
X Automatic transmission: shift the automatic transmission to position P.
X Switch off all electrical consumers (e.g. radio, blower, etc.).
X Open the bonnet (Y page 313). Jump-starting
341Breakdown assistance Z
Page 366 of 381
This is the case:
R
if they cause a change of the vehicle type
from that for which the vehicle's general
operating permit was granted
R if other road users could be endangered
R if the emission or noise levels are adversely
affected.
Always specify the vehicle identification num-
ber (VIN) (Y page 364) and the engine num-
ber (Y page 365) when ordering genuine
Mercedes-Benz parts. Vehicle electronics
Tampering with the engine electron-
ics
G
WARNING
Always have work on the engine electronics
and related components carried out at a quali-
fied specialist workshop. Otherwise, the vehi-
cle's operating safety could be affected.
! Only have work carried out on the engine
electronics and its associated parts, such
as control units, sensors and connector
leads, at a qualified specialist workshop.
Vehicle components may otherwise wear
more quickly and the vehicle's operating
permit may be invalidated. Retrofitting two-way radios and
mobile phones (RF transmitters)
G
WARNING
Incorrect retrofitting of RF transmitters can
cause the vehicle electronics to malfunction.
The vehicle's operating safety and thus your
own safety are impaired.
Have aftermarket radio frequency transmit-
ting equipment installed at a qualified spe-
cialist workshop. G
WARNING
Incorrect retrofitting of RF transmitters can
lead to increased electromagnetic radiation in
the vehicle interior. Using an exterior aerial
takes into account current scientific discus-
sions relating to the possible health hazards
that may result from electromagnetic fields.
Have aftermarket radio frequency transmit-
ting equipment installed at a qualified spe-
cialist workshop.
! The operating permit may be invalidated
if the instructions for installation and use of
RF transmitters are not observed.
In particular, the following conditions must
be complied with:
R only approved wavebands may be used.
R the maximum permissible output in
these wavebands must be complied with.
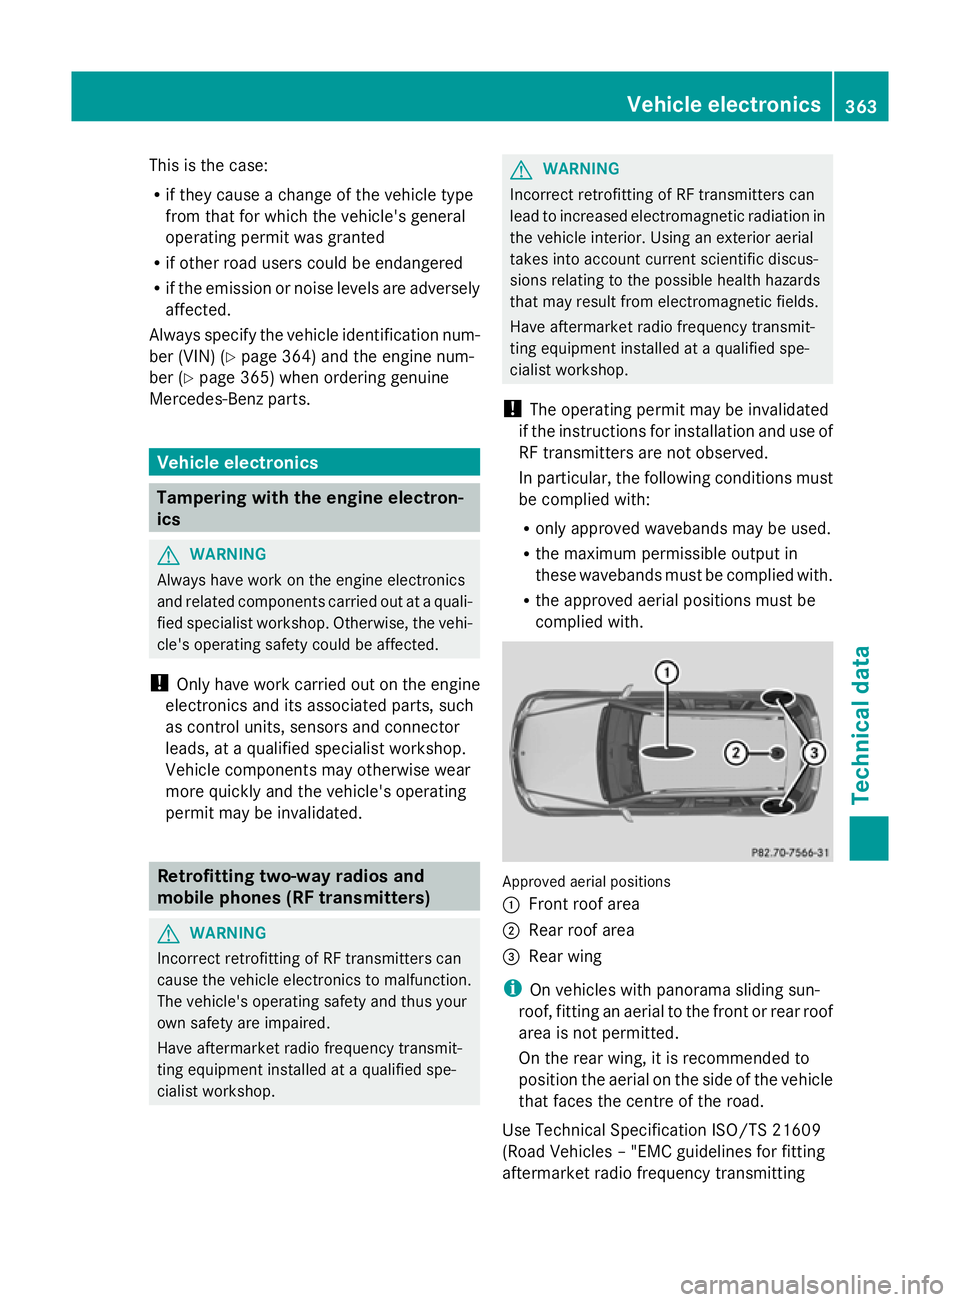
R the approved aerial positions must be
complied with. Approved aerial positions
:
Front roof area
; Rear roof area
= Rear wing
i On vehicles with panorama sliding sun-
roof, fitting an aerial to the front or rear roof
area is not permitted.
On the rear wing, it is recommended to
position the aerial on the side of the vehicle
that faces the centre of the road.
Use Technical Specification ISO/TS 21609
(Road Vehicles – "EMC guidelines for fitting
aftermarket radio frequency transmitting Vehicle electronics
363Technical data Z
Page 367 of 381
equipment") when retrofitting RF (radio fre-
quency) transmitters. Comply with the legal
requirements for add-on parts.
If your vehicle has fittings for two-way radio
equipment, use the power supply or aerial
connections intended for use with the basic
wiring. Be sure to observe the manufacturer's
additional instructions when installing.
Deviations with respect to wavebands, maxi-
mum transmission outputs or aerial positions
must be approved by Mercedes-Benz.
The maximum transmission output (PEAK) at
the base of the aerial must not exceed the
following values: Waveband Maximum
transmission
output (PEAK) Short wave (f < 54 MHz) 100 W
4 m waveband 30 W
2 m waveband 50 W
Trunked radio/Tetra 35 W
70 cm waveband 35 W
GSM/DCS/PCS
850/900/1800/1900 10 W
UMTS/LTE 10 W
The following can be used in the vehicle with-
out restrictions:
R
RF transmitters with a maximum transmis-
sion output of up to 100 mW
R mobile phones (GSM/DCS/PCS/UMTS/
LTE)
There are no restrictions when positioning the
aerial on the outside of the vehicle for the fol-
lowing wavebands:
R trunked radio/Tetra
R 70 cm waveband
R GSM/DCS/PCS
R UMTS/LTE Identification plates
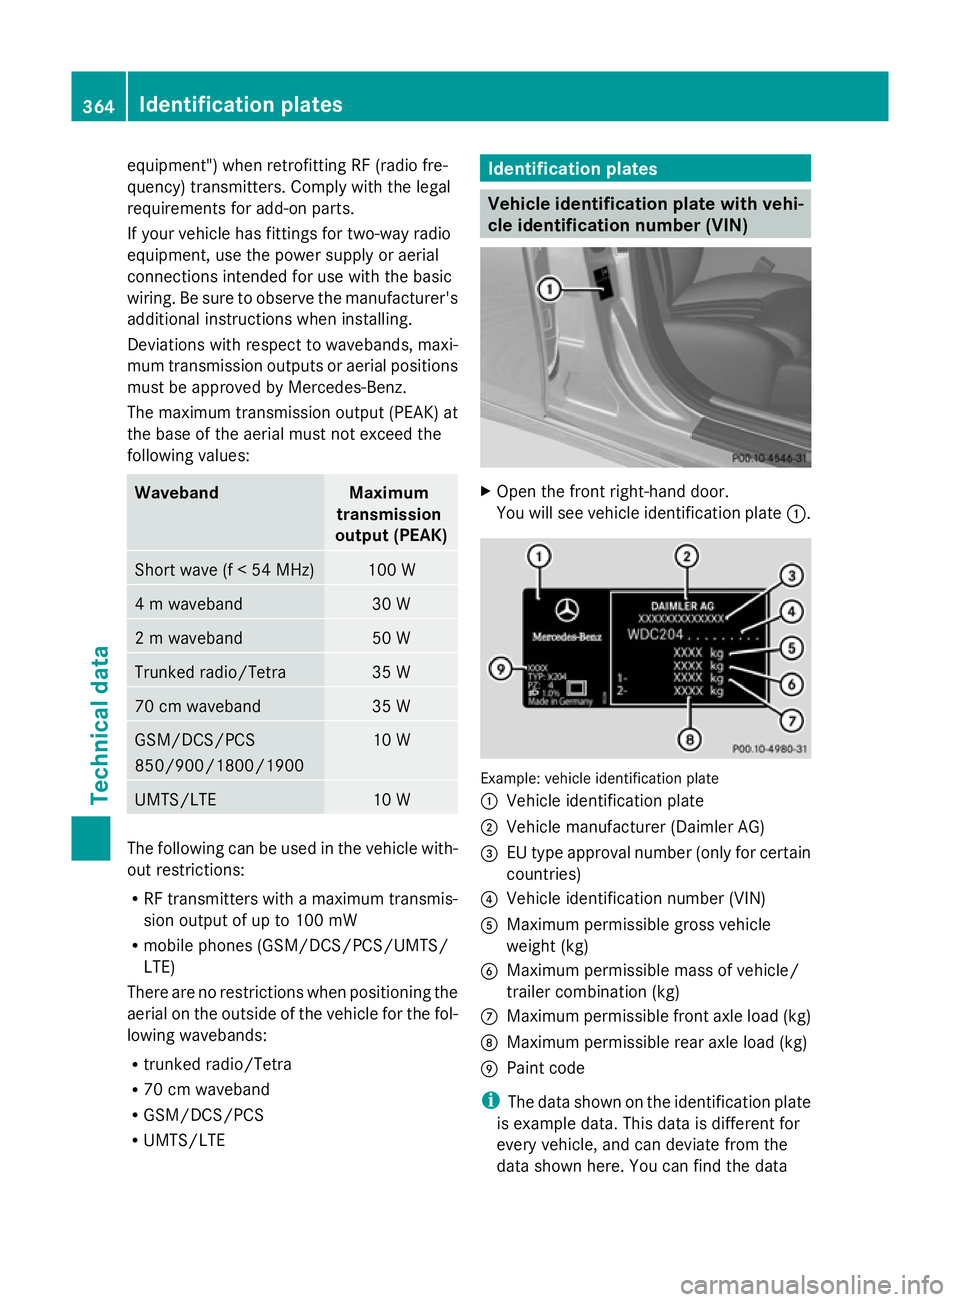
Vehicle identification plate with vehi-
cle identification number (VIN)
X
Open the front right-hand door.
You will see vehicle identification plate :. Example: vehicle identification plate
:
Vehicle identification plate
; Vehicle manufacturer (Daimler AG)
= EU type approval number (only for certain
countries)
? Vehicle identification number (VIN)
A Maximum permissible gross vehicle
weight (kg)
B Maximum permissible mass of vehicle/
trailer combination (kg)
C Maximum permissible front axle load (kg)
D Maximum permissible rear axle load (kg)
E Paint code
i The data shown on the identification plate
is example data. This data is different for
every vehicle, and can deviate from the
data shown here. You can find the data 364
Identification platesTechnical data
Page 378 of 381
24 GHz radar sensor system (country overview)
The 24 GHz radar sensor system requires separate approval for each country. When you are
driving in a country in which the radar sensor system is not approved, you must deactivate
the system using the on-board computer (Y page 242).
The current country overview can be obtained from a Mercedes-Benz Service Centre or on
the Internet at: http://www.mercedes-benz.de/betriebsanleitung.
Vehicles with a navigation system: the radar sensor system is deactivated automatically
near radio telescope facilities. A display message appears in the multifunction display to tell
you that the radar sensor system is being switched off (Y page 272).
The currently active systems are automatically deactivated:
R DISTRONIC PLUS (Y page 178)
R Blind Spot Assist (Y page 203)
R Active Blind Spot Assist (Y page 207)
R BAS PLUS (Y page 66)
R PRE-SAFE ®
Brake (Y page 69)
If deactivation does not occur automatically, you must deactivate the radar sensor system
using the on-board computer (Y page 242).
Vehicles without navigation and vehicles for Australia: you must deactivate the radar
sensor system using the on-board computer when you are near a radio telescope facility
(Y page 242). 24 GHz radar sensor system (country overview)
375Technical data Z