2012 MERCEDES-BENZ GLK SUV automatic transmission
[x] Cancel search: automatic transmissionPage 168 of 381

Using KEYLESS-GO
X
Press the Start/Stop button (Y page 147).
The engine stops and all the indicator
lamps in the instrument cluster go out.
i When the driver's door is closed, this cor-
responds to key position 1. When the driv-
er's door is open, this corresponds to key
position 0, i.e. key removed.
i The engine can be switched off while the
vehicle is in motion by pressing and holding
the Start/Stop button for approximately
3 seconds. This function operates inde-
pendently of the ECO start/stop automatic
engine switch-off function. Parking brake
G
WARNING
If you must brake the vehicle with the parking
brake, the braking distance is considerably
longer and the wheels could lock. This increa-
ses the risk of skidding and an accident.
Only use the parking brake to brake the vehi-
cle when the service brake is faulty. Do not
apply the parking brake too firmly. If the
wheels lock, release the parking brake until
the wheels begin turning again. G
WARNING
If you leave children unsupervised in the vehi-
cle, they could set it in motion by, for example:
R releasing the parking brake
R shifting the automatic transmission out of
the parking position P
R starting the engine.
They could also operate the vehicle's equip-
ment. There is a risk of an accident and injury.
When leaving the vehicle, always take the key
with you and lock the vehicle. Never leave
children unsupervised in the vehicle. X
To apply: depress parking brake ;firmly.
The J indicator lamp in the instrument
cluster lights up if the engine is running.
X To release: depress the brake pedal and
keep it depressed.
X Pull release handle :.
The J indicator lamp in the instrument
cluster goes out. Parking up the vehicle
If you leave the vehicle parked up for longer
than four weeks, the battery may be damaged
by exhaustive discharging.
X Disconnect the battery or connect it to a
trickle charger.
i You can obtain information about trickle
chargers from a qualified specialist work-
shop.
If you leave the vehicle parked up for longer
than six weeks, the vehicle may suffer dam-
age as a result of lack of use.
X Visit a qualified specialist workshop and
seek advice. Driving tips
General driving tips
Important safety notes G
WARNING
If you switch off the ignition while driving,
safety-relevant functions are only available Driving tips
165Driving and parking
Z
Page 169 of 381
with limitations, or not at all. This could affect,
for example, the power steering and the brake
boosting effect. You will require considerably
more effort to steer and brake. There is a risk
of an accident.
Do not switch off the ignition while driving. ECO display
The ECO display provides feedback on how
economical your driving characteristics are.
The ECO display assists you in achieving the
most economical driving style for the selec-
ted settings and existing conditions. Con-
sumption can be significantly influenced by
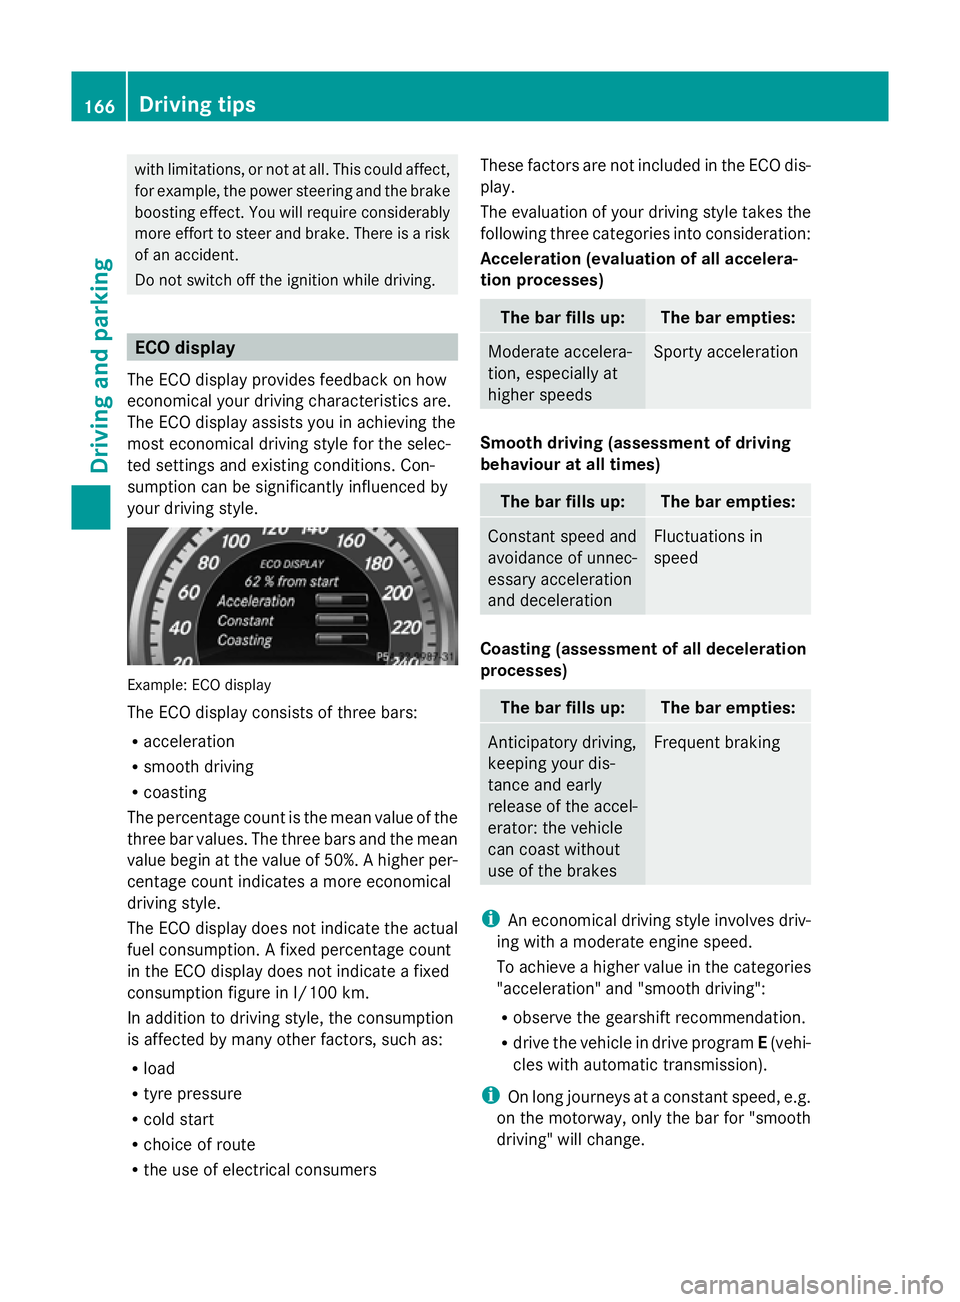
your driving style. Example: ECO display
The ECO display consists of three bars:
R acceleration
R smooth driving
R coasting
The percentage count is the mean value of the
three bar values. The three bars and the mean
value begin at the value of 50%. A higher per-
centage count indicates a more economical
driving style.
The ECO display does not indicate the actual
fuel consumption. A fixed percentage count
in the ECO display does not indicate a fixed
consumption figure in l/100 km.
In addition to driving style, the consumption
is affected by many other factors, such as:
R load
R tyre pressure
R cold start
R choice of route
R the use of electrical consumers These factors are not included in the ECO dis-
play.
The evaluation of your driving style takes the
following three categories into consideration:
Acceleration (evaluation of all accelera-
tion processes) The bar fills up: The bar empties:
Moderate accelera-
tion, especially at
higher speeds Sporty acceleration
Smooth driving (assessment of driving
behaviour at all times)
The bar fills up: The bar empties:
Constant speed and
avoidance of unnec-
essary acceleration
and deceleration Fluctuations in
speed
Coasting (assessment of all deceleration
processes)
The bar fills up: The bar empties:
Anticipatory driving,
keeping your dis-
tance and early
release of the accel-
erator: the vehicle
can coast without
use of the brakes Frequent braking
i
An economical driving style involves driv-
ing with a moderate engine speed.
To achieve a higher value in the categories
"acceleration" and "smooth driving":
R observe the gearshift recommendation.
R drive the vehicle in drive program E(vehi-
cles with automatic transmission).
i On long journeys at a constant speed, e.g.
on the motorway, only the bar for "smooth
driving" will change. 166
Driving tipsDriving and parking
Page 176 of 381
R
Observe the warnings for off-road driving
(Y page 170).
R Drive slowly.
R Accelerate gently and make sure that the
wheels are gripping.
R Avoid high engine speeds, except when
driving on sandy and muddy routes with
high driving resistance.
R Select a shift range appropriate to the gra-
dient.
R Before tackling steep downhill gradients,
select shift range 1.
Maximum gradient-climbing capability On good road surfaces, 70% of the maximum
gradient-climbing capability is available.
i If the load on the front axle is reduced
when pulling away on a steep uphill slope,
the front wheels have a tendency to spin.
4ETS recognises this and brakes the
wheels accordingly. The rear wheel torque
is increased and it is easier to pull away.
Hilltops When driving up an uphill gradient, slightly
reduce pressure on the accelerator immedi-
ately before reaching the brow of the hill.
Make use of the vehicle's own impetus to
travel over the brow.
This style of driving prevents:
R the vehicle from lifting off the ground on the
brow of a hill
R the vehicle from travelling too quickly down
the other side.
Driving downhill R
Drive slowly.
R Do not drive at an angle down steep
inclines. Steer into the line of fall and drive
with the front wheels aligned straight. Oth-
erwise, the vehicle could slip sideways, tip
and overturn. R
Before tackling steep downhill gradients,
select shift range 1.
R Activate DSR. If this is not sufficient, brake
gently. When doing so, make sure that the
vehicle is facing in the direction of the line
of fall.
R Check that the brakes are working normally
after a long downhill stretch.
i Off-road ABS is activated when the off-
road drive program is selected.
At speeds below 30 km/h, the front wheels
lock cyclically during braking. The digging-
in effect achieved in the process reduces
the stopping distance when driving off-
road. The steerability of the vehicle is con-
siderably reduced if the wheels lock. Driving systems
Cruise control
Important safety notes Cruise control maintains a constant road
speed for you. It brakes automatically in order
to avoid exceeding the set speed. You must
select a low gear in good time on long and
steep downhill gradients, especially if the
vehicle is laden or towing a trailer. On vehicles
with automatic transmission, select shift
range
1,2or 3. By doing so, you will make
use of the braking effect of the engine. This
relieves the load on the brake system and
prevents the brakes from overheating and
wearing too quickly. G
WARNING
Do not change down for additional engine
braking on a slippery road surface. This could
cause the drive wheels to lose their grip and
the vehicle could skid.
Use cruise control only if road and traffic con-
ditions make it appropriate to maintain a
steady speed for a prolonged period. You can
store any road speed above 30 km/h. Driving systems
173Driving and parking Z
Page 178 of 381
i
Vehicles with manual transmission:
R always drive at adequate, but not exces-
sive, engine speeds.
R change gear in good time.
R if possible, do not change down several
gears at a time.
Storing the current speed and calling up
the last stored speed G
WARNING
Only call up a stored speed if you know what
that speed is and if it is suitable for the current
traffic and driving situation. You can other-
wise endanger yourself or others by uninten-
tionally triggering sudden acceleration or
braking.
X Briefly pull the cruise control lever towards
you =.
X Remove your foot from the accelerator
pedal.
The first time cruise control is activated, it
stores the current speed or regulates the
speed of the vehicle to the previously
stored speed.
Setting a speed X
Press the cruise control lever up :for a
higher speed or down ?for a lower speed.
X Keep the cruise control lever pressed until
the desired speed is reached.
X Release the cruise control lever.
The new speed is stored.
X To adjust the set speed in 1 km/h incre-
ments: briefly press the cruise control
lever up :or down ?to the pressure
point.
The last speed stored is increased or
reduced in 1 km/h increments.
X To adjust the set speed in 10 km/h
increments: press the cruise control lever briefly up
:or down ?beyond the pres-
sure point.
The last speed stored is increased or
reduced in 10 km/h increments.
i Cruise control is not deactivated if you
depress the accelerator pedal. For exam-
ple, if you accelerate briefly to overtake,
cruise control adjusts the vehicle's speed
to the last speed stored after you have fin-
ished overtaking.
Deactivating cruise control There are several ways to deactivate cruise
control:
X
Briefly press the cruise control lever for-
wards B.
or
X Brake
or
X Briefly press the cruise control lever in the
direction of arrow A.
Variable SPEEDTRONIC is selected. LIM
indicator lamp ;in the cruise control lever
lights up.
Cruise control is automatically deactivated if:
R you depress the parking brake.
R you are driving at less than 30 km/h.
R ESP ®
intervenes or you deactivate ESP ®
.
R you shift into neutral in a vehicle with man-
ual transmission while driving or depress
the clutch pedal for longer than six sec-
onds.
R on vehicles with manual transmission, you
shift to a gear that is too high, and as a
result the engine speed is too low.
R on vehicles with automatic transmission,
you shift into position Nwhile driving.
If cruise control is deactivated, you will hear
a warning tone. You will see the Cruise Cruise
control off
control off message in the multifunction
display for approximately five seconds.
i The last speed stored is cleared when you
switch off the engine. Driving systems
175Driving and parking Z
Page 179 of 381
SPEEDTRONIC
Important safety notes G
WARNING
Never depress the brake pedal continuously
while the vehicle is in motion, e.g. never cause
the brakes to rub by applying constant slight
pedal pressure. This causes the brake system
to overheat, increases the braking distance
and can lead to the brakes failing completely. G
WARNING
Do not change down for additional engine
braking on a slippery road surface. This could
cause the drive wheels to lose their grip and
the vehicle could skid. G
WARNING
SPEEDTRONIC is only an aid designed to
assist driving. You are responsible for the
vehicle's speed and for braking in good time.
SPEEDTRONIC brakes automatically so that
you do not exceed the set speed. On long and
steep downhill gradients, especially if the
vehicle is laden or towing a trailer, you must
shift to a lower gear in good time or select
shift range 1,2or 3on vehicles with auto-
matic transmission. By doing so, you will
make use of the braking effect of the engine.
This relieves the load on the brake system and
prevents the brakes from overheating and
wearing too quickly. If you need additional
braking, depress the brake pedal repeatedly
rather than continuously.
You can set a variable or permanent limit
speed:
R variable for speed limits, e.g. in built-up
areas
R permanent for long-term speed restric-
tions, e.g. when driving with winter tyres
fitted (Y page 178)
i The speed indicated in the speedometer
may differ slightly from the limit speed
stored. Variable SPEEDTRONIC General notes
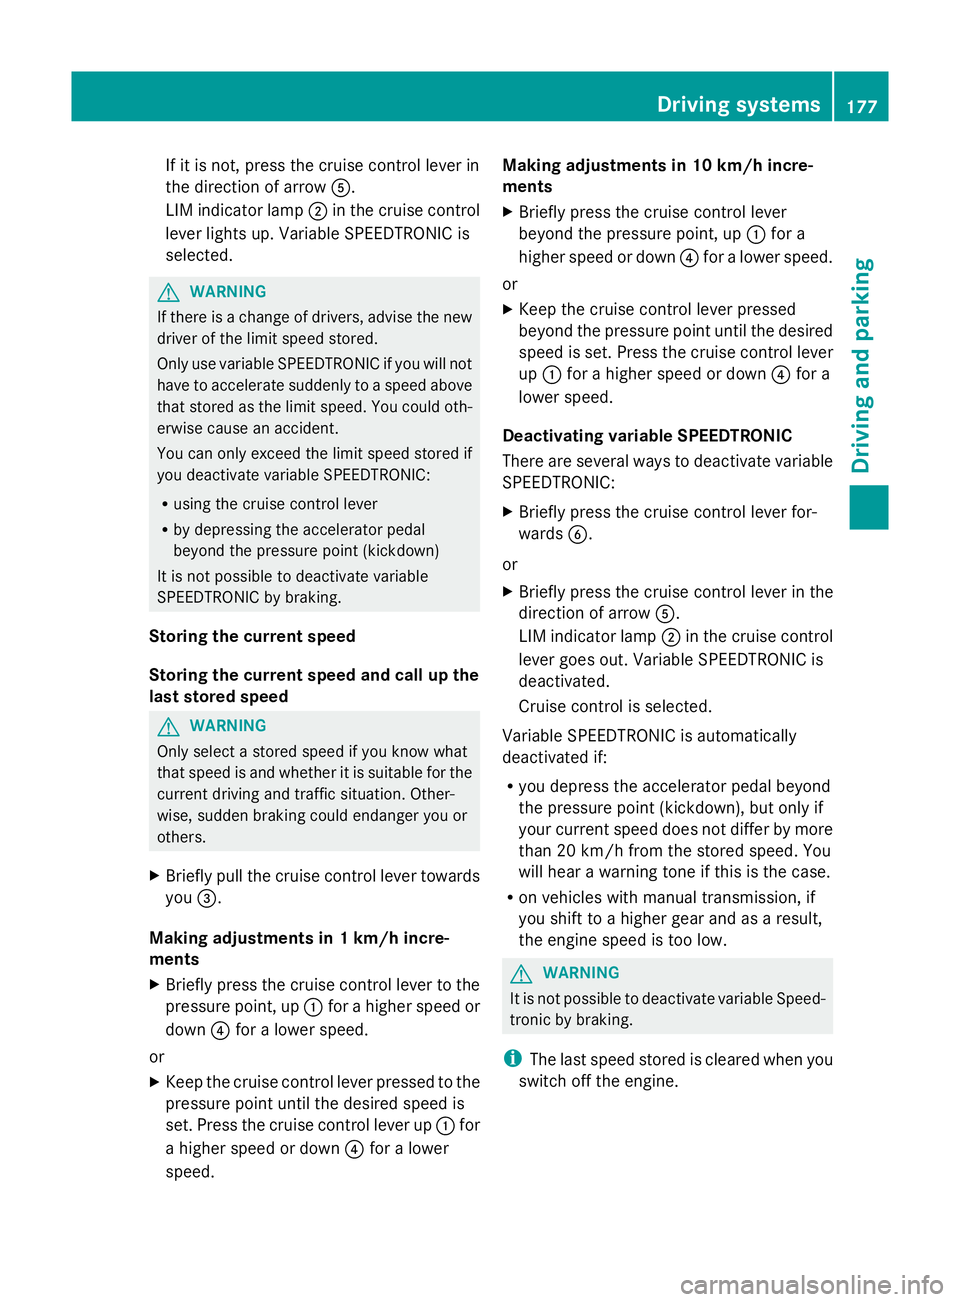
With the cruise control lever, you can operate
cruise control or DISTRONIC PLUS and vari-
able SPEEDTRONIC.
The LIM indicator lamp on the cruise control
lever indicates which system you have selec-
ted:
R LIM indicator lamp off: cruise control or
DISTRONIC PLUS is selected.
R LIM indicator lamp on: variable SPEED-
TRONIC is selected.
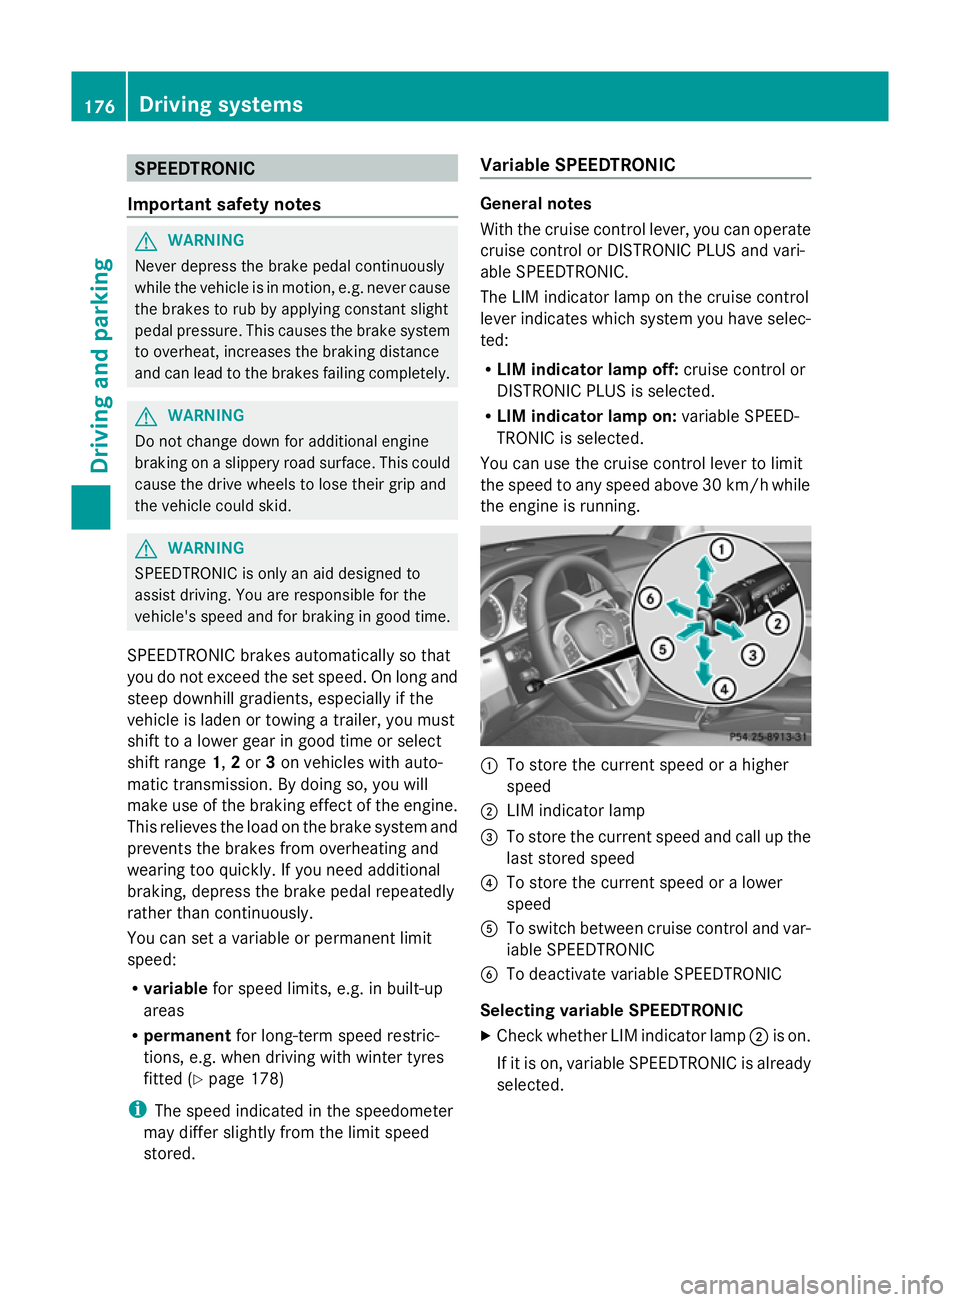
You can use the cruise control lever to limit
the speed to any speed above 30 km/hw hile
the engine is running. :
To store the current speed or a higher
speed
; LIM indicator lamp
= To store the current speed and call up the
last stored speed
? To store the current speed or a lower
speed
A To switch between cruise control and var-
iable SPEEDTRONIC
B To deactivate variable SPEEDTRONIC
Selecting variable SPEEDTRONIC
X Check whether LIM indicator lamp ;is on.
If it is on, variable SPEEDTRONIC is already
selected. 176
Driving systemsDriving and parking
Page 180 of 381
If it is not, press the cruise control lever in
the direction of arrow
A.
LIM indicator lamp ;in the cruise control
lever lights up. Variable SPEEDTRONIC is
selected. G
WARNING
If there is a change of drivers, advise the new
driver of the limit speed stored.
Only use variable SPEEDTRONIC if you will not
have to accelerate suddenly to a speed above
that stored as the limit speed. You could oth-
erwise cause an accident.
You can only exceed the limit speed stored if
you deactivate variable SPEEDTRONIC:
R using the cruise control lever
R by depressing the accelerator pedal
beyond the pressure point (kickdown)
It is not possible to deactivate variable
SPEEDTRONIC by braking.
Storing the current speed
Storing the current speed and call up the
last stored speed G
WARNING
Only select a stored speed if you know what
that speed is and whether it is suitable for the
current driving and traffic situation. Other-
wise, sudden braking could endanger you or
others.
X Briefly pull the cruise control lever towards
you =.
Making adjustments in 1 km/h incre-
ments
X Briefly press the cruise control lever to the
pressure point, up :for a higher speed or
down ?for a lower speed.
or
X Keep the cruise control lever pressed to the
pressure point until the desired speed is
set. Press the cruise control lever up :for
a higher speed or down ?for a lower
speed. Making adjustments in 10 km/h incre-
ments
X
Briefly press the cruise control lever
beyond the pressure point, up :for a
higher speed or down ?for a lower speed.
or
X Keep the cruise control lever pressed
beyond the pressure point until the desired
speed is set. Press the cruise control lever
up : for a higher speed or down ?for a
lower speed.
Deactivating variable SPEEDTRONIC
There are several ways to deactivate variable
SPEEDTRONIC:
X Briefly press the cruise control lever for-
wards B.
or
X Briefly press the cruise control lever in the
direction of arrow A.
LIM indicator lamp ;in the cruise control
lever goes out. Variable SPEEDTRONIC is
deactivated.
Cruise control is selected.
Variable SPEEDTRONIC is automatically
deactivated if:
R you depress the accelerator pedal beyond
the pressure point (kickdown), but only if
your current speed does not differ by more
than 20 km/h from the stored speed. You
will hear a warning tone if this is the case.
R on vehicles with manual transmission, if
you shift to a higher gear and as a result,
the engine speed is too low. G
WARNING
It is not possible to deactivate variable Speed-
tronic by braking.
i The last speed stored is cleared when you
switch off the engine. Driving systems
177Driving and parking Z
Page 186 of 381
lever up
:or down ;to the pressure
point.
The last speed stored is increased or
reduced in 1 km/h increments.
X To adjust the set speed in 10-km/h
increments: press the cruise control lever
briefly up :or down ;beyond the pres-
sure point.
The last speed stored is increased or
reduced in 10 km/h increments.
i DISTRONIC PLUS is not deactivated if you
depress the accelerator pedal. If you accel-
erate to overtake, DISTRONIC PLUS
adjusts the vehicle's speed to the last
speed stored after you have finished over-
taking.
Storing the current speed or calling up
the stored speed G
WARNING
Only call up a stored speed if you know what
that speed is and if it is suitable for the current
traffic and driving situation. You can other-
wise endanger yourself or others by uninten-
tionally triggering sudden acceleration or
braking.
X Briefly pull the cruise control lever towards
you ?.
X Remove your foot from the accelerator
pedal.
DISTRONIC PLUS is activated. The first
time it is activated, the current speed is
stored. Otherwise, it sets the vehicle cruise
speed to the previously stored value.
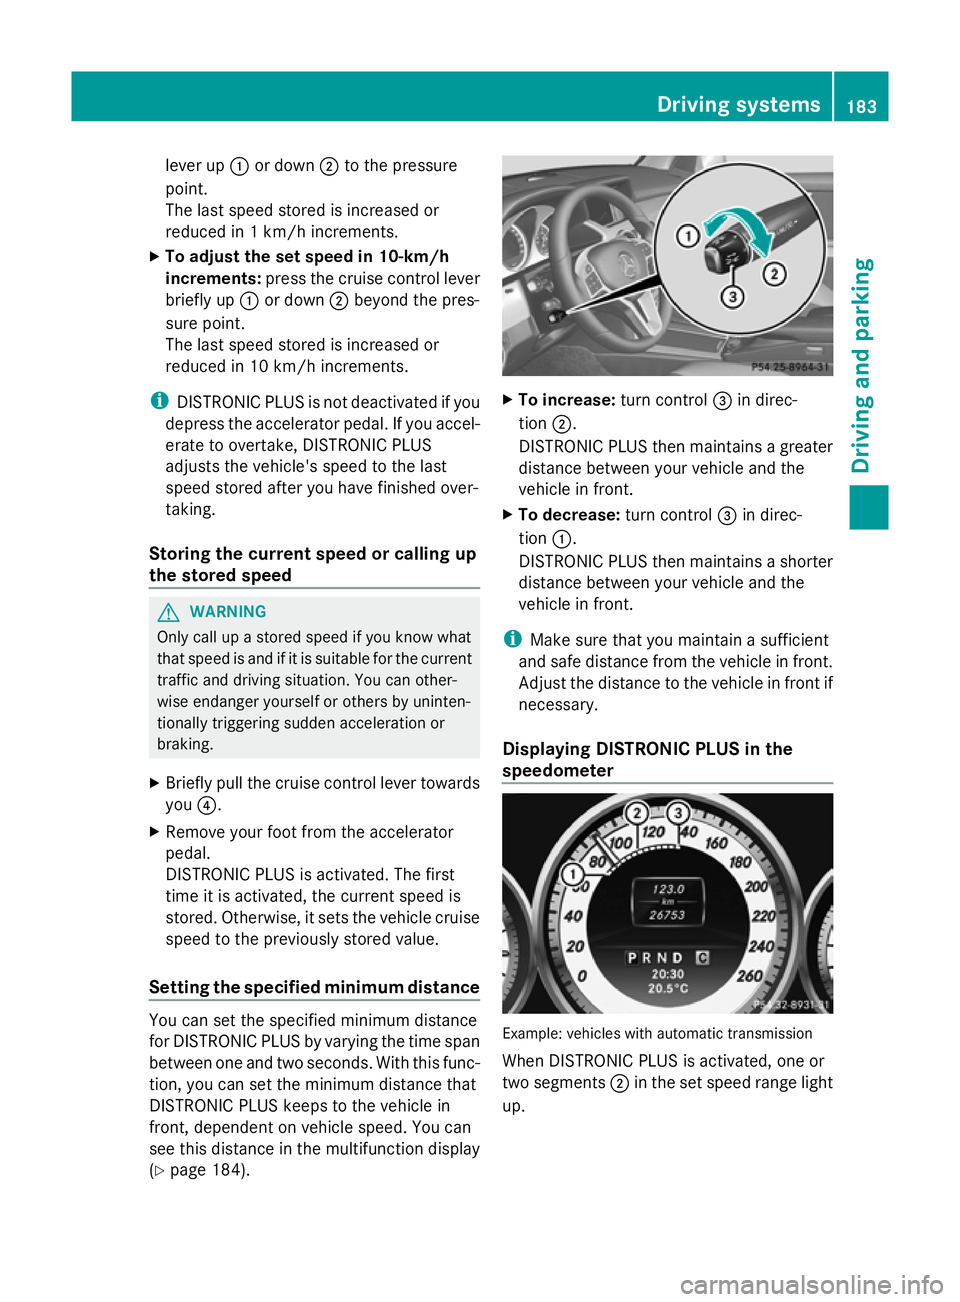
Setting the specified minimum distance You can set the specified minimum distance
for DISTRONIC PLUS by varying the time span
between one and two seconds. With this func-
tion, you can set the minimum distance that
DISTRONIC PLUS keeps to the vehicle in
front, dependent on vehicle speed. You can
see this distance in the multifunction display
(Y page 184). X
To increase: turn control=in direc-
tion ;.
DISTRONIC PLUS then maintains a greater
distance between your vehicle and the
vehicle in front.
X To decrease: turn control=in direc-
tion :.
DISTRONIC PLUS then maintains a shorter
distance between your vehicle and the
vehicle in front.
i Make sure that you maintain a sufficient
and safe distance from the vehicle in front.
Adjust the distance to the vehicle in front if
necessary.
Displaying DISTRONIC PLUS in the
speedometer Example: vehicles with automatic transmission
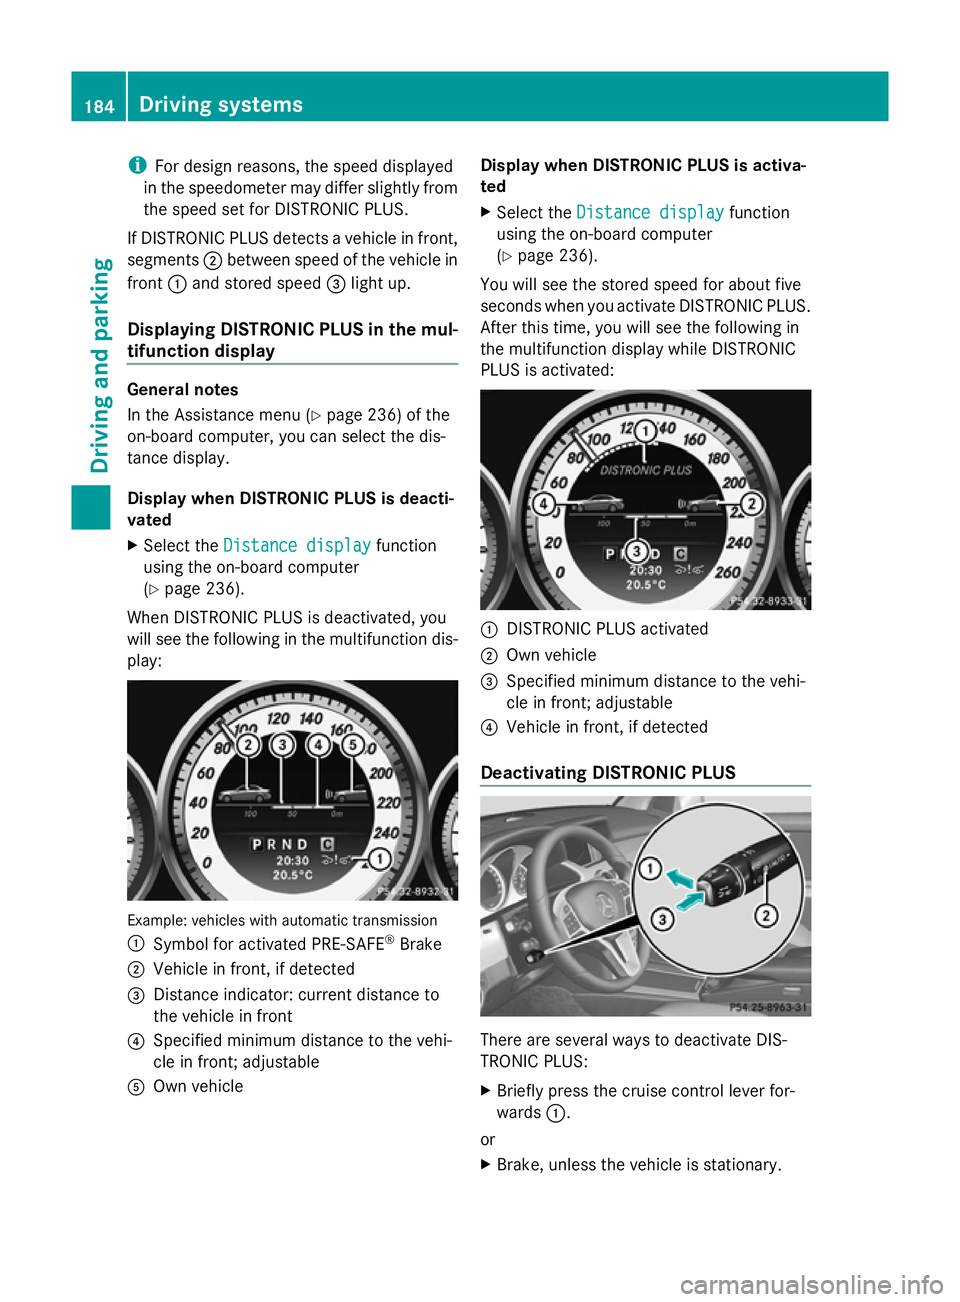
When DISTRONIC PLUS is activated, one or
two segments
;in the set speed range light
up. Driving systems
183Driving and parking Z
Page 187 of 381
i
For design reasons, the speed displayed
in the speedometer may differ slightly from
the speed set for DISTRONIC PLUS.
If DISTRONIC PLUS detects a vehicle in front,
segments ;between speed of the vehicle in
front :and stored speed =light up.
Displaying DISTRONIC PLUS in the mul-
tifunction display General notes
In the Assistance menu (Y
page 236) of the
on-board computer, you can select the dis-
tance display.
Display when DISTRONIC PLUS is deacti-
vated
X Select the Distance display
Distance display function
using the on-board computer
(Y page 236).
When DISTRONIC PLUS is deactivated, you
will see the following in the multifunction dis-
play: Example: vehicles with automatic transmission
: Symbol for activated PRE-SAFE ®
Brake
; Vehicle in front, if detected
= Distance indicator: current distance to
the vehicle in front
? Specified minimum distance to the vehi-
cle in front; adjustable
A Own vehicle Display when DISTRONIC PLUS is activa-
ted
X
Select the Distance display
Distance display function
using the on-board computer
(Y page 236).
You will see the stored speed for about five
seconds when you activate DISTRONIC PLUS.
After this time, you will see the following in
the multifunction display while DISTRONIC
PLUS is activated: :
DISTRONIC PLUS activated
; Own vehicle
= Specified minimum distance to the vehi-
cle in front; adjustable
? Vehicle in front, if detected
Deactivating DISTRONIC PLUS There are several ways to deactivate DIS-
TRONIC PLUS:
X
Briefly press the cruise control lever for-
wards :.
or
X Brake, unless the vehicle is stationary. 184
Driving systemsDriving and parking