2012 MERCEDES-BENZ GLK SUV emergency towing
[x] Cancel search: emergency towingPage 8 of 381

Air vents
Glove compartment .......................142
Important safety notes ..................141
Rear ............................................... 143
Setting ........................................... 141
Setting the centre air vents ...........142
Setting the side air vents ...............142
Alarm system
see ATA (Anti-Theft Alarm system)
Anti-glare film .................................... 310
Anti-lock Braking System see ABS (Anti-lock Braking System)
Anti-Theft Alarm system
see ATA (Anti-Theft Alarm system)
Approach/departure angle ..............172
Aquaplaning ....................................... 168
Ashtray ............................................... 306
ASSYST PLUS Displaying a service message ........312
Hiding a service message ..............312
Notes ............................................. 312
Resetting the service interval dis-
pla y................................................ 312
Service message ............................ 312
Special service requirements ......... 313
ATA (Anti-Theft Alarm system)
Activating/deactivating ...................72
Function .......................................... .72
Interior motion sensor .....................73
Switching off the alarm ....................72
Tow-away protection ........................ 72
ATTENTION ASSIST
Activating/deactivating .................237
Display message (12-button mul-
tifunction steering wheel) ..............271
Function/notes ............................. 201
Audio DVD (12-button multifunc-
tion steering wheel) ..........................233
Audio menu (on-board computer,
12-button multifunction steering
wheel) ................................................ .233
Audio menu (on-board computer) ....233
Authorised workshop see Qualified specialist workshop AUTO lights
Display message (12-button mul-
tifunction steering wheel) ..............263
Display message (4-button multi-
function steering wheel) ................260
see Lights
Automatic engine start (ECO start/
stop function) .................................... 152
Automatic engine switch-off (ECO
start/stop function) ..........................151
Automatic headlamp mode ..............111
Automatic transmission Accelerator pedal position .............157
Automatic drive program ...............159
Changing gea r............................... 157
DIRECT SELECT lever .....................155
Display message (4-button multi-
function steering wheel) ................278
Drive position (ECO start/stop
function) ........................................ 157
Driving tips .................................... 157
Emergency running mode ..............161
Engaging drive position .................. 157
Engaging neutral ............................ 157
Engaging park position automati-
call y............................................... 156
Engaging reverse gear ...................156
Engaging the park position ............156
Kickdown ....................................... 158
Manual drive program ....................160
Neutral (ECO start/stop function) .156
Problem (fault) ............................... 161
Program selector button ................158
Pulling away ................................... 149
Shift ranges ................................... 159
Starting the engine ........................148
Steering wheel gearshift paddle s... 159
Trailer towing ................................. 158
Transmission position displa y........ 156
Transmission positions ..................157
Automatic transmission emer-
gency running mode .........................161
Automatic transmissions Display message (12-button mul-
tifunction steering wheel) ..............279 Index
5
Page 14 of 381

E
EASY-ENTRY feature Activating/deactivating (12-but-
ton multifunction steering wheel) ..243
Function/notes ............................. 102
EASY-EXIT feature
Activating/deactivating (12-but-
ton multifunction steering wheel) ..243
Crash-responsive ........................... 103
Function/notes ............................. 102
EBD (electronic brake force distri-
bution)
Display message (12 button mul-
tifunction steering wheel) ..............253
Function/notes ................................ 69
EBD (Electronic Brake-force Distri-
bution)
Display message (4-button multi-
function steering wheel) ................248
ECO display
Function/notes ............................. 166
On-board computer (12-button
multifunction steering wheel) ........231
ECO start/stop function
Deactivating/activating .................150
General information .......................150
Electrical fuses
see Fuses
Electronic Stability Program
see ESP ®
(Electronic Stability Program)
Electronic Traction System
see ETS/4ETS (Electronic Trac-
tion System)
Emergency key
Unlocking the driver's door ..............84
Emergency key element
Function/notes ................................ 78
Locking vehicle ................................ 84
Emergency release
Driver's door .................................... 84
Emergency spare wheel
Inflating the collapsible spare
wheel ............................................. 336
Notes/data .................................... 359
Storage location ............................ 328
Stowing .......................................... 328 Emergency unlocking
Tailgate ............................................ 88
Vehicle ............................................. 84
Engine
ECO start/stop function ................150
Engine number ............................... 365
Jump-starting ................................. 341
Running irregularl y......................... 153
Starting problems ..........................153
Starting the engine with the key ....148
Starting with KEYLESS GO .............149
Stopping ........................................ 164
Tow-starting (vehicle) ..................... 345
Warning lamp (engine diagnos-
tics) ............................................... 291
Engine electronics
Notes ............................................. 363
Problem (fault) ............................... 153
Engine oil
Additives ........................................ 370
Checking the oil level ..................... 315
Checking the oil level using the
dipstick .......................................... 315
Display message (12-button mul-
tifunction steering wheel) ..............268
Display message (4-button multi-
function steering wheel) ................265
Filling capacity ............................... 370
Notes about oil grades ................... 369
Notes on oil level/consumption ....315
Topping up ..................................... 316
Viscosity ........................................ 370
Environmental protection
Returning an end-of-life vehicle .......25
ESP ®
(Electronic Stability Pro-
gram) Deactivating/activating ...................68
Display message (12-button mul-
tifunction steering wheel) ..............252
Display message (4-button multi-
function steering wheel) ................247
ETS/4ETS ........................................ 68
Function/notes ................................ 67
Important safety guidelines .............67
Trailer stabilisatio n.......................... 69
Warning lamp ................................. 288
ETS/4ETS (Electronic Traction Sys-
tem) ...................................................... 68 Index
11
Page 25 of 381

Towing
Important safety notes ..................342
With the rear axle raised ................344
Towing a trailer
Active Blind Spot Assist .................210
Active Lane Keeping Assist .... 207, 213
Active Parking Assist .....................196
Lights display message (12-but-
ton multifunction steering wheel) ..260
Lights display message (4-button
multifunction steering wheel) ........257
Towing away
Fitting the towing eye ....................343
Removing the towing eye ...............344
With both axles on the ground .......344
Tow-starting
Emergency engine starting ............345
Fitting the towing eye ....................343
Important safety notes ..................342
Removing the towing eye ...............344
Trailer coupling
see Towing a trailer
Trailer towing
7-pin connector ............................. 221
Blind Spot Assist ............................ 205
Cleaning the trailer tow hitch ......... 321
Coupling up a trailer ......................220
Decoupling a trailer .......................220
Driving tips .................................... 215
ESP ®
................................................ 69
Fitting the ball coupling .................217
Important safety notes ..................215
Mounting dimensions ....................373
Parktroni c...................................... 191
Power supply ................................. 221
Removing the ball coupling ............220
Shift range ..................................... 158
Storing the ball coupling ................220
Trailer loads ................................... 374
Transmission
see Automatic transmission
see Manual transmission
Transmission position display .........156
Transmission position display
(DIRECT SELECT lever) ......................156
Transporting the vehicle ..................345Travelling uphill
Brow of hill ..................................... 173
Driving downhill ............................. 173
Maximum gradient-climbing capa-
bility .............................................. .173
Trim pieces (cleaning instructions) .323
Trip computer On-board computer (12-button
multifunction steering wheel) ........230
On-board computer (4-button
multifunction steering wheel) ........226
Trip meter
Displaying/resetting (4-button
multifunction steering wheel) ........226
Displaying (12-button multifunc-
tion steering wheel) .......................230
Resetting (12-button multifunc-
tion steering wheel) .......................232
Turn signal
Display message (12-button mul-
tifunction steering wheel) ..............261
Display message (4-button multi-
function steering wheel) ................258
see Turn signals
Turn signals
Changing bulbs (front) ...................120
Changing bulbs (rear) ....................121
Switching on/off ........................... 113
TV
Operating (on-board computer) .....234
see Separate operating instructions
Two-way radio
Frequencies ................................... 363
Installation ..................................... 363
Transmission output (maximum) .... 363
Type identification plate
see Vehicle identification plate
Tyre pressure
Display message (12-button mul-
tifunction steering wheel) ..............277
Display message (4-button multi-
function steering wheel) ................276
Not reached (TIREFIT) ....................331
Pressure loss warning ....................355
Reached (TIREFIT) ..........................331
Recommended ............................... 353
Tyres
Checking ........................................ 351 22
Index
Page 26 of 381

Direction of rotatio
n...................... 357
Display message (12-button mul-
tifunction steering wheel) ..............277
Display message (4-button multi-
function steering wheel) ................276
Important safety notes ..................350
Replacing ....................................... 356
Service life ..................................... 351
Storing ........................................... 357
Tyre size (data) .............................. 357
Tyre tread ...................................... 351
see Flat tyre U
Unladen weight ................................. 372
Unlocking Emergency unlocking .......................84
From inside the vehicle (central
unlocking button) ............................. 83 V
Vanity mirror (in sun visor) ..............306
Variable SPEEDTRONIC see SPEEDTRONIC
Vehicle
Correct use ...................................... 27
Data acquisition ............................... 28
Electronics ..................................... 363
Emergency unlocking .......................84
Equipment ....................................... 25
Implied warranty .............................. 28
Individual settings ..........................238
Leaving parked up .........................165
Locking (in an emergency) ...............84
Locking (key) ................................... 76
Lowering ........................................ 337
Pulling away ................................... 149
Raising ........................................... 333
Registration ..................................... 27
Towing away .................................. 342
Tow-starting ................................... 342
Transporting .................................. 345
Unlocking (in an emergency) ...........84
Unlocking (key) ................................ 76
Vehicle data ................................... 372
Vehicle data ....................................... 372
Vehicle dimensions ...........................372Vehicle emergency locking
................84
Vehicle identification number see VIN
Vehicle identification plate ..............364
Vehicle tool kit .................................. 327
Vehicle weights ................................. 372
Video (DVD) ........................................ 234
Video DVD (12-button multifunc-
tion steering wheel) ..........................234
VIN ...................................................... 364 W
Warning and indicator lamps ABS ................................................ 286
Brakes ........................................... 286
Distance warning signal .................294
ESP ®
.............................................. 288
ESP ®
OFF ....................................... 289
LIM (cruise control) ........................ 174
LIM (DISTRONIC PLUS) ..................179
LIM (variable SPEEDTRONIC )......... 176
PASSENGER AIRBAG OFF ................56
Reserve fuel ................................... 292
Seat belt ........................................ 284
SRS ................................................ 291
Warning triangle ................................ 326
Washer fluid Display message (12-button mul-
tifunction steering wheel) ..............281
Display message (4-button multi-
function steering wheel) ................279
Wheel bolt tightening torque ...........337
Wheel chock ...................................... 333
Wheels Changing/replacing .......................356
Changing a wheel .......................... 332
Checking ........................................ 351
Cleaning ......................................... 319
Fitting a new wheel ........................335
Important safety notes ..................350
Removing a wheel ..........................335
Storing ........................................... 357
Tightening torque ........................... 337
Wheel size/tyre size ......................357 Index
23
Page 300 of 381

Front stowage compartments
Glove compartment
X
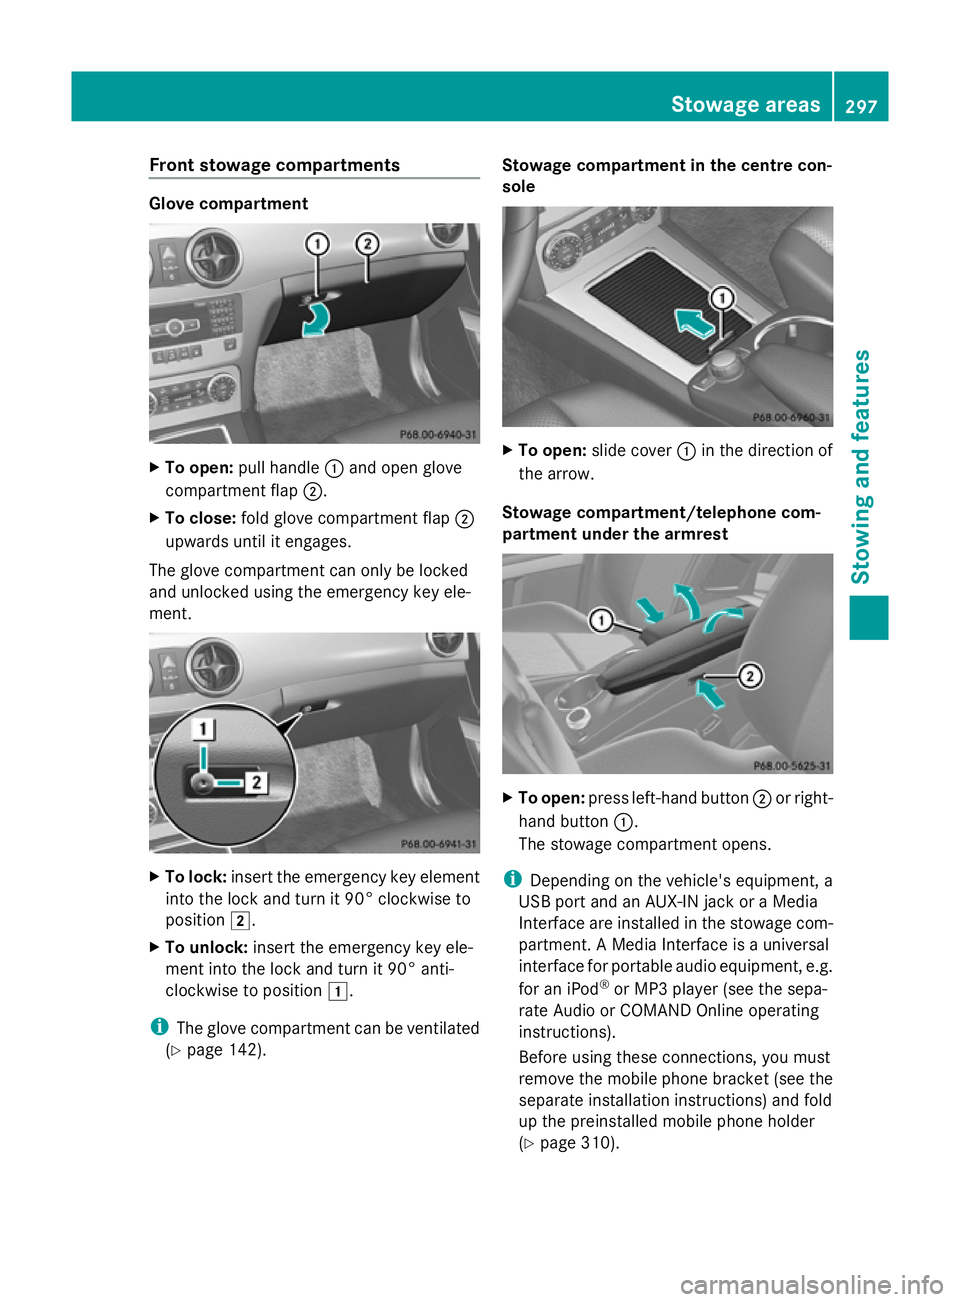
To open: pull handle :and open glove
compartment flap ;.
X To close: fold glove compartment flap ;
upwards until it engages.
The glove compartment can only be locked
and unlocked using the emergency key ele-
ment. X
To lock: insert the emergency key element
into the lock and turn it 90° clockwise to
position 2.
X To unlock: insert the emergency key ele-
ment into the lock and turn it 90° anti-
clockwise to position 1.
i The glove compartment can be ventilated
(Y page 142). Stowage compartment in the centre con-
sole
X
To open: slide cover :in the direction of
the arrow.
Stowage compartment/telephone com-
partment under the armrest X
To open: press left-hand button ;or right-
hand button :.
The stowage compartment opens.
i Depending on the vehicle's equipment, a
USB port and an AUX-IN jack or a Media
Interface are installed in the stowage com-
partment. A Media Interface is a universal
interface for portable audio equipment, e.g.
for an iPod ®
or MP3 player (see the sepa-
rate Audio or COMAND Online operating
instructions).
Before using these connections, you must
remove the mobile phone bracket (see the
separate installation instructions) and fold
up the preinstalled mobile phone holder
(Y page 310). Stowage areas
297Stowing and featu res Z
Page 310 of 381

X
To open: pull cover ;out by its top edge.
X To remove the insert: press release but-
ton =and lift the insert up and out.
X To fit the insert: fit insert:from above
into the holder and press down into the
holder until it engages. Cigarette lighter
G
WARNING
Only hold the hot cigarette lighter by its knob.
Otherwise, you might burn yourself.
Make sure that children travelling in the vehi-
cle are not able to injure themselves on the
hot cigarette lighter or cause a fire with it.
Vehicles with manual transmission X
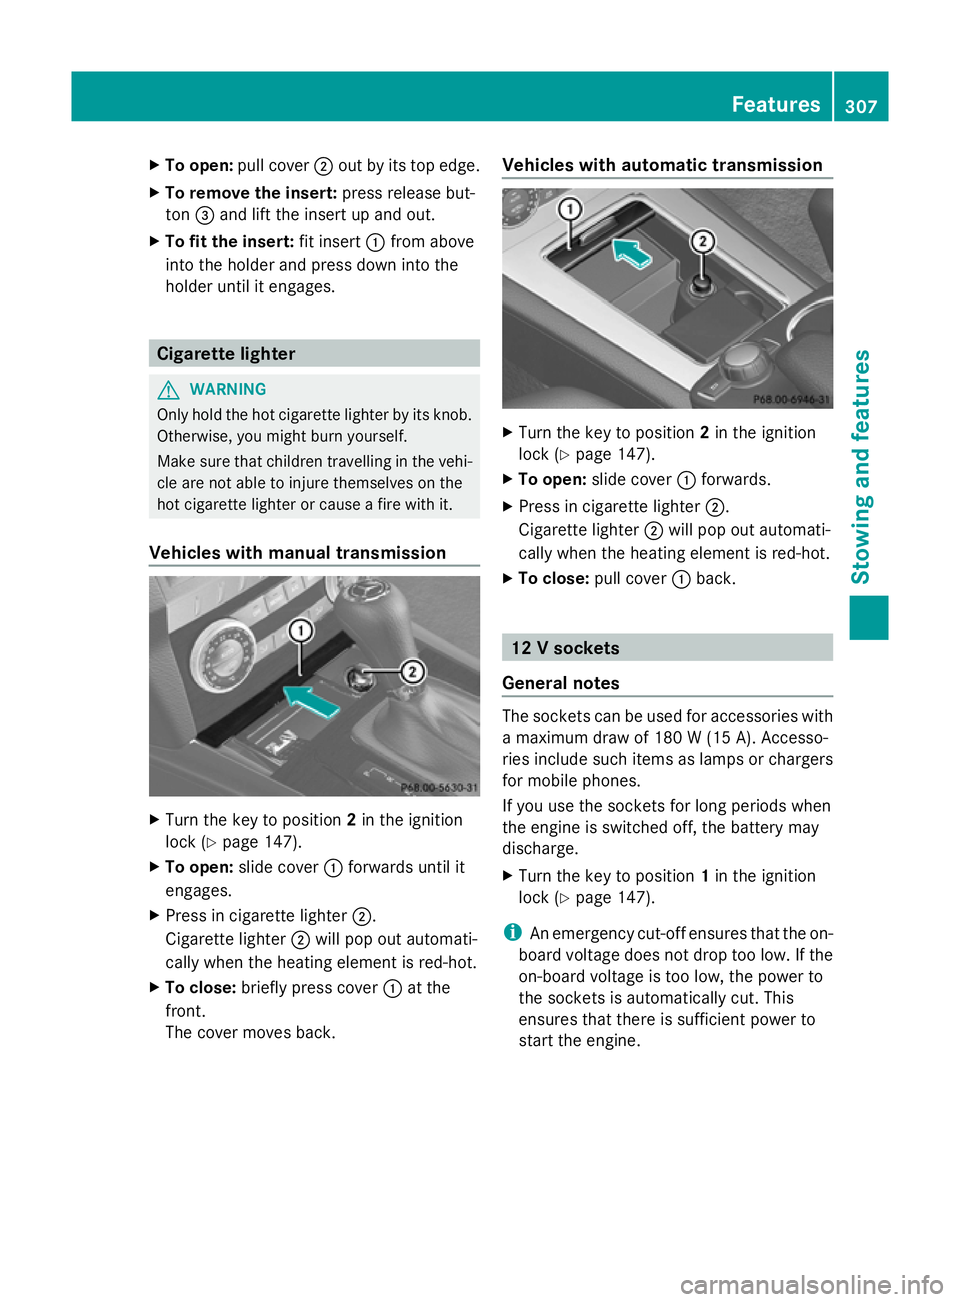
Turn the key to position 2in the ignition
lock (Y page 147).
X To open: slide cover :forwards until it
engages.
X Press in cigarette lighter ;.
Cigarette lighter ;will pop out automati-
cally when the heating element is red-hot.
X To close: briefly press cover :at the
front.
The cover moves back. Vehicles with automatic transmission
X
Turn the key to position 2in the ignition
lock (Y page 147).
X To open: slide cover :forwards.
X Press in cigarette lighter ;.
Cigarette lighter ;will pop out automati-
cally when the heating element is red-hot.
X To close: pull cover :back. 12 V sockets
General notes The sockets can be used for accessories with
a maximum draw of 180 W (15 A). Accesso-
ries include such items as lamps or chargers
for mobile phones.
If you use the sockets for long periods when
the engine is switched off, the battery may
discharge.
X
Turn the key to position 1in the ignition
lock (Y page 147).
i An emergency cut-off ensures that the on-
board voltage does not drop too low. If the
on-board voltage is too low, the power to
the sockets is automatically cut. This
ensures that there is sufficient power to
start the engine. Features
307Stowing an d features Z
Page 331 of 381

X
Vehicles with a collapsible emergency
spare wheel: lift up the luggage compart-
ment floor ( Ypage 303).
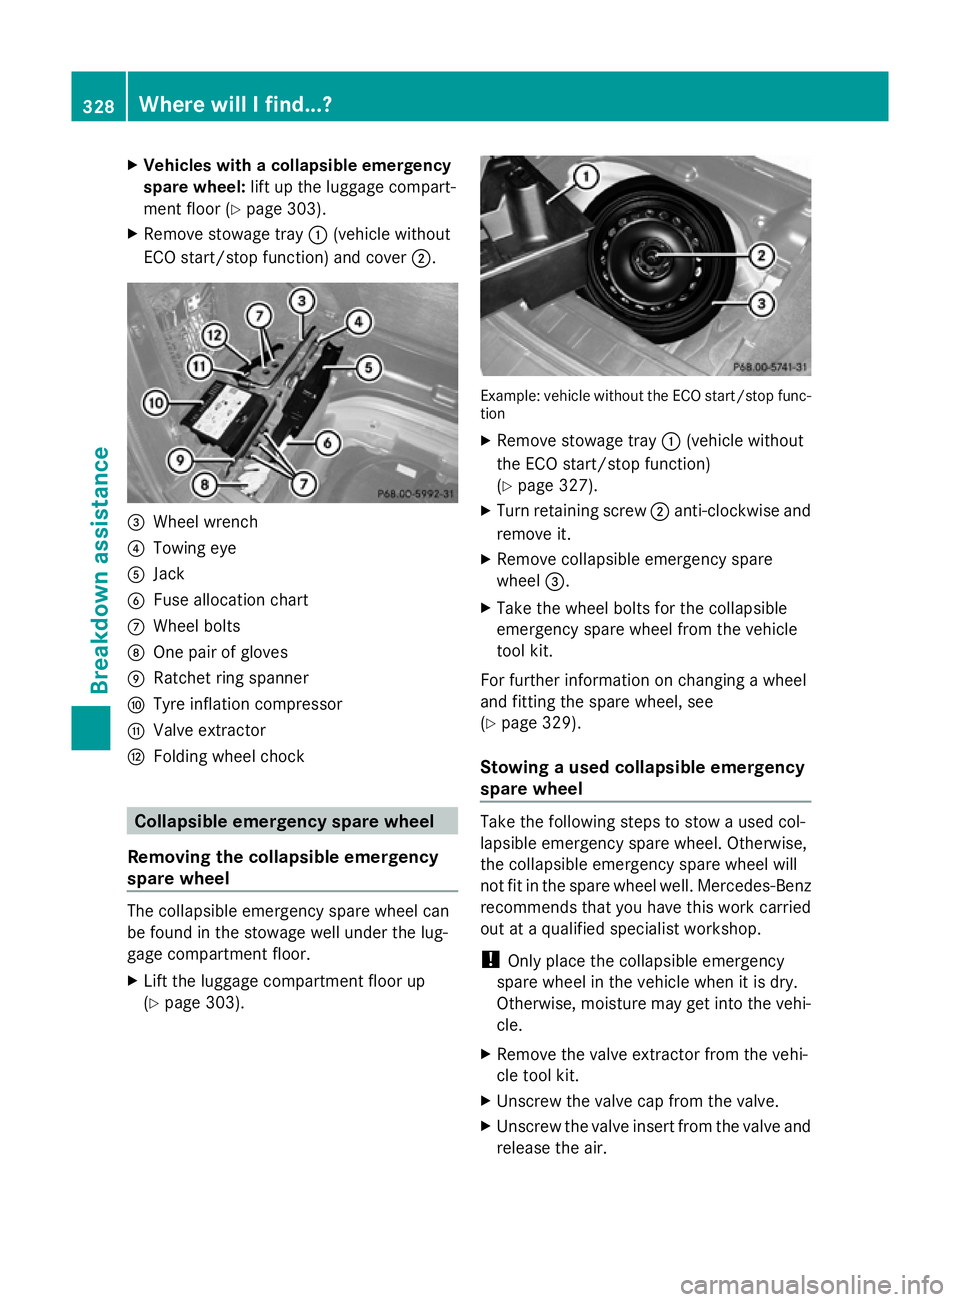
X Remove stowage tray :(vehicle without
ECO start/stop function) and cover ;.=
Wheel wrench
? Towing eye
A Jack
B Fuse allocation chart
C Wheel bolts
D One pair of gloves
E Ratchet ring spanner
F Tyre inflation compressor
G Valve extractor
H Folding wheel chock Collapsible emergency spare wheel
Removing the collapsible emergency
spare wheel The collapsible emergency spare wheel can
be found in the stowage well under the lug-
gage compartment floor.
X Lift the luggage compartment floor up
(Y page 303). Example: vehicle without the ECO start/stop func-
tion
X
Remove stowage tray :(vehicle without
the ECO start/stop function)
(Y page 327).
X Turn retaining screw ;anti-clockwise and
remove it.
X Remove collapsible emergency spare
wheel =.
X Take the wheel bolts for the collapsible
emergency spare wheel from the vehicle
tool kit.
For further information on changing a wheel
and fitting the spare wheel, see
(Y page 329).
Stowing a used collapsible emergency
spare wheel Take the following steps to stow a used col-
lapsible emergency spare wheel. Otherwise,
the collapsible emergency spare wheel will
not fit in the spare wheel well. Mercedes-Benz
recommends that you have this work carried
out at a qualified specialist workshop.
!
Only place the collapsible emergency
spare wheel in the vehicle when it is dry.
Otherwise, moisture may get into the vehi-
cle.
X Remove the valve extractor from the vehi-
cle tool kit.
X Unscrew the valve cap from the valve.
X Unscrew the valve insert from the valve and
release the air. 328
Where will I find...?Breakdown assistance
Page 340 of 381

X
Stow plug ?and the air hose in the lower
section of the blower housing.
X Stow the tyre inflation compressor in the
vehicle.
Lowering the vehicle G
WARNING
Tyre pressure that is too high or too low can
lead to a blow-out of the fitted emergency
spare wheel/spare wheel, particularly when
driving with a heavy load and increasing
speed. There is a risk of accident.
Check the tyre pressure of the emergency
spare wheel or spare wheel and adjust it.
When doing so, observe the specified tyre
pressure.
! Inflate the collapsible emergency spare
wheel using the tyre inflation compressor
before lowering the vehicle. The wheel rim
could otherwise be damaged.
X Place the ratchet ring spanner onto the
hexagon nut of the jack so that the letters
AB are visible.
X Turn the ratchet ring spanner until the vehi-
cle is once again standing firmly on the
ground.
X Place the jack to one side. G
WARNING
The wheels could work loose if the wheel nuts
and bolts are not tightened to the specified
tightening torque. There is a risk of accident. Have the tightening torque immediately
checked at a qualified specialist workshop
after a wheel is changed.
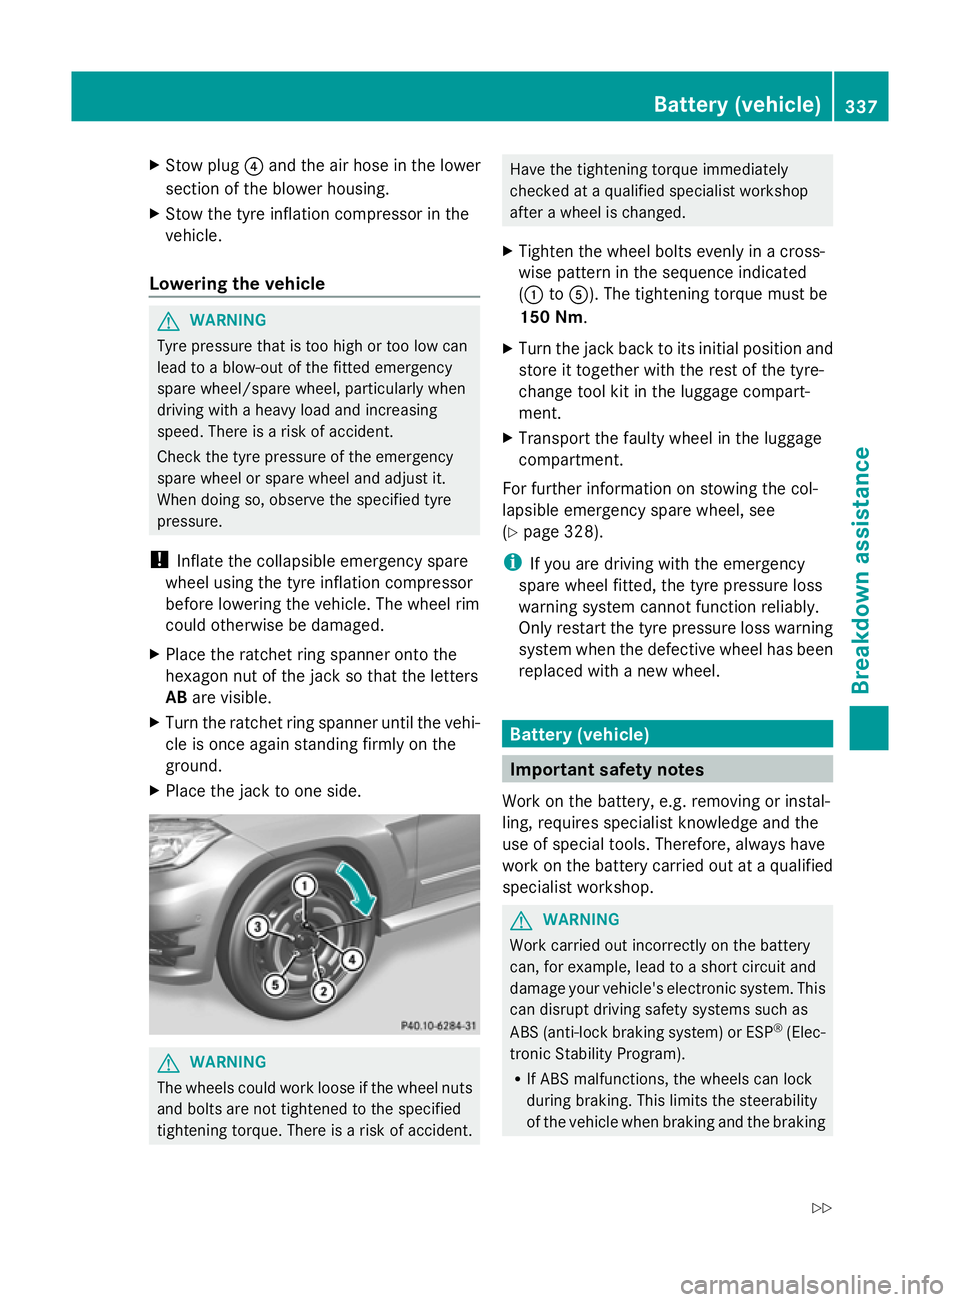
X Tighten the wheel bolts evenly in a cross-
wise pattern in the sequence indicated
(: toA). The tightening torque must be
150 Nm.
X Turn the jack back to its initial position and
store it together with the rest of the tyre-
change tool kit in the luggage compart-
ment.
X Transport the faulty wheel in the luggage
compartment.
For further information on stowing the col-
lapsible emergency spare wheel, see
(Y page 328).
i If you are driving with the emergency
spare wheel fitted, the tyre pressure loss
warning system cannot function reliably.
Only restart the tyre pressure loss warning
system when the defective wheel has been
replaced with a new wheel. Battery (vehicle)
Important safety notes
Work on the battery, e.g. removing or instal-
ling, requires specialist knowledge and the
use of special tools. Therefore, always have
work on the battery carried out at a qualified
specialist workshop. G
WARNING
Work carried out incorrectly on the battery
can, for example, lead to a short circuit and
damage your vehicle's electronic system. This
can disrupt driving safety systems such as
ABS (anti-lock braking system) or ESP ®
(Elec-
tronic Stability Program).
R If ABS malfunctions, the wheels can lock
during braking. This limits the steerability
of the vehicle when braking and the braking Battery (vehicle)
337Breakdown assistance
Z