2012 MERCEDES-BENZ GLK SUV ECO mode
[x] Cancel search: ECO modePage 119 of 381
When the Off-road-Lights are switched on,
the active light function is deactivated and
the headlamp range adjustment is set to the
static mode. Adaptive Highbeam Assist
G
WARNING
Adaptive Highbeam Assist is only an aid
designed to assist driving. The driver is
responsible for adjusting the vehicle's lighting
to the prevailing light, vision and traffic con-
ditions.
The system may be impaired or deactivated:
R if there is poor visibility, e.g. due to snow,
rain, fog or spray
R if the area of the windscreen around the
optical sensor is dirty, misted up or covered
up, e.g. by a sticker
The system may not recognise the following
road users:
R road users that have no lighting, e.g. pedes-
trians
R road users that have poor lighting, e.g.
cyclists
R road users whose lighting is not clearly visi-
ble, e.g. road users behind a crash barrier
R on rare occasions: road users that have
lights that may be recognised too late or not
at all
The automatic main-beam headlamps will not
be deactivated, or they may be activated
despite road users travelling in front of or
approaching the vehicle.
Thus, you could cause an accident and injure
yourself and others. Always observe traffic
conditions and, if necessary, dip the lights
manually.
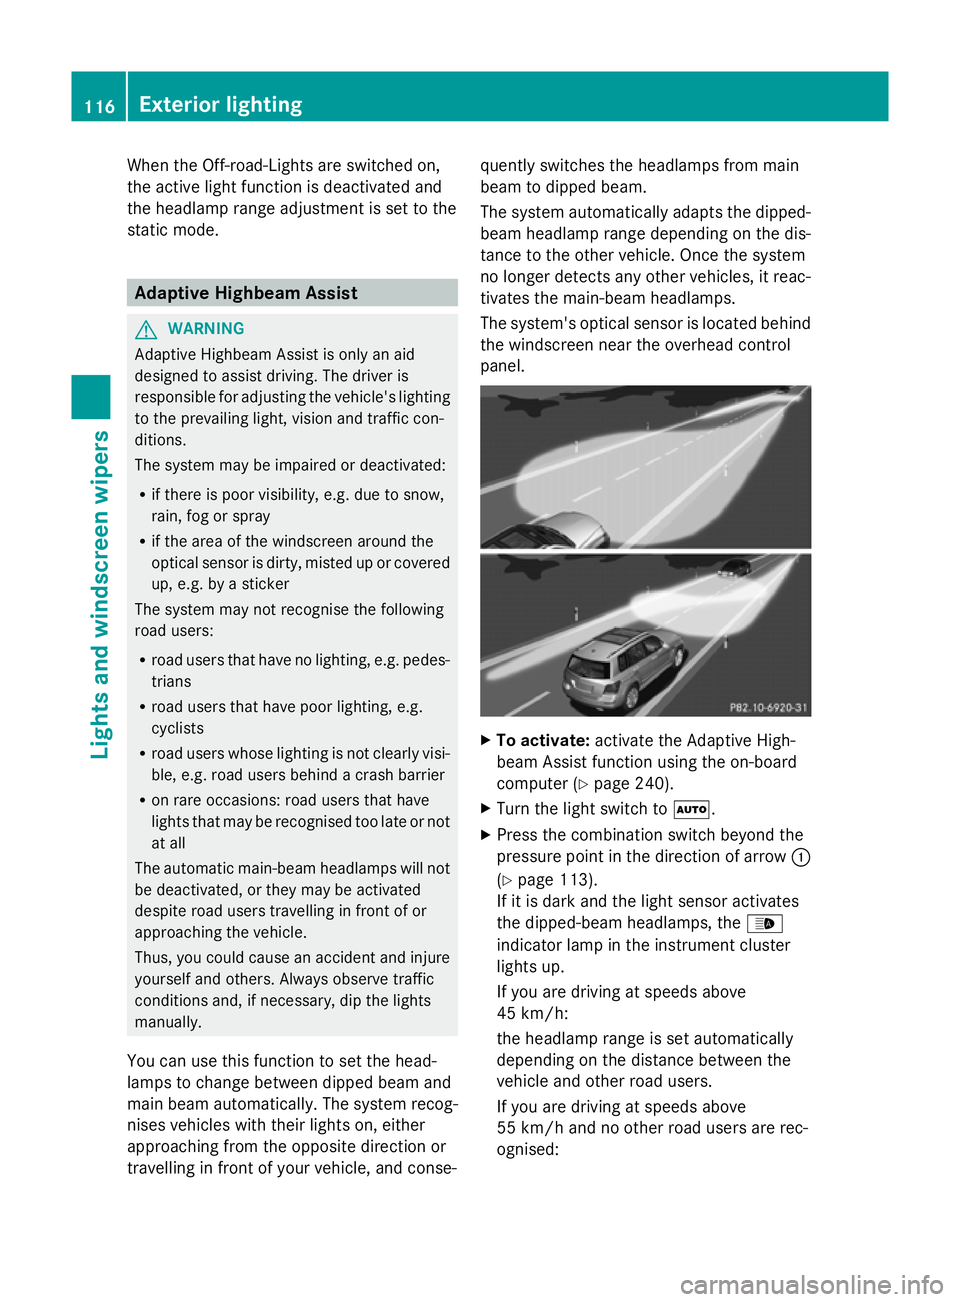
You can use this function to set the head-
lamps to change between dipped beam and
main beam automatically. The system recog-
nises vehicles with their lights on, either
approaching from the opposite direction or
travelling in front of your vehicle, and conse- quently switches the headlamps from main
beam to dipped beam.
The system automatically adapts the dipped-
beam headlamp range depending on the dis-
tance to the other vehicle. Once the system
no longer detects any other vehicles, it reac-
tivates the main-beam headlamps.
The system's optical sensor is located behind
the windscreen near the overhead control
panel. X
To activate: activate the Adaptive High-
beam Assist function using the on-board
computer (Y page 240).
X Turn the light switch to Ã.
X Press the combination switch beyond the
pressure point in the direction of arrow :
(Y page 113).
If it is dark and the light sensor activates
the dipped-beam headlamps, the _
indicator lamp in the instrument cluster
lights up.
If you are driving at speeds above
45 km/h:
the headlamp range is set automatically
depending on the distance between the
vehicle and other road users.
If you are driving at speeds above
55 km/h and no other road users are rec-
ognised: 116
Exterior lightingLights and windscreen wipers
Page 132 of 381
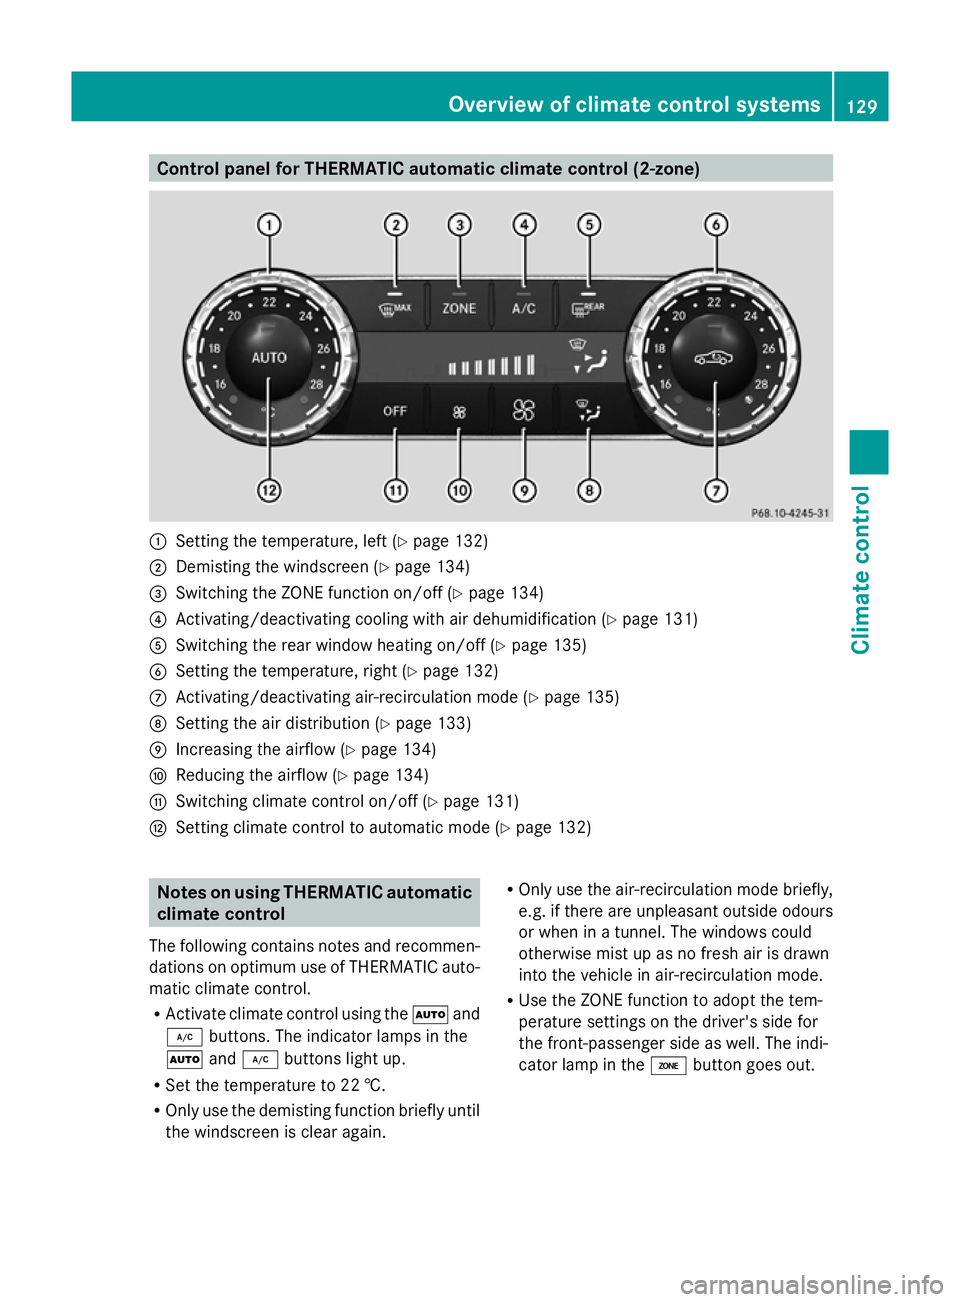
Control panel for THERMATIC automatic climate control (2-zone)
:
Setting the temperature, left (Y page 132)
; Demisting the windscreen (Y page 134)
= Switching the ZONE function on/off (Y page 134)
? Activating/deactivating cooling with air dehumidification (Y page 131)
A Switching the rear window heating on/off (Y page 135)
B Setting the temperature, right (Y page 132)
C Activating/deactivating air-recirculation mode (Y page 135)
D Setting the air distribution (Y page 133)
E Increasing the airflow (Y page 134)
F Reducing the airflow ( Ypage 134)
G Switching climate control on/off (Y page 131)
H Setting climate control to automatic mode (Y page 132)Notes on using THERMATIC automatic
climate control
The following contains notes and recommen-
dations on optimum use of THERMATIC auto-
matic climate control.
R Activate climate control using the Ãand
¿ buttons. The indicator lamps in the
à and¿ buttons light up.
R Set the temperature to 22 †.
R Only use the demisting function briefly until
the windscreen is clear again. R
Only use the air-recirculation mode briefly,
e.g. if there are unpleasant outside odours
or when in a tunnel. The windows could
otherwise mist up as no fresh air is drawn
into the vehicle in air-recirculation mode.
R Use the ZONE function to adopt the tem-
perature settings on the driver's side for
the front-passenger side as well. The indi-
cator lamp in the ábutton goes out. Overview of climate control systems
129Climate control Z
Page 134 of 381
Notes on using THERMOTRONIC auto-
matic climate control
The following contains instructions and rec-
ommendations to enable you to get the most
out of your THERMOTRONIC automatic cli-
mate control.
R Activate climate control using the Ãand
¿ buttons. The indicator lamps in the
à and¿ buttons light up.
R In automatic mode, you can also use the
ñ button to set a climate mode
(FOCUS/MEDIUM/DIFFUSE). The
MEDIUM level is recommended.
R Set the temperature to 22 †.
R Only use the demisting function briefly until
the windscreen is clear again.
R Only use the air-recirculation mode briefly,
e.g. if there are unpleasant outside odours
or when in a tunnel. The windows could
otherwise mist up as no fresh air is drawn
into the vehicle in air-recirculation mode.
R Use the ZONE function to adopt the tem-
perature settings on the driver's side for
the front-passenger side and the rear com-
partment as well. The indicator lamp in the
á button goes out.
R Use the residual heat function if you want
to heat or ventilate the vehicle interior
when the ignition is switched off. The resid-
ual heat function can only be activated or
deactivated with the ignition switched off. Operating the climate control system
Switching climate control on/off
Points to observe before use i
If climate control is switched off, the air
supply and air circulation are also switched
off. Only use this setting for a brief period.
The windows could otherwise mist up.
i Switch on climate control primarily using
the à button ( Ypage 132). Switching on/off X
Turn the key to position 2in the ignition
lock.
X To switch on: press theÃbutton.
The indicator lamp in the Ãbutton lights
up. Airflow and air distribution are set to
automatic mode.
or
X Press the ^button.
The indicator lamp in the ^button goes
out. The previous settings are reactivated.
X To switch off: press the^button.
The indicator lamp in the ^button lights
up. Activating/deactivating the cooling
with air dehumidification function
Points to observe before use G
WARNING
If the "cooling with air dehumidification" func-
tion is deactivated, the air inside the vehicle
will not be cooled (during warm weather) or
dehumidified. The windows could mist up
more quickly. This may prevent you from
observing the traffic conditions, thereby caus-
ing an accident.
The cooling with air dehumidification function
is only available when the engine is running.
The air inside the vehicle is cooled and dehu-
midified according to the temperature selec-
ted.
Condensation may drip from the underside of
the vehicle when cooling mode is active. This
is normal and not a sign that there is a mal-
function.
i The cooling with air dehumidification
function uses refrigerant R134a. This
refrigerant does not contain chlorofluoro-
carbons, and therefore does not damage
the ozone layer. Operating the climate control system
131Climate control Z
Page 139 of 381
i
Air-recirculation mode deactivates auto-
matically:
R after approximately five minutes at out-
side temperatures below approximately
5 †
R after approximately five minutes if cool-
ing with air dehumidification is deactiva-
ted
R after approximately 30 minutes at out-
side temperatures above approximately
5 † with the "cooling with air dehumidi-
fication" function switched on. Convenience opening/closing using
the air-recirculation button G
WARNING
Make sure that nobody can become trapped
between the side window and the door frame
as the side windows are opened and closed.
Make sure that all objects and body parts are
clear of the side windows when they are being
opened or closed. You or the objects could be
drawn in or become trapped between the side
window and the door frame as the window
moves. If there is a risk of entrapment, oper-
ate the Wswitch to move the side window
in the opposite direction.
Make sure that nobody can become trapped
as the panorama sliding sunroof is opened
and closed. If there is a risk of entrapment,
operate the 3switch to move the pano-
rama sliding sunroof in the opposite direction.
X Convenience closing feature: press and
hold the gbutton until the side win-
dows and the panorama sliding sunroof are
closed.
The indicator lamp in the gbutton lights
up. Air-recirculation mode is activated.
X Convenience opening feature: press and
hold the gbutton until the side win-
dows and the panorama sliding sunroof
have opened. The side windows and the panorama sliding sunroof move back to
their original position.
The indicator lamp in the
gbutton goes
out. Air-recirculation mode is deactivated.
i If you open the side windows or the pan-
orama sliding sunroof manually after clos-
ing with the convenience closing feature,
they will remain in this position when
opened using the convenience opening fea-
ture. Activating/deactivating the residual
heat function
The "Residual heat" function is only available
with THERMOTRONIC automatic climate con-
trol.
It is possible to make use of the residual heat
of the engine to continue heating the station-
ary vehicle for up to 30 minutes after the
engine has been switched off. The heating
time depends on the temperature that has
been set for the vehicle interior.
i The blower will run at a low speed regard-
less of the airflow setting.
i If you activate the residual heat function
at high temperatures, only the ventilation
will be activated. The blower runs at
medium speed.
X Turn the key to position 0in the ignition
lock or remove it.
X To activate: press theÌbutton.
The indicator lamp in the Ìbutton lights
up.
X To deactivate: press theÌbutton.
The indicator lamp in the Ìbutton goes
out.
i Residual heat is deactivated automati-
cally:
R after approximately 30 minutes
R when the ignition is switched on
R if the battery voltage drops
R when the auxiliary heating is activated 136
Operating the climate control systemClimate control
Page 152 of 381
i
You can start the engine without preglow
if the engine is warm.
Using KEYLESS-GO to start the engine G
WARNING
Your vehicle can be started using a valid KEY-
LESS-GO key. For this reason, children should
never be left unsupervised in the vehicle.
Always take the key with you when leaving the
vehicle, even if you are only leaving it for a
short time.
i The Start/Stop button can be used to
start the vehicle manually without inserting
the key into the ignition lock. The key must
be in the vehicle and the Start/Stop button
must be inserted in the ignition lock. This
mode for starting the engine operates inde-
pendently of the ECO start/stop automatic
engine start function.
X Depress the brake pedal and keep it
depressed.
X To start a petrol engine: press the Start/
Stop button (Y page 147) once.
The engine starts.
X To start a diesel engine: press the Start/
Stop button (Y page 147) once.
Preglow is activated and the engine starts. Pulling away
Manual transmission X
Depress the brake pedal and keep it
depressed.
X Fully depress the clutch pedal.
X Shift to either first gear or reverse gear R.
X Release the parking brake (Y page 165).
X Release the brake pedal.
X Slowly release the clutch pedal and gently
depress the accelerator pedal.
! Change gear in good time and avoid spin-
ning the wheels. Otherwise, you could dam-
age the vehicle. i
Follow the shift recommendations in the
multifunction display for an economical
driving style (Y page 155).
i The vehicle locks centrally once you have
pulled away. The locking knobs in the doors
drop down.
You can open the doors from the inside at
any time.
You can also deactivate the automatic door
lock (Y page 241).
Automatic transmission G
WARNING
If the engine speed is above the idling speed
and you engage transmission position Dor
R, the vehicle could pull away suddenly. There
is a risk of an accident.
When engaging transmission position Dor R,
always firmly depress the brake pedal and do
not simultaneously accelerate.
i It is only possible to shift the transmission
from position Pto the desired position if
you depress the brake pedal. Only then is
the parking lock released.
X Depress the brake pedal and keep it
depressed.
X Shift the transmission to position Dor R.
X Release the parking brake (Y page 165).
X Release the brake pedal.
X Carefully depress the accelerator pedal.
i The vehicle locks centrally once you have
pulled away. The locking knobs in the doors
drop down.
You can open the doors from the inside at
any time.
You can also deactivate the automatic door
lock (Y page 241).
i Upshifts take place at higher engine
speeds after a cold start. This helps the
catalytic converter to reach its operating
temperature more quickly. Driving
149Driving and parking Z
Page 161 of 381
Kickdown
Use kickdown for maximum acceleration.
X Depress the accelerator pedal beyond the
pressure point.
The transmission shifts to a lower gear
depending on the engine speed.
X Ease off the accelerator pedal once the
desired speed is reached.
The automatic transmission shifts back up.
Towing a trailer X
Drive in the middle of the engine speed
range on uphill gradients.
X Shift down to shift range 3or
2(Y page 159)depending on the uphill or
downhill gradient, even if cruise control or
SPEEDTRONIC is activated. Program selector button
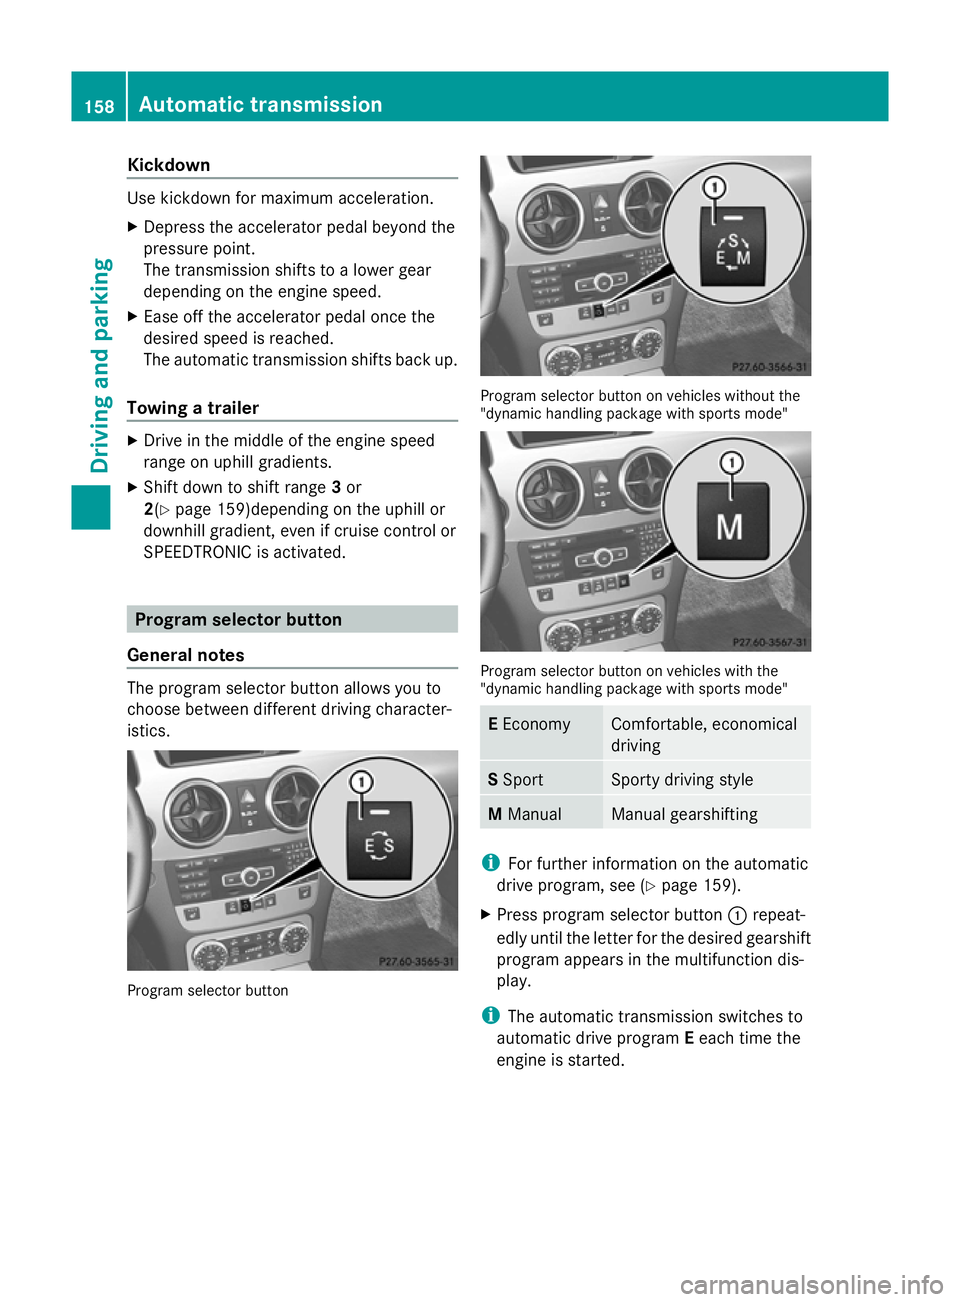
General notes The program selector button allows you to
choose between different driving character-
istics. Program selector button Program selector button on vehicles without the
"dynamic handling package with sports mode"
Program selector button on vehicles with the
"dynamic handling package with sports mode"
E
Economy Comfortable, economical
driving
S
Sport Sporty driving style
M
Manual Manual gearshifting
i
For further information on the automatic
drive program, see (Y page 159).
X Press program selector button :repeat-
edly until the letter for the desired gearshift
program appears in the multifunction dis-
play.
i The automatic transmission switches to
automatic drive program Eeach time the
engine is started. 158
Automatic trans
missionDriving and parking
Page 164 of 381
Problems with the transmission
Problem Possible causes/consequences and
M
MSolutions The transmission has
problems shifting gear. The transmission is losing oil.
X
Have the transmission checked at a qualified specialist work-
shop immediately. The acceleration ability
is deteriorating.
The transmission no
longer changes gear. The transmission is in emergency mode.
It is only possible to shift into
secondgear and reverse gear.
X Stop.
X Shift the transmission to position P.
X Switch off the engine.
X Wait at least 10 seconds before restarting the engine.
X Shift the transmission to position Dor R.
If D is selected, the transmission shifts into secondgear; ifRis
selected, the transmission shifts into reverse gear.
X Have the transmission checked at a qualified specialist work-
shop immediately. Refuelling
Important safety notes
G
WARNING
Fuel is highly flammable. Fire, naked flames
and smoking are therefore prohibited when
handling fuels.
Switch off the engine and the auxiliary heating
before refuelling. G
WARNING
Avoid contact with fuels.
It is hazardous to your health if your skin
comes into direct contact with fuels or you
breathe in fuel vapours. G
WARNING
Do not use petrol to refuel a diesel tank. Never
mix diesel with petrol. Doing so could damage
the fuel system and the engine. The vehicle
could also catch fire.
! Do not use petrol to refuel vehicles with a
diesel engine. Do not use diesel to refuel vehicles with a petrol engine. Even small
amounts of the wrong fuel result in damage
to the fuel system and the engine.
! Do not switch on the ignition if you acci-
dentally refuel with the wrong fuel. Other-
wise, the fuel will enter the fuel lines. Notify
a qualified specialist workshop and have
the fuel tank and fuel lines drained com-
pletely.
! Overfilling the fuel tank could damage the
fuel system.
! Take care not to spill any fuel on painted
surfaces. You could otherwise damage the
paintwork.
! Use a filter when adding fuel from a fuel
can. The fuel lines and/or the diesel injec-
tion system could otherwise be blocked by
particles from the fuel can.
Further information on fuel and on fuel grades
can be found in the "Fuel" section
(Y page 365). Refuelling
161Driving and parking Z
Page 169 of 381
with limitations, or not at all. This could affect,
for example, the power steering and the brake
boosting effect. You will require considerably
more effort to steer and brake. There is a risk
of an accident.
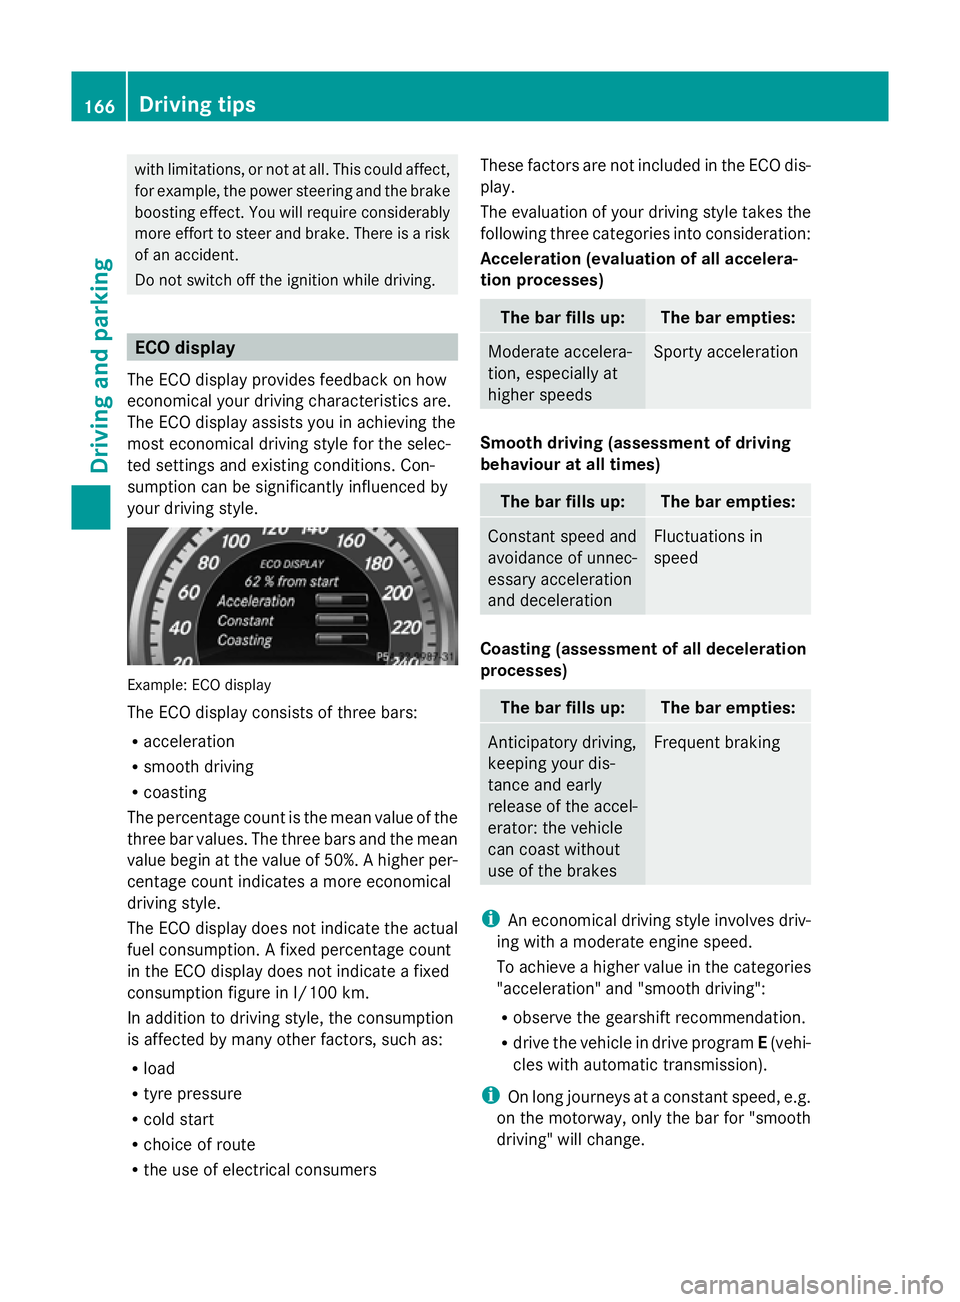
Do not switch off the ignition while driving. ECO display
The ECO display provides feedback on how
economical your driving characteristics are.
The ECO display assists you in achieving the
most economical driving style for the selec-
ted settings and existing conditions. Con-
sumption can be significantly influenced by
your driving style. Example: ECO display
The ECO display consists of three bars:
R acceleration
R smooth driving
R coasting
The percentage count is the mean value of the
three bar values. The three bars and the mean
value begin at the value of 50%. A higher per-
centage count indicates a more economical
driving style.
The ECO display does not indicate the actual
fuel consumption. A fixed percentage count
in the ECO display does not indicate a fixed
consumption figure in l/100 km.
In addition to driving style, the consumption
is affected by many other factors, such as:
R load
R tyre pressure
R cold start
R choice of route
R the use of electrical consumers These factors are not included in the ECO dis-
play.
The evaluation of your driving style takes the
following three categories into consideration:
Acceleration (evaluation of all accelera-
tion processes) The bar fills up: The bar empties:
Moderate accelera-
tion, especially at
higher speeds Sporty acceleration
Smooth driving (assessment of driving
behaviour at all times)
The bar fills up: The bar empties:
Constant speed and
avoidance of unnec-
essary acceleration
and deceleration Fluctuations in
speed
Coasting (assessment of all deceleration
processes)
The bar fills up: The bar empties:
Anticipatory driving,
keeping your dis-
tance and early
release of the accel-
erator: the vehicle
can coast without
use of the brakes Frequent braking
i
An economical driving style involves driv-
ing with a moderate engine speed.
To achieve a higher value in the categories
"acceleration" and "smooth driving":
R observe the gearshift recommendation.
R drive the vehicle in drive program E(vehi-
cles with automatic transmission).
i On long journeys at a constant speed, e.g.
on the motorway, only the bar for "smooth
driving" will change. 166
Driving tipsDriving and parking