2012 MERCEDES-BENZ GL SUV ignition
[x] Cancel search: ignitionPage 92 of 441

Side windows
Important safety notes
G
WARNING
Mak esure that nobody can become trapped
between the side window and the door frame
when aside window is opened. Do not touch
or lean against the side window during the
opening procedure. You could become trap-
ped between the side window and the door
frame as the side window moves down. If
there is arisk of becoming trapped, release
the switch or pull the switch upwards to close
the side window again. G
WARNING
Make sure that nobody can become trapped
as you close aside window. If there is arisk
of becoming trapped, release the switch or
press it again to open the side window again. G
WARNING
Children may injur ethemselves if they open
or close the side windows.
Never leav echildren unsupervised in the vehi-
cle. Always tak ethe key with you when leaving
the vehicle, even if you ar eonly leaving it for
as hort time. G
WARNING
Do not leav echildren unsupervised in the
vehicle, even if they ar esecured in achild
restraint system .The children could:
R be seriously or even fatall yinjured on parts
of the vehicle
R be seriously or even fatally injured by pro-
longed exposure to extremely hig hor
extremely low temperatures
If children open adoor, they could:
R seriously or even fatally injure other people
R get out of the vehicle and injure them-
selves, or be seriously or even fatally
injure dbya passing vehicle
Activat ethe child-proof locks/override fea-
tur eifc hildren ar etravelling in th evehicle. They could otherwise open doors or side win-
dows while the vehicle is in motion and
thereby injure themselves or others.
Opening and closin
gthe side win-
dows
Th es witches for all side windows are located
on the driver's door. There is also aswitch on
each door for the correspondin gside window.
The switches on the driver's door take prec-
edence. :
Front left
; Front right
= Rear right
? Rear left
X Turn the key to position 1or 2in the ignition
lock.
X To open: press the corresponding switch.
X To close: pull the corresponding switch.
i If you press the switch beyond the point
of resistance, an automatic opening/clos-
ing process is started in the corresponding
direction. You can stop automatic opera-
tion by pressing again.
i You can continue to operate the side win-
dows after switching off the engine or
removing the key. This func tion remains
active for fiv eminutes or until the driver's
or front-passenger door is opened.
i The side windows cannot be operated
from the rear when the override featur efor
the side window sisactivate d(Ypage 60). Side windows
89Opening and closing Z
Page 93 of 441

Opening and closing th
ehinged side
windows
Important safet ynotes G
WARNING
Make sure that nobody can become trapped
as you close the hinged side windows. If there
is ar isk of becomin gtrapped ,release the
switch or push the switch again to reopen the
side window.
Opening and closing The hinged side windows are operated elec-
tri
ca lly from the driver's seat. X
Make sure that the key is in position 1or
2 in the ignition lock.
X To open fully: press switch:and release.
X To close fully: pull switch:and release.
X To stop the closing procedure: press
switch :again.
Bot hhinged side windows open fully.
i If the hinged side windows are blocked
when closing, the closing procedur eis
interrupted and the hinged side windows
open again fully. Convenienc
eopening feature
General notes You can ventilate the vehicle before you start
driving
.Todot his, the key is used to carry out
the followin gfunctions simultaneously:
R unlock the vehicle
R open the side windows
R open the hinged side windows
R open the sliding sunroof or the panorama
sliding sunroof and the roller sunblinds
R switch on the seat ventilation for the driv-
er's seat
i The convenience opening feature can
only be operated using the key. The key
must be close to the driver' sdoor handle.
Convenience opening feature X
Point the tip of the key at the driver's door
handle.
X Press and hold the %button until the
side window sand the sliding sunroo forthe
panorama slidin gsunroof are in the desired
position.
If the roller sunblinds of the panorama slid-
ing sunroof are closed ,the roller sunblinds
ar eo pened first.
X Press and hold the %button again until
the panorama sliding sunroof is in the
desired position.
X To interrup tconvenience opening:
release the %button. Convenienc
eclosing feature
Important safety notes G
WAR
NING
Whe nusing the convenience closing feature,
make sur ethat nobody can becom etrapped.
Procee dasfollows if ther eisar isk of entrap-
ment: 90
Side windowsOpening and clos
ing
Page 94 of 441

With the key:
R
release the &button.
R press and hold the %button unti lthe
side windows and the slidin gsunroof or the
panorama sliding sunroof open again.
With KEYLESS-GO:
R release the senso rsurface on the door han-
dle.
R pull the door handle immediately and hold
it.
The side windows and the sliding sunroof
or the panorama sliding sunroof open.
Whe nyou lock the vehicle, you can simulta-
neously:
R close the side windows
R close the hinged side windows
R close the slidin gsunroof or the panorama
sliding sunroof
On vehicles with apanorama sliding sunroof,
you can then close the roller sunblinds.
Usin gthe key Th
ek ey must be close to the driver' sdoor
handle.
X Point the tip of the key at the driver's door
handle.
X Press and hold the &button until the
side window sand the sliding sunroo forthe
panorama slidin gsunroof are fully closed.
X Make sure that all the side windows and the
sliding sunroof or panorama sliding sunroof
are closed.
On vehicles with apanorama sliding sunroof:
X Press and hold the &button again until
the roller sunblinds of the panorama sliding
sunroof close.
X To interrupt convenienc eclosing:
release the &button. Using KEYLESS-GO The KEYL
ESS-GO key must be outside the
vehicle. All the doors must be closed. X
Touch recesse dsensor surface :on the
door handle until the side windows and the
sliding sunroof or the panorama sliding
sunroof are fully closed.
i Make sure you only touc hrecessed sen-
sor surface :.
X Make sure that all the side windows and the
sliding sunroof or panorama sliding sunroof
are closed.
On vehicles with apanorama sliding sunroof:
X Touch recessed senso rsurface :on the
door handle again until the roller sunblinds
of the panorama sliding sunroof close.
X To interrupt convenienc eclosing:
release recessed sensor surface :on the
door handle. Resetting the side windows
If as ide window can no longer be closed fully,
you must reset it.
X Close all doors.
X Turn the key to position 1or 2in the ignition
lock.
X Pull the corresponding switch on the door
control panel until the side window is com-
pletely closed. (Y page 89)
X Hold the switch for an additional second. Side windows
91Opening and clos ing Z
Page 97 of 441

Change the position of the slidin
gsunroof
or open aside window. The noise will be
reduced or eliminated.
Your vehicle may be fitted with asliding sun-
roof or apanorama sliding sunroof. In this
section, the term "sliding sunroof" refers to
both types of sliding sunroof. Operating the sliding sunroof
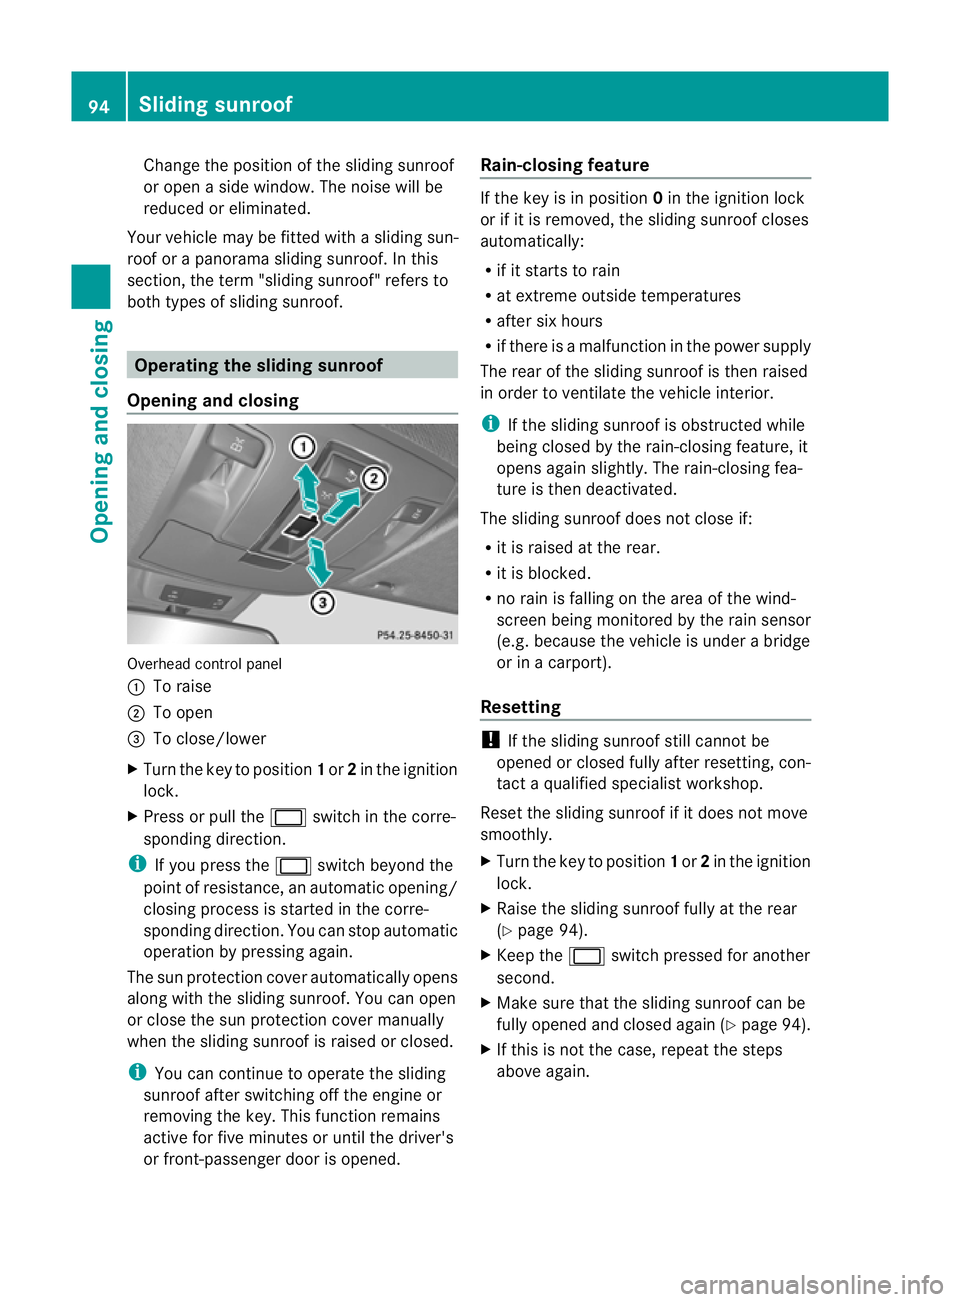
Opening and closing Overhead control panel
:
To raise
; To open
= To close/lower
X Turn the key to position 1or 2in the ignition
lock.
X Press or pull the 2switch in the corre-
sponding direction.
i If you press the 2switch beyond the
point of resistance, an automatic opening/
closing process is started in the corre-
sponding direction. You can stop automatic
operation by pressing again.
The sun protection cover automatically opens
along with the sliding sunroof. You can open
or close the sun protection cover manually
when the sliding sunroof is raised or closed.
i You can continue to operate the sliding
sunroof after switching off the engine or
removing the key. This function remains
active for five minutes or until the driver's
or front-passenger door is opened. Rain-closing featu
re If
the key is in position 0in the ignition lock
or if it is removed, the sliding sunroo fcloses
automatically:
R if it starts to rain
R at extreme outside temperatures
R after six hours
R if there is amalfunction in the power supply
The rear of the sliding sunroof is then raised
in order to ventilate the vehicle interior.
i If the sliding sunroof is obstructed while
being closed by the rain-closing feature, it
opens again slightly. The rain-closing fea-
ture is then deactivated.
The sliding sunroof does not close if:
R it is raised at the rear.
R it is blocked.
R no rain is falling on the area of the wind-
screen being monitored by the rain sensor
(e.g. because the vehicle is under abridge
or in acarport).
Resetting !
If the sliding sunroof still cannot be
opened or closed fully after resetting, con-
tact aqualified specialist workshop.
Reset the sliding sunroof if it does not move
smoothly.
X Turn the key to position 1or 2in the ignition
lock.
X Raise the sliding sunroof fully at the rear
(Y page 94).
X Keep the 2switch presse dfor another
second.
X Make sure that the slidin gsunroof can be
fully opened and closed again (Y page 94).
X If this is not the case, repeat the steps
above again. 94
Sliding sunroofOpenin
gand closing
Page 98 of 441

Oper
ating the panorama sliding sun-
roof
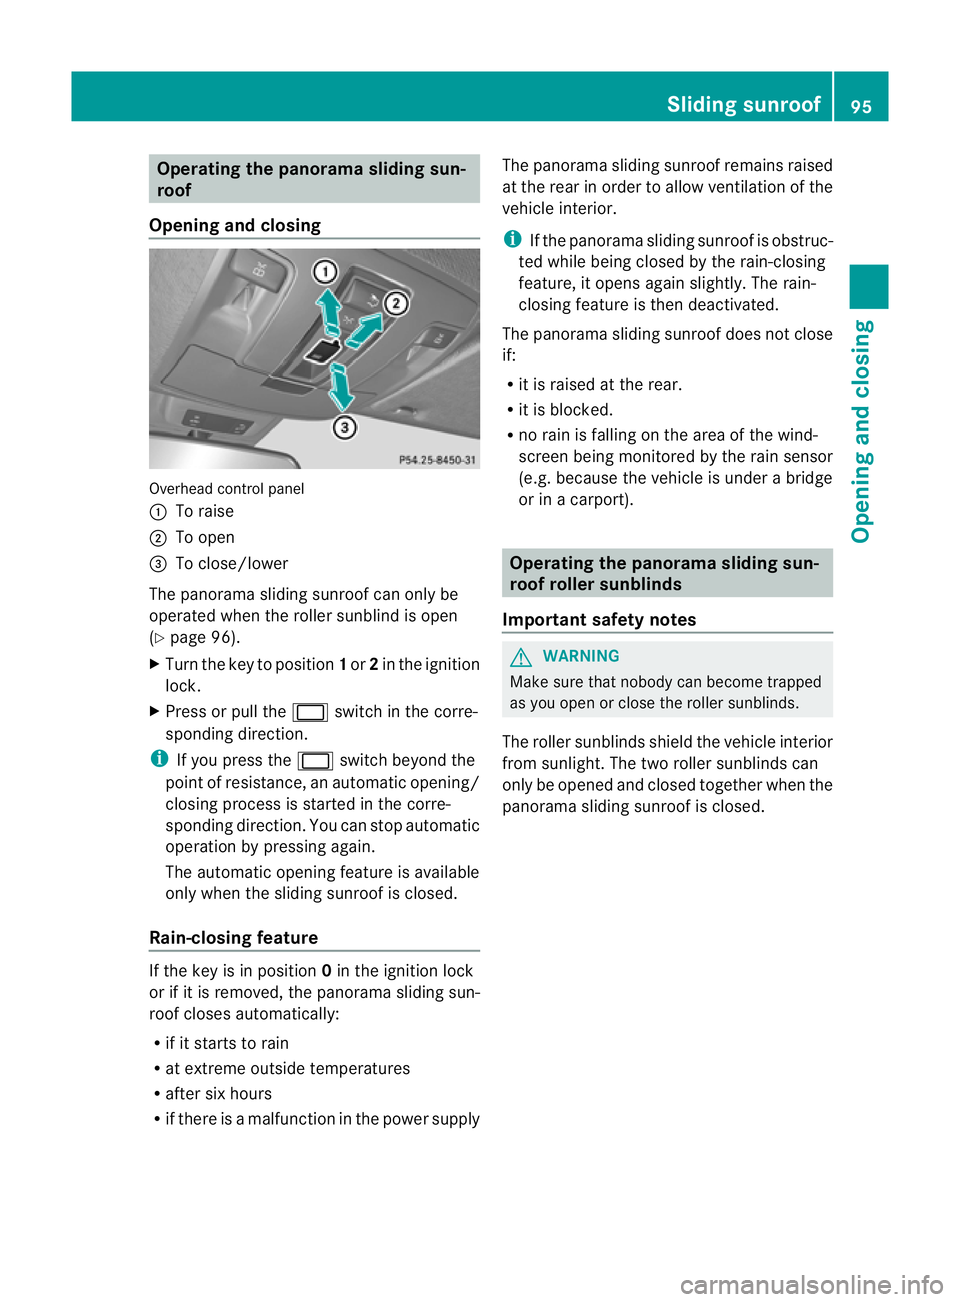
Opening and closing Overhead control panel
:
To raise
; To open
= To close/lower
The panorama sliding sunroof can only be
operated when the roller sunblind is open
(Y page 96).
X Turn the key to position 1or 2in the ignition
lock.
X Press or pull the 2switch in the corre-
spondin gdirection.
i If you press the 2switch beyond the
point of resistance, an automatic opening/
closing process is started in the corre-
sponding direction. You can stop automatic
operation by pressing again.
The automatic opening featur eisavailable
onl yw hen the slidin gsunroof is closed.
Rain-closin gfeature If the key is in position
0in the ignition lock
or if it is removed, the panoram asliding sun-
roof closes automatically:
R if it start storain
R at extreme outside temperatures
R after six hours
R if there is amalfunction in the power supply The panorama sliding sunroof remains raised
at the rear in order to allow ventilation of the
vehicle interior.
i
If the panorama sliding sunroof is obstruc-
ted while being closed by the rain-closing
feature, it opens again slightly. The rain-
closing feature is then deactivated.
The panorama sliding sunroof does not close
if:
R it is raised at the rear.
R it is blocked.
R no rain is falling on the area of the wind-
screen being monitored by the rain sensor
(e.g. because the vehicle is under abridge
or in acarport). Operating the panorama sliding sun-
roof roller sunblinds
Important safet ynotes G
WARNING
Make sure that nobody can become trapped
as you open or close the roller sunblinds.
The roller sunblinds shield the vehicle interior
from sunlight. The two roller sunblinds can
only be opened and closed together when the
panoram asliding sunroof is closed. Slidin
gsunroof
95Openingand closing Z
Page 99 of 441

Opening and closing th
eroller sun-
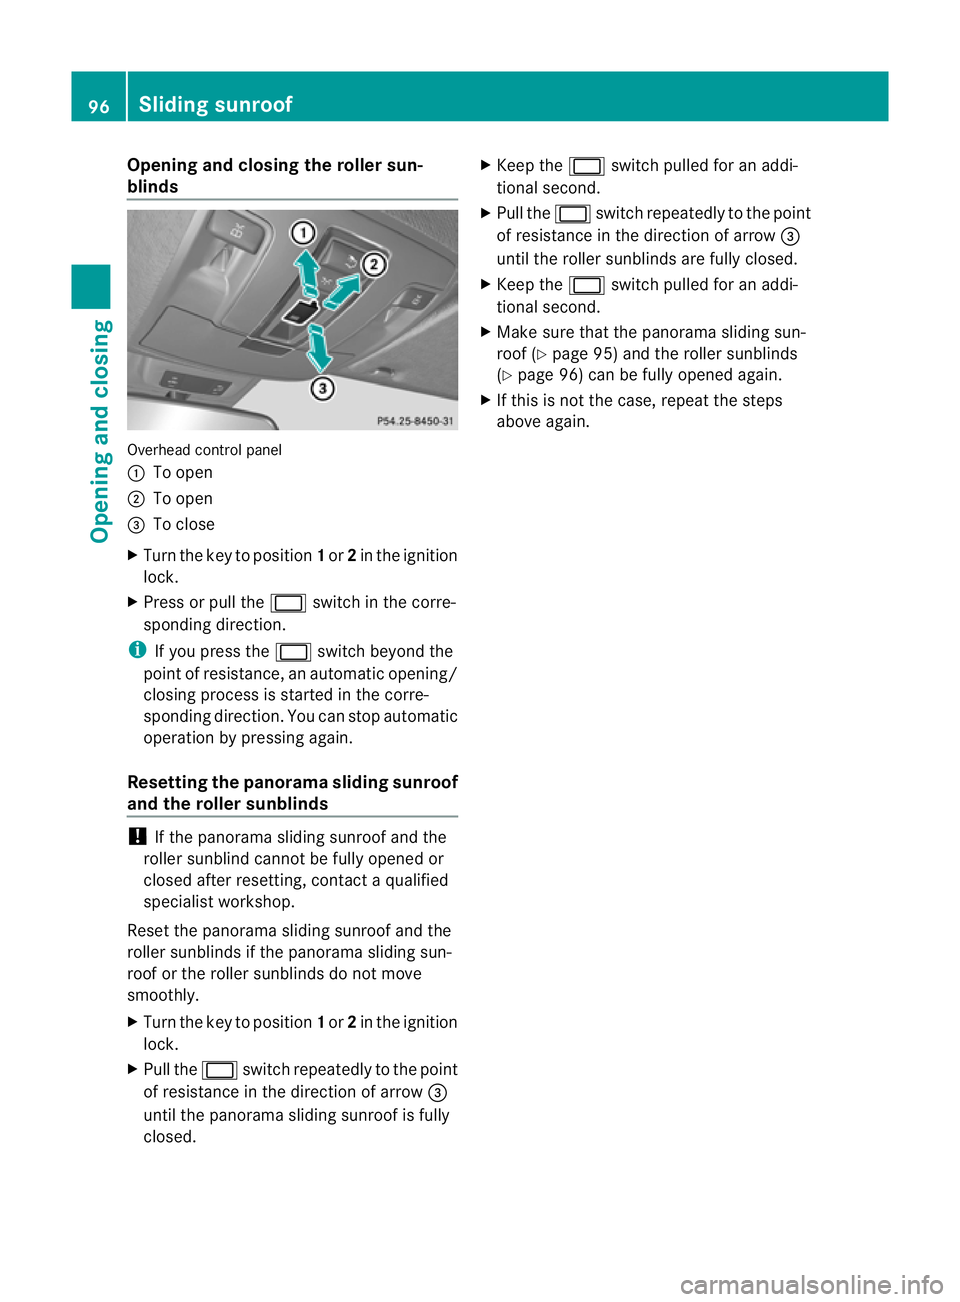
blinds Overhead control panel
:
To open
; To open
= To close
X Turn the key to position 1or 2in the ignition
lock.
X Press or pull the 2switch in the corre-
sponding direction.
i If you press the 2switch beyond the
point of resistance, an automatic opening/
closing process is started in the corre-
sponding direction. You can stop automatic
operation by pressing again.
Resetting the panorama sliding sunroof
and the roller sunblinds !
If the panoram asliding sunroof and the
roller sunblind cannot be fully opened or
closed after resetting, contact aqualified
specialist workshop.
Reset the panorama sliding sunroof and the
roller sunblinds if the panorama sliding sun-
roof or the roller sunblinds do not move
smoothly.
X Turn the key to position 1or 2in the ignition
lock.
X Pull the 2switch repeatedly to the point
of resistance in the direction of arrow =
until the panorama sliding sunroof is fully
closed. X
Keep the 2switch pulled for an addi-
tional second.
X Pull the 2switch repeatedly to the point
of resistance in the direction of arrow =
until the roller sunblinds are fully closed.
X Keep the 2switch pulled for an addi-
tional second.
X Make sure that the panorama sliding sun-
roof (Y page 95) and the roller sunblinds
(Y page 96) can be fully opened again.
X If this is not the case, repeat the steps
above again. 96
Sliding sunroofOpenin
gand closing
Page 104 of 441

Seats
Important safety notes
G
WARNING
The seat scan still be adjusted when there is
no key in the ignition lock. For this reason,
children shoul dnever be left unsupervised in
the vehicle. They could adjust the seats and
becom etrapped. G
WARNING
Only adjus tthe driver's seat when the vehicle
is stationary .You will otherwise be distracted
from the road and traffic condition sand you
could los econtrol of the vehicle as aresult of
the seat moving. This could cause an acci-
dent. G
WARNING
If you adjust the seat height carelessly, you or
others could be trapped and thereby injured.
Children in particula rcould unintentionally
press the buttons to electrically adjust the
seats and becom etrapped.
Take care that:
R while moving th eseats, your hands do not
get under the lever assembly of the seat
adjustmen tsystem.
R children in the vehicle do not slid etheir
hands unde rthe levers. G
WARNING
Make sur ethat nobody can becom etrapped
when adjustin gthe seats.
Observ ethe note sonairbags.
Secur echildren as recommended; see the
"Childre ninthe vehicle" section. G
WARNING
Make sur ethat the bac kofyour head is sup-
ported at eye level by the cen tralarea of the
head restraint. If your head is not supported
correctly by th ehead restraint ,you coul dsuf-
fer asever eneck injury in the event of an accident
.Never driv eifthe head rest raints are
not engaged and set correctly. G
WARNING
As eat belt can only offer its intended degree
of protection when the back rest is almost ver-
tical and the occupan tiss itting upright. Avoid
seat positions that do not allow the seat belt
to be routed correctly. Adjust the backrest so
that it is as upright as possible .Never travel
with the back rest reclined too fa rbackwards.
You could otherwise be seriousl yoreven
fatally injured in th eevent of an accident or
sudden braking.
! To avoid damag etothe seats and the seat
heating, observe the followin ginformation:
R do not spill any liquids on the seats. If
liquid is spilled on the seats, dry them as
soon as possible.
R if the sea tcover sare damp or wet, do not
switc hont he seat heating. The seat
heating should also not be used to dry
the seats.
R clea nthe seat cover sasrecommended;
see "In terior care".
R do not transport heav yloads on the
seats. Do not plac eshar pobjects on the
seat cushions ,e.g. knives, nails or tools.
Th es eats should only be occupied by
passengers, if possible.
R when the seat heatin gisinoperation ,do
not cover the seats with insulating mate-
rials, e.g. blanke ts,c oats, bags, seat cov-
ers, child seats or booster seats.
! Make sure that ther eare no objects in the
footwell or behind th eseats when moving
the seat back .There is arisk that the seats
and/or the objects could be damaged.
i The head restraint scannot be removed
from the fron tseats. The rear-compart-
men thead restraints, however ,can be
removed (Y page 104).
For more information ,contac taqualified
specialist workshop. Seats
101Seats, steering wheel and mirrors Z
Page 112 of 441

Driver's and front-p
assenger seat Rear seats
Th
et hree red indicat or lampsinthebutton
indicat ethe heating lev el youhave selected.
The system automatically switches down
from level 3to level 2after approximately
eight minutes.
The system automatically switches down
from level 2to level 1after approxima tely ten
minutes.
The system automatically switches off
approximately 35 minutes after it is set to
level 1.
You can set the distribution of the heated
sections of the seat cushion and backrest.
You can find information about this in the
separate operatin ginstructions.
X Make sure that the key is in position 1or
2 in the ignition lock.
X To switch on: pressbutton :repeatedly
until the desired heating level is set.
X To switch off: press button:repeatedly
until all the indicator lamps go out. i
If the batter yvoltage is too low, the seat
heatin gmay switch off.
Problems with the seat heating The seat heating has switched off prema-
turely or cannot be switched on. The vehicle's
electrical system voltage is too low because
too many electrical consumers are switched
on.
X
Switc hoff elect rical consumers that you do
not need, such as the rear window heating
or interior lighting. Switchin
gthe seat ventilation on/off
Switchin gon/off The three blue indicator lamps in the buttons
indicat
ethe ven tilation level you have selec-
ted.
X Make sure that the key is in position 1or
2 in the ignition lock.
X To switch on: press button:repeatedly
until the desired ventilation level is set.
X To switch off: press button:repeatedly
until all the indicator lamps go out.
i If the batter yvoltage is too low, the seat
ven tilation may switch off.
i You can open the side windows and the
sliding sunroof using the "Convenience
opening" featur e(Ypage 90). The seat ven-
tilation of the driver' sseat automatically
switches to the highest level. Seats
109Seats, steering wheel and mirrors Z