2012 MERCEDES-BENZ GL ignition
[x] Cancel search: ignitionPage 163 of 384
obtained from oil companies, e.g. at gas
stations.
Refueling
Fuel filler flap
The fuel filler flap is unlocked or locked
automatically when you open or close the
vehicle with the SmartKey or using KEYLESS-
GO.
The position of the fuel filler cap is displayed
in the instrument cluster 8. The arrow
next to the filling pump indicates the side of
the vehicle.
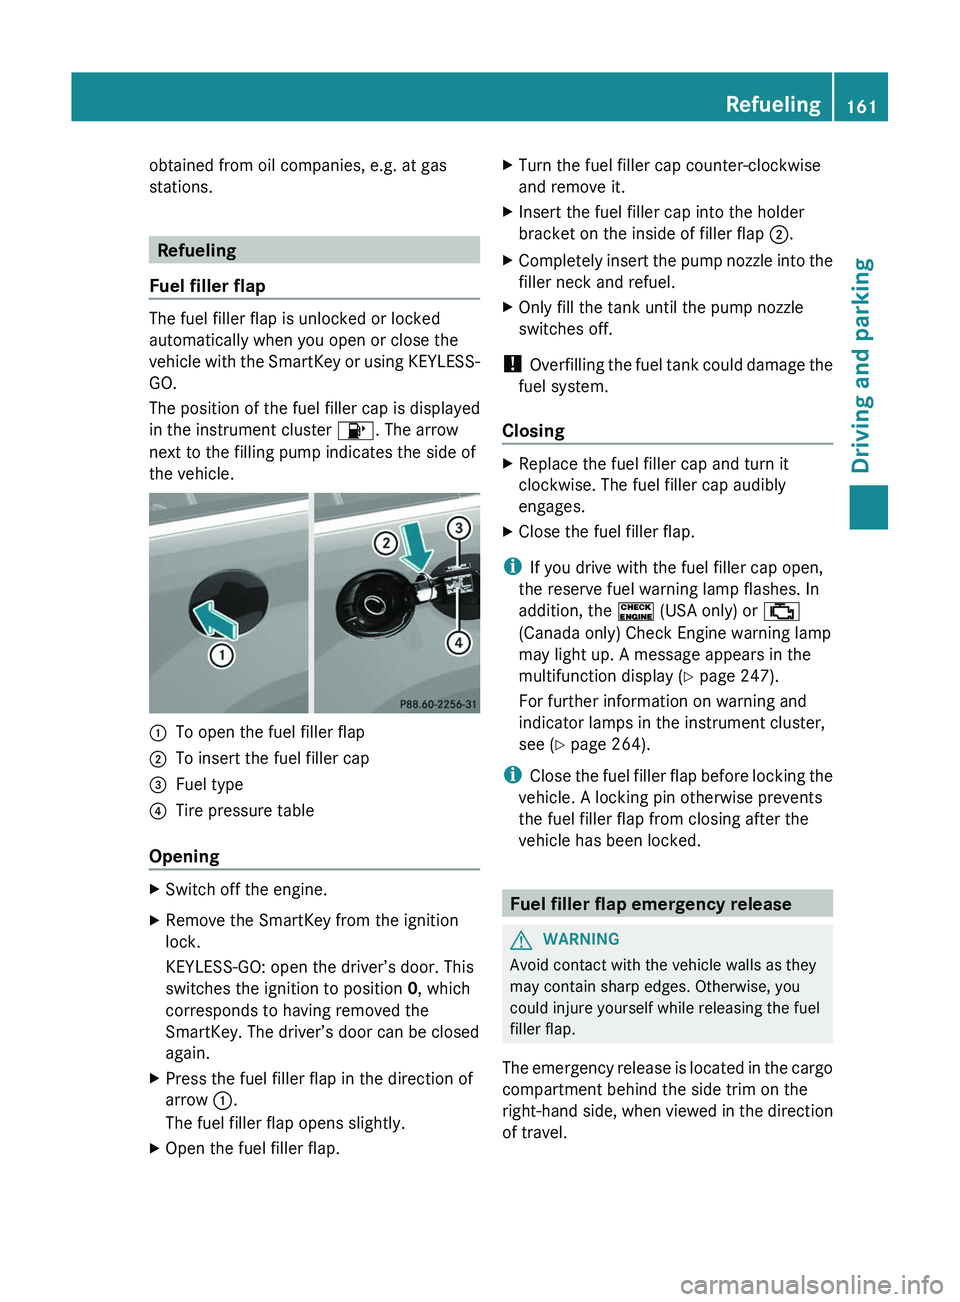
:To open the fuel filler flap;To insert the fuel filler cap=Fuel type?Tire pressure table
Opening
XSwitch off the engine.XRemove the SmartKey from the ignition
lock.
KEYLESS-GO: open the driver’s door. This
switches the ignition to position 0, which
corresponds to having removed the
SmartKey. The driver’s door can be closed
again.XPress the fuel filler flap in the direction of
arrow :.
The fuel filler flap opens slightly.XOpen the fuel filler flap.XTurn the fuel filler cap counter-clockwise
and remove it.XInsert the fuel filler cap into the holder
bracket on the inside of filler flap ;.XCompletely insert the pump nozzle into the
filler neck and refuel.XOnly fill the tank until the pump nozzle
switches off.
! Overfilling the fuel tank could damage the
fuel system.
Closing
XReplace the fuel filler cap and turn it
clockwise. The fuel filler cap audibly
engages.XClose the fuel filler flap.
i If you drive with the fuel filler cap open,
the reserve fuel warning lamp flashes. In
addition, the ! (USA only) or ;
(Canada only) Check Engine warning lamp
may light up. A message appears in the
multifunction display ( Y page 247).
For further information on warning and
indicator lamps in the instrument cluster,
see ( Y page 264).
i Close the fuel filler flap before locking the
vehicle. A locking pin otherwise prevents
the fuel filler flap from closing after the
vehicle has been locked.
Fuel filler flap emergency release
GWARNING
Avoid contact with the vehicle walls as they
may contain sharp edges. Otherwise, you
could injure yourself while releasing the fuel
filler flap.
The emergency release is located in the cargo
compartment behind the side trim on the
right-hand side, when viewed in the direction
of travel.
Refueling161Driving and parkingZ
Page 165 of 384
Problems with fuel and the fuel tankProblemPossible causes/consequences and M SolutionsFuel is leaking from the
vehicle.GRisk of explosion or fire
The fuel line or the fuel tank is defective.
XTurn the SmartKey to position 0(Y page 149) in the ignition lock
immediately and remove it.XDo not restart the engine under any circumstances.XConsult a qualified specialist workshop.The fuel filler flap
cannot be opened.The fuel filler flap is not unlocked.
or
The SmartKey battery is discharged.XUnlock the vehicle using the mechanical key ( Y page 79).XOpen the tailgate.XManually unlock the fuel filler flap using the emergency release
( Y page 161).The fuel filler flap is unlocked, but the opening mechanism is
jammed.XManually unlock the fuel filler flap using the emergency release
( Y page 161).XConsult a qualified specialist workshop.The engine will not
start.The fuel tank of a vehicle with a diesel engine has been run
completely dry.XRefuel the vehicle with at least 5.3 US qt (5 liters) of diesel.XTurn the ignition on for at least 10 seconds ( Y page 149).XStart the engine continuously for up to 10 seconds until it runs
smoothly.
If the engine does not start:
XTurn the ignition on again for approximately 10 seconds
( Y page 149).XStart the engine again continuously for up to 10 seconds until
it runs smoothly.
If the engine does not start after three attempts:
XConsult a qualified specialist workshop.Refueling163Driving and parkingZ
Page 167 of 384
use a sponge and cold water to clean it. DEF
residues crystallize after time and
contaminate the affected surfaces.
! DEF is not a fuel additive and must not be
added to the fuel tank. If DEF is added to
the fuel tank, this can lead to engine
damage.
i If you are adding between maintenance
intervals, add approximately 1 gallon (3.8 l)
of DEF to the DEF tank. One gallon (3.8 l)
of DEF is approximately 2 DEF refill bottles.
For further information on DEF, see:
( Y page 374).
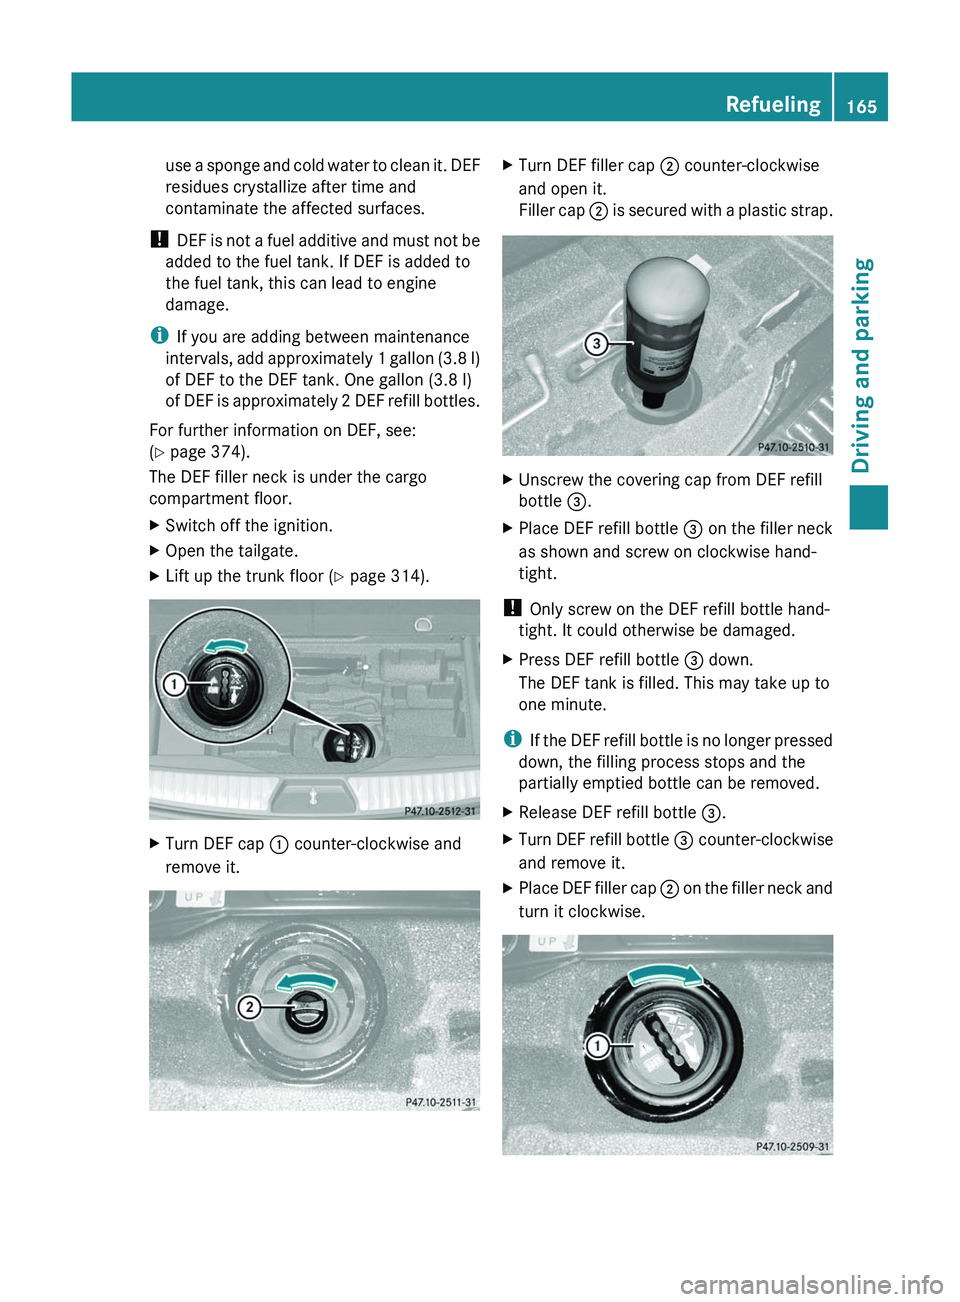
The DEF filler neck is under the cargo
compartment floor.XSwitch off the ignition.XOpen the tailgate.XLift up the trunk floor ( Y page 314).XTurn DEF cap : counter-clockwise and
remove it.XTurn DEF filler cap ; counter-clockwise
and open it.
Filler cap ; is secured with a plastic strap.XUnscrew the covering cap from DEF refill
bottle =.XPlace DEF refill bottle = on the filler neck
as shown and screw on clockwise hand-
tight.
! Only screw on the DEF refill bottle hand-
tight. It could otherwise be damaged.
XPress DEF refill bottle = down.
The DEF tank is filled. This may take up to
one minute.
i If the DEF refill bottle is no longer pressed
down, the filling process stops and the
partially emptied bottle can be removed.
XRelease DEF refill bottle =.XTurn DEF refill bottle = counter-clockwise
and remove it.XPlace DEF filler cap ; on the filler neck and
turn it clockwise.Refueling165Driving and parkingZ
Page 168 of 384
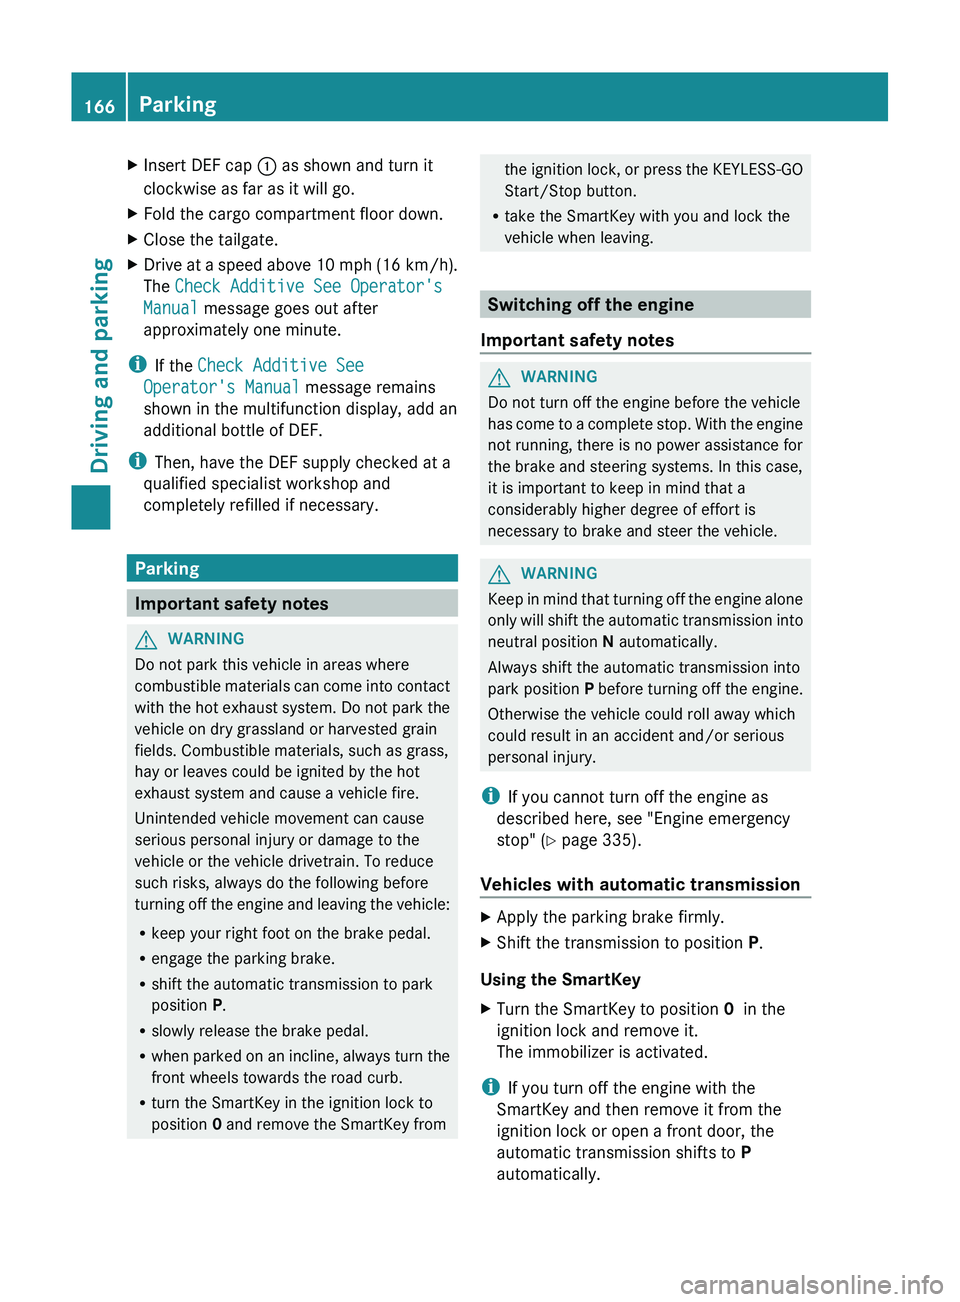
XInsert DEF cap : as shown and turn it
clockwise as far as it will go.XFold the cargo compartment floor down.XClose the tailgate.XDrive at a speed above 10 mph (16 km/h).
The Check Additive See Operator's
Manual message goes out after
approximately one minute.
i If the Check Additive See
Operator's Manual message remains
shown in the multifunction display, add an
additional bottle of DEF.
i Then, have the DEF supply checked at a
qualified specialist workshop and
completely refilled if necessary.
Parking
Important safety notes
GWARNING
Do not park this vehicle in areas where
combustible materials can come into contact
with the hot exhaust system. Do not park the
vehicle on dry grassland or harvested grain
fields. Combustible materials, such as grass,
hay or leaves could be ignited by the hot
exhaust system and cause a vehicle fire.
Unintended vehicle movement can cause
serious personal injury or damage to the
vehicle or the vehicle drivetrain. To reduce
such risks, always do the following before
turning off the engine and leaving the vehicle:
R keep your right foot on the brake pedal.
R engage the parking brake.
R shift the automatic transmission to park
position P.
R slowly release the brake pedal.
R when parked on an incline, always turn the
front wheels towards the road curb.
R turn the SmartKey in the ignition lock to
position 0 and remove the SmartKey from
the ignition lock, or press the KEYLESS-GO
Start/Stop button.
R take the SmartKey with you and lock the
vehicle when leaving.
Switching off the engine
Important safety notes
GWARNING
Do not turn off the engine before the vehicle
has come to a complete stop. With the engine
not running, there is no power assistance for
the brake and steering systems. In this case,
it is important to keep in mind that a
considerably higher degree of effort is
necessary to brake and steer the vehicle.
GWARNING
Keep in mind that turning off the engine alone
only will shift the automatic transmission into
neutral position N automatically.
Always shift the automatic transmission into
park position P before turning off the engine.
Otherwise the vehicle could roll away which
could result in an accident and/or serious
personal injury.
i If you cannot turn off the engine as
described here, see "Engine emergency
stop" ( Y page 335).
Vehicles with automatic transmission
XApply the parking brake firmly.XShift the transmission to position P.
Using the SmartKey
XTurn the SmartKey to position 0 in the
ignition lock and remove it.
The immobilizer is activated.
i If you turn off the engine with the
SmartKey and then remove it from the
ignition lock or open a front door, the
automatic transmission shifts to P
automatically.
166ParkingDriving and parking
Page 169 of 384
Using KEYLESS-GOXPress the Start/Stop button (Y page 149).
The engine stops and all the indicator
lamps in the instrument cluster go out.
i When the driver's door is closed, this
corresponds to SmartKey position 1. When
the driver's door is open, it corresponds to
SmartKey position 0 or "SmartKey
removed".
i If you use the Start/Stop button to switch
off the engine, the automatic transmission
shifts to N automatically. If you then open
the driver's or front-passenger door, the
automatic transmission shifts to P.
i In an emergency, the engine can be
turned off while the vehicle is in motion by
pressing and holding the Start/Stop button
for three seconds.
Parking brake
GWARNING
Engaging the parking brake while the vehicle
is in motion can cause the rear wheels to lock
up. You could lose control of the vehicle and
cause an accident. In addition, the vehicle's
brake lights do not light up when the parking
brake is engaged.
GWARNING
When leaving the vehicle, always remove the
SmartKey from the starter switch, take it with
you, and lock the vehicle. Do not leave
children unattended in the vehicle, or with
access to an unlocked vehicle. Children could
release the parking brake and/or shift the
automatic transmission out of park position
P , either of which could result in an accident
and/or serious personal injury.
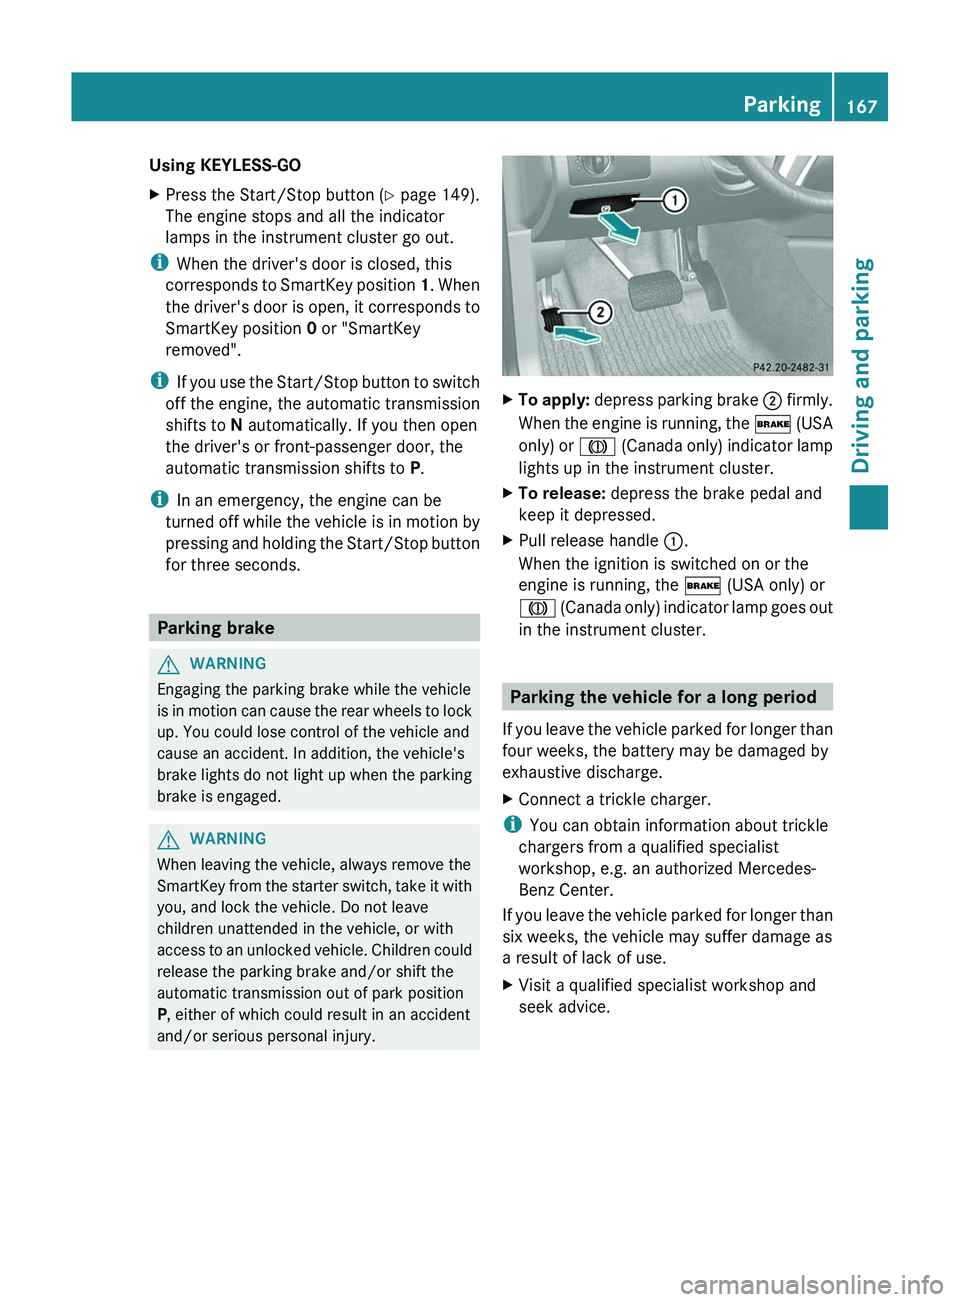
XTo apply: depress parking brake ; firmly.
When the engine is running, the $ (USA
only) or J (Canada only) indicator lamp
lights up in the instrument cluster.XTo release: depress the brake pedal and
keep it depressed.XPull release handle :.
When the ignition is switched on or the
engine is running, the $ (USA only) or
J (Canada only) indicator lamp goes out
in the instrument cluster.
Parking the vehicle for a long period
If you leave the vehicle parked for longer than
four weeks, the battery may be damaged by
exhaustive discharge.
XConnect a trickle charger.
i You can obtain information about trickle
chargers from a qualified specialist
workshop, e.g. an authorized Mercedes-
Benz Center.
If you leave the vehicle parked for longer than
six weeks, the vehicle may suffer damage as
a result of lack of use.
XVisit a qualified specialist workshop and
seek advice.Parking167Driving and parkingZ
Page 172 of 384
drive on for a short while. This allows the
airflow to cool the brakes more quickly.
Wet roadsGWARNING
After driving in heavy rain for some time
without applying the brakes or through water
deep enough to wet brake components, the
first braking action may be somewhat
reduced. You have to depress the brake pedal
more firmly. Maintain a safe distance from
vehicles in front.
After driving on a wet road or having the
vehicle washed, brake firmly while paying
attention to the traffic conditions. This will
warm up the brake discs, thereby drying them
more quickly and protecting them against
corrosion.
Limited braking performance on salt
treated roads
GWARNING
The layer of salt on the brake discs and the
brake pads/linings may cause a delay in the
braking effect, resulting in a significantly
longer braking distance, which could lead to
an accident.
To avoid this danger, you should:
R occasionally brake carefully, without
putting other road users at risk, when you
are driving on salted roads. This helps to
remove any salt that may have started to
build up on the brake discs and the brake
pads/linings.
R maintain a greater distance to the vehicle
ahead and drive with particular care.
R carefully apply the brakes at the end of a
trip and immediately after commencing a
new trip, so that salt residues are removed
from the brake discs.
Servicing the brakes
! If the brake warning lamp lights up in the
instrument cluster and you hear a warning
tone even though the parking brake has
been released, the brake fluid level may be
too low. Observe additional warning
messages in the multifunction display.
The brake fluid level may be too low due to
brake pad wear or leaking brake lines.
Have the brake system checked
immediately. Have this work carried out at
an authorized Mercedes-Benz Center.
All checks and maintenance work on the
brake system must be carried out at a
qualified specialist workshop. This work
should be carried out at an authorized
Mercedes-Benz Center.
Have the brake pads and brake fluid installed
or replaced at a qualified specialist workshop,
e.g. an authorized Mercedes-Benz Center.
GWARNING
If other than recommended brake pads are
installed, or other than recommended brake
fluid is used, the braking properties of the
vehicle can be degraded to an extent that safe
braking is substantially impaired. This could
result in an accident.
! A function or performance test should
only be carried out on a 2-axle
dynamometer. If you are planning to have
the vehicle tested on such a dynamometer,
contact an authorized Mercedes-Benz
Center to obtain further information first.
Otherwise, you could damage the drive
train or the brake system.
! As the ESP ®
system operates
automatically, the engine and the ignition
must be switched off (SmartKey in position
0 or 1 in the ignition lock or Start/Stop
button in position 0 or 1) while the parking
brake is being tested on a brake
dynamometer (maximum 10 seconds).
170Driving tipsDriving and parking
Page 192 of 384
the speed increases. As the vehicle
decelerates, the vehicle is raised back up to
highway level. In ADS SPORT(Y page 195),
the vehicle skips highway level and is lowered
directly to high-speed level.
Make changes to the vehicle level while the
vehicle is in motion. This enables the vehicle
to adjust to the new level as quickly as
possible.
The vehicle level may change visibly when you
park the vehicle and the outside temperature
changes. When the temperature drops, the
vehicle level is lower; with an increase in
temperature, the vehicle level rises.
When you unlock the vehicle or open a door,
the vehicle begins to balance the load
discrepancies while still parked. However, for
significant level changes, e.g. after the
vehicle has been stationary for a long period,
the engine must be on. For safety reasons,
the vehicle is only lowered when the doors are
closed. Lowering is interrupted if a door is
opened and continues once the door has
been closed.GWARNING
Make sure that nobody is in the vicinity of the
wheel arch or the underbody when changing
the vehicle level. You could otherwise trap
yourself or others.
GWARNING
Always select as low a vehicle level as
possible. If the vehicle level is high, the vehicle
center of gravity shifts upwards. This
increases the risk of the vehicle tipping over.
Adapt your driving style to suit the vehicle
level. ESP ®
cannot reduce the risk of an
accident if you drive too fast. ESP ®
cannot
override the laws of physics.
! When driving on extremely rough terrain,
select a high vehicle level in good time.
Make sure that there is always sufficient
ground clearance to prevent damage to the
vehicle.
! Remove the key from the ignition before
raising one or more wheels with the
appropriate equipment.
For information about driving off-road, see
( Y page 174).
Vehicles without extended Off-Road Pro
engineering package
Basic setting
The extent to which the vehicle is raised or
lowered depends on the basic setting
selected.
Select:
R Raised level, for driving on normal off-road
terrain
R Highway/high-speed level for normal roads
The individual vehicle levels differ from
highway level as follows:
R +2.3 in (+ 60 mm) at the raised level
R +/–0 in (+/–0 mm) at the highway level 23
R –0.6 in (–15 mm) at the high-speed level
Raised level
Only select raised level when this is
appropriate for the road conditions.
Otherwise, fuel consumption increases and
handling performance may be affected.
Your selection remains stored even if you
remove the SmartKey from the ignition lock.
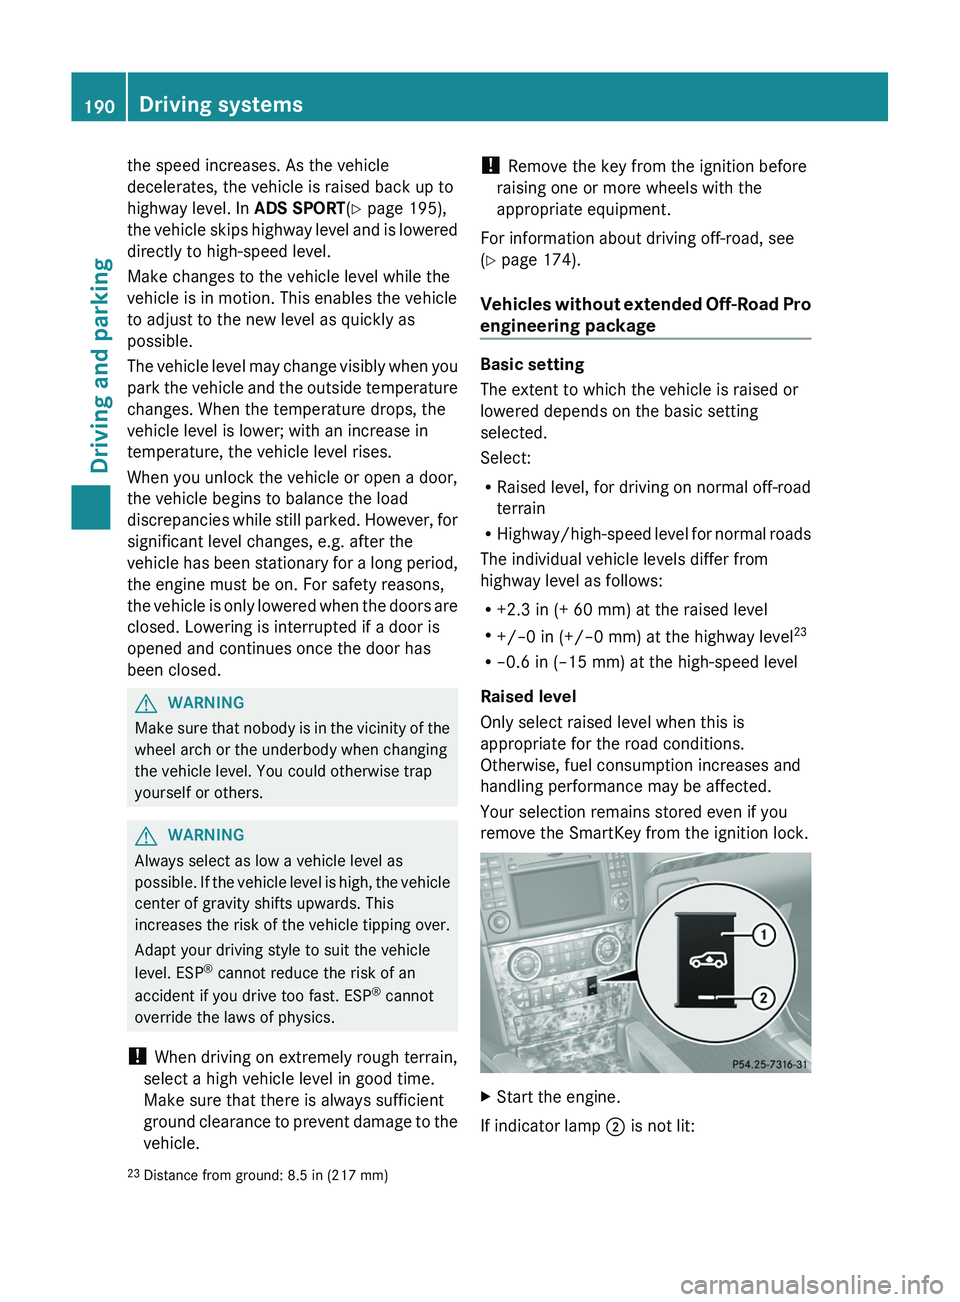
XStart the engine.
If indicator lamp ; is not lit:
23
Distance from ground: 8.5 in (217 mm)190Driving systemsDriving and parking
Page 194 of 384
Vehicles with extended Off-Road Pro
engineering package
Basic settings
The extent to which the vehicle is raised or
lowered depends on the basic setting
selected.
Select:
R Off-road level 3 for freeing the vehicle in
impassable terrain at low speeds only
R Off-road level 2 for driving on normal off-
road terrain
R Off-road level 1 for driving on easily
negotiable off-road terrain
R Highway/high-speed level for normal roads
The individual vehicle levels differ from
highway level as follows:
R +3.5 in (+ 90 mm) at off-road level 3
R +2.3 in (+ 60 mm) at off-road level 2
R +1.2 in (+ 30 mm) at off-road level 1
R +/–0 in (+/–0 mm) at the highway level
R –0.6 in (–15 mm) at the high-speed level
Off-road levels
GWARNING
Vehicle off-road level 3 is not intended for use
on paved roads. This vehicle level is intended
for clearing impracticable situations at low
speed exclusively. The vehicle has a very high
center of gravity in off-road level 3. This
increases the overturning hazard.
R Select off-road level 3 exclusively for
clearing impracticable situations at low
speed.
R Adapt your driving style to the modified
conditions.
R Do not exceed a speed of 12 mph
(20 km/h).
R Avoid extreme, quick steering movements.
R Keep in mind the vehicle's driving
characteristics are modified.
You should therefore drive in off-road level 3
with particular caution as it could otherwise
lead to an accident and/or serious injury to
you or others.
If you drive too fast at off-road level 3, then
the Reduce speed to below 12 mph
( 20 km/h ) message appears in the
multifunction display. You also hear a
warning. The vehicle is lowered.
i You cannot clear these messages.
Only select an off-road level when this is
appropriate for road conditions. Otherwise,
fuel consumption increases and handling
performance may be affected.
Your selection remains stored even if you
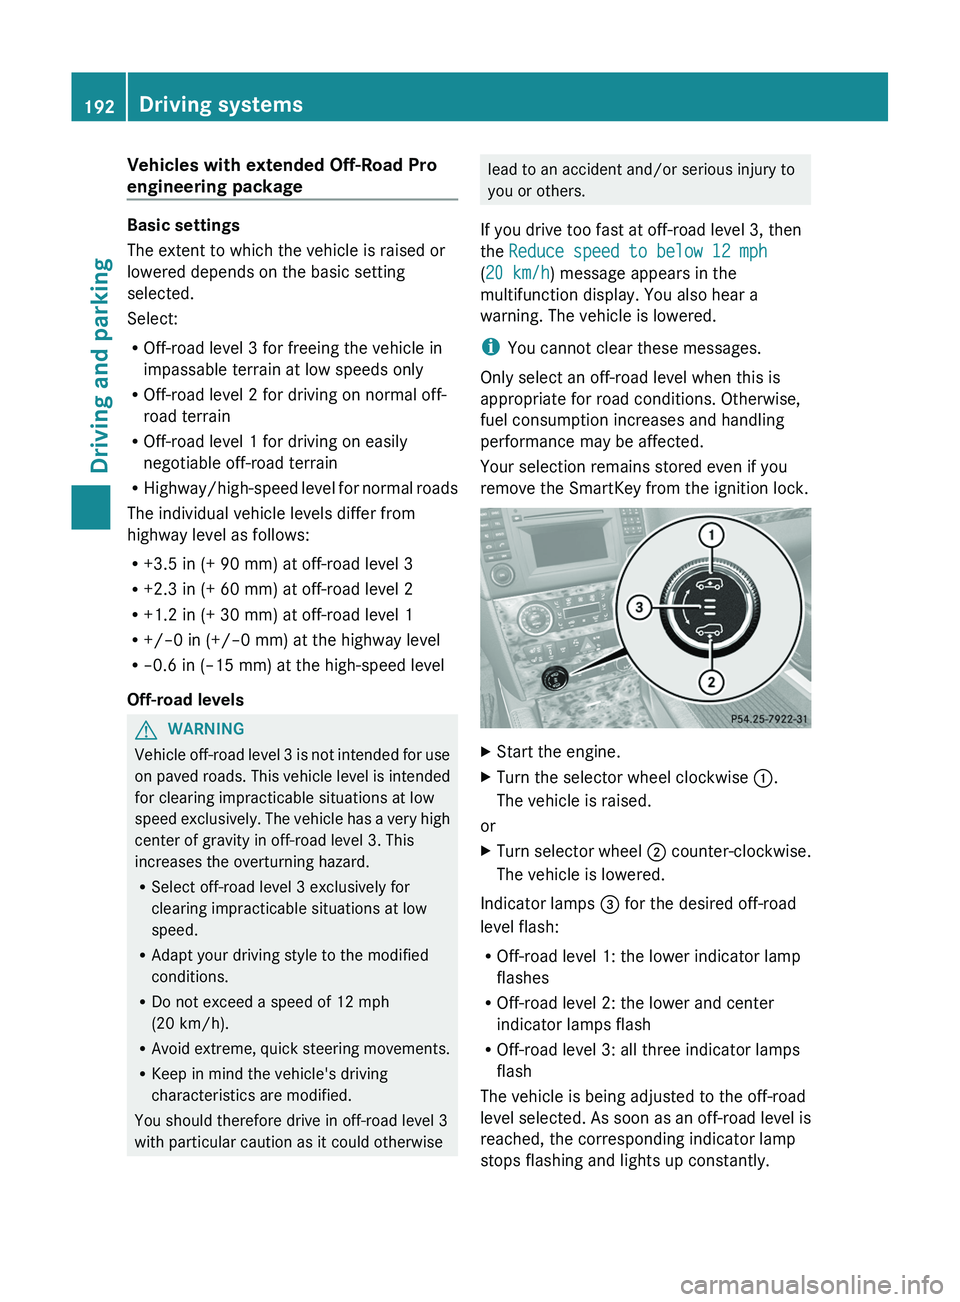
remove the SmartKey from the ignition lock.XStart the engine.XTurn the selector wheel clockwise :.
The vehicle is raised.
or
XTurn selector wheel ; counter-clockwise.
The vehicle is lowered.
Indicator lamps = for the desired off-road
level flash:
R Off-road level 1: the lower indicator lamp
flashes
R Off-road level 2: the lower and center
indicator lamps flash
R Off-road level 3: all three indicator lamps
flash
The vehicle is being adjusted to the off-road
level selected. As soon as an off-road level is
reached, the corresponding indicator lamp
stops flashing and lights up constantly.
192Driving systemsDriving and parking