2012 MERCEDES-BENZ GL ignition
[x] Cancel search: ignitionPage 219 of 384
surface is free of ice. The road may still be icy,
especially in wooded areas or on bridges.
Changes in the outside temperature are
displayed after a short delay.
Speedometer with segments
The segments in the speedometer indicate
which speed range is available.
DISTRONIC ( Y page 182) activated:
One or two segments in the set speed range
light up.
DISTRONIC detects a vehicle in front:
The segments between the speed of the
vehicle in front and the stored speed light up.
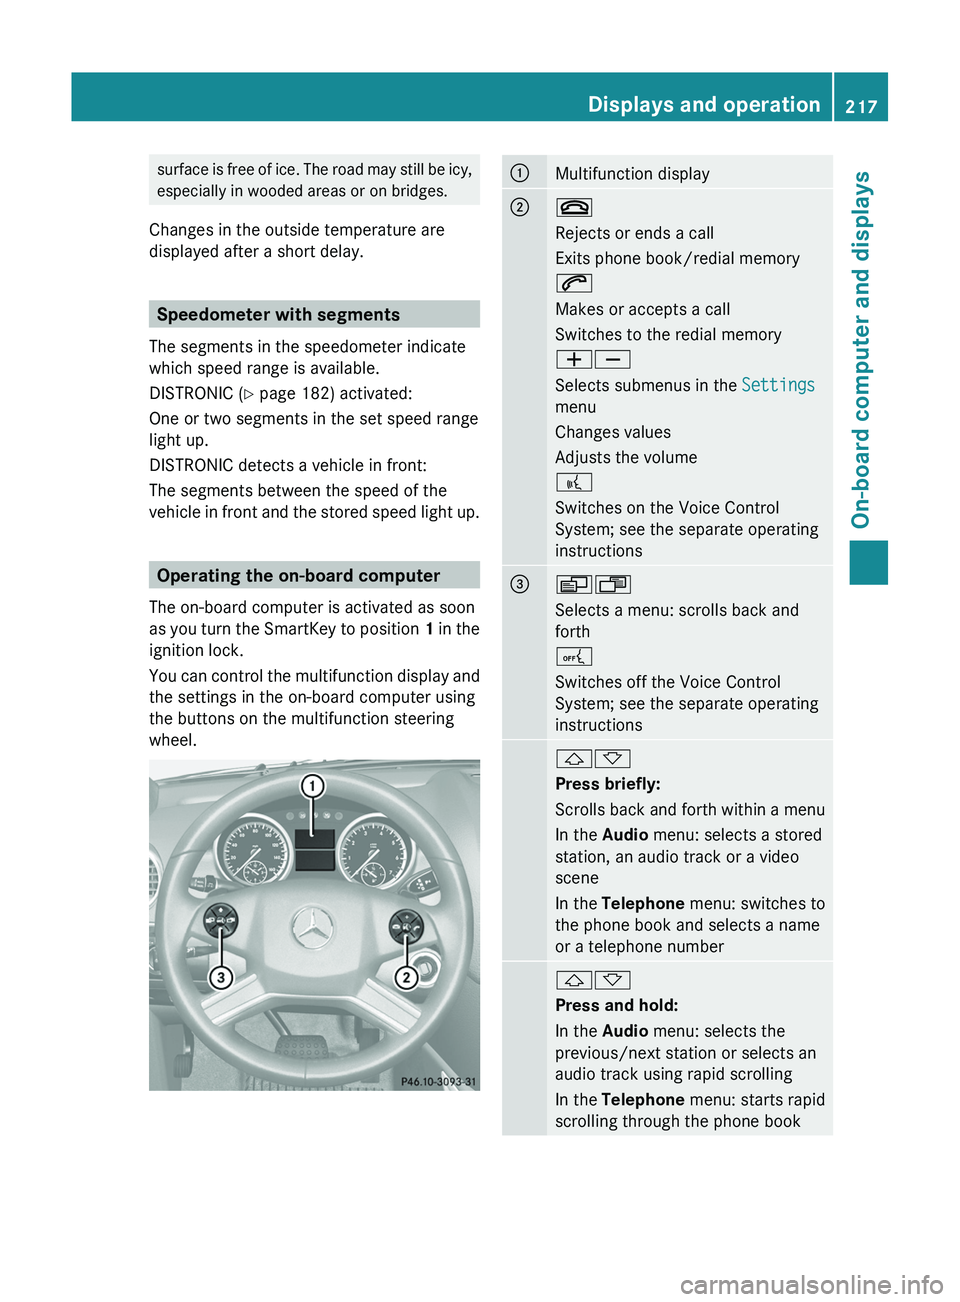
Operating the on-board computer
The on-board computer is activated as soon
as you turn the SmartKey to position 1 in the
ignition lock.
You can control the multifunction display and
the settings in the on-board computer using
the buttons on the multifunction steering
wheel.
:Multifunction display;~
Rejects or ends a call
Exits phone book/redial memory
6
Makes or accepts a call
Switches to the redial memory
WX
Selects submenus in the Settings
menu
Changes values
Adjusts the volume
?
Switches on the Voice Control
System; see the separate operating
instructions=VU
Selects a menu: scrolls back and
forth
A
Switches off the Voice Control
System; see the separate operating
instructions&*
Press briefly:
Scrolls back and forth within a menu
In the Audio menu: selects a stored
station, an audio track or a video
scene
In the Telephone menu: switches to
the phone book and selects a name
or a telephone number&*
Press and hold:
In the Audio menu: selects the
previous/next station or selects an
audio track using rapid scrolling
In the Telephone menu: starts rapid
scrolling through the phone bookDisplays and operation217On-board computer and displaysZ
Page 228 of 384
Rthe tail lamps
R the fog lamps 30
R the low-beam headlamps 31
R the side marker lampXPress V or U on the steering wheel
to select the Settings menu.XPress the & button to select submenus.XPress the W or X button to select the
Lighting submenu.XPress the & button to select Headlamp
delayed shut-off .XPress the W or X button to activate
or deactivate the Headlamp delayed
shut-off function.XBefore switching off the engine, turn the
light switch to position Ã.
The exterior lighting delayed switch-off is
activated.XPress the &, V or U button to
select a different display.
Deactivating the delayed switch-off
temporarily:
XBefore leaving the vehicle, turn the
SmartKey to position 0 in the ignition lock.XTurn the SmartKey to position 2 in the
ignition lock and back to position 0.
The delayed switch-off is deactivated.
Delayed switch-off is reactivated the next
time you start the engine.
Activating/deactivating the interior
lighting delayed switch-off
If the Interior lighting Delayed Shut-
off function is activated and you remove the
SmartKey from the ignition lock, the interior
lighting remains on for 10 seconds.
XPress the V or U button on the
steering wheel to select the Settings
menu.XPress the & button to select submenus.XPress the W or X button to select the
Lighting submenu.XPress the & button to select Interior
Lighting Delayed Shut-off .XPress the W or X button to activate
or deactivate the Interior Lighting
Delay function.XPress the &, V or U button to
select a different display.
Vehicle
Activating/deactivating the automatic
door locking feature
If you select the Automatic Door Locking
function, the vehicle is centrally locked above
a speed of around 9 mph (15 km/h).
i For further information on the automatic
locking feature, see ( Y page 84).
XPress the V or U button on the
steering wheel to select the Settings
menu.XPress the & button to call up the
selection of submenus.XPress the W or X button to select the
Vehicle submenu.XPress the & button to select
Automatic Door Locking .XPress the W or X button to switch
Automatic Door Locking on or off.XPress the &, V or U button to
select a different display.
Activating/deactivating the acoustic
locking confirmation
If you activate the Acoustic Lock
Feedback function, an audible signal sounds
when the vehicle is locked or unlocked. When
unlocking, the signal sounds once. When
locking, it sounds three times.
30 Only for vehicles with front fog lamps.
31 Only for vehicles without front fog lamps.226Menus and submenusOn-board computer and displays
Page 230 of 384
XPress the & button to select Easy-
entry Function .XPress the W or X button to activate
or deactivate the Easy-entry Function .XPress the &, V or U button to
select a different display.
Switching the belt adjustment on/off
For further information on belt adjustment
( Y page 58).
XPress the V or U button on the
steering wheel to select the Settings
menu.XPress the & button to select submenus.XPress the W or X button to select the
Comfort submenu.XPress the & button to select Belt
Adjustment .XPress the W or X button to activate
or deactivate Belt Adjustment .XPress the &, V or U button to
select a different display.
Switching the Fold in mirrors when
locking function on/off
If you activate the Fold In Mirrors When
Locking function, the exterior mirrors are
folded in when the vehicle is locked. If you
switch on the ignition, the exterior mirrors
fold out again.
If you have switched the function on and you
fold the exterior mirrors in using the button
on the door ( Y page 112), they will not fold
out automatically. The exterior mirrors can
then only be folded out using the button on
the door.
XPress V or U on the steering wheel
to select the Settings menu.XPress the & button to select submenus.XPress the W or X button to select the
Convenience submenu.XPress & to select Fold In Mirrors
When Locking .XPress W or X to activate/deactivate
the Fold Mirrors In When Locking
function.XPress the &, V or U button to
select a different display.
Additional functions menu
Activating/deactivating the distance
warning function
This function is only available with
DISTRONIC.
XPress V or U on the steering wheel
to select the Additional functions menu.XPress the & or * button to select the
Distance warning function.XPress the W or X button to activate
or deactivate the Distance warning
system.
When the distance warning function
( Y page 72) is activated, the Ä symbol
is shown in the lower multifunction display.XPress the &, V or U button to
select a different display.
Activating/deactivating Blind Spot
Assist
Further information about Blind Spot Assist
( Y page 201).
XPress V or U on the steering wheel
to select the Additional functions menu.XPress the & or * button to select the
Blind Spot Assist function.XPress the W or X button to switch
Blind Spot Assist on or off.XPress the &, V or U button to
select a different display.
Setting DSR
With the DSR speed function, you can set the
speed of DSR (the speed for driving downhill)
( Y page 204) to a value between 3 mph
228Menus and submenusOn-board computer and displays
Page 231 of 384
(Canada: 4 km/h) and 10 mph (Canada:
18 km/h). The adjustments are made in
1-mph increments (Canada:
2-km/h increments).XPress V or U on the steering wheel
to select the Additional functions menu.XPress the & or * button to select the
DSR Speed function.XPress the W or X button to set the
desired threshold speed.XPress the &, V or U button to
select a different display.
Trip computer menu
Trip computer "From start" or "From
reset"
The values in the From Start submenu refer
to the start of your journey, while those in the
From Reset submenu refer to the last time
you reset ( Y page 229) this submenu.
XPress the V or U button on the
steering wheel to select the trip
computer menu.XPress the & or * button to select
From Start or From Reset .
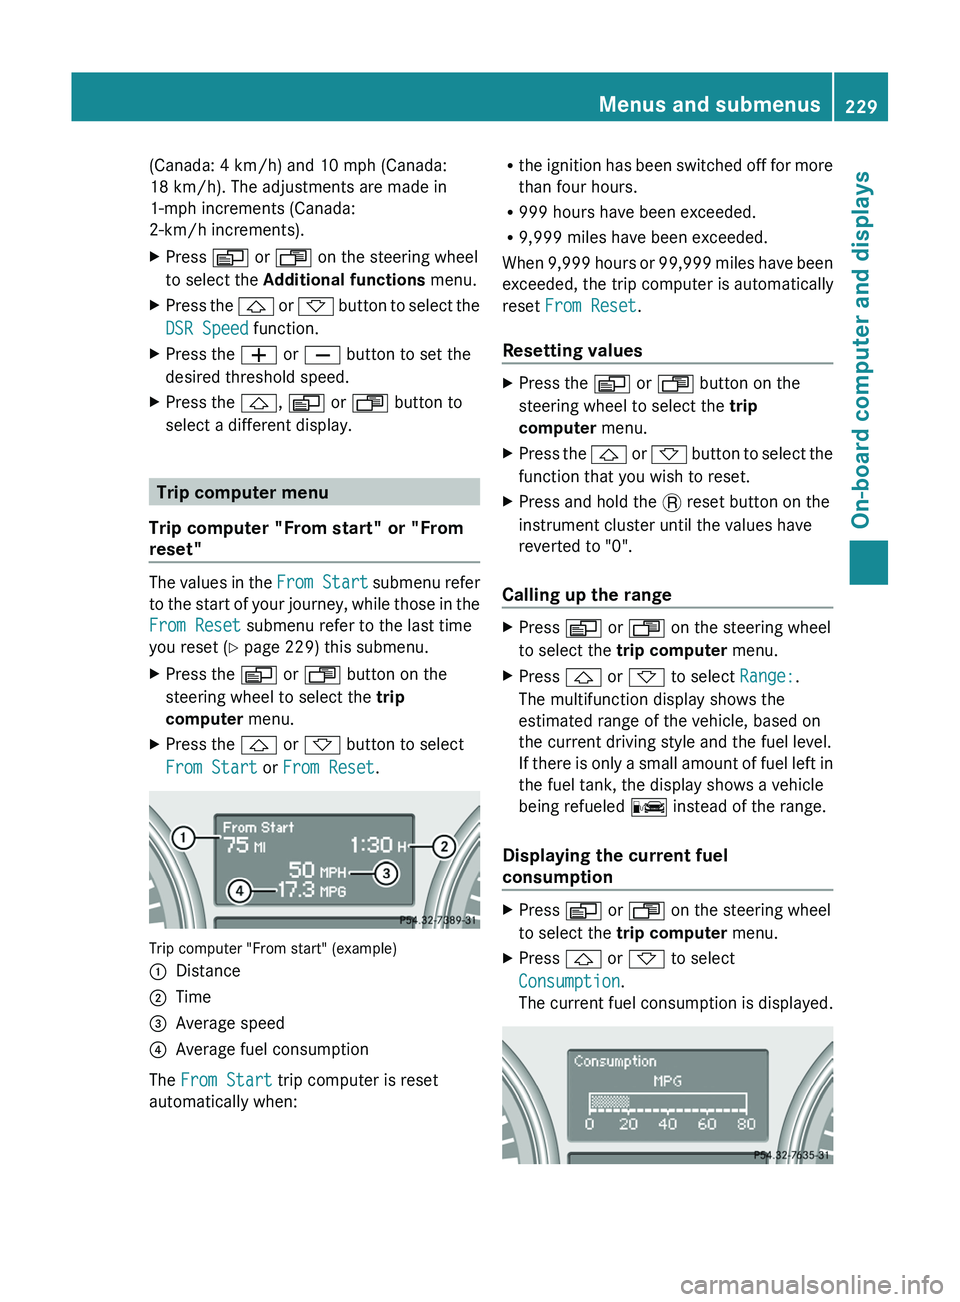
Trip computer "From start" (example)
:Distance;Time=Average speed?Average fuel consumption
The From Start trip computer is reset
automatically when:
R the ignition has been switched off for more
than four hours.
R 999 hours have been exceeded.
R 9,999 miles have been exceeded.
When 9,999 hours or 99,999 miles have been
exceeded, the trip computer is automatically
reset From Reset .
Resetting valuesXPress the V or U button on the
steering wheel to select the trip
computer menu.XPress the & or * button to select the
function that you wish to reset.XPress and hold the . reset button on the
instrument cluster until the values have
reverted to "0".
Calling up the range
XPress V or U on the steering wheel
to select the trip computer menu.XPress & or * to select Range:.
The multifunction display shows the
estimated range of the vehicle, based on
the current driving style and the fuel level.
If there is only a small amount of fuel left in
the fuel tank, the display shows a vehicle
being refueled C instead of the range.
Displaying the current fuel
consumption
XPress V or U on the steering wheel
to select the trip computer menu.XPress & or * to select
Consumption .
The current fuel consumption is displayed.Menus and submenus229On-board computer and displaysZ
Page 234 of 384
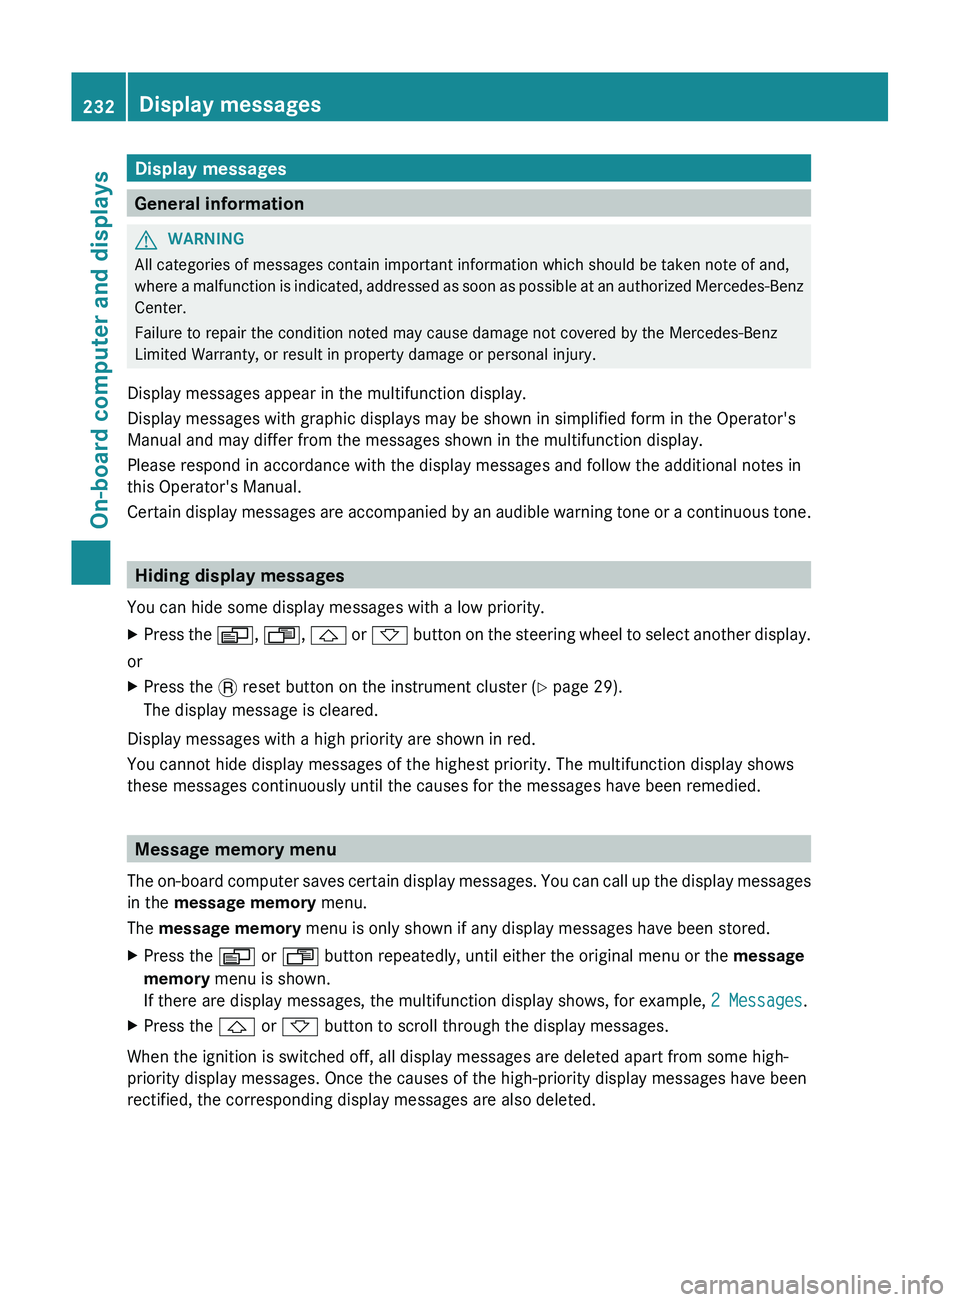
Display messages
General information
GWARNING
All categories of messages contain important information which should be taken note of and,
where a malfunction is indicated, addressed as soon as possible at an authorized Mercedes-Benz
Center.
Failure to repair the condition noted may cause damage not covered by the Mercedes-Benz
Limited Warranty, or result in property damage or personal injury.
Display messages appear in the multifunction display.
Display messages with graphic displays may be shown in simplified form in the Operator's
Manual and may differ from the messages shown in the multifunction display.
Please respond in accordance with the display messages and follow the additional notes in
this Operator's Manual.
Certain display messages are accompanied by an audible warning tone or a continuous tone.
Hiding display messages
You can hide some display messages with a low priority.
XPress the V, U , & or * button on the steering wheel to select another display.
or
XPress the . reset button on the instrument cluster ( Y page 29).
The display message is cleared.
Display messages with a high priority are shown in red.
You cannot hide display messages of the highest priority. The multifunction display shows
these messages continuously until the causes for the messages have been remedied.
Message memory menu
The on-board computer saves certain display messages. You can call up the display messages
in the message memory menu.
The message memory menu is only shown if any display messages have been stored.
XPress the V or U button repeatedly, until either the original menu or the message
memory menu is shown.
If there are display messages, the multifunction display shows, for example, 2 Messages.XPress the & or * button to scroll through the display messages.
When the ignition is switched off, all display messages are deleted apart from some high-
priority display messages. Once the causes of the high-priority display messages have been
rectified, the corresponding display messages are also deleted.
232Display messagesOn-board computer and displays
Page 240 of 384
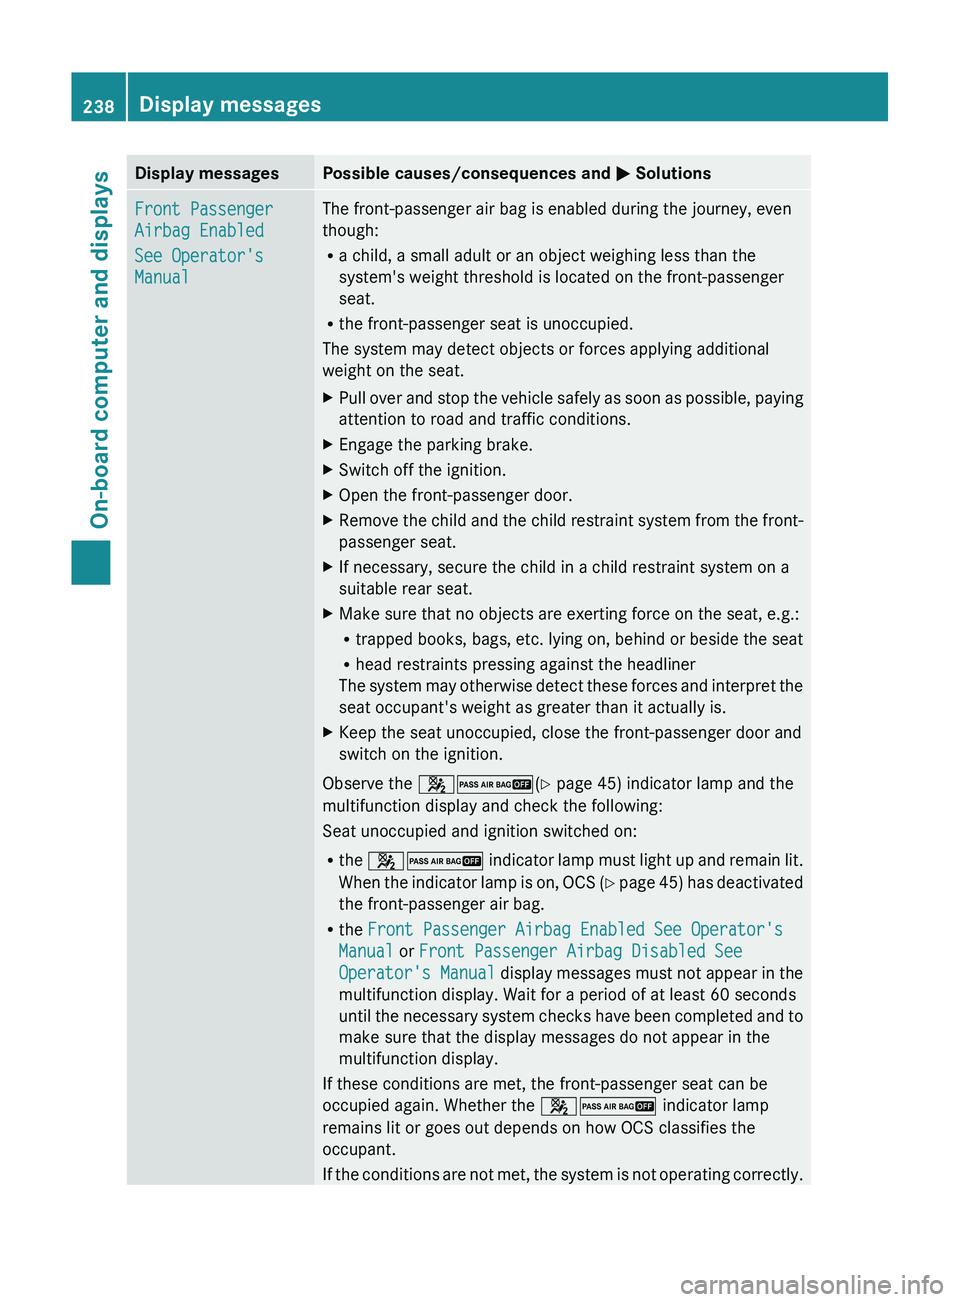
Display messagesPossible causes/consequences and M SolutionsFront Passenger
Airbag Enabled
See Operator's
ManualThe front-passenger air bag is enabled during the journey, even
though:
R a child, a small adult or an object weighing less than the
system's weight threshold is located on the front-passenger
seat.
R the front-passenger seat is unoccupied.
The system may detect objects or forces applying additional
weight on the seat.XPull over and stop the vehicle safely as soon as possible, paying
attention to road and traffic conditions.XEngage the parking brake.XSwitch off the ignition.XOpen the front-passenger door.XRemove the child and the child restraint system from the front-
passenger seat.XIf necessary, secure the child in a child restraint system on a
suitable rear seat.XMake sure that no objects are exerting force on the seat, e.g.:
R trapped books, bags, etc. lying on, behind or beside the seat
R head restraints pressing against the headliner
The system may otherwise detect these forces and interpret the
seat occupant's weight as greater than it actually is.XKeep the seat unoccupied, close the front-passenger door and
switch on the ignition.
Observe the 42 (Y page 45) indicator lamp and the
multifunction display and check the following:
Seat unoccupied and ignition switched on:
R the 42 indicator lamp must light up and remain lit.
When the indicator lamp is on, OCS (Y page 45) has deactivated
the front-passenger air bag.
R the Front Passenger Airbag Enabled See Operator's
Manual or Front Passenger Airbag Disabled See
Operator's Manual display messages must not appear in the
multifunction display. Wait for a period of at least 60 seconds
until the necessary system checks have been completed and to
make sure that the display messages do not appear in the
multifunction display.
If these conditions are met, the front-passenger seat can be
occupied again. Whether the 42 indicator lamp
remains lit or goes out depends on how OCS classifies the
occupant.
If the conditions are not met, the system is not operating correctly.
238Display messagesOn-board computer and displays
Page 242 of 384
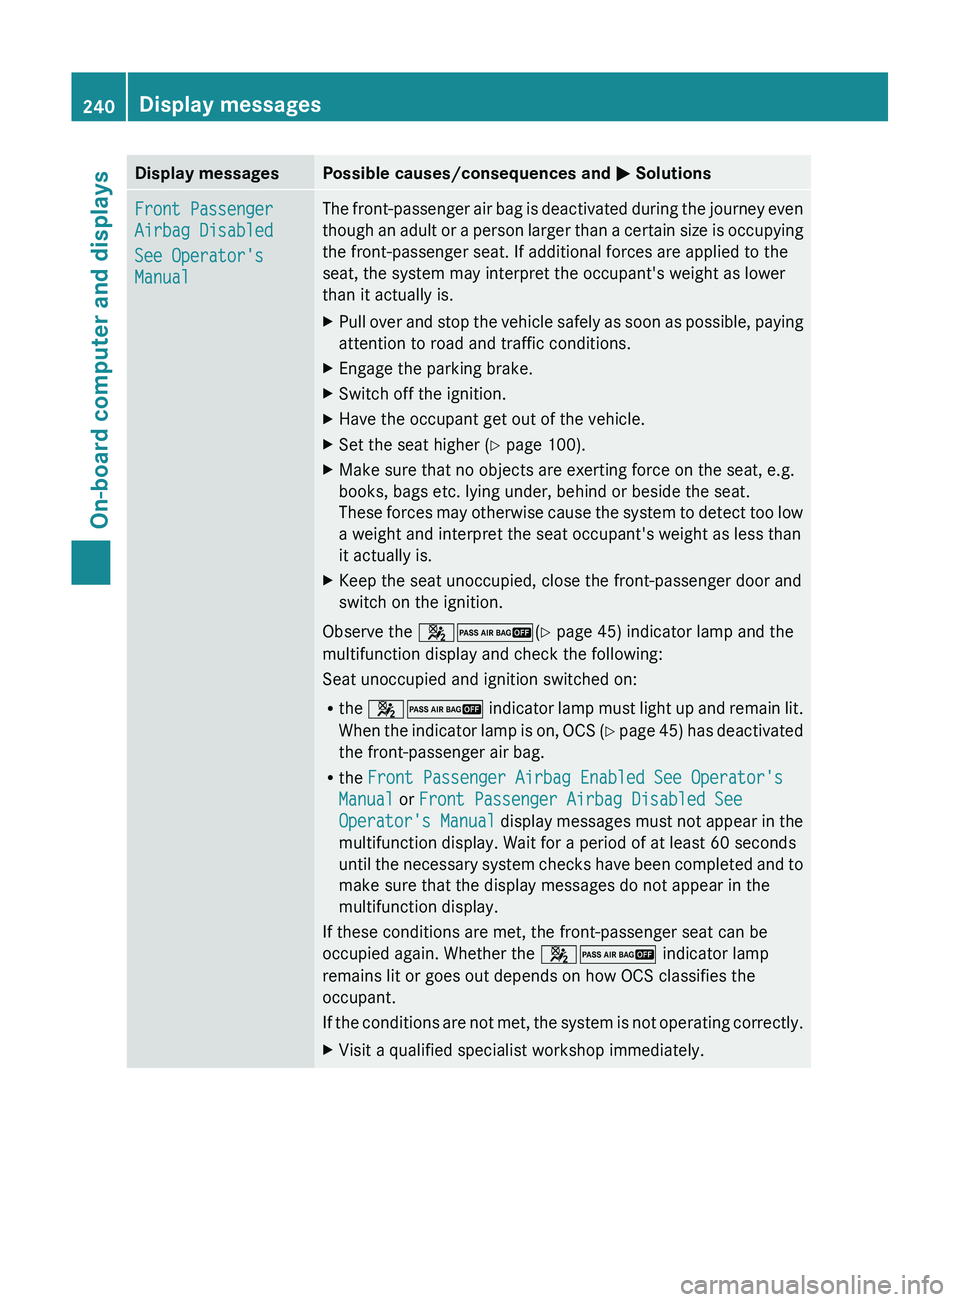
Display messagesPossible causes/consequences and M SolutionsFront Passenger
Airbag Disabled
See Operator's
ManualThe front-passenger air bag is deactivated during the journey even
though an adult or a person larger than a certain size is occupying
the front-passenger seat. If additional forces are applied to the
seat, the system may interpret the occupant's weight as lower
than it actually is.XPull over and stop the vehicle safely as soon as possible, paying
attention to road and traffic conditions.XEngage the parking brake.XSwitch off the ignition.XHave the occupant get out of the vehicle.XSet the seat higher ( Y page 100).XMake sure that no objects are exerting force on the seat, e.g.
books, bags etc. lying under, behind or beside the seat.
These forces may otherwise cause the system to detect too low
a weight and interpret the seat occupant's weight as less than
it actually is.XKeep the seat unoccupied, close the front-passenger door and
switch on the ignition.
Observe the 42 (Y page 45) indicator lamp and the
multifunction display and check the following:
Seat unoccupied and ignition switched on:
R the 42 indicator lamp must light up and remain lit.
When the indicator lamp is on, OCS (Y page 45) has deactivated
the front-passenger air bag.
R the Front Passenger Airbag Enabled See Operator's
Manual or Front Passenger Airbag Disabled See
Operator's Manual display messages must not appear in the
multifunction display. Wait for a period of at least 60 seconds
until the necessary system checks have been completed and to
make sure that the display messages do not appear in the
multifunction display.
If these conditions are met, the front-passenger seat can be
occupied again. Whether the 42 indicator lamp
remains lit or goes out depends on how OCS classifies the
occupant.
If the conditions are not met, the system is not operating correctly.
XVisit a qualified specialist workshop immediately.240Display messagesOn-board computer and displays
Page 258 of 384
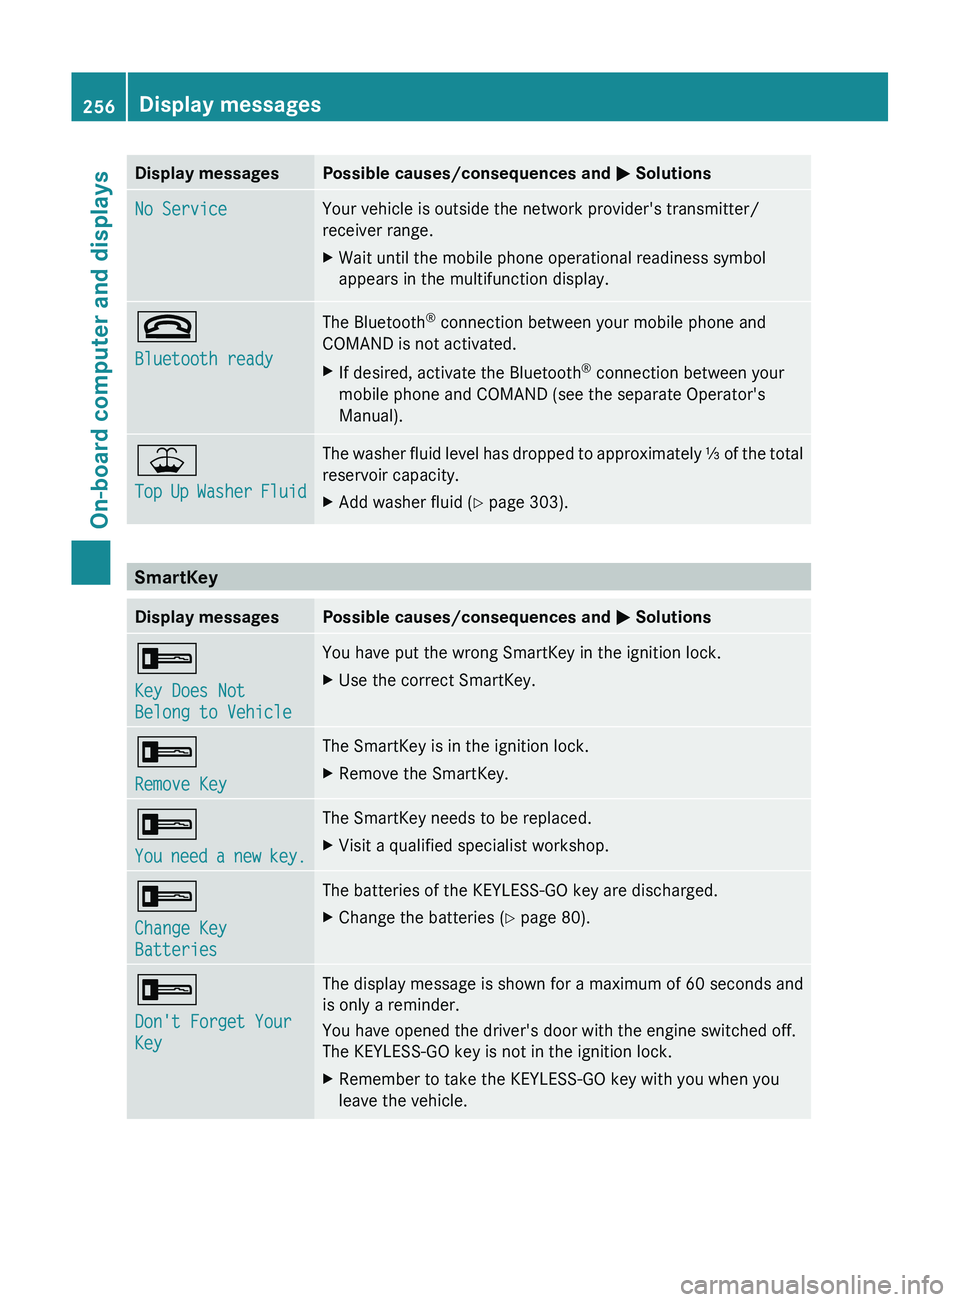
Display messagesPossible causes/consequences and M SolutionsNo ServiceYour vehicle is outside the network provider's transmitter/
receiver range.XWait until the mobile phone operational readiness symbol
appears in the multifunction display.~
Bluetooth readyThe Bluetooth ®
connection between your mobile phone and
COMAND is not activated.XIf desired, activate the Bluetooth ®
connection between your
mobile phone and COMAND (see the separate Operator's
Manual).¥
Top Up Washer FluidThe washer fluid level has dropped to approximately ⅓ of the total
reservoir capacity.XAdd washer fluid ( Y page 303).
SmartKey
Display messagesPossible causes/consequences and M Solutions+
Key Does Not
Belong to VehicleYou have put the wrong SmartKey in the ignition lock.XUse the correct SmartKey.+
Remove KeyThe SmartKey is in the ignition lock.XRemove the SmartKey.+
You need a new key.The SmartKey needs to be replaced.XVisit a qualified specialist workshop.+
Change Key
BatteriesThe batteries of the KEYLESS-GO key are discharged.XChange the batteries ( Y page 80).+
Don't Forget Your
KeyThe display message is shown for a maximum of 60 seconds and
is only a reminder.
You have opened the driver's door with the engine switched off.
The KEYLESS-GO key is not in the ignition lock.XRemember to take the KEYLESS-GO key with you when you
leave the vehicle.256Display messagesOn-board computer and displays