2012 MERCEDES-BENZ GL reset
[x] Cancel search: resetPage 231 of 384
(Canada: 4 km/h) and 10 mph (Canada:
18 km/h). The adjustments are made in
1-mph increments (Canada:
2-km/h increments).XPress V or U on the steering wheel
to select the Additional functions menu.XPress the & or * button to select the
DSR Speed function.XPress the W or X button to set the
desired threshold speed.XPress the &, V or U button to
select a different display.
Trip computer menu
Trip computer "From start" or "From
reset"
The values in the From Start submenu refer
to the start of your journey, while those in the
From Reset submenu refer to the last time
you reset ( Y page 229) this submenu.
XPress the V or U button on the
steering wheel to select the trip
computer menu.XPress the & or * button to select
From Start or From Reset .
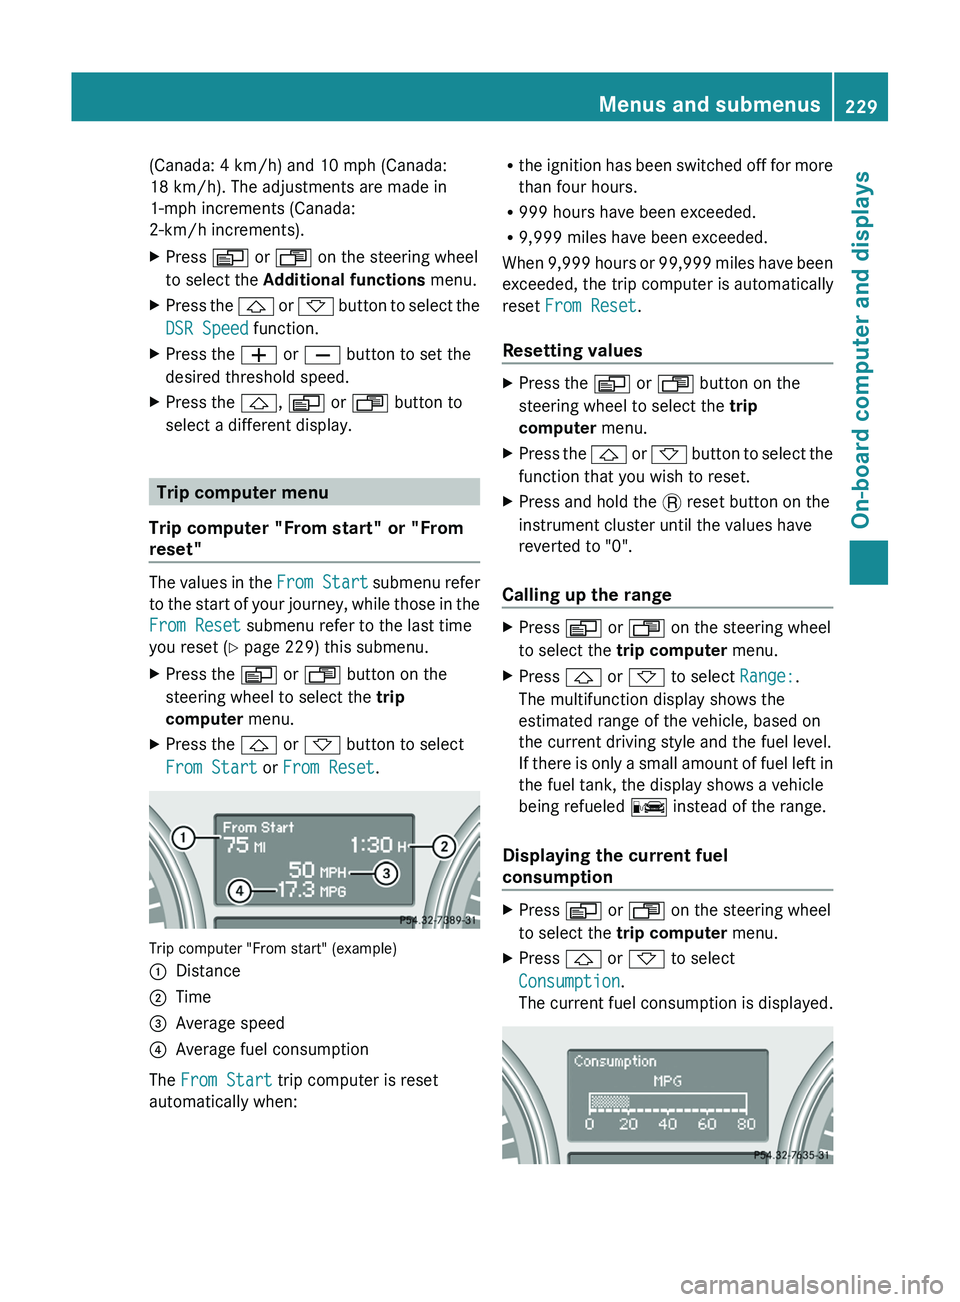
Trip computer "From start" (example)
:Distance;Time=Average speed?Average fuel consumption
The From Start trip computer is reset
automatically when:
R the ignition has been switched off for more
than four hours.
R 999 hours have been exceeded.
R 9,999 miles have been exceeded.
When 9,999 hours or 99,999 miles have been
exceeded, the trip computer is automatically
reset From Reset .
Resetting valuesXPress the V or U button on the
steering wheel to select the trip
computer menu.XPress the & or * button to select the
function that you wish to reset.XPress and hold the . reset button on the
instrument cluster until the values have
reverted to "0".
Calling up the range
XPress V or U on the steering wheel
to select the trip computer menu.XPress & or * to select Range:.
The multifunction display shows the
estimated range of the vehicle, based on
the current driving style and the fuel level.
If there is only a small amount of fuel left in
the fuel tank, the display shows a vehicle
being refueled C instead of the range.
Displaying the current fuel
consumption
XPress V or U on the steering wheel
to select the trip computer menu.XPress & or * to select
Consumption .
The current fuel consumption is displayed.Menus and submenus229On-board computer and displaysZ
Page 234 of 384
Display messages
General information
GWARNING
All categories of messages contain important information which should be taken note of and,
where a malfunction is indicated, addressed as soon as possible at an authorized Mercedes-Benz
Center.
Failure to repair the condition noted may cause damage not covered by the Mercedes-Benz
Limited Warranty, or result in property damage or personal injury.
Display messages appear in the multifunction display.
Display messages with graphic displays may be shown in simplified form in the Operator's
Manual and may differ from the messages shown in the multifunction display.
Please respond in accordance with the display messages and follow the additional notes in
this Operator's Manual.
Certain display messages are accompanied by an audible warning tone or a continuous tone.
Hiding display messages
You can hide some display messages with a low priority.
XPress the V, U , & or * button on the steering wheel to select another display.
or
XPress the . reset button on the instrument cluster ( Y page 29).
The display message is cleared.
Display messages with a high priority are shown in red.
You cannot hide display messages of the highest priority. The multifunction display shows
these messages continuously until the causes for the messages have been remedied.
Message memory menu
The on-board computer saves certain display messages. You can call up the display messages
in the message memory menu.
The message memory menu is only shown if any display messages have been stored.
XPress the V or U button repeatedly, until either the original menu or the message
memory menu is shown.
If there are display messages, the multifunction display shows, for example, 2 Messages.XPress the & or * button to scroll through the display messages.
When the ignition is switched off, all display messages are deleted apart from some high-
priority display messages. Once the causes of the high-priority display messages have been
rectified, the corresponding display messages are also deleted.
232Display messagesOn-board computer and displays
Page 307 of 384
Maintenance
Service interval display
Service messages
Information on the type of service and service
intervals (see separate Service Booklet).
You can obtain further information from an
authorized Mercedes-Benz Center or at
http://www.mbusa.com (USA only).
The service interval display informs you of the
next service due date.
If a service due date has been exceeded, you
also hear an acoustic signal.
The multifunction display shows a service
message for a few seconds, e.g.
Service A in .. mi
Service A due now
Service A overdue by .. mi
The letter indicates how much time the
workshop will require to carry out the service
work. The letters displayed range from A for
a short service duration to H for a long service
duration.
The service interval display does not take into
account any periods of time during which the
battery is disconnected.
Maintaining the time-dependent service
schedule:
XNote down the service due date displayed
in the multifunction display before
disconnecting the battery.
or
XSubtract the battery disconnection periods
from the service date shown on the display
after reconnecting the battery.
i The service interval display does not
provide any information regarding the
engine's oil level. Observe the notes on the
engine oil level ( Y page 301).
Hiding a service messageXPress the . reset button on the
instrument cluster ( Y page 29).
Displaying a service message
XSwitch on the ignition.XPress V or U to select the standard
display menu on the steering wheel
( Y page 220).XSelect & or * to select the service
interval display.
The service due date appears in the
multifunction display.
Please bear the following in mind
Resetting service interval display
If the qualified specialist workshop, e.g. a
Mercedes-Benz Center, carried out the
maintenance work, the service interval
display will be reset.
Further information, on maintenance for
example, can be obtained at an authorized
Mercedes-Benz Center or directly from
Mercedes-Benz.
! If the service interval display has been
reset unintentionally, have the setting
corrected at a Mercedes-Benz Center.
Have service work carried out as described
in the Service Booklet. This may otherwise
lead to increased wear and damage to the
major assemblies or the vehicle.
Driving abroad
An extensive Mercedes-Benz Service network
is also available in other countries. You can
obtain further information from any
authorized Mercedes-Benz Center.
Care
Notes on care
Regular care of your vehicle is a condition for
retaining the quality in the long term.
Care305Maintenance and careZ
Page 330 of 384
Benz. Contact an authorized Mercedes-
Benz Center for more information.
The battery and the cover of the positive
terminal clamp must be installed securely
during operation.
i Remove the SmartKey if you park the
vehicle and do not require any electrical
consumers. The vehicle will then use very
little energy, thus conserving battery
power.
Mercedes-Benz recommends that you do not
carry out work on batteries yourself, e.g.
removing or charging. Always have this work
performed at a qualified specialist workshop,
e.g. an authorized Mercedes-Benz Center.
i If the power supply has been interrupted,
e.g. if the battery has been reconnected,
you must carry out the following tasks:
R set the clock ( Y page 224).
On vehicles with COMAND and a
navigation system, the clock is set
automatically.
R reset the sliding sunroof ( Y page 94).
R reset the function for automatically
folding the exterior mirrors in/out by
folding the mirrors out once
( Y page 113).
R reset the side windows ( Y page 92).
Charging the battery
GWARNING
Never charge a battery still installed in the
vehicle unless a battery charger unit approved
by Mercedes-Benz is being used. Gases may
escape during charging and cause explosions
that may result in paint damage, corrosion or
personal injury.
A battery charger unit specially adapted for
Mercedes-Benz vehicles and tested and
approved by Mercedes-Benz is available as an
accessory. It permits the charging of the
battery in its installed position. Contact an
authorized Mercedes-Benz Center for further
information and availability.
Charge the battery in accordance with the
separate instructions for the battery charger.GWARNING
There is a risk of acid burns during the
charging process due to the gases which
escape from the battery. Do not lean over the
battery during the charging process.
GWARNING
Battery acid is caustic. Avoid contact with the
skin, eyes or clothing.
! Only charge the installed battery with a
battery charger which has been tested and
approved by Mercedes-Benz. These battery
chargers allow the battery to be charged
while still installed.
! Only use battery chargers with a
maximum charging voltage of 14.8 V.
! Only charge the battery using the jump-
starting connection point.
The jump-starting connection point is in the
engine compartment ( Y page 329).
XOpen the hood ( Y page 300).XConnect the battery charger to the positive
terminal and earth point in the same order
as when connecting the donor battery in
the jump-starting procedure
( Y page 329).XRead the battery charger's operating
instructions before charging the battery.328BatteryBreakdown assistance
Page 348 of 384
GWARNING
The tire pressure loss warning system does
not provide a warning for wrongly selected tire
inflation pressures. Always adjust tire
inflation pressure according to the Tire and
Loading Information placard on the driver's
door B-pillar or on the tire inflation pressure
label located on the inside of the fuel filler flap.
The tire pressure loss warning system does
not replace regular checks of the tire inflation
pressures since a gradual pressure loss in
more than one tire cannot be detected by the
tire pressure loss warning system.
The tire pressure loss warning system is not
able to issue a warning due to a sudden
dramatic loss of tire inflation pressure (e.g.
tire blowout caused by a foreign object). In
this case bring the vehicle to a halt by carefully
applying the brakes and avoiding abrupt
steering maneuvers.
The function of the tire pressure loss warning
system is limited or delayed if:
R snow chains are mounted to your vehicle's
tires.
R road conditions are wintry.
R you are driving on sand or gravel.
R you adopt a very sporty driving style
(cornering at high speeds or driving with
high rates of acceleration).
R you are towing a very heavy or large trailer.
R you are driving with a heavy load (in the
vehicle or on the roof).
Restarting the tire pressure loss
warning system
Restart the tire pressure loss warning system
if you have:
R changed the tire pressure
R changed the wheels or tires
R mount new wheels or tires
XBefore restarting, consult the Tire and
Loading Information placard on the
B-pillar on the driver's side or the tirepressure table on the inside of the fuel filler
flap to ensure the tire pressure in all four
tires is set correctly for the current
operating conditions.XObserve the notes in the section on tire
pressures ( Y page 341).GWARNING
The tire pressure loss warning system can
only give reliable warnings if you have set the
correct tire pressure.
If an incorrect tire pressure is set, these
incorrect values will be monitored.
A tire with insufficient pressure results in
vehicle instability when driving, thus
increasing the risk of an accident.
XMake sure that the SmartKey is in position
2 (Y page 149) in the ignition lock.XPress and hold the V or U button on
the multifunction steering wheel until the
standard display appears in the
multifunction display ( Y page 220).XPress the * or & button until the
Run Flat Indicator Active Menu: R-
Button message appears in the
multifunction display.XPress the reset button ( Y page 29) on the
instrument cluster.
The Restart Run Flat Indicator?
message appears in the multifunction
display.
If you wish to confirm the restart:
XPress the W button.
The Run Flat Indicator Restarted
message appears in the multifunction
display.
After a teach-in period, the tire pressure
loss warning system will monitor the set
tire pressures of all four tires.346Tire pressureWheels and tires
Page 351 of 384
XCheck the tire pressure on all four wheels
and correct it if necessary.
i If the wheel positions on the vehicle are
interchanged, the tire pressures may be
displayed for the wrong positions for a
short time. This is rectified after a few
minutes of driving, and the tire pressures
are displayed for the correct positions.
Restarting the tire pressure monitor
GWARNING
It is the driver's responsibility to set the tire
pressure to the recommended cold tire
pressure. Underinflated tires affect the ability
to steer or brake the vehicle. You might lose
control over the vehicle.
When you restart the tire pressure monitor,
all existing warning messages are deleted and
the warning lamps go out. The monitor uses
the currently set tire pressures as the
reference values for monitoring.
The tire pressure monitor must be restarted
when you set the tire pressure to a new value
(as a result of changed drive or load
characteristics, for example). The tire
pressure monitor then monitors the new tire
pressure values.
Restart the tire pressure monitor after you
have set the tire pressure to the value
recommended for the desired driving
situation ( Y page 341). Only correct tire
pressures on cold tires. Comply with the
recommended tire pressures on the tire and
loading information table on the B-pillar on
the driver's side. Additional tire pressure
values for driving at high speeds or with heavy
loads can be found in the tire pressure table
on the inside of the fuel filler flap.
XMake sure that the tire pressure is correct
on all four wheels.XMake sure that the SmartKey is in position
2 in the ignition lock.XPress and hold the V or U button on
the multifunction steering wheel until thestandard display appears in the
multifunction display ( Y page 220).XPress and hold the & or * button
until the tire pressure of each wheel or the
Tire pressure displayed after
driving for a few minutes message
appears.XPress the reset button on the instrument
cluster ( Y page 29).
The Restart tire pressure
monitor? message appears in the
multifunction display.
If you wish to confirm the restart:
XPress the W button.
The Tire Pressure Monitor
Restarted message appears in the
multifunction display.
After driving for a few minutes, the system
checks whether the current tire pressures
are within the specified range. The new tire
pressures are then accepted as reference
values and monitored.
If you wish to cancel the restart:
XPress the X button.
The tire pressure values stored at the last
restart will continue to be monitored.
Loading the vehicle
Instruction labels for tires and loads
GWARNING
Do not overload the tires by exceeding the
specified load limit as indicated on the Tire
and Loading Information placard on the
driver's door B-pillar. Overloading the tires
can overheat them, possibly causing a
blowout. Overloading the tires can also result
in handling or steering problems, or brake
failure.
Loading the vehicle349Wheels and tiresZ