2012 MERCEDES-BENZ GL reset
[x] Cancel search: resetPage 58 of 384
belt buckled, you are much more likely to hit
the interior of the vehicle or be ejected from
it. You can be seriously injured or killed.
In the same crash, the possibility of injury or
death is lessened if you are properly wearing
your seat belt. The air bags can only protect
as intended if the occupants are properly
wearing their seat belts.GWARNING
Never ride in a moving vehicle with the seat
backrest in an excessively reclined position as
this can be dangerous. You could slide under
the seat belt in a collision. If you slide under
it, the seat belt would apply force at the
abdomen or neck. That could cause serious
or even fatal injuries. The seat backrest and
seat belt provide the best restraint when the
wearer is in a position that is as upright as
possible and the seat belt is properly
positioned on the body.
GWARNING
Never let more people ride in the vehicle than
there are seat belts available. Make sure
everyone riding in the vehicle is correctly
restrained with a separate seat belt. Never
use a seat belt for more than one person at a
time.
GWARNING
Damaged seat belts or seat belts that have
been subjected to stress in an accident must
be replaced and their anchoring points must
also be checked.
Only use seat belts which have been approved
by Mercedes-Benz.
Do not make any modifications to the seat
belts. This can lead to unintended activation
of the ETDs or to their failure to activate when
necessary.
Do not bleach or dye seat belts as this may
severely weaken them. In a crash they may
not be able to provide adequate protection.
Have all work carried out only by qualified
technicians. Contact an authorized
Mercedes-Benz Center.
Correct use of the seat beltsGWARNING
USE SEAT BELTS PROPERLY
R Seat belts can only work when used
properly. Never wear seat belts in any other
way than as described in this section, as
that could result in serious injuries in the
event of an accident.
R Each occupant should wear their seat belt
at all times, because seat belts help reduce
the likelihood of and potential severity of
injuries in accidents, including rollovers.
The integrated restraint system includes
SRS (driver front air bag, driver's side knee
bag, front-passenger front air bag, side
impact air bags, window curtain air bags for
the side windows), Emergency Tensioning
Devices, seat belt force limiters, and front
seat knee bolsters.
The system is designed to enhance the
protection offered to properly belted
occupants in certain frontal (front air bags,
driver's side knee bag and ETDs) and side
(side impact air bags, window curtain air
bags, and ETDs) impacts which exceed
preset deployment thresholds and in
certain rollovers (window curtain air bags
and ETDs).
R Never wear the shoulder belt under your
arm, across your neck or off your shoulder.
In a frontal crash, your body would move
too far forward. That would increase the
chance of head and neck injuries. The seat
belt would also apply too much force to the
ribs or abdomen, which could severely
injure internal organs such as your liver or
spleen.
Adjust the seat belt so that the shoulder
section is located as close as possible to
the middle of the shoulder. It should not
touch the neck. Never pass the shoulder
56Occupant safetySafety
Page 94 of 384
If potential danger exists, proceed as follows:
R Release the & button to stop the closing
procedure. To open, press and hold the
% button. To continue the closing
procedure after making sure that there is
no danger of anyone being harmed by the
closing procedure, press and hold the
& button.
Vehicles with KEYLESS-GO:
R Release the lock button on the outside door
handle to stop the closing procedure.
R Immediately pull on the same outside door
handle and hold firmly. The door windows
and the sliding sunroof will open for as long
as the door handle is held but the door is
not opened.
Using the SmartKey
i The SmartKey must be close to the
driver's door handle.
XPoint the tip of the SmartKey at the driver's
door handle.XPress and hold the & button until the
side windows and the sliding sunroof are
fully closed.XMake sure that all the side windows and the
sliding sunroof are closed.XTo interrupt convenience closing:
release the & button.
Using KEYLESS-GO
The KEYLESS-GO key must be outside the
vehicle. All the doors must be closed.
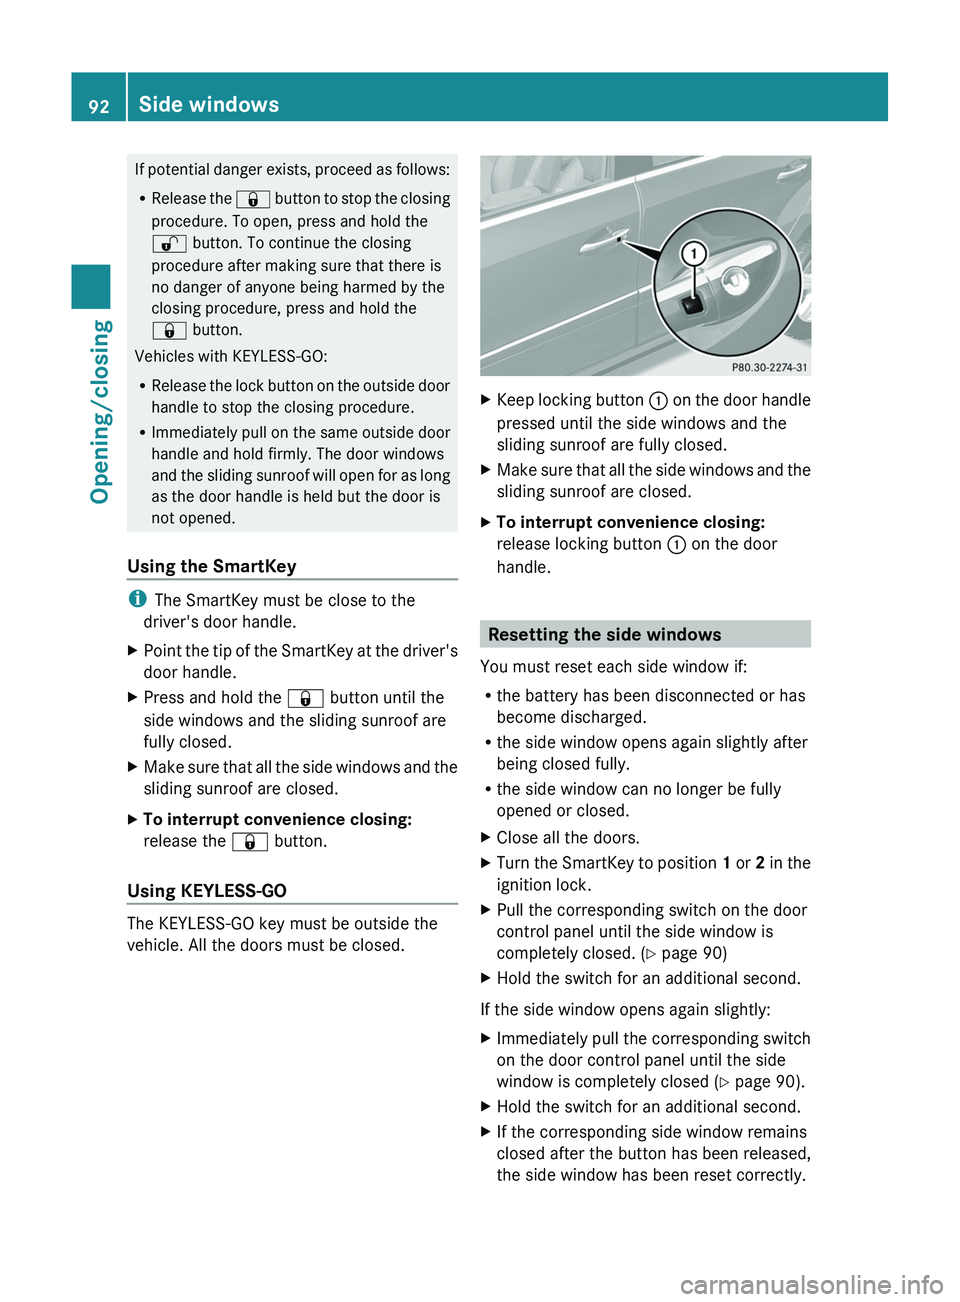
XKeep locking button : on the door handle
pressed until the side windows and the
sliding sunroof are fully closed.XMake sure that all the side windows and the
sliding sunroof are closed.XTo interrupt convenience closing:
release locking button : on the door
handle.
Resetting the side windows
You must reset each side window if:
R the battery has been disconnected or has
become discharged.
R the side window opens again slightly after
being closed fully.
R the side window can no longer be fully
opened or closed.
XClose all the doors.XTurn the SmartKey to position 1 or 2 in the
ignition lock.XPull the corresponding switch on the door
control panel until the side window is
completely closed. ( Y page 90)XHold the switch for an additional second.
If the side window opens again slightly:
XImmediately pull the corresponding switch
on the door control panel until the side
window is completely closed ( Y page 90).XHold the switch for an additional second.XIf the corresponding side window remains
closed after the button has been released,
the side window has been reset correctly.92Side windowsOpening/closing
Page 96 of 384

damaged if water enters the vehicle
interior.
i Resonance noises can occur in addition
to the usual airflow noises when the sliding
sunroof is open. They are caused by minor
pressure fluctuations in the vehicle interior.
Change the position of the sliding sunroof
or open a side window slightly to reduce or
eliminate these noises.
Operating the sliding sunroof
Opening and closing
i You can continue to operate the sliding
sunroof after switching off the engine or
removing the SmartKey from the ignition
lock. This function is available for up to five
minutes or until the driver's or front-
passenger door is opened.
Overhead control panel
:To raise;To open=To close/lowerXTurn the SmartKey to position 1 or 2 in the
ignition lock.XPress or pull the 2 switch in the
corresponding direction.
i If you press the 2 switch beyond the
point of resistance, an automatic opening/
closing process is started in the
corresponding direction. You can stop
automatic operation by operating the
switch again.
When opening and raising the roof,
automatic operation is only available if the
sliding sunroof is in the closed position.
The sun protection cover automatically opens
along with the sliding sunroof. You can open
or close the sun protection cover manually
when the sliding sunroof is raised or closed.
Resetting
Reset the sliding sunroof if it does not move
smoothly, or if the battery has been
disconnected or has become discharged.
XRemove the SmartKey from the ignition
lock or select position 0 (KEYLESS-GO).XRemove the fuse for the sliding sunroof
from the fuse box. To find out where the
fuse is located, refer to the fuse allocation
chart in the vehicle tool kit ( Y page 314).XReinsert the fuse.XTurn the SmartKey to position 2 in the
ignition lock.XRaise the sliding sunroof fully at the rear
( Y page 94).XKeep the 2 switch pressed for another
second.XMake sure that the sliding sunroof can be
fully opened and closed again (Y page 94).XIf this is not the case, repeat the steps
above again.
! If the sliding sunroof still cannot be
opened or closed fully after resetting,
contact a qualified specialist workshop.
Problems with the sliding sunroof
Problem: the sunroof cannot be closed
and you cannot see the cause.
GWARNING
You could be severely or even fatally injured
when closing the sliding sunroof with
increased closing force or if the anti-
entrapment feature is deactivated. Make sure
94Sliding sunroofOpening/closing
Page 115 of 384

iMake sure that the exterior mirrors are
always folded out fully while the vehicle is
in motion, as they may otherwise vibrate.
i If you are driving faster than
30 mph (47 km/h), you can no longer fold
in the exterior mirrors.
Setting the exterior mirrors
If the battery has been disconnected or
completely discharged, the exterior mirrors
must be reset. The exterior mirrors will
otherwise not fold in when you select the
"Fold in mirrors when locking" function in the
on-board computer ( Y page 228).
XMake sure that the SmartKey is in
position 1 in the ignition lock.XBriefly press button :.
Folding the exterior mirrors in or out
automatically
If the "Fold in mirrors when locking" function
is activated in the on-board computer
( Y page 228):
R the exterior mirrors fold in automatically as
soon as you lock the vehicle from the
outside.
R the exterior mirrors fold out again
automatically as soon as you unlock the
vehicle and then open the driver's or front-
passenger door.
i The mirrors do not fold out if they have
been folded in manually.
Exterior mirror out of position
If an exterior mirror has been pushed out of
position, proceed as follows:
XVehicles without electrically folding
exterior mirrors: move the exterior mirror
into the correct position manually.XVehicles with electronically folding
mirrors: press the mirror-folding button(Y page 112) repeatedly until you hear the
mirror engage in position.
The mirror housing is engaged again and
you can adjust the exterior mirrors as usual
( Y page 112).
Automatic anti-glare mirrors
GWARNING
If incident light from headlamps is prevented
from striking the sensor in the rear-view
mirror, for instance, by luggage piled too high
in the vehicle, the mirror's automatic anti-
glare function will not operate.
Incident light could then blind you. This may
distract you from the traffic conditions and,
as a result, you may cause an accident.
The rear-view mirror and the exterior mirror
on the driver's side automatically go into anti-
glare mode if the ignition is switched on and
incident light from headlamps strikes the
sensor in the rear-view mirror.
The mirrors do not go into anti-glare mode if
reverse gear is engaged or the interior lighting
is switched on.
Parking position for the exterior
mirror on the front-passenger side
Setting and storing the parking position
You can position the front-passenger side
exterior mirror in such a way that you can see
the rear wheel on that side as soon as you
engage reverse gear. You can store this
position.
Mirrors113Seats, steering wheel and mirrorsZ
Page 116 of 384
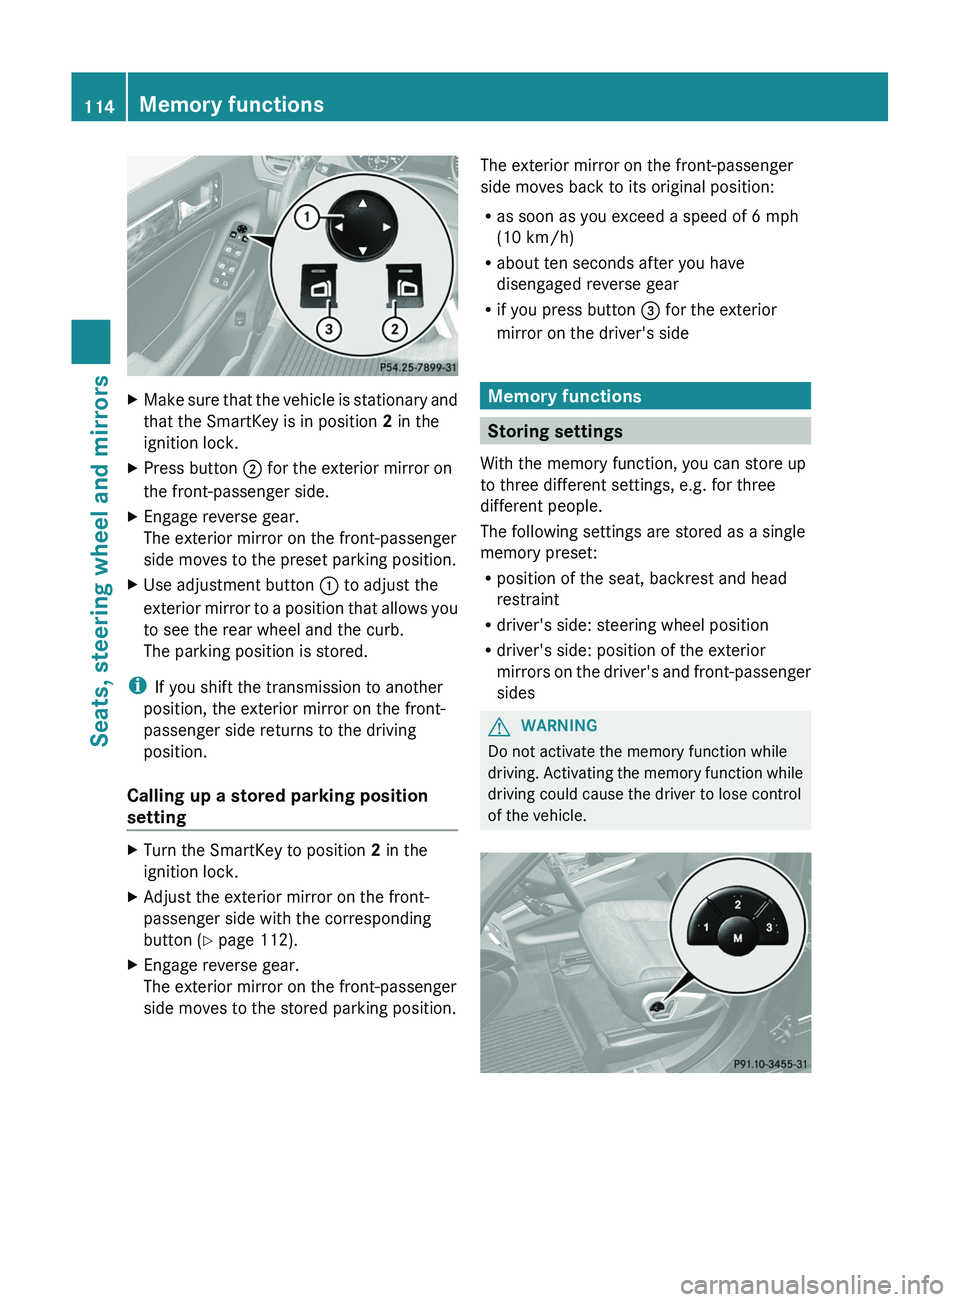
XMake sure that the vehicle is stationary and
that the SmartKey is in position 2 in the
ignition lock.XPress button ; for the exterior mirror on
the front-passenger side.XEngage reverse gear.
The exterior mirror on the front-passenger
side moves to the preset parking position.XUse adjustment button : to adjust the
exterior mirror to a position that allows you
to see the rear wheel and the curb.
The parking position is stored.
i If you shift the transmission to another
position, the exterior mirror on the front-
passenger side returns to the driving
position.
Calling up a stored parking position
setting
XTurn the SmartKey to position 2 in the
ignition lock.XAdjust the exterior mirror on the front-
passenger side with the corresponding
button ( Y page 112).XEngage reverse gear.
The exterior mirror on the front-passenger
side moves to the stored parking position.The exterior mirror on the front-passenger
side moves back to its original position:
R as soon as you exceed a speed of 6 mph
(10 km/h)
R about ten seconds after you have
disengaged reverse gear
R if you press button = for the exterior
mirror on the driver's side
Memory functions
Storing settings
With the memory function, you can store up
to three different settings, e.g. for three
different people.
The following settings are stored as a single
memory preset:
R position of the seat, backrest and head
restraint
R driver's side: steering wheel position
R driver's side: position of the exterior
mirrors on the driver's and front-passenger
sides
GWARNING
Do not activate the memory function while
driving. Activating the memory function while
driving could cause the driver to lose control
of the vehicle.
114Memory functionsSeats, steering wheel and mirrors
Page 117 of 384
XAdjust the seat (Y page 100).XOn the driver's side, adjust the steering
wheel (Y page 110) and the exterior mirrors
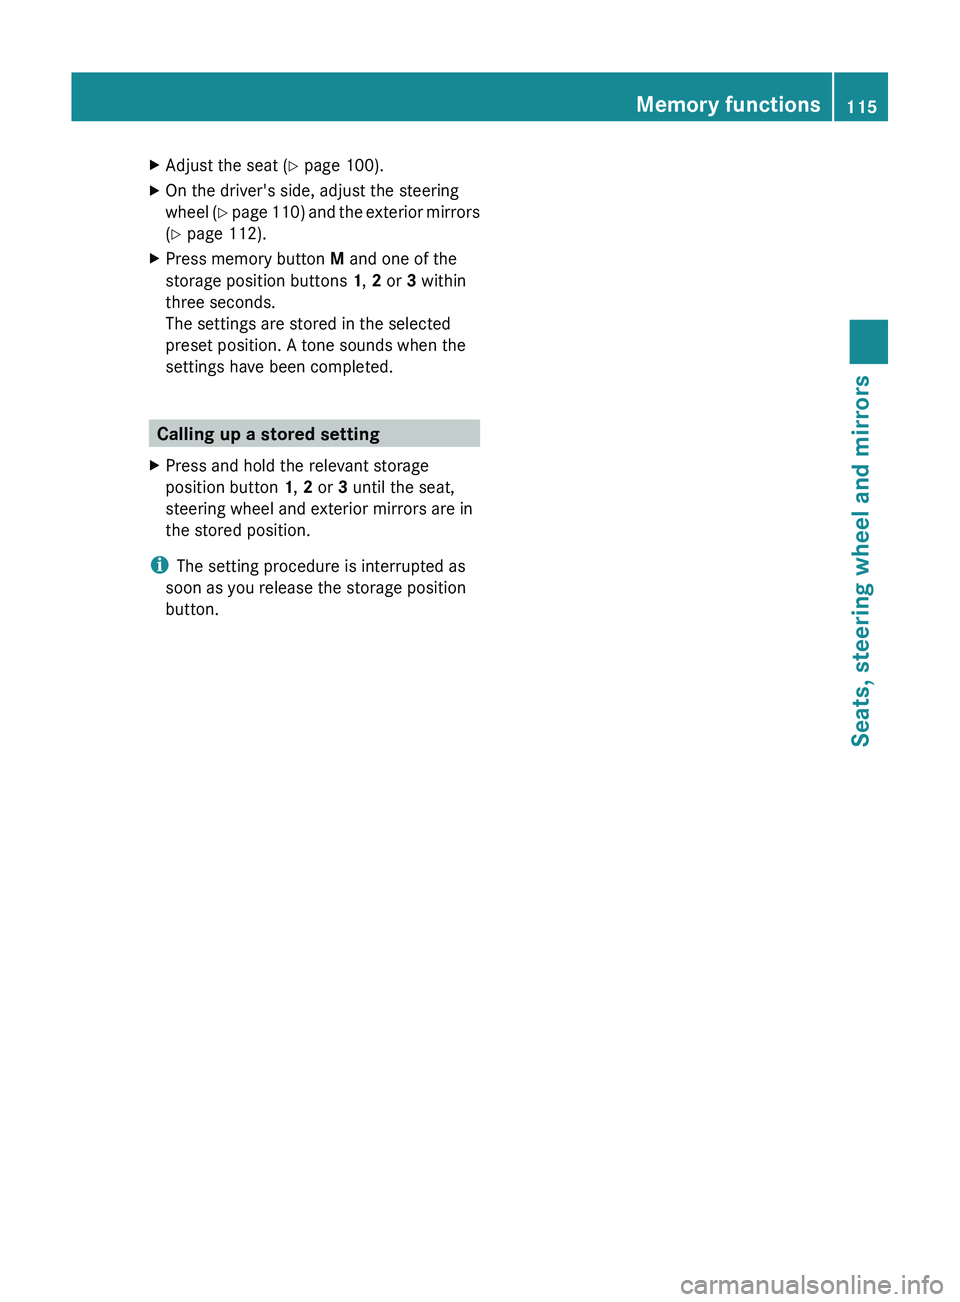
( Y page 112).XPress memory button M and one of the
storage position buttons 1, 2 or 3 within
three seconds.
The settings are stored in the selected
preset position. A tone sounds when the
settings have been completed.
Calling up a stored setting
XPress and hold the relevant storage
position button 1, 2 or 3 until the seat,
steering wheel and exterior mirrors are in
the stored position.
i The setting procedure is interrupted as
soon as you release the storage position
button.
Memory functions115Seats, steering wheel and mirrorsZ
Page 123 of 384
XTo switch off the rear fog lamp: press the
light switch in as far as it will go.
The yellow R indicator lamp on the light
switch goes out.XTo switch off the rear fog lamp: press the
light switch in as far as it will go.
The yellow R indicator lamp in the
instrument cluster goes out.
Headlamp cleaning system
The headlamps are cleaned automatically if
the "Wipe with washer fluid" function is
operated five times while the lights are on and
the engine is running (Y page 128). When you
switch off the ignition, the automatic
headlamp cleaning system is reset and
counting is resumed from 0.
Combination switch
Turn signals
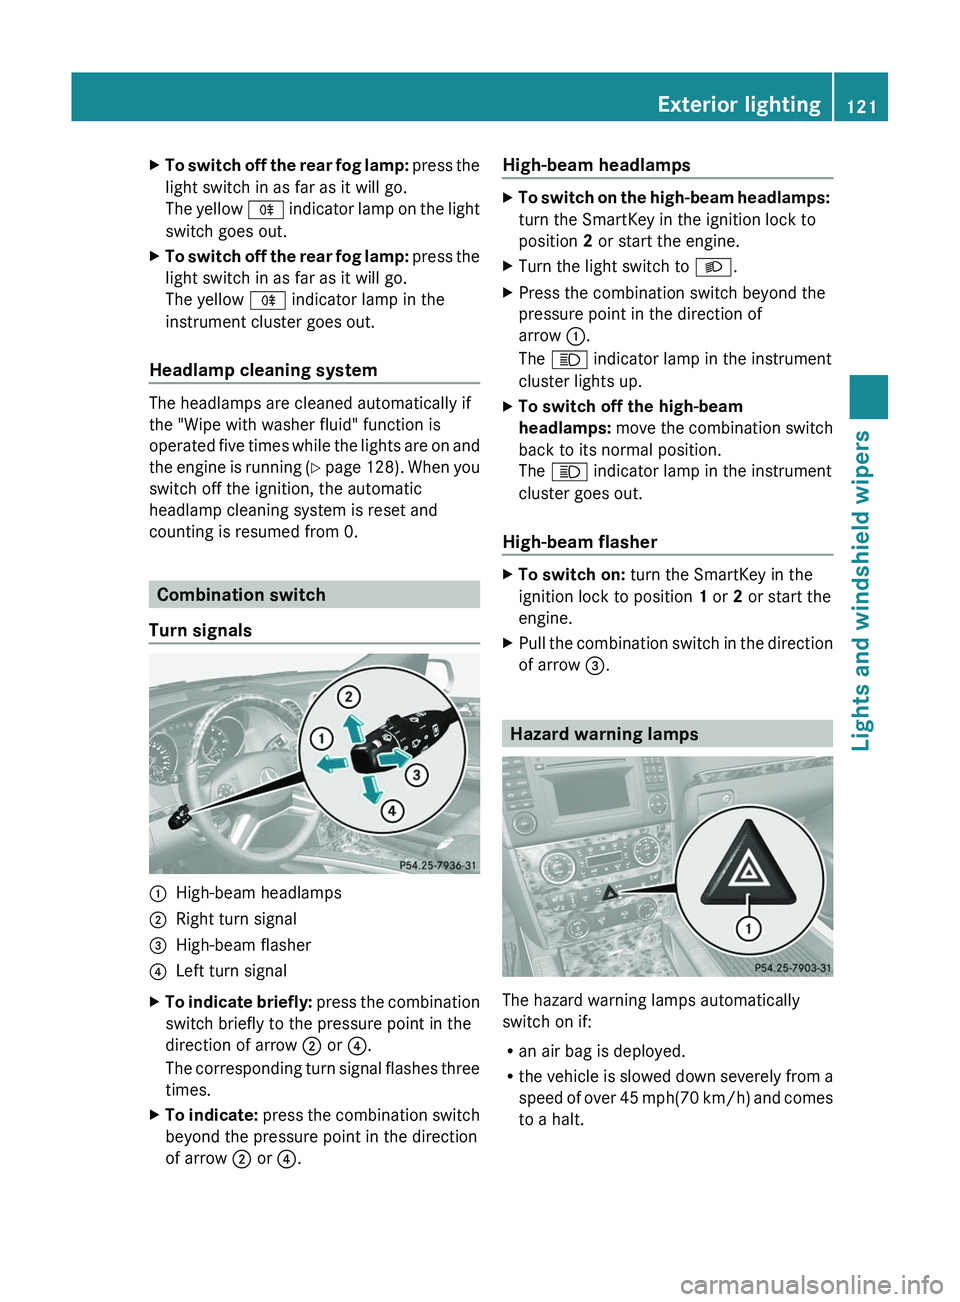
:High-beam headlamps;Right turn signal=High-beam flasher?Left turn signalXTo indicate briefly: press the combination
switch briefly to the pressure point in the
direction of arrow ; or ?.
The corresponding turn signal flashes three
times.XTo indicate: press the combination switch
beyond the pressure point in the direction
of arrow ; or ?.High-beam headlampsXTo switch on the high-beam headlamps:
turn the SmartKey in the ignition lock to
position 2 or start the engine.XTurn the light switch to L.XPress the combination switch beyond the
pressure point in the direction of
arrow :.
The K indicator lamp in the instrument
cluster lights up.XTo switch off the high-beam
headlamps: move the combination switch
back to its normal position.
The K indicator lamp in the instrument
cluster goes out.
High-beam flasher
XTo switch on: turn the SmartKey in the
ignition lock to position 1 or 2 or start the
engine.XPull the combination switch in the direction
of arrow =.
Hazard warning lamps
The hazard warning lamps automatically
switch on if:
R an air bag is deployed.
R the vehicle is slowed down severely from a
speed of over 45 mph (70 km/h) and comes
to a halt.
Exterior lighting121Lights and windshield wipersZ
Page 182 of 384
Use cruise control only if road and traffic
conditions make it appropriate to maintain a
steady speed for a prolonged period. You can
set any road speed above 20 mph
(30 km/h).GWARNING
The cruise control is a convenience system
designed to assist the driver during vehicle
operation. The driver is and must always
remain responsible for the vehicle's speed
and for safe brake operation.
Only use the cruise control if the road, traffic,
and weather conditions make it advisable to
travel at a constant speed.
R The use of the cruise control can be
dangerous on winding roads or in heavy
traffic because conditions do not allow safe
driving at a constant speed.
R The use of the cruise control can be
dangerous on slippery roads. Rapid
changes in tire traction can result in wheel
spin and loss of control.
R Deactivate the cruise control when driving
in fog.
The "Resume" function should only be
operated if the driver is fully aware of the
previously set speed and wishes to resume
this particular preset speed.
GWARNING
When cruise control brakes, the brake pedal
is pulled back (i.e. operated automatically).
The area around the pedal must not be
blocked by obstacles:
R Do not place any objects in the footwell.
R Ensure that floormats and carpets are fixed
securely. In particular, do not place several
floormats on top of one another.
R Do not place your foot under the brake
pedal, as it could become trapped.
Non-compliance could lead you to cause an
accident in which you and/or others could be
seriously injured.
i Cruise control should not be activated
during off-road driving.
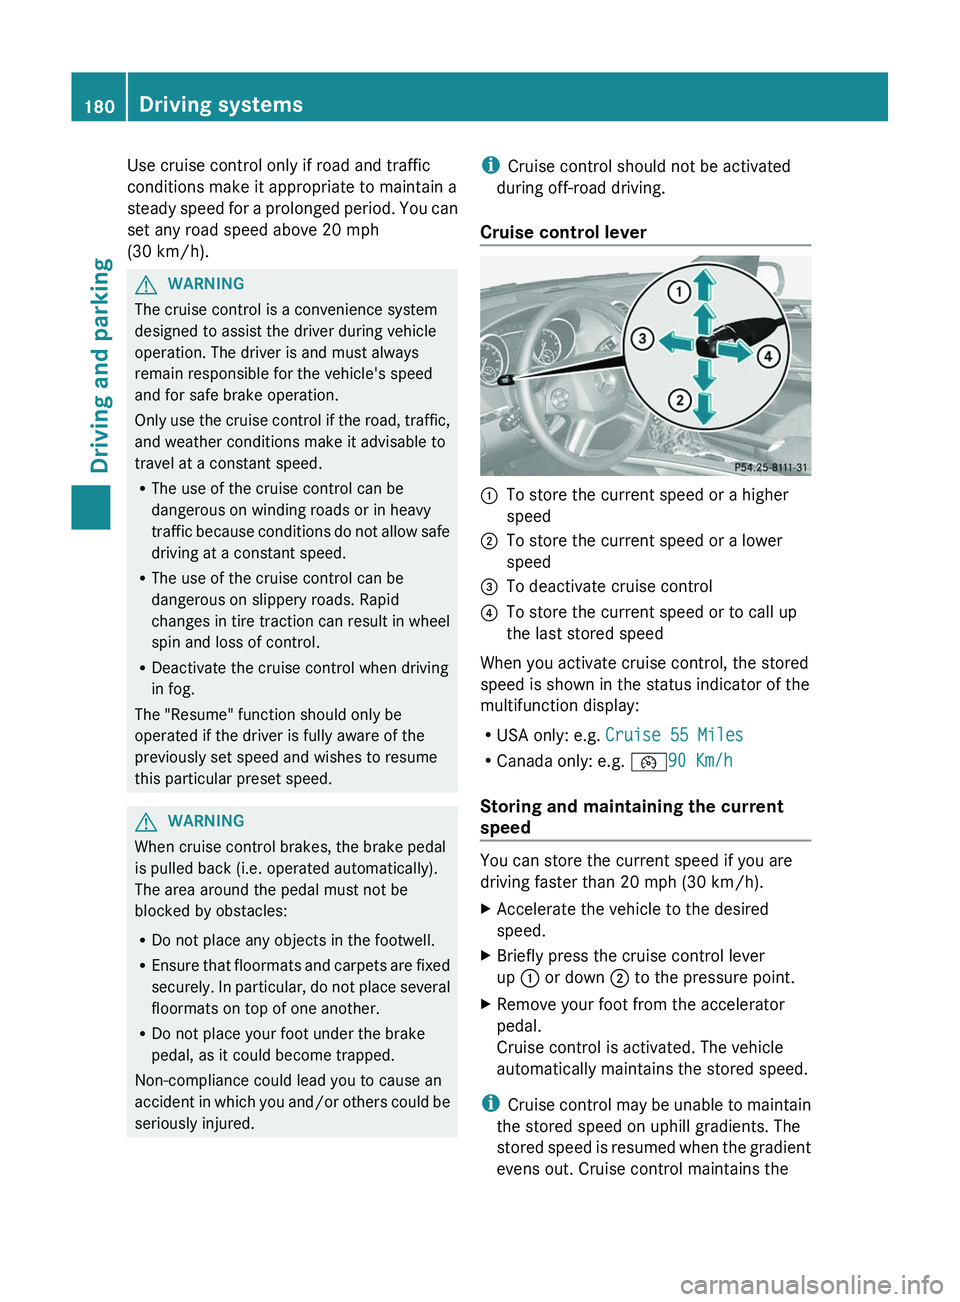
Cruise control lever:To store the current speed or a higher
speed;To store the current speed or a lower
speed=To deactivate cruise control?To store the current speed or to call up
the last stored speed
When you activate cruise control, the stored
speed is shown in the status indicator of the
multifunction display:
R USA only: e.g. Cruise 55 Miles
R Canada only: e.g. ¯90 Km/h
Storing and maintaining the current
speed
You can store the current speed if you are
driving faster than 20 mph (30 km/h).
XAccelerate the vehicle to the desired
speed.XBriefly press the cruise control lever
up : or down ; to the pressure point.XRemove your foot from the accelerator
pedal.
Cruise control is activated. The vehicle
automatically maintains the stored speed.
i Cruise control may be unable to maintain
the stored speed on uphill gradients. The
stored speed is resumed when the gradient
evens out. Cruise control maintains the
180Driving systemsDriving and parking