2012 MERCEDES-BENZ G-CLASS SUV warning
[x] Cancel search: warningPage 83 of 357
X
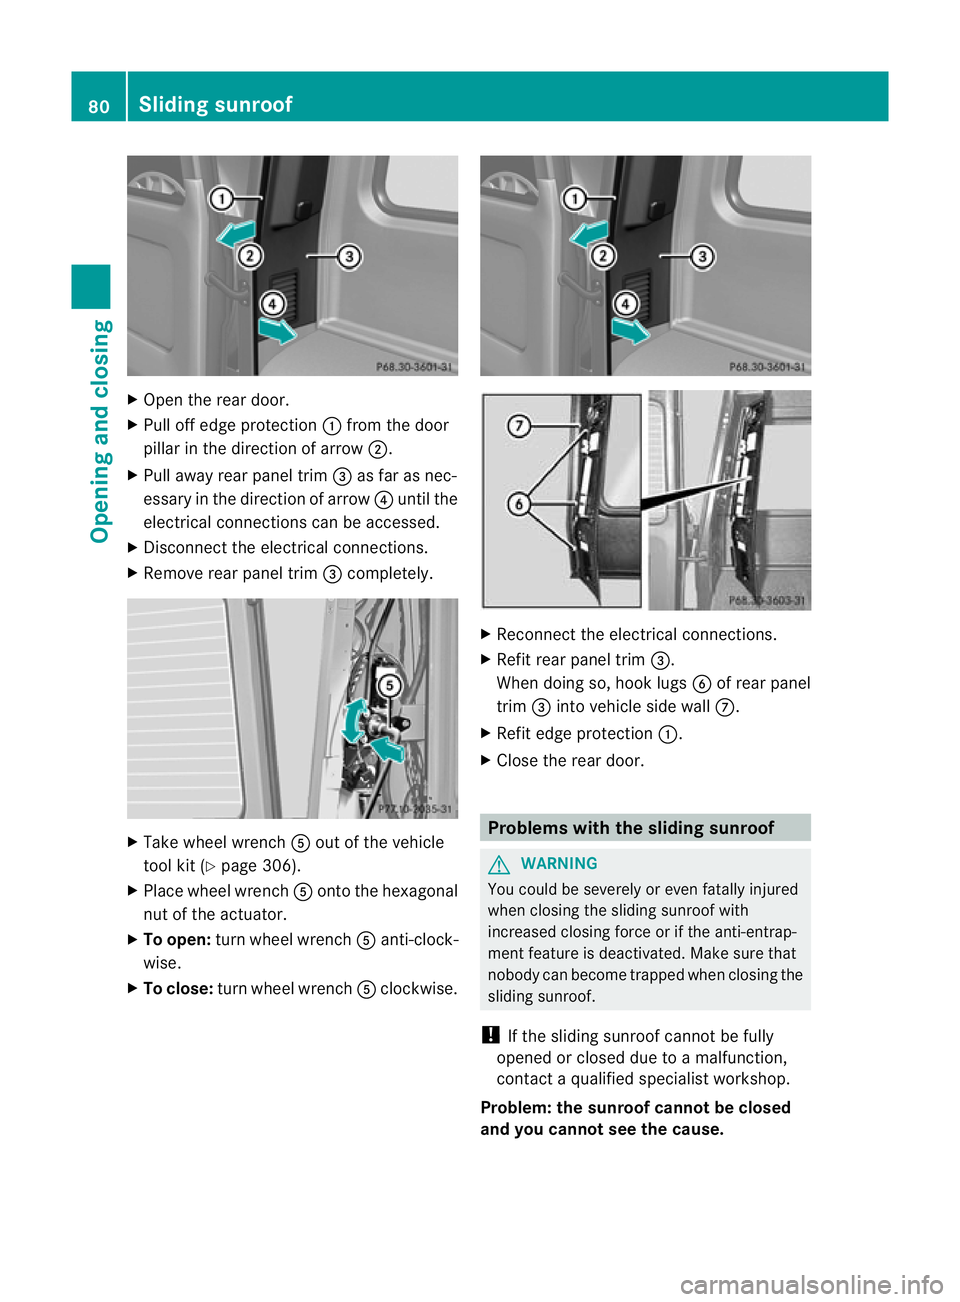
Open the rear door.
X Pull off edge protection :from the door
pillar in the direction of arrow ;.
X Pull away rear panel trim =as far as nec-
essary in the direction of arrow ?until the
electrical connections can be accessed.
X Disconnect the electrical connections.
X Remove rear panel trim =completely. X
Take wheel wrench Aout of the vehicle
tool kit (Y page 306).
X Place wheel wrench Aonto the hexagonal
nut of the actuator.
X To open: turn wheel wrench Aanti-clock-
wise.
X To close: turn wheel wrench Aclockwise. X
Reconnect the electrical connections.
X Refit rear panel trim =.
When doing so, hook lugs Bof rear panel
trim =into vehicle side wall C.
X Refit edge protection :.
X Close the rear door. Problems with the sliding sunroof
G
WARNING
You could be severely or even fatally injured
when closing the sliding sunroof with
increased closing force or if the anti-entrap-
ment feature is deactivated. Make sure that
nobody can become trapped when closing the
sliding sunroof.
! If the sliding sunroof cannot be fully
opened or closed due to a malfunction,
contact a qualified specialist workshop.
Problem: the sunroof cannot be closed
and you cannot see the cause. 80
Sliding sunroofOpening and closing
Page 84 of 357
If the sliding sunroof is obstructed during
closing and reopens again slightly:
X Immediately after the sliding sunroof
blocks, pull the ¡switch in the over-
head control panel down to the point of
resistance and hold it until the sliding sun-
roof is closed.
If the sliding sunroof is obstructed again dur-
ing closing and reopens again slightly:
X Immediately after the sliding sunroof
blocks, pull the ¡switch in the over-
head control panel down to the point of
resistance and hold it until the sliding sun-
roof is closed. Soft top (G-Class Cabriolet)
Important safety notes
G
WARNING
If the closed soft top is not locked, it can open
while the vehicle is in motion. This could
cause you to lose control of the vehicle .There
is a risk of an accident.
Only drive with the soft top fully open or
closed.
! Never sit on the soft top or store heavy
objects on it. Otherwise, the soft top will be
damaged.
! The soft top swings upwards when it is
opened or closed. In order to avoid dam-
aging the soft top or other parts of the vehi-
cle when opening or closing the soft top,
observe the following:
R there must be sufficient clearance above
the vehicle.
R the tonneau cover must not be attached
to the opened soft top.
R the luggage compartmentc over must
not be pushed up by the load.
R there must not be any objects on the lug-
gage compartment cover.
R no roof rack must be fitted. R
the outside temperature must be over
−15 †.
R the fabric must not be dirty, wet or fro-
zen.
R the vehicle must not be parked at a steep
angle, e.g. off-road.
R zip fasteners and quick-release fasteners
must be closed.
The soft top can only be opened and closed if
the vehicle is stationary.
i Make sure the soft top is dry before open-
ing it. Water could otherwise enter the vehi-
cle interior or luggage compartment.
i Avoid repeatedly opening and closing the
soft top. This discharges the battery. Operating the soft top
Opening X
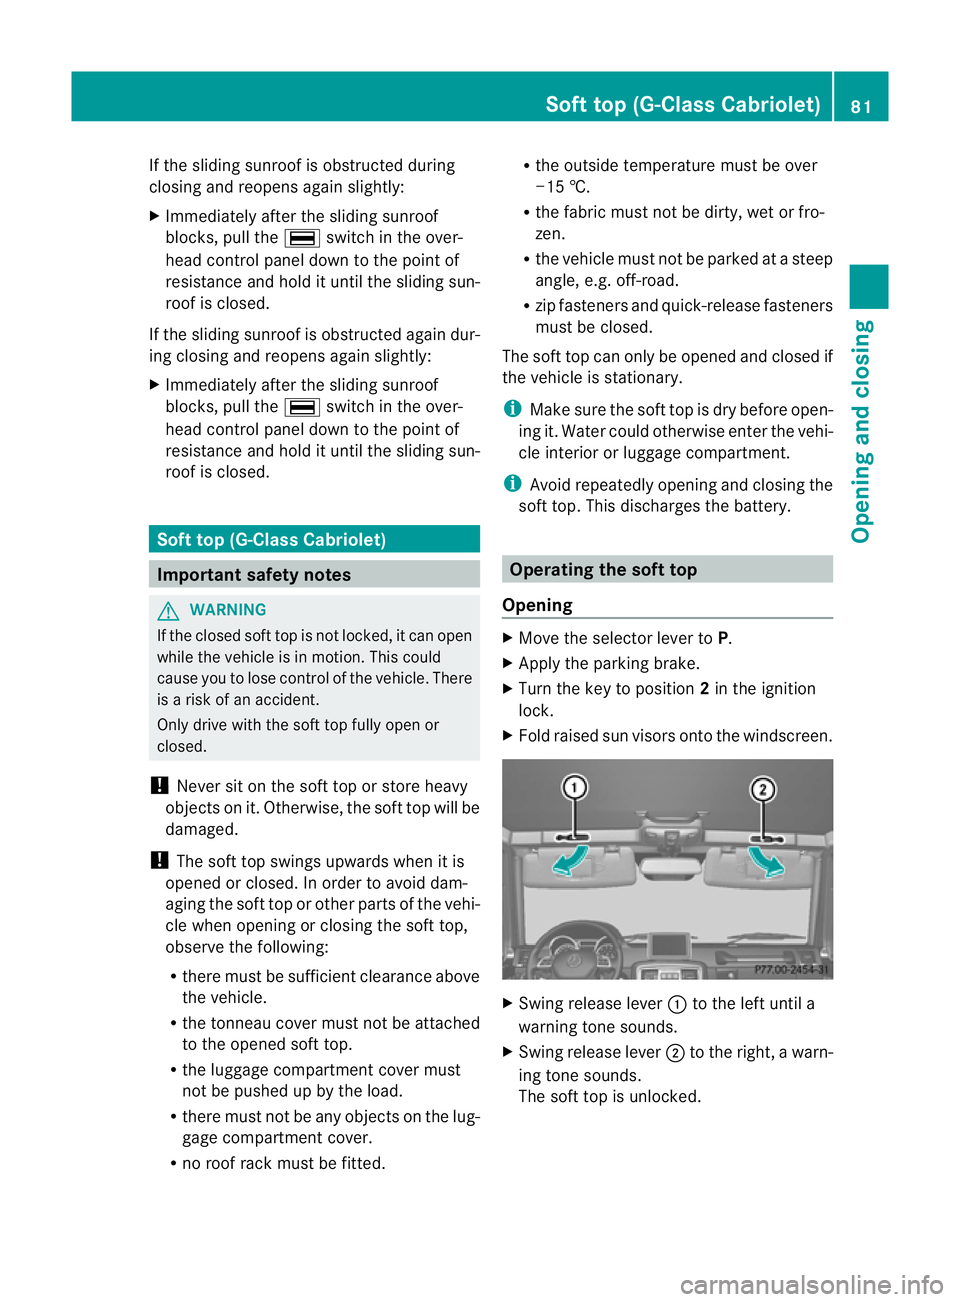
Move the selector lever to P.
X Apply the parking brake.
X Turn the key to position 2in the ignition
lock.
X Fold raised sun visors onto the windscreen. X
Swing release lever :to the left until a
warning tone sounds.
X Swing release lever ;to the right, a warn-
ing tone sounds.
The soft top is unlocked. Soft top (G-Class Cabriolet)
81Opening and closing Z
Page 85 of 357
=
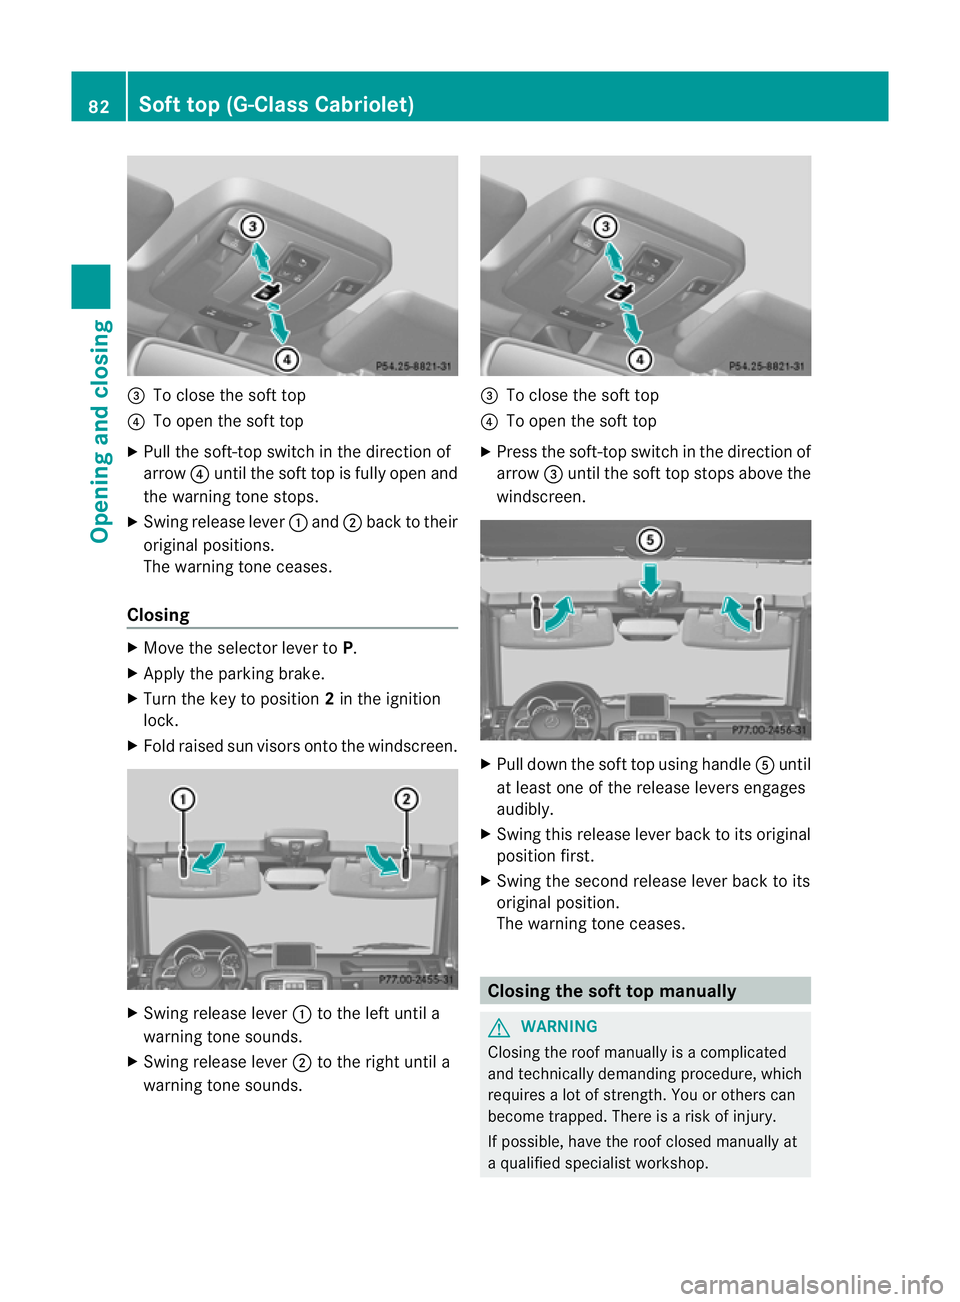
To close the soft top
? To open the soft top
X Pull the soft-top switch in the direction of
arrow ?until the soft top is fully open and
the warning tone stops.
X Swing release lever :and ;back to their
original positions.
The warning tone ceases.
Closing X
Move the selector lever to P.
X Apply the parking brake.
X Turn the key to position 2in the ignition
lock.
X Fold raised sun visors onto the windscreen. X
Swing release lever :to the left until a
warning tone sounds.
X Swing release lever ;to the right until a
warning tone sounds. =
To close the soft top
? To open the soft top
X Press the soft-top switch in the direction of
arrow =until the soft top stops above the
windscreen. X
Pull down the soft top using handle Auntil
at least one of the release levers engages
audibly.
X Swing this release lever back to its original
position first.
X Swing the second release lever back to its
original position.
The warning tone ceases. Closing the soft top manually
G
WARNING
Closing the roof manually is a complicated
and technically demanding procedure, which
requires a lot of strength. You or others can
become trapped. There is a risk of injury.
If possible, have the roof closed manually at
a qualified specialist workshop. 82
Soft top (G-Class Cabriolet)Opening and closing
Page 86 of 357
G
WARNING
If anywhere other than the indicated gripping
points is gripped, you or others can become
trapped or stuck. There is a risk of injury.
Take off jewellery and watches. Only hold the
indicated gripping points. Do not reach
between the cover halves and into the hinges.
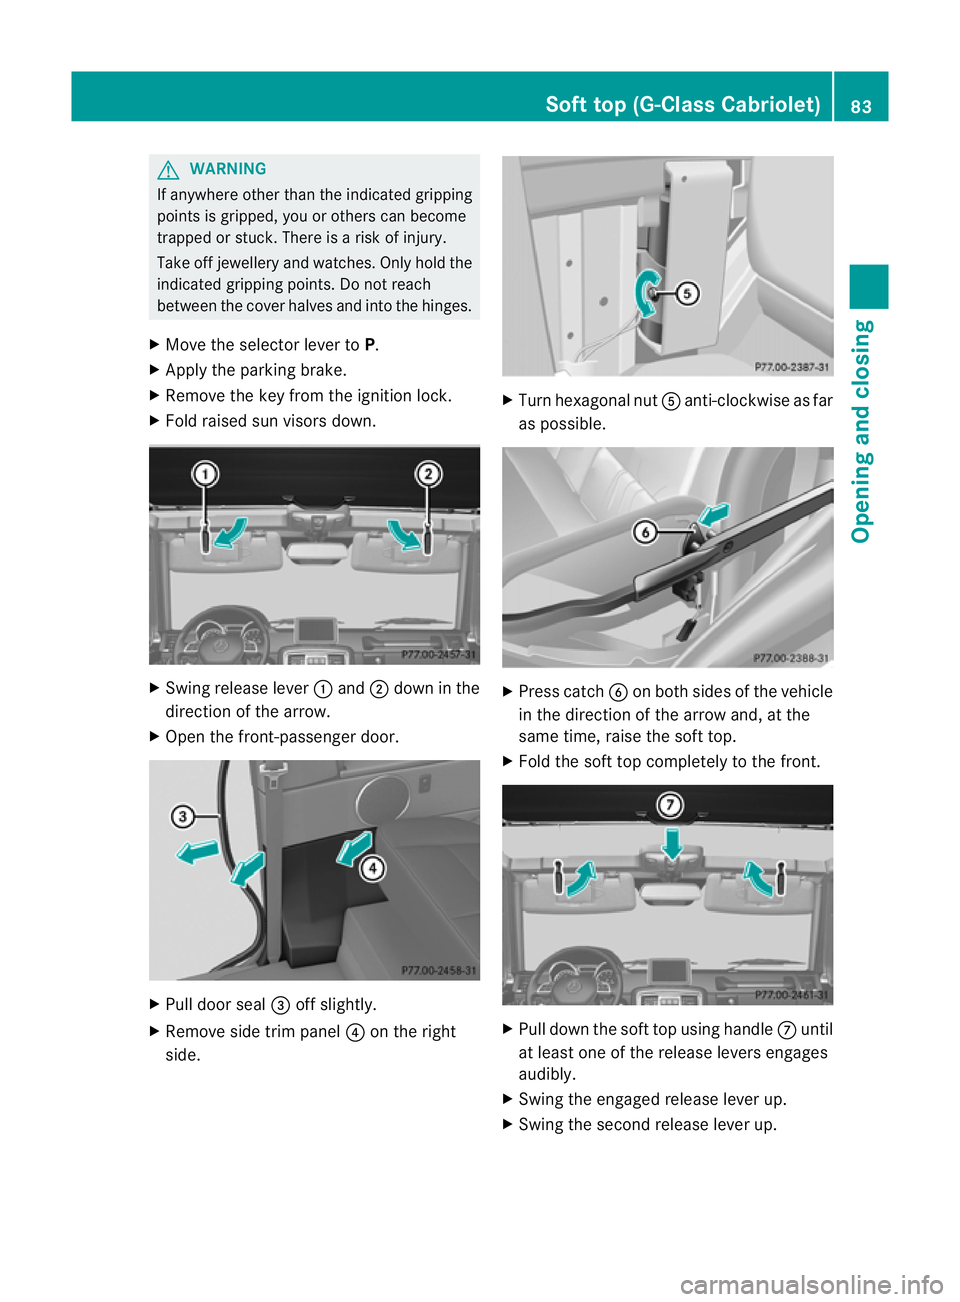
X Move the selector leve rtoP.
X Apply the parking brake.
X Remove the key from the ignition lock.
X Fold raised su nvisors down. X
Swing release lever :and ;down in the
direction of the arrow.
X Open the front-passenger door. X
Pull door seal =off slightly.
X Remove side trim panel ?on the right
side. X
Turn hexagonal nut Aanti-clockwise as far
as possible. X
Press catch Bon both sides of the vehicle
in the direction of the arrow and, at the
same time, raise the soft top.
X Fold the soft top completely to the front. X
Pull down the soft top using handle Cuntil
at least one of the release levers engages
audibly.
X Swing the engaged release lever up.
X Swing the second release lever up. Soft top (G-Class Cabriolet)
83Opening and closing Z
Page 87 of 357
Draught stop
General notes G
WARNING
If the draught stop is incorrectly fitted, it could
detach itsel fduring a journey and endanger
other road users. There is a ris kofanaccident
and injury.
Fit the draught stop as described. Do not
place any objects on top of the fitted draught
stop.
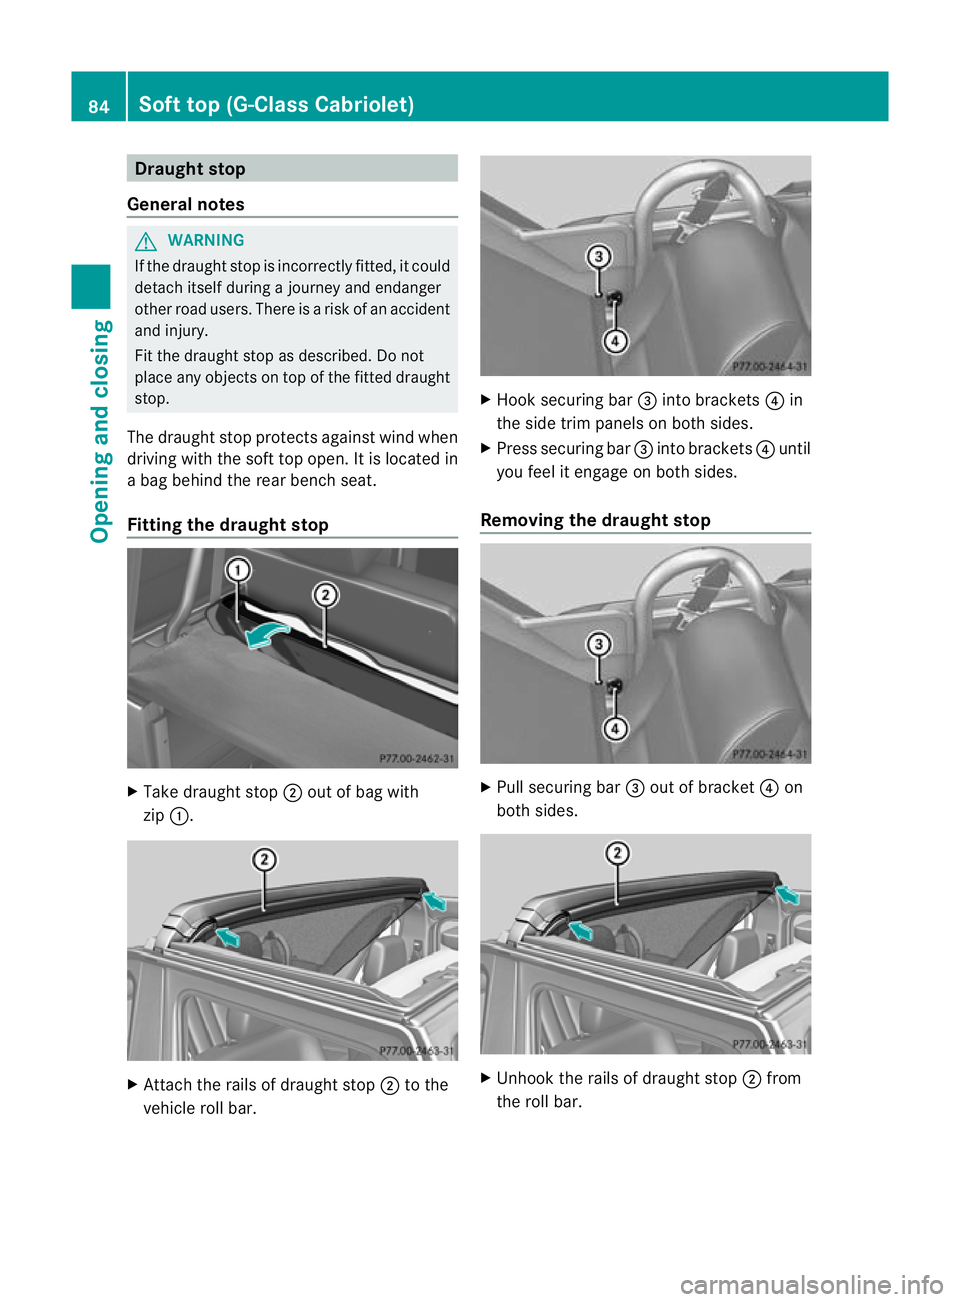
The draught stop protects against wind when
driving with the soft top open. It is located in
a bag behind the rea rbenchs eat.
Fitting the draught stop X
Take draught stop ;out of bag with
zip :. X
Attach the rails of draught stop ;to the
vehicle roll bar. X
Hook securing bar =into brackets ?in
the side trim panels on both sides.
X Press securing bar =into brackets ?until
you feel it engage on both sides.
Removing the draught stop X
Pull securing bar =out of bracket ?on
both sides. X
Unhook the rails of draught stop ;from
the roll bar. 84
Soft top (G-Class Cabriolet)Opening and closing
Page 94 of 357
Seats
Important safety notes
G
WARNING
The seats can still be adjusted when there is
no key in the ignition lock. For this reason,
children should never be left unsupervised in
the vehicle. They could adjust the seats and
become trapped. G
WARNING
Only adjust the driver's seat when the vehicle
is stationary. You will otherwise be distracted
from the road and traffic conditions and you
could lose control of the vehicle as a result of
the seat moving. This could cause an acci-
dent. G
WARNING
If you adjust the seat height carelessly, you or
others could be trapped and thereby injured.
Children in particular could unintentionally
press the buttons to electrically adjust the
seats and become trapped.
Take care that:
R while moving the seats, your hands do not
get under the lever assembly of the seat
adjustment system.
R children in the vehicle do not slide their
hands under the levers. G
WARNING
Make sure that nobody can become trapped
when adjusting the seats.
Observe the notes on airbags.
Secure children as recommended; see the
"Children in the vehicle" section. G
WARNING
Make sure that the back of your head is sup-
ported at eye level by the central area of the
head restraint .Ifyour head is not supported
correctly by the head restraint, you could suf-
fer a severe neck injury in the event of an accident
.Never drive if the head restraints are
not engaged and set correctly. G
WARNING
Occupants should only travel sitting on seats
which have the head restraints fitted. On a
seat which is occupied, move the head
restraint into the upright position .This
reduces the risk of injury to the passenger in
the event of an accident. G
WARNING
As eat belt can only offer its intended degree
of protection when the backrest is almost ver-
tical and the occupant is sitting upright. Avoid
seat positions that do not allow the seat belt
to be routed correctly. Adjust the backrest so
that it is as upright as possible. Never travel
with the backrest reclined too far backwards.
You could otherwise be seriously or even
fatally injured in the event of an accident or
sudden braking.
! To avoid damage to the seats and the seat
heating, observe the following information:
R do not spill any liquids on the seats. If
liquid is spilled on the seats, dry them as
soon as possible.
R if the seat covers are damp or wet, do not
switch on the seat heating. The seat
heating should also not be used to dry
the seats.
R clean the seat covers as recommended;
see the "Interior care" section.
R do not transport heavy loads on the
seats. Do not place sharp objects on the
seat cushions, e.g. knives, nails or tools.
The seats should only be occupied by
passengers, if possible.
R when the seat heating is in operation, do
not cover the seats with insulating mate-
rials, e.g. blankets, coats, bags, seat cov-
ers, child seats or booster seats.
! Make sure that there are no objects in the
footwell or behind the seats when moving Seats
91Seats, steering wheel and mirrors Z
Page 95 of 357

the seat back. There is a risk tha
tthe seats
and/or the objects could be damaged.
! When the rear bench seat is folded for-
wards, the front seats cannot be moved to
their rearmost position. You could other-
wise damage the seats and the rear bench
seat.
! Make sure that the sun visor is folded up
before adjusting the backrest and head
restraint height. The head restraint and sun
visor could otherwise collide when the head
restraint is fully extended.
i If the front door is open, the seats can be
adjusted for up 30 minutes after the igni-
tion has been switched off.
i The rear-compartment head restraints
can be removed (Y page 93).
For more information, contact a qualified
specialist workshop.
i You can find further information about
enlarging the luggage compartment( fold-
ing the rear bench sea tforwards) on
(Y page 270). Adjusting the seats electrically
! Make sure that the cupholder on the
centre console is folded down before you
move the front-passenger seat forwards. :
Head restraint height
; Seat cushion angle
= Seat height ?
Seat fore-and-aft adjustment
A Backrest angle
i You can store the seat settings using the
memory function (Y page 102). Adjusting the head restraints
Important safety notes G
WARNING
Occupants should only travel sitting on seats
that have the head restraints fitted. This
reduces the risk of injury to the occupant in
the event of an accident.
Adjusting the front seat head restraint
height :
Head restraint height
; Seat cushion angle
= Seat height
? Seat fore-and-aft adjustment
A Backrest angle
X Slide head restraint adjustmen tbutton :
up or down in the direction of the arrow.
Adjusting the luxury head restraints G
WARNING
When folding bac kthe head restraint side bol-
sters, do not put your hands between the side
bolster and the cushion holder. There is a
danger of becoming trapped. 92
SeatsSeats, steering wheel and mirrors
Page 96 of 357
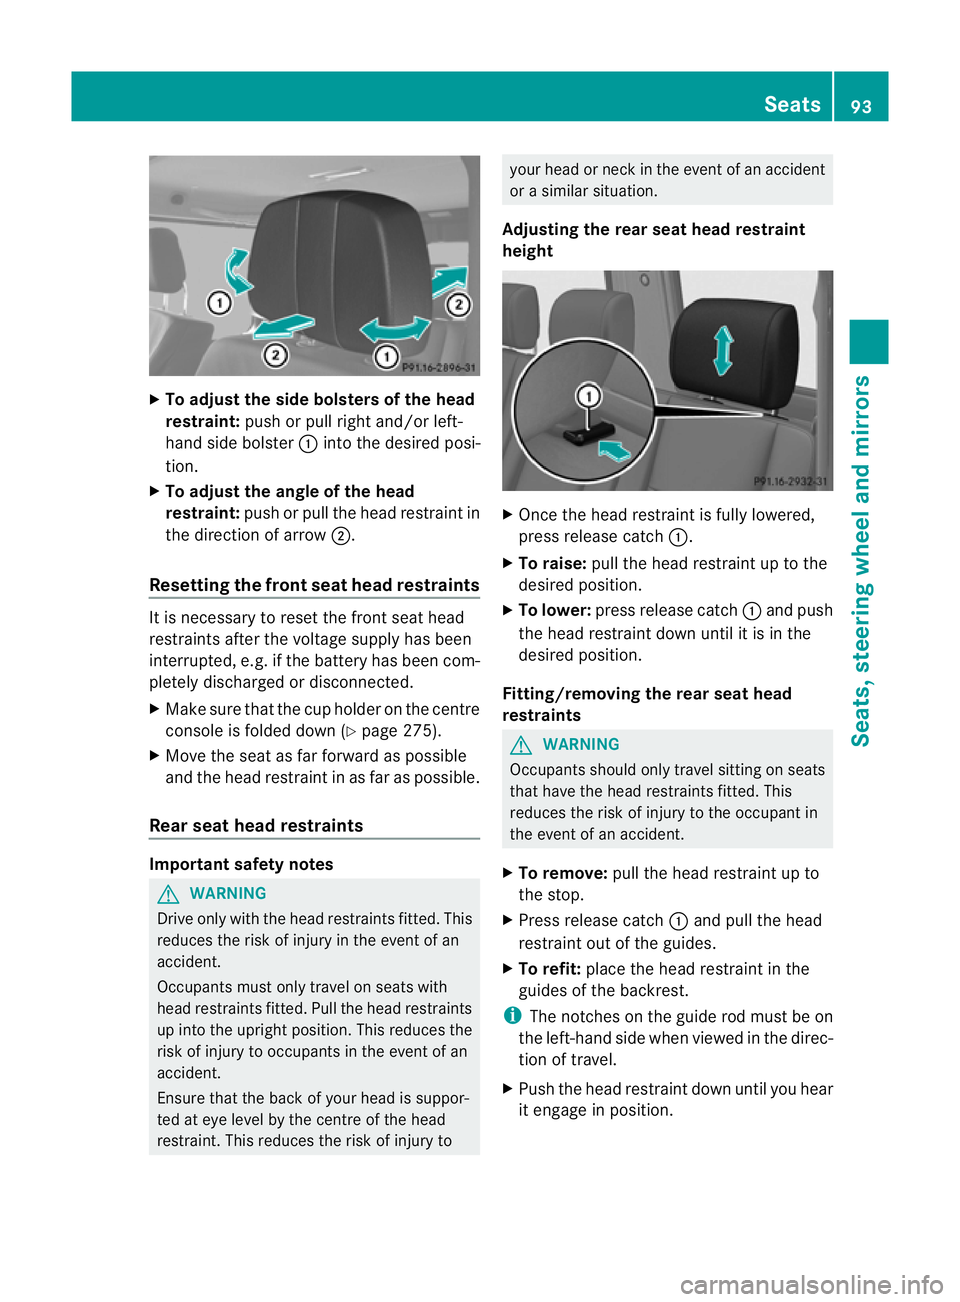
X
To adjust the side bolsters of the head
restraint: push or pull right and/or left-
hand side bolster :into the desired posi-
tion.
X To adjust the angle of the head
restraint: push or pull the head restraint in
the direction of arrow ;.
Resetting the front seat head restraints It is necessary to reset the front seat head
restraints after the voltage supply has been
interrupted, e.g .ifthe battery has been com-
pletely discharged or disconnected.
X Make sure that the cup holder on the centre
console is folded down (Y page 275).
X Move the seat as far forward as possible
and the head restraint in as far as possible.
Rear seat head restraints Important safety notes
G
WARNING
Drive only with the head restraints fitted. This
reduces the risk of injury in the event of an
accident.
Occupants must only travel on seats with
head restraints fitted. Pull the head restraints
up into the upright position. This reduces the
risk of injury to occupants in the event of an
accident.
Ensure that the back of your head is suppor-
ted at eye level by the centre of the head
restraint. This reduces the risk of injury to your head or neck in the event of an accident
or a similar situation.
Adjusting the rear seat head restraint
height X
Once the head restraint is fully lowered,
press release catch :.
X To raise: pull the head restraint up to the
desired position.
X To lower: press release catch :and push
the head restraint down until it is in the
desired position.
Fitting/removing the rear seat head
restraints G
WARNING
Occupants should only travel sitting on seats
that have the head restraints fitted. This
reduces the risk of injury to the occupant in
the event of an accident.
X To remove: pull the head restraint up to
the stop.
X Press release catch :and pull the head
restraint out of the guides.
X To refit: place the head restraint in the
guides of the backrest.
i The notches on the guide rod must be on
the left-hand side when viewed in the direc-
tion of travel.
X Push the head restraint down until you hear
it engage in position. Seats
93Seats, steering wheel and mirrors Z