2012 MERCEDES-BENZ G-CLASS SUV wheel
[x] Cancel search: wheelPage 280 of 357
Stowage compartment/ashtray
Stowage compartment/ashtray in the
centre console G
WARNING
Make sure that the engine has been switched
off and that the parking brake is applied so
that the vehicle cannot pull away unintention-
ally. :
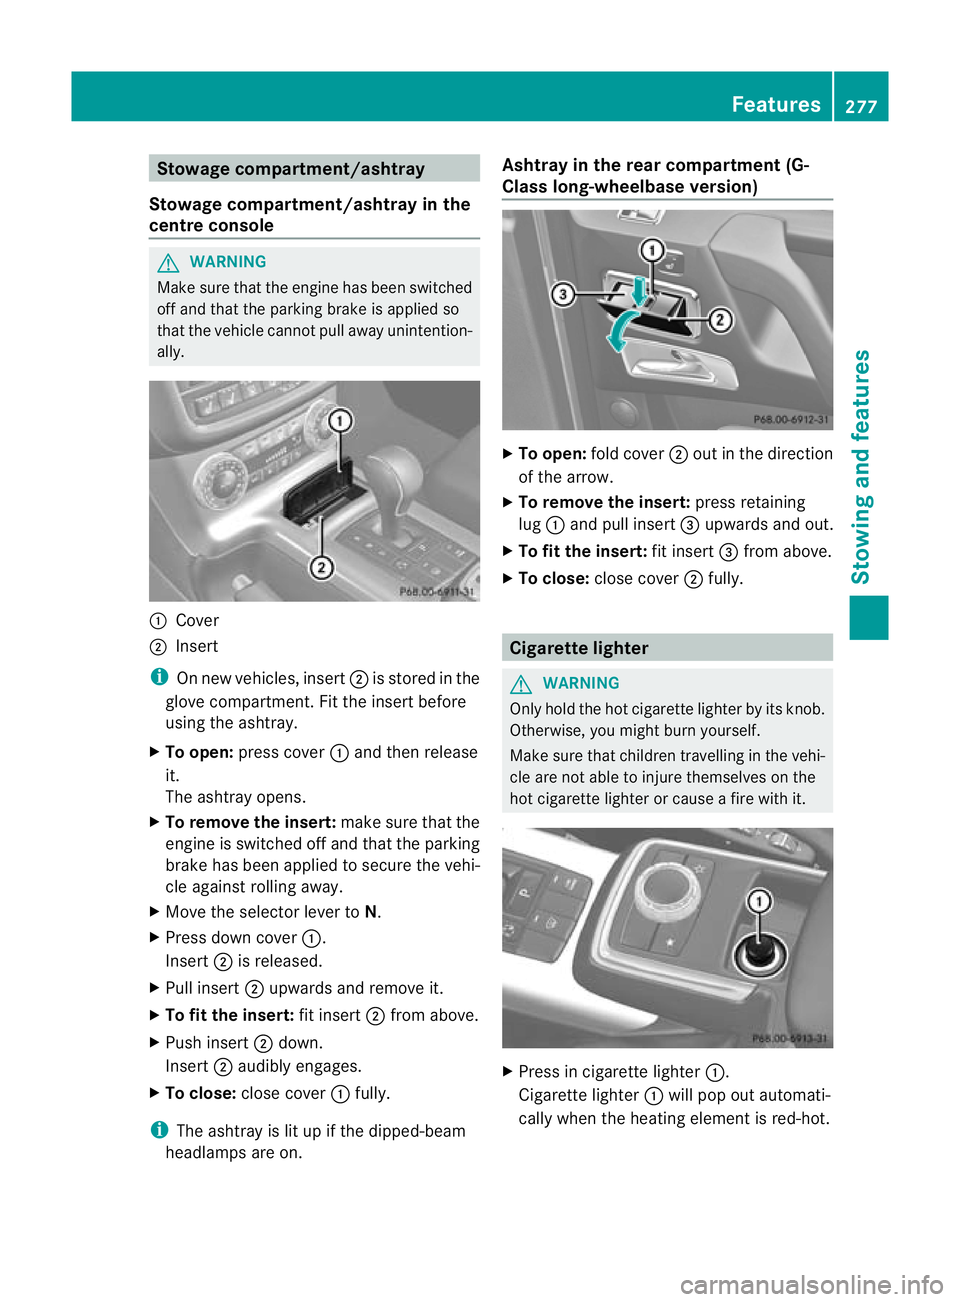
Cover
; Insert
i On new vehicles, insert ;is stored in the
glove compartment. Fit the insert before
using the ashtray.
X To open: press cover :and then release
it.
The ashtray opens.
X To remove the insert: make sure that the
engine is switched off and that the parking
brake has been applied to secure the vehi-
cle against rolling away.
X Move the selector lever to N.
X Press down cover :.
Insert ;is released.
X Pull insert ;upwards and remove it.
X To fit the insert: fit insert;from above.
X Push insert ;down.
Insert ;audibly engages.
X To close: close cover :fully.
i The ashtray is lit up if the dipped-beam
headlamps are on. Ashtray in the rear compartment (G-
Class long-wheelbase version)
X
To open: fold cover ;out in the direction
of the arrow.
X To remove the insert: press retaining
lug :and pull insert =upwards and out.
X To fit the insert: fit insert=from above.
X To close: close cover ;fully. Cigarette lighter
G
WARNING
Only hold the hot cigarette lighter by its knob.
Otherwise, you might burn yourself.
Make sure that children travelling in the vehi-
cle are not able to injure themselves on the
hot cigarette lighter or cause a fire with it. X
Press in cigarette lighter :.
Cigarette lighter :will pop out automati-
cally when the heating element is red-hot. Features
277Stowing and features Z
Page 281 of 357
i
You can use the cigarette lighter socket
for accessories up to 180 W
(Y page 278). 12
Vsockets
General notes !
If you are simultaneously using all three
sockets in the vehicle, make sure that you
do not exceed the maximum current draw
of 45 A. Otherwise, you will overload the
fuses.
The sockets can be used for accessories with
am aximum current draw of 180 W(15 A), e.g.
lamps or chargers for mobile phones.
If you use the sockets for long periods when
the engine is switched off, the battery may
discharge.
X Turn the key to position 2in the ignition
lock.
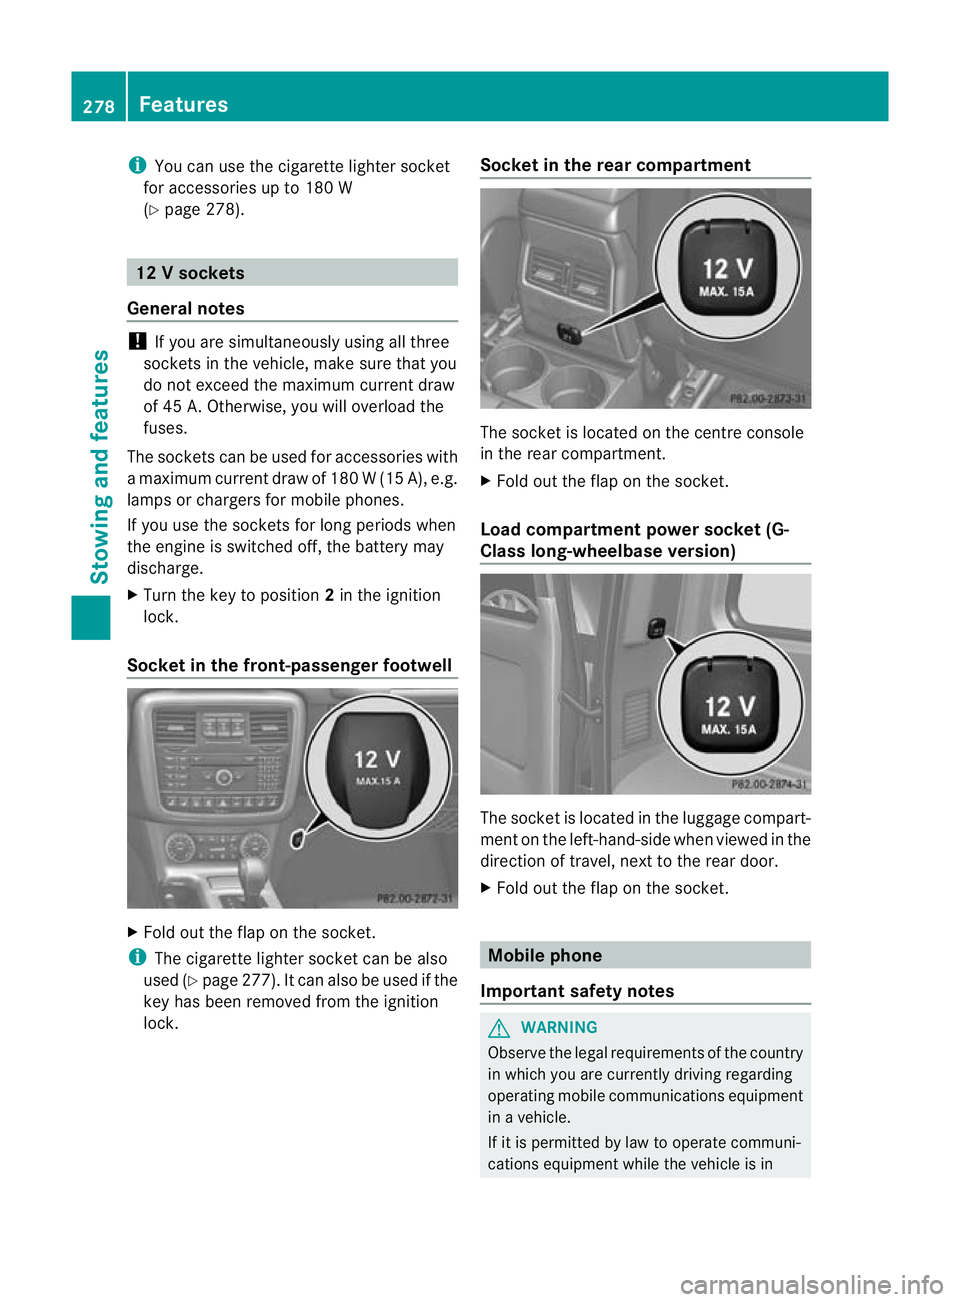
Socket in the front-passenge rfootwell X
Fold out the flap on th esocket.
i The cigarette lighter socket can be also
used (Y page 277). It can also be used if the
key has been removed from the ignition
lock. Socket in the rear compartment The socket is located on the centre console
in the rear compartment.
X
Fold out the flap on the socket.
Load compartment power socket (G-
Class long-wheelbase version) The socket is located in the luggage compart-
ment on the left-hand-side when viewed in the
direction of travel, next to the rear door.
X Fold out the flap on the socket. Mobile phone
Important safety notes G
WARNING
Observe the legal requirements of the country
in which you are currently driving regarding
operating mobile communications equipment
in a vehicle.
If it is permitted by law to operate communi-
cations equipment while the vehicle is in 278
FeaturesStowing and features
Page 283 of 357

Operating the mobile phone
You can operate the telephon
eusing the
6 and~ buttons on the multifunction
steering wheel. You can operate other mobile
phone functions via the on-board computer
(Y page 218).
When you remove the key from the ignition
lock, the mobile phone remains switched on
for approximately ten minutes (run-on time).
If you make a call during this time, the mobile
phone will be switched off approximately ten
minutes after you have ended the call. Garage door opener
Important safety notes You can use the HomeLink
®
garage door
opener integrated into the rear-view mirror to
operate up to three different gate/garage
door opener systems.
i The garage door opener is only available
for certain countries. Observe the legal
requirements for each individual country.
The HomeLink ®
garage door opener is
compatible with most European garage and
gate opener drives. More information on
HomeLink ®
and/or compatible products is
available from:
R any Mercedes-Benz Service Centre
R the HomeLink ®
hotline
(0) 08000 466 354 65 (free of charge) or
+49 (0) 6838 907 277 (charges apply)
R on the Internet at:
http://www.homelink.com
Programming the remote control Programming
G
WARNING
Only press the button on the integrated
garage door opener if there are no persons or
objects present within the sweep of the garage door. Persons could otherwise be
injured as the door moves.
Remote control in the rear-view mirror
:
Indicator lamp
;=? Transmitter buttons
A Garage door remote control
B Transmitter button on the garage
door remote control
Garage door remote control Ais not part of
the garage door opener.
i To achieve the best result, insert new bat-
teries in garage door remote control Aof
your garage door drive before program-
ming.
X Delete the memory of the integrated
remote control (Y page 283) before pro-
gramming it for the first time.
X Turn the key to position 2(Ypage 143) in
the ignition lock.
X Press and hold transmitter button ;,=
or ?.
After a short time, indicator lamp :will
start flashing. It flashes abouto nce per
second.
i Indicato rlamp :flashes immediately
th ef irst tim ethat the transmitter button is
programmed. If this transmitter button has
already been programmed, indicator
lamp :will only start flashing at a rate of
once a second after 20 seconds have
elapsed.
X Keep the transmitter button depressed. 280
FeaturesStowing and features
Page 295 of 357
Checking the oil level using the oil dip-
stick
Example
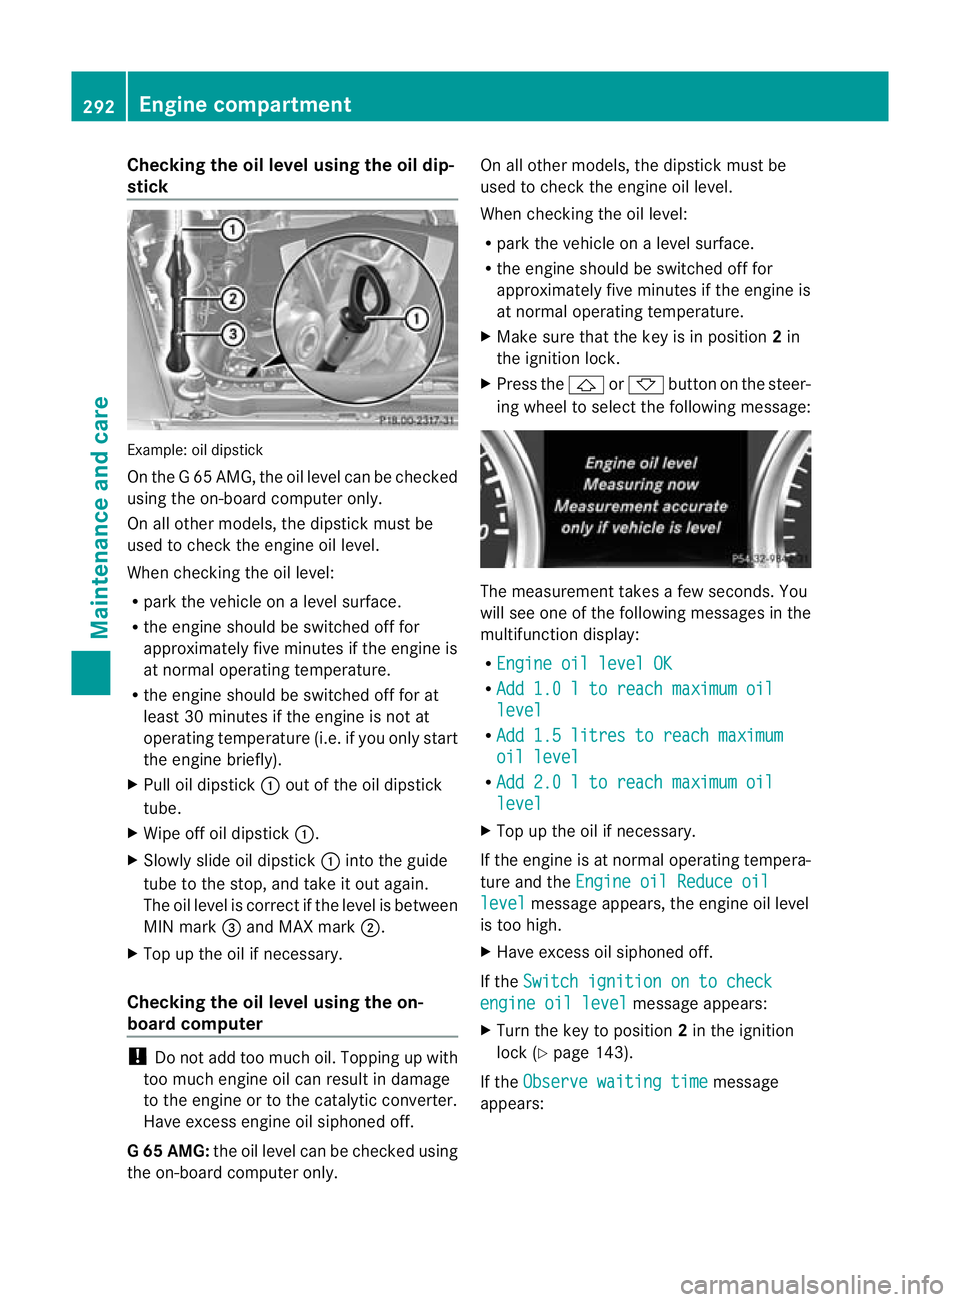
:oil dipstick
On the G 65 AMG, the oil level can be checked
using the on-board computer only.
On all other models, the dipstick must be
used to chec kthe engine oil level.
When checking the oil level:
R park the vehicle on a level surface.
R the engine should be switched off for
approximately five minutes if the engine is
at normal operating temperature.
R the engine should be switched off for at
least 30 minutes if the engine is not at
operating temperature (i.e. if you only start
the engine briefly).
X Pull oil dipstick :out of the oil dipstick
tube.
X Wipe off oil dipstick :.
X Slowly slide oil dipstick :into the guide
tube to the stop, and take it out again.
The oil level is correct if the level is between
MIN mark =and MAX mark ;.
X Top up the oil if necessary.
Checking the oil level using the on-
board computer !
Do not add too much oil. Topping up with
too much engine oil can result in damage
to the engine or to the catalytic converter.
Have excess engine oil siphoned off.
G6 5 AMG: the oil level can be checked using
the on-board computer only. On all other models, the dipstic
kmust be
used to chec kthe engine oil level.
When checking the oil level:
R park the vehicle on a level surface.
R the engine should be switched off for
approximately five minutes if the engine is
at normal operating temperature.
X Make sure that the key is in position 2in
the ignition lock.
X Press the &or* button on the steer-
ing wheel to select the following message: The measurement takes a few seconds. You
will see one of the following messages in the
multifunction display:
R Engine oil level OK R
Add 1.0 l to reach maximum oil level
R
Add 1.5 litres to reach maximum oil level
R
Add 2.0 l to reach maximum oil level
X
Top up the oil if necessary.
If the engine is at normal operating tempera-
ture and the Engine oil Reduce oil level message appears, the engine oil level
is too high.
X Have excess oil siphoned off.
If the Switch ignition on to check engine oil level message appears:
X Turn the key to position 2in the ignition
lock (Y page 143).
If the Observe waiting time message
appears: 292
Engine compartmentMaintenance and care
Page 296 of 357
X
If the engine is at normal operating tem-
perature: repeat the measuremen tafter
about five minutes.
X If the engine is not at normal operating
temperature: (e.g. if the engine was only
started briefly) repeat the measurement
after about 30 minutes.
If the Engine oil level Not when engine on message appears:
X Switch off the engine.
X If the engine is at normal operating tem-
perature: wait about five minutes before
carrying out the measurement.
X If the engine is not at normal operating
temperature: e.g. if the engine was only
started briefly, wait approximately
30 minutes before carrying out the meas-
urement.
i If you wish to cancel the measurement,
press the *or& button on the mul-
tifunction steering wheel.
Adding engine oil H
Environmental note
When topping up the oil, take care not to spill
any. If oil enters the soil or waterways, it is
harmful to the environment.
! Do not add too much oil .Ifthe oil level is
above the "max" mark on the dipstick, too
much oil has been added. This can lead to
damage to the engine or the catalytic con-
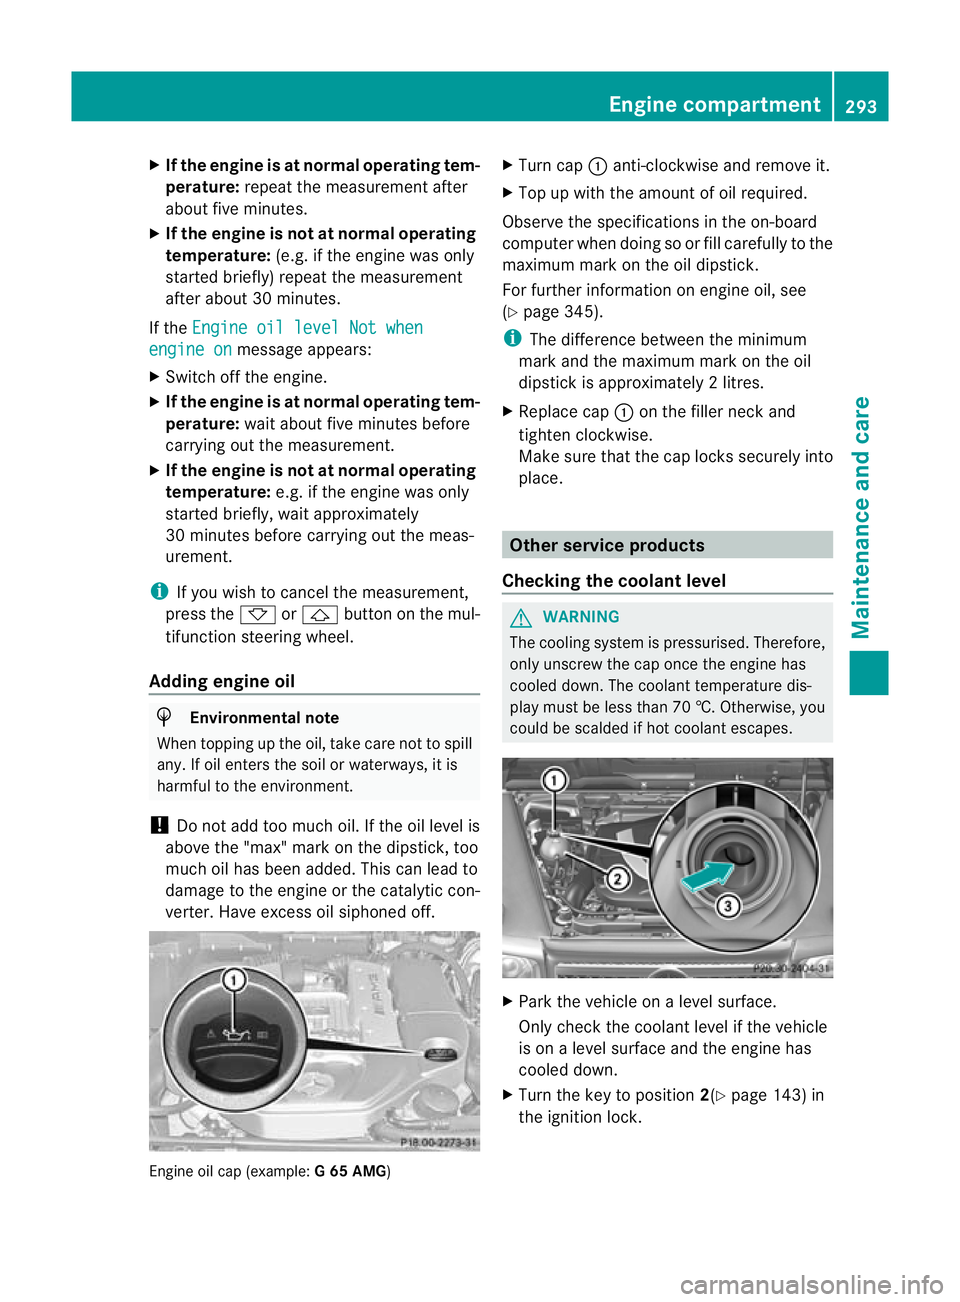
verter. Have excess oil siphoned off. Engine oil cap (example:
G 65 AMG) X
Turn cap :anti-clockwise and remove it.
X Top up with the amount of oil required.
Observe the specifications in the on-board
computer when doing so or fill carefully to the
maximum mark on the oil dipstick.
For further information on engine oil, see
(Y page 345).
i The difference between the minimum
mark and the maximum mark on the oil
dipstick is approximately 2litres.
X Replace cap :on the filler neck and
tighten clockwise.
Make sure that the cap locks securely into
place. Other service products
Checking the coolant level G
WARNING
The cooling system is pressurised. Therefore,
only unscrew the cap once the engine has
cooled down. The coolan ttemperature dis-
play must be less than 70 †. Otherwise, you
could be scalded if hot coolant escapes. X
Park the vehicle on a level surface.
Only chec kthe coolant level if the vehicle
is on a level surface and the engine has
cooled down.
X Turn the key to position 2(Ypage 143) in
the ignition lock. Engine compartment
293Maintenance and care Z
Page 298 of 357
The ASSYST service interval display does not
take into account any periods of time during
which the battery is disconnected.
Hiding aservice message X
To hide the service message, press the
% back button on the multifunction
steering wheel ( Ypage 31)( Ypage 214).
Displaying service messages Use the buttons on the multifunction steering
wheel.
X Switch the ignitio non.
X Press VorU to select the standard
display menu on the steering wheel
(Y page 215).
X Press &or* to select the ASSYST
service interval display.
The ¯ or± service symbol and the
service due date are displayed.
Information about Service Arduous operating conditions or increased
loads on the vehicle will require some service
work to be performed more often than for a
vehicle in normal use. Such arduous condi-
tions include regular city driving with frequent
intermediate stops and use in mountainous
terrai noronp oor road surfaces.
For example, if the vehicle is used under ardu-
ous operating conditions, have air filters,
engine oil and oil filters changed frequently
and check the wheels often.F urther informa-
tion can be obtained at a qualified specialist
workshop, e.g. a Mercedes-Ben zService
Centre. Fuel/water separator
H
Environmental note
Dispose of service products in an environ-
mentally-responsible manner. !
If you continue driving without having the
fuel/water separator serviced, this could
cause damage to the engine. Any resulting
damage is not covered by the warranty.
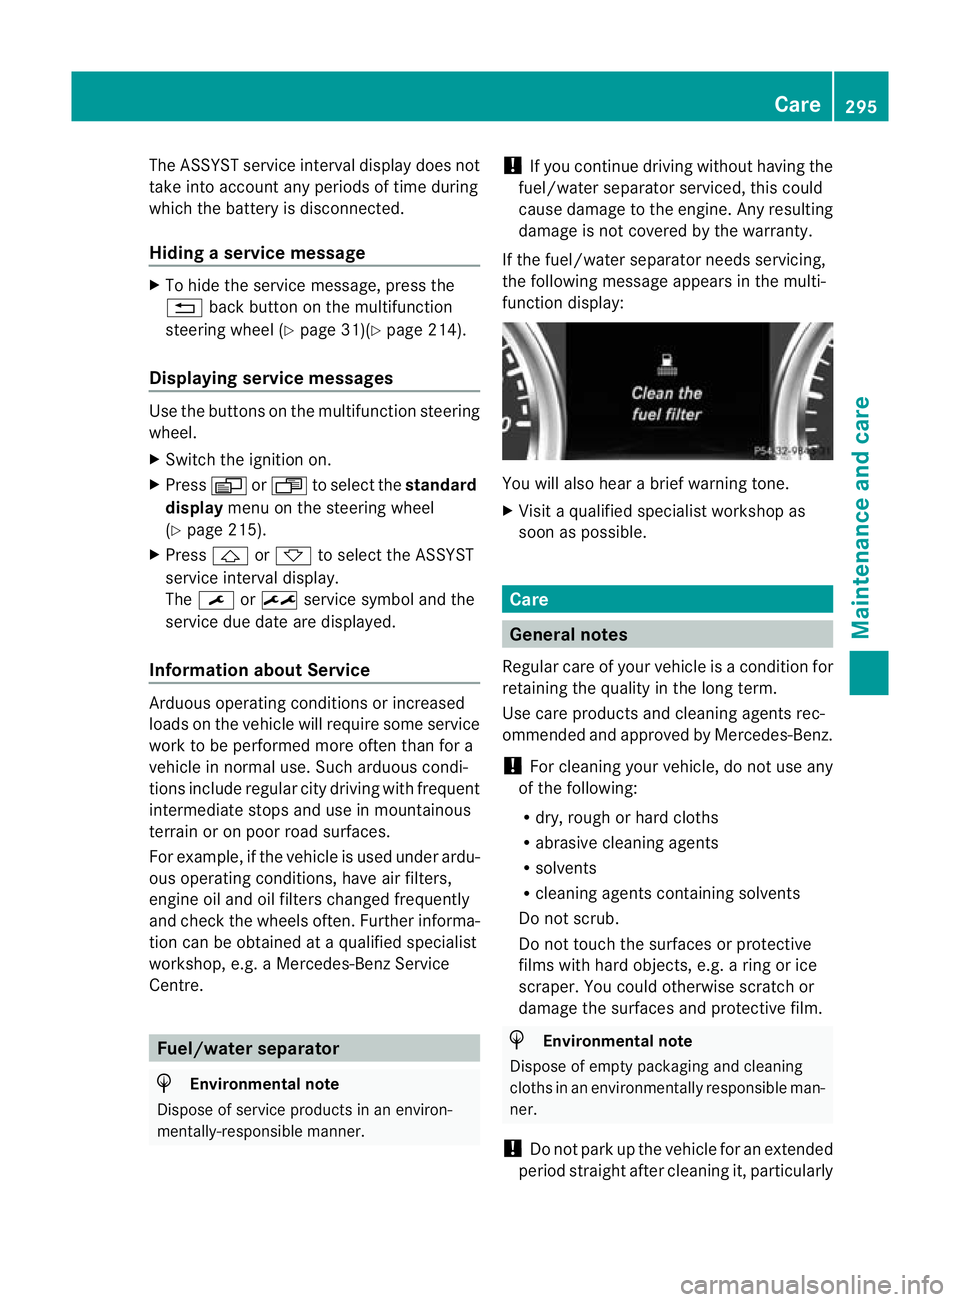
If the fuel/water separator needs servicing,
the following message appears in the multi-
function display: You will also hear a brief warning tone.
X
Visit a qualified specialist workshop as
soon as possible. Care
General notes
Regular care of your vehicle is a condition for
retaining the quality in the long term.
Use care products and cleaning agents rec-
ommended and approved by Mercedes-Benz.
! For cleaning your vehicle, do not use any
of the following:
R dry, rough or hard cloths
R abrasive cleaning agents
R solvents
R cleaning agents containing solvents
Do not scrub.
Do not touch the surfaces or protective
films with hard objects, e.g. a ring or ice
scraper. You could otherwise scratch or
damage the surfaces and protective film. H
Environmental note
Dispose of empty packaging and cleaning
cloths in an environmentally responsible man-
ner.
! Do not park up the vehicle for an extended
period straight after cleaning it, particularly Care
295Maintenance and care Z
Page 299 of 357
after having cleaned the wheels with wheel
cleaner. Wheel cleaners could cause
increased corrosio
nofthe brake discs and
brake pads/linings. For this reason, you
should drive for a few minutes after clean-
ing. Braking heats the brake discs and the
brake pads/linings, thus drying them. The
vehicle can then be parked up. Care of the exterior
Automatic car wash G
WARNING
Braking efficiency is reduced after washing
the vehicle. This could cause an accident. For
this reason, following a car wash, drive with
particular care until the brakes are dry.
! Preferably use car washes with adjustable
high-pressure jets for pre-washing. This
corresponds with the specifications for
cabriolet programmes. In car washes that
use high water pressures, there is a risk
that a small amount of water may leak into
the vehicle.
! Cabriolet: do not treat the vehicle with
hot wax under any circumstances.
! Make sure that the automatic car wash is
suitable for the size of the vehicle. Fold in
the exterior mirrors before the vehicle is
washed. The exterior mirrors could other-
wise be damaged.
! Make sure that the automatic transmis-
sion is in position Nwhen washing your
vehicle in a tow-through car wash. The vehi-
cle could be damaged if the transmission is
in another position.
! Make sure that:
R the side windows and sliding sunroof are
closed completely.
R the blower for the ventilation/heating is
switched off (airflow control is turned to position
0/theÃandÁ buttons
are switched off).
R the windscreen wiper switch is at posi-
tion 0.
The vehicle could otherwise be damaged.
You can wash the vehicle in an automatic car
wash from the very start.
Wash off excess dirt before cleaning the vehi-
cle in an automatic car wash.
After using an automatic car wash, wipe off
wax from the windscreen and the wiper
blades. This will prevent smears and reduce
wiping noises caused by residue on the wind-
screen.
High-pressure cleaning equipment G
WARNING
Do not use high-pressure cleaners with circu-
lar-jet nozzles (dirt grinders) to clean your
vehicle, in particular the tyres. You could oth-
erwise damage the tyres and cause an acci-
dent.
! Always maintain a distance of at least
30 cm between the vehicle and the high-
pressure cleaner nozzle. Information about
the correct distance is available from the
equipment manufacturer.
Move the high-pressure cleaner nozzle
around when cleaning your vehicle.
Do not aim directly at any of the following:
R tyres
R door gaps, roof gaps, joints etc.
R soft top (Cabriolet)
R electrical components
R battery
R connectors
R lights
R seals
R trim elements
R ventilation slots
Damaged seals or electrical components
can lead to leaks or failures. 296
CareMaintenance and care
Page 300 of 357
Cleaning the G-Class Cabriolet soft top
!
Never use any of the following to clean the
sof ttop:
R petrol
R thinner
R tar or stain remover
R other organic solvents
! Remove bird droppings immediately as
they are corrosive and, therefore, can make
the soft-top fabric leak. Do not use high-
pressure cleaning equipment to clean the
vehicle. Do not use sharp-edged equipment
to remove ice and snow.
X Light soiling: you can clean the soft top
while it is dry or rinse it with clear water.
X Normal to heavy soiling: clean the soft
top with a brush and clear water. Clean
stains and other heavy soiling with a brush
and suitable soft-top cleaning agents.
Always brush in the direction of the fabric,
from front to back.
Frequent cleaning reduces the soft top's
resistance to dirt.
To restore this resistance, clean your soft top
with Mercedes-Benz Cabriolet care products.
Incorrect cleaning and care, as well as ageing,
can cause the soft-top seams to leak. Have
the soft-top seams sealed at a qualified spe-
cialist workshop.
i Cover the soft top appropriately if you
plan to leave the vehicle outside for a long
period of time.
Cleaning the wheels !
Do not use acidic wheel cleaning products
to remove brake dust. This could damage
wheel bolts and brake components.
! Do not park up the vehicle for an extended
period straight after cleaning it, particularly
after having cleaned the wheels with wheel
cleaner. Wheel cleaners could cause
increased corrosion of the brake discs and
brake pads/linings. For this reason, you should drive for a few minutes after clean-
ing. Braking heats the brake discs and the
brake pads/linings, thus drying them. The
vehicle can then be parked up.
Cleaning the paintwork !
Do not affix:
R stickers
R films
R magnetic plates or similar items
to painted surfaces. You could otherwise
damage the paintwork.
Scratches, corrosive deposits, areas affected
by corrosion and damage caused by inade-
quate care cannot always be completely
repaired. In such cases, visit a qualified spe-
cialist workshop.
X Remove impurities immediately, where
possible, whilst avoiding rubbing too hard.
X Soak insect remains with insect remover
and rinse off the treated areas afterwards.
X Soak bird droppings with water and rinse
off the treated areas afterwards.
X Remove coolant, brake fluid, tree resin,
oils, fuels and greases by rubbing gently
with a cloth soaked in petroleum ether or
lighter fluid.
X Use tar remover to remove tar stains.
X Use silicone remover to remove wax.
Care and treatment of matt paintwork !
Never polish the vehicle or the light alloy
wheels. Polishing makes the paintwork
shiny.
! Never use paint cleaner, buffing or pol-
ishing products, or gloss preserver, e.g.
wax. These products are only suitable for
high-gloss surfaces. Their use on vehicles
with matt finish leads to considerable sur-
face damage (shiny, spotted areas).
Always have paintwork repairs carried out
at a qualified specialist workshop. Care
297Maintenance and care Z