2012 MERCEDES-BENZ G-CLASS SUV wheel size
[x] Cancel search: wheel sizePage 20 of 357

Towing
Important safety notes ..................315
In the event of malfunctions ..........317
Towing atrailer
Activ eBlind Spot Assist .................196
Axle load, permissible ....................350
Trailer tow hitch ............................. 350
Towing away
With both axles on the ground .......317
Towing eye
Front .............................................. 316
Rea r............................................... 316
Tow-starting
Important safety notes ..................315
Trailer
7-pin connector ............................. 208
Power supply ................................. 208
Trailer coupling (cleaning instruc-
tions) .................................................. 299
Trailer loads Technical data ............................... 350
Trailer towing
Blind Spot Assist ............................ 192
Driving tips .................................... 206
ESP ®
................................................ 63
Lights displa ymessage .................. 234
Mounting dimensions ....................350
Parktroni c...................................... 199
Shift range ..................................... 152
Trailer loads ................................... 350
Transfer case
General notes ................................ 201
Shifting .......................................... 202
Shifting (general notes) .................. 202
Shifting (important safety notes) ...202
Shifting to neutra l.......................... 203
Shift range ..................................... 201
Switching off the off-road gear
ratio ............................................... 203
Switching on the off-road gear
ratio ............................................... 202
Transmission
see Automatic transmission
Transmission positions ....................151
Transport (vehicle) ............................317
Travelling uphill Brow of hill ..................................... 173 Trip computer (on-board computer)
215
Trip meter Calling up ....................................... 215
Resetting (on-board computer) ......216
Turn signals
Changing bulbs (front) ...................117
Switching on/off ........................... 108
Two-way radio
Frequencies ................................... 339
Installatio n..................................... 339
Transmission output (maximum) .... 339
Type identification plate
see Vehicle identification plate
Tyre pressure
Calling up (on-board computer) .....327
Checking manually ........................327
Display message ............................ 245
Recommended ............................... 325
Table (single tyres )......................... 326
Tyre pressure monitor
Checking the tyre pressure elec-
tronically ........................................ 328
Function/notes ............................. 327
Restarting ...................................... 328
Warning lamp ................................. 263
Warning message .......................... 328
Tyres
Changing awheel .......................... 329
Checking ........................................ 323
Direction of rotatio n...................... 330
Display message ............................ 245
Grip ................................................ 166
Important safety notes ..................322
Replacing ....................................... 329
Service life ..................................... 323
Storing ........................................... 330
Technical data ............................... 333
Tyr esize (data) .............................. 333
Tyr etread ...................................... 323
see Flat tyre U
Unladen weight ................................. 348
Unlocking Emergency unlocking .......................74
From inside the vehicle (central
unlocking button) ............................. 73 Index
17
Page 21 of 357

V
Vanity mirror Sun visor ........................................ 276
Variable SPEEDTRONIC
Function/note s............................. 178
Vehicle
Correct use ...................................... 23
Data acquisition ............................... 23
Display message ............................ 248
Electronics ..................................... 339
Emergency locking ........................... 75
Emergency unlocking .......................74
Equipment ....................................... 21
Implied warranty .............................. 23
Individua lsettings .......................... 221
Leaving parked up .........................164
Locking (key )................................... 68
Lowering ........................................ 332
Pulling away ................................... 144
Raising ........................................... 330
Registration ..................................... 22
Securing from rolling away ............330
Towing away .................................. 315
Tow-starting ................................... 315
Transporting .................................. 317
Unlocking (key )................................ 68
Vehicle data ................................... 348
Vehicle data ....................................... 348
Vehicle dimensions ...........................348
Vehicle identification number see VIN
Vehicle identification plate ..............340
Vehicle tool kit .................................. 306
Vehicle tool kit pocket ......................306
Vehicle weights ................................. 348
Ventilation Setting the airflow .........................131
Video
Operating the DVD ......................... 218
VIN ...................................................... 340W
Warning and indicator lamps ABS ................................................ 254
Brakes ........................................... 253
Distance warning signa l................. 262ESP
®
.............................................. 256
ESP ®
OFF ....................................... 257
Fuel tank ........................................ 260
LIM (cruise control) ........................ 174
LIM (DISTRONIC PLUS) ..................183
LIM (variable SPEEDTRONIC) .........179
Overview .................................. 29, 251
Parking brake ................................ 259
PASSENGER AIRBAG OFF ................50
Preglow .......................................... 260
Seat bel t........................................ 252
SRS ................................................ 259
Tyr ep ressure monitor ...................263
Warning triangle ................................ 304
Washer fluid Display message ............................ 251
Wheel bol ttightening torque ...........332
Wheels Changing/replacing .......................329
Changing awheel .......................... 329
Checking ........................................ 323
Cleaning ......................................... 297
Cleaning (warning) .........................330
Fitting anew wheel ........................ 332
Fitting awheel ............................... 330
Important safety notes ..................322
Overview ........................................ 322
Removing awheel .......................... 332
Storing ........................................... 330
Technical data ............................... 333
Tightening torque ........................... 332
Whee lsize/tyre size ...................... 333
Windowbag
Display message ............................ 234
Operation ........................................ .42
Windows
see Side windows
Windows (cleaning instructions) .....298
Windscreen Demisting ...................................... 131
Windscreen heating ..........................132
Windscreen washe rfluid
see Windscreen washer system
Windscreen washer system
Notes ............................................. 347
Topping up ..................................... 29418
Index
Page 65 of 357

light up continuously. The hazard warning
lamps switch off automatically if you travel
faster than 10 km/h
.You can also switch off
the hazard warning lamps using the hazard
warning switch button (Y page 109).ESP
®
(Electronic Stability Program)
Important safety notes i
Observe the "Important safety notes" sec-
tion (Y page 60). G
WARNING
If ESP ®
is malfunctioning, ESP ®
is unable to
stabilise the vehicle. In addition, other driving
safety systems are switched off. This increa-
ses the risk of skidding and an accident.
Drive on carefully. Have ESP ®
checked at a
qualified specialist workshop.
! Only operate the vehicle for a maximum
of ten seconds on a brake dynamometer.
Switch off the ignition.
Application of the brakes by ESP ®
may oth-
erwise destroy the brake system.
! A function or performance test should
only be carried out on atwin-axle dyna-
mometer. Before you operate the vehicle
on such a dynamometer, please consult a
qualified workshop .You could otherwise
damage the drive train or the brake system.
ESP ®
monitors driving stability and traction.
Traction is the transmission of power from the
tyres to the road surface.
ESP ®
is deactivated if the åwarning lamp
in the instrument cluster lights up continu-
ously when the engine is running.
If the ÷ warning lamp and the åwarn-
ing lamp are lit continuously, ESP ®
is not
available due to a malfunction.
Observe the information on warning lamps
(Y page 256) and any display messages that
appear in the instrument cluster
(Y page 229). If ESP
®
detects that the vehicle is deviating
from the direction desired by the driver, one
or more wheels are braked to stabilise the
vehicle. If necessary, the engine output is also
modified to keep the vehicle on the desired
course within physical limits. ESP ®
assists
the driver when pulling away on wet or slip-
pery roads. ESP ®
can also stabilise the vehi-
cle during braking.
If ESP ®
intervenes, the ÷warning lamp
flashes in the instrument cluster.
If ESP ®
intervenes:
X Do not deactivate ESP ®
under any circum-
stances.
X When pulling away, only depress the accel-
erator pedal as far as is necessary.
X Adapt your driving style to suit the prevail-
ing road and weather conditions.
i Only use wheels with the recommended
tyre sizes. Only then will ESP ®
function
properly.
i If differential locks are switched on, ABS,
BAS and ESP ®
switch off automatically.
4ETS (Electronic Traction System) Traction control remains active if you deacti-
vate ESP
®
.
X If appropriate for the driving conditions,
engage the LOW RANGE off-road gear
(Y page 202).
Traction control is part of ESP ®
.
Traction control brakes the drive wheels indi-
vidually if they spin. This enables you to pull
away and accelerate on slippery surfaces, for
example if the road surface is slippery on one
side. In addition, more drive torque is trans-
ferred to the wheel or wheels with traction.
Traction control remains active if you deacti-
vate ESP ®
.
Traction control is no longer active above a
speed of about 60 km/h. 62
Driving safety systemsSafety
Page 102 of 357
Position of the steering wheel when the
EASY-ENTRY/EXIT featurei s activeThe steering wheel moves upwards and
towards the dashboard if:
R you remove the key from the ignition lock
or
R you open the driver's door with the key in
position 0or 1in the ignition lock.
i The steering wheel only moves upwards
and towards the dashboard if it has not
already reached the upper end stop.
Position of the steering wheel for driv-
ing The steering wheel is moved to the previously
set position if:
R the driver's door is closed and
R you insert the key into the ignition lock
The last position of the steering wheel is
stored when you switch off the ignition or
when you store the setting with the memory
function (Y page 102). Mirrors
Rear-view mirror
X Adjust the rear-view mirror by hand so you
have a good overview of the traffic condi-
tions behind you. Exterior mirrors
Adjusting the exterior mirrors G
WARNING
The exterior mirrors reduce the size of the
image. Objects are actually closer than they
appear. You could misjudge the distance from
vehicles driving behind and cause an acci-
dent, e.g. when changin glane. For this rea-
son, make sure of the actual distance from the
vehicle driving behind by glancing ove ryour
shoulder. X
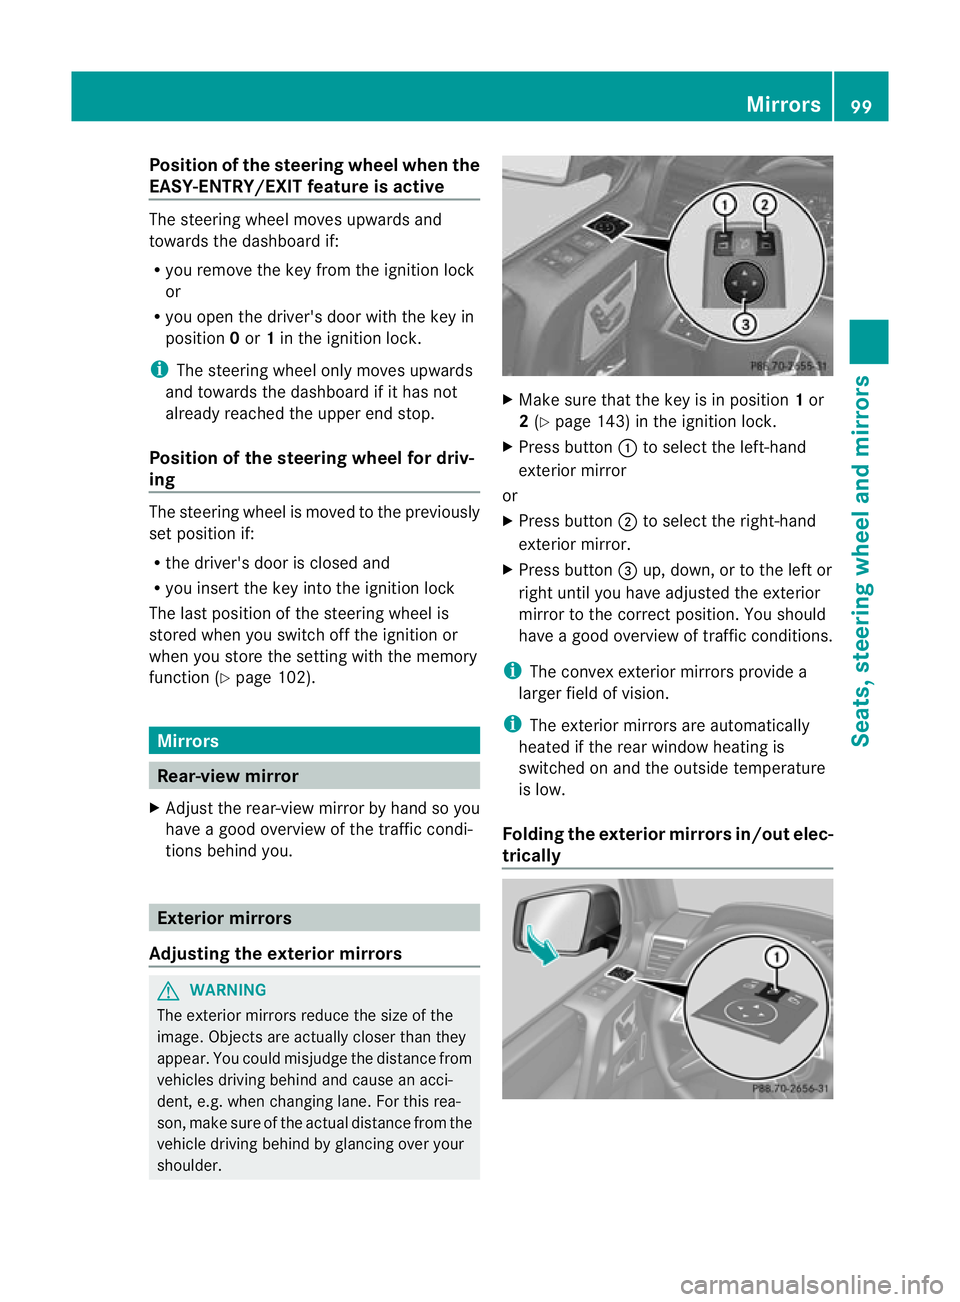
Make sure that the key is in position 1or
2 (Y page 143) in the ignition lock.
X Press button :to select the left-hand
exterior mirror
or
X Press button ;to select the right-hand
exterior mirror.
X Press button =up, down, or to the left or
right until you have adjusted the exterior
mirror to the correc tposition. You should
have a good overview of traffic conditions.
i The convex exterior mirrors provide a
larger field of vision.
i The exterior mirrors are automatically
heated if the rear window heating is
switched on and the outside temperature
is low.
Folding the exterior mirrors in/out elec-
trically Mirrors
99Seats, steering wheel and mirrors Z
Page 299 of 357
after having cleaned the wheels with wheel
cleaner. Wheel cleaners could cause
increased corrosio
nofthe brake discs and
brake pads/linings. For this reason, you
should drive for a few minutes after clean-
ing. Braking heats the brake discs and the
brake pads/linings, thus drying them. The
vehicle can then be parked up. Care of the exterior
Automatic car wash G
WARNING
Braking efficiency is reduced after washing
the vehicle. This could cause an accident. For
this reason, following a car wash, drive with
particular care until the brakes are dry.
! Preferably use car washes with adjustable
high-pressure jets for pre-washing. This
corresponds with the specifications for
cabriolet programmes. In car washes that
use high water pressures, there is a risk
that a small amount of water may leak into
the vehicle.
! Cabriolet: do not treat the vehicle with
hot wax under any circumstances.
! Make sure that the automatic car wash is
suitable for the size of the vehicle. Fold in
the exterior mirrors before the vehicle is
washed. The exterior mirrors could other-
wise be damaged.
! Make sure that the automatic transmis-
sion is in position Nwhen washing your
vehicle in a tow-through car wash. The vehi-
cle could be damaged if the transmission is
in another position.
! Make sure that:
R the side windows and sliding sunroof are
closed completely.
R the blower for the ventilation/heating is
switched off (airflow control is turned to position
0/theÃandÁ buttons
are switched off).
R the windscreen wiper switch is at posi-
tion 0.
The vehicle could otherwise be damaged.
You can wash the vehicle in an automatic car
wash from the very start.
Wash off excess dirt before cleaning the vehi-
cle in an automatic car wash.
After using an automatic car wash, wipe off
wax from the windscreen and the wiper
blades. This will prevent smears and reduce
wiping noises caused by residue on the wind-
screen.
High-pressure cleaning equipment G
WARNING
Do not use high-pressure cleaners with circu-
lar-jet nozzles (dirt grinders) to clean your
vehicle, in particular the tyres. You could oth-
erwise damage the tyres and cause an acci-
dent.
! Always maintain a distance of at least
30 cm between the vehicle and the high-
pressure cleaner nozzle. Information about
the correct distance is available from the
equipment manufacturer.
Move the high-pressure cleaner nozzle
around when cleaning your vehicle.
Do not aim directly at any of the following:
R tyres
R door gaps, roof gaps, joints etc.
R soft top (Cabriolet)
R electrical components
R battery
R connectors
R lights
R seals
R trim elements
R ventilation slots
Damaged seals or electrical components
can lead to leaks or failures. 296
CareMaintenance and care
Page 310 of 357
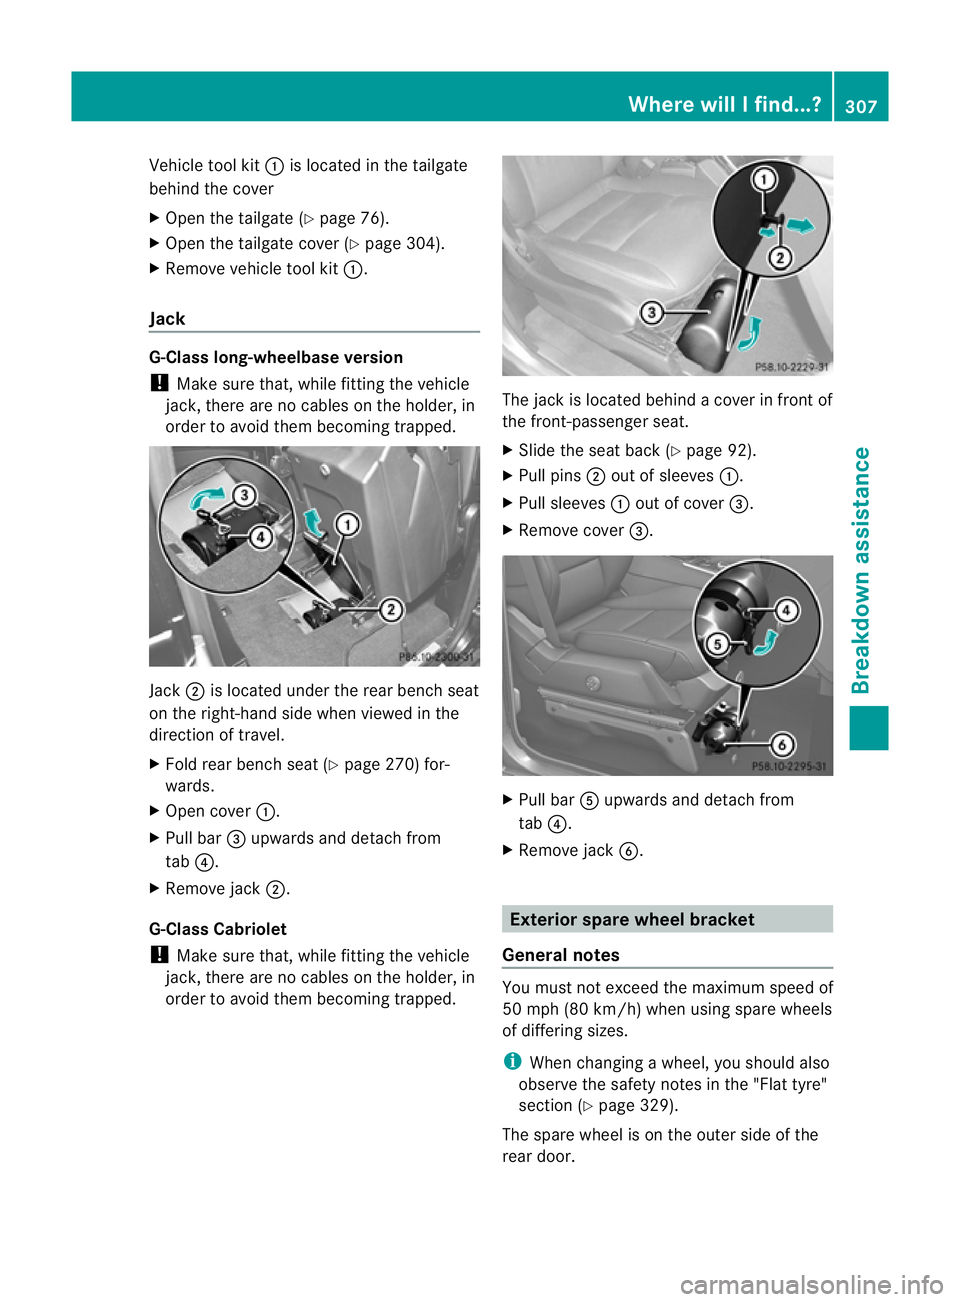
Vehicle tool kit
:is located in the tailgate
behind the cover
X Open the tailgate (Y page 76).
X Open the tailgate cover (Y page 304).
X Remove vehicle tool kit :.
Jack G-Class long-wheelbase version
!
Make sure that, while fitting the vehicle
jack, there are no cables on the holder, in
order to avoid them becoming trapped. Jack
;is located under the rear bench seat
on the right-hand side when viewed in the
direction of travel.
X Fold rear bench seat (Y page 270) for-
wards.
X Open cover :.
X Pull bar =upwards and detach from
tab ?.
X Remove jack ;.
G-Class Cabriolet
! Make sure that, while fitting the vehicle
jack, there are no cables on the holder, in
order to avoid them becoming trapped. The jack is located behind a cover in front of
the front-passenger seat.
X
Slide the seat back (Y page 92).
X Pull pins ;out of sleeves :.
X Pull sleeves :out of cover =.
X Remove cover =. X
Pull bar Aupwards and detach from
tab ?.
X Remove jack B. Exterior spare wheel bracket
General notes You must not exceed the maximum speed of
50 mph (80 km/h) when using spare wheels
of differing sizes.
i
When changing a wheel, you should also
observe the safety notes in the "Flat tyre"
section (Y page 329).
The spare wheel is on the outer side of the
rear door. Where will I find...?
307Breakdown assistance
Page 326 of 357
Regular checking of wheels and tyres
R Regularly check the wheels and tyres of
your vehicle for damage at leas tevery 14
days, as well as after driving off-road or on
rough roads. Damage includes cuts, punc-
tures, cracks and bulges on tyres or severe
corrosio nordeformation on wheels, for
example. Damaged wheels can cause a
loss of tyre pressure.
R Regularly chec kthe tyre tread depth and
the condition of the tread across the whole
width of the tyre (Y page 323). In order to
inspect the inner side of the tyre surface,
turn the steering wheel to full lock.
R All wheels must have a valve cap to protect
the valve against dirt and moisture. Do not
fit anything onto the valve other than the
standard valve cap or avalve cap approved
by Mercedes-Ben zfor your vehicle.
Do not fit anything onto the valve, such as
tyre pressure monitoring systems.
R You should regularly check the pressure of
all your tyres including the spare wheel,
particularly prior to long trips. Adjust the
tyre pressure as necessary (Y page 328).
The service life of tyres depends on various
factors, including the following:
R driving style
R tyre pressure
R tyre mileage Tyre tread
G
WARNING
Please keep in mind that:
R tyre grip decreases rapidly on wet roads
when the tread depth is less than 3mm.
Thus, you should replace tyres that have
insufficient tread.
R winter tyres should be replaced when the
tread depth is 4mmorless, as they no lon-
ger provide adequate grip.
R the tread on a tyre may not wear evenly.
Thus, you should regularly check the tread depth and the condition of the tread across
the entire width of all tyres. If necessary,
turn the fron
twheels to full lock in order to
inspect the tyre tread more easily.
Otherwise, you could lose control of the vehi-
cle and cause an accident due to the reduced
grip of the tyres on the road. Selecting, fitting and replacing tyres
R Only fit tyres and wheels of the same type
and make.
R Only fit approved tyres of the correct size
onto the wheels.
R Tyres are supplied with a protective layer
from the factory. Run in new tyres at mod-
erate speeds for the first 100 km. They only
reach their full performance after this dis-
tance.
R Do not drive with tyres which have too little
tread depth. This otherwise significantly
reduces the traction on wet roads (aqua-
planing).
R Replace the tyres after six years at the lat-
est, regardless of wear. This also applies to
the spare wheel. Winter operation
General notes
Have your vehicle winterproofed at a qualified
specialist workshop at the onset of winter.
Observe the notes in the "Changing a wheel"
section (Y page 329). Driving with summer tyres
At temperatures below +7 †, summer tyres
lose elasticity and therefore traction and
braking power. Change the tyres on your vehi-
cle to M+S tyres. Using summer tyres at very
cold temperatures could cause tears to form,
thereby damaging the tyres permanently. Winter operation
323Wheels and tyres Z
Page 328 of 357
i
You may wish to deactivate
ESP ®
(Y page 62) when pulling away with
snow chains fitted. This way you can allow
the wheels to spin in a controlled manner,
achieving an increased driving force (cut-
ting action). Tyre pressure
Tyre pressure specifications
Important safety notes G
WARNING
Underinflated or overinflated tyres pose the
following risks:
R the tyres may burst, especially as the load
and vehicle speed increase.
R the tyres may wear excessively and/or
unevenly, which may greatly impair tyre
traction.
R the driving characteristics, as well as steer-
ing and braking, may be greatly impaired.
There is a risk of an accident.
Observe the recommended tyre pressure and
chec kthe tyre pressure of all the tyres includ-
ing the spare wheel:
R at least every two weeks
R when the load changes
R before embarking on a longer journey
R for changed operating conditions, e.g. off-
road driving
If necessary, correct the tyre pressure. G
WARNING
If you fit unsuitable accessories onto tyre
valves, the tyre valves may be overloaded and
malfunction, which can cause tyre pressure
loss. Due to their design, retrofitted tyre pres-
sure monitors keep the tyre valve open. This
can also result in tyre pressure loss. There is
a risk of accident.
Only screw standard valve caps or valve caps
specifically provided by Mercedes-Ben zfor
your vehicle onto the tyre valve. G
WARNING
If the tyre pressure drops repeatedly, the
wheel, valve or tyre may be damaged. Tyre
pressure that is too low may result in a tyre
blow-out. There is a risk of accident.
R Check the tyre for foreign objects.
R Check whether the wheel is losing air or the
valve is leaking.
If you are unable to rectify the damage, con-
tact a qualified specialist workshop. H
Environmental note
Check the tyre pressure regularly, at least
every 14 days.
General notes You will find a table of tyre pressures for var-
ious operating conditions on the inside of
your vehicle's fuel filler flap.
Operation with a trailer:
the applicable
value for the rear tyres is the maximum tyre
pressure value stated in the table inside the
fuel filler flap.
The table inside the fuel filler flap may state
tyre pressures for different load conditions.
These are defined in the table as different
numbers of passengers and amounts of lug-
gage. The actual number of seats may vary –
for more information, please refer to the vehi-
cle's registration documents.
If tyre sizes are not specified, the tyre pres-
sures stated on the tyre pressure information
label apply for all tyres approved for this vehi-
cle. Tyre pressure
325Wheels and tyres Z