2012 MERCEDES-BENZ G-CLASS SUV fuse
[x] Cancel search: fusePage 13 of 357

Front-passenger seat
Display message ............................ 249
Fuel
Additives ........................................ 343
Consumption statistics ..................215
Displaying the current consump-
tion ................................................ 215
Displaying the range ......................215
Fuel gauge ..................................... 211
Grade (petrol) ................................ 342
Important safety notes ..................341
Notes for AMG vehicles .................343
Premium-grade unleaded petrol ..... 342
Problem (malfunction) ...................159
Quality (diesel )............................... 343
Refuelling ...................................... .156
Tank content/reserve fuel .............342
Fuel/water separator
Service .......................................... .295
Fuel filler flap
Emergency release ........................158
Opening/closing ............................ 157
Fuel filte r(white display message) .240
Fuel level Calling up the range (on-board
computer) ...................................... 215
Gauge ............................................ 211
Fuel reserve
see Fuel
Fuel tank
Capacity ........................................ 342
Problem (malfunction) ...................159
Fuse allocation chart ........................318
Fuse box Battery case ................................... 320
Dashboard ..................................... 319
Front-passenger footwell ...............319
Transmission tunnel ....................... 319
Fuse extractor ................................... 318
Fuses Allocation chart ............................. 318
Before changing ............................. 318
Dashboard fuse box .......................319
Fuse allocation chart .....................318
Fuse box in the front-passenger
footwell .......................................... 319
Fuse box in the transmission tun-
nel ................................................. 319Important safety notes
..................318
In the battery case .........................320 G
Garage door opener Clearing the memory .....................283
Frequencies ................................... 283
Important safety notes ..................280
Opening/closing the garage door ..282
Programming the remote control ...280
Gear indicator (on-board computer) 225
Gearshift program SETUP (on-board computer) ..........226
Genuine Mercedes-Benz parts .........338
Genuine wood trim and trim strips
(cleaning instructions) ......................300
Glove compartment ..........................267
Gradient-climbing capability (max-
imum) ................................................. 173 H
Hazard warning lamps ......................109
Headlamp Cleaning system (function) ............108
Cleaning system (notes) ................347
Headlamps
Cleaning ......................................... 298
Misting up ...................................... 110
Topping up the cleaning system ....294
see Automatic headlamp mode
Head restraints
Adjusting ......................................... 92
Adjusting (rear) ................................ 93
Fitting/removing (rear) ....................93
Luxury .............................................. 92
Resetting (front) ............................... 93
Heating
see Climate control
High-pressure cleaners ....................296
Hill start assist .................................. 145
HOLD function Function/notes ............................. 19610
Index
Page 18 of 357

Bel
ttensioner .................................. 47
Cleaning ......................................... 301
Display message ............................ 232
Fastening ......................................... 44
Fastening, front ............................... 44
Fastening in the rear, centre ............45
Important safety guidelines .............43
Rea rseat belt status indicator .........47
Releasing ......................................... 46
Warning lamp ................................. 252
Warning lamp (function) ................... 47
Seat heating
Malfunction indicator lamp ..............96
Seats
Adjusting (electrically). ....................92
Adjusting the 4-way lumba rsup-
por t.................................................. 94
Adjusting the head restraint ............92
Cleaning the cover .........................300
Correct driver's seat position ........... 90
Important safety notes ....................91
Overview .......................................... 91
Storing settings (memory function) 102
Switching sea theating on/off .........95
Switching the sea tventilation on/
off .................................................... 96
Seat ventilation
Malfunction indicator lamp ..............97
Securing aload .................................. 270
Sensors (cleaning instructions) .......298
Service menu (on-board computer) .220
Service products
AdBlue ®
special additive s.............. 345
Brake fluid ..................................... 346
Coolant (engine) ............................ 347
Engine oil ....................................... 345
Fuel ................................................ 341
Important safety notes ..................341
Notes ............................................. 341
Washer fluid .................................. .347
Settings
Calling up a stored setting .............102
Factory (on-board computer) .........225
On-board computer .......................221
Setting the air distribution ...............131
SETUP (on-board computer) .............226
Shift ranges ....................................... 153Short journeys (diesel particle fil-
ter)
...................................................... 164
Side lamps Switching on/off ........................... 107
Side windows
Convenience opening ......................78
Important safety notes ....................77
Opening/closing .............................. 77
Overview .......................................... 77
Troubleshooting ............................... 78
Ski rack .............................................. 275
Sliding sunroof Important safety information ...........79
Opening/closing .............................. 79
Operating manually ..........................79
Problem (malfunction) .....................80
Snow chains ...................................... 324
Socket Front-passenger footwell ...............278
Luggage compartment ...................278
Rea rcompartmen t......................... 278
Soft top
Closing ............................................ .82
Closing manually in an emergenc y... 82
Important safety notes ....................81
Opening ........................................... 81
Troubleshooting ............................... 87
Spare fuses ........................................ 318
Spare wheel Fitting ............................................ 329
Notes/data .................................... 333
Spare wheel bracket at the rear ....307
Stainless-steel spare wheel cover ..308
Specialist workshop ............................ 22
Speed, controlling see Cruise control
Speedometer
Digita l............................................ 216
In the Instrument cluster ...............211
Segments ...................................... 212
Selecting the unit of measurement 221
see Instrument cluster
SPEEDTRONIC
Display message ............................ 244
Permanent ..................................... 182
Selecting ........................................ 179
Variabl e......................................... 178 Index
15
Page 52 of 357
tion instructions and the correct use of the
child restraint system.
Child restraint systems shoul dbe fitted to the
rear seats. Children are generally better pro-
tected there.
The entire base of the child restraint system
must always rest on the seat cushion. There-
fore, never place objects, e.g. a cushion,
under the child restraint system.
Only use child restraint systems with the orig-
inal cover designed for them. Only replace
damaged covers with genuine Mercedes-Benz
covers.
We recommend the use of child restraint sys-
tems which have been approved for
Mercedes-Benz vehicles. G
WARNING
When leaving the vehicle, it can still roll away
despite being braked by the HOLD function if:
R there is a malfunction in the system or in
the voltage supply
R the HOLD function is deactivated by the
accelerator pedal being depressed, e.g. by
a vehicle occupant
R the electrical system in the engine com-
partment, the battery or the fuses are tam-
pered with
R the battery is disconnected
There is a risk of an accident.
Before leaving the vehicle, always deactivate
the HOLD function and secure the vehicle
from rolling away. G
WARNING
Unsecured or incorrectly positioned loads
increase the risk of injury for children and all
other occupants in the event of:
R an accident
R a braking manoeuvre
R a sudden change of direction
Do not carry heavy or hard objects in the vehi-
cle interior unless they are secured. You will find further information under "Loading guide-
lines" in the index.
If a child is travelling in your vehicle, secure
the child using a child restraint system which
is appropriate to the size, age and weight of
the child and recommended for Mercedes-
Benz vehicles. You should preferably fit the
restraint system to a suitable rear seat. Make
sure that the child is secured in a child
restraint system throughout the trip.
Mercedes-Benz recommends that you only
use the child restraint systems listed under
(Y page 56).
You can obtain information about the correct
child restraint system from any Mercedes-
Benz Service Centre.
i It is advisable to use Mercedes-Benz care
products to clean child restraint systems.
You can obtain information about this at
any Mercedes-Benz Service Centre.
Child restraint system on the front-
passenger seat G
WARNING
If the front-passenger airbag is not disabled:
R a child secured in a child restraint system
on the front-passenger seat could be seri-
ously and even fatally injured by the front-
passenger airbag deploying. This is espe-
cially a risk if the child is in the immediate
vicinity of the front-passenger airbag when
it deploys.
R never secure a child on the front-passenger
seat in a rearward-facing child restraint sys-
tem. Only secure a rearward-facing child
restraint system on a suitable rear seat.
R always move the front-passenger seat to
the rearmost position if you secure a child
in a forward-facing child restraint system
on the front-passenger seat. Children in the vehicle
49Safety
Z
Page 90 of 357
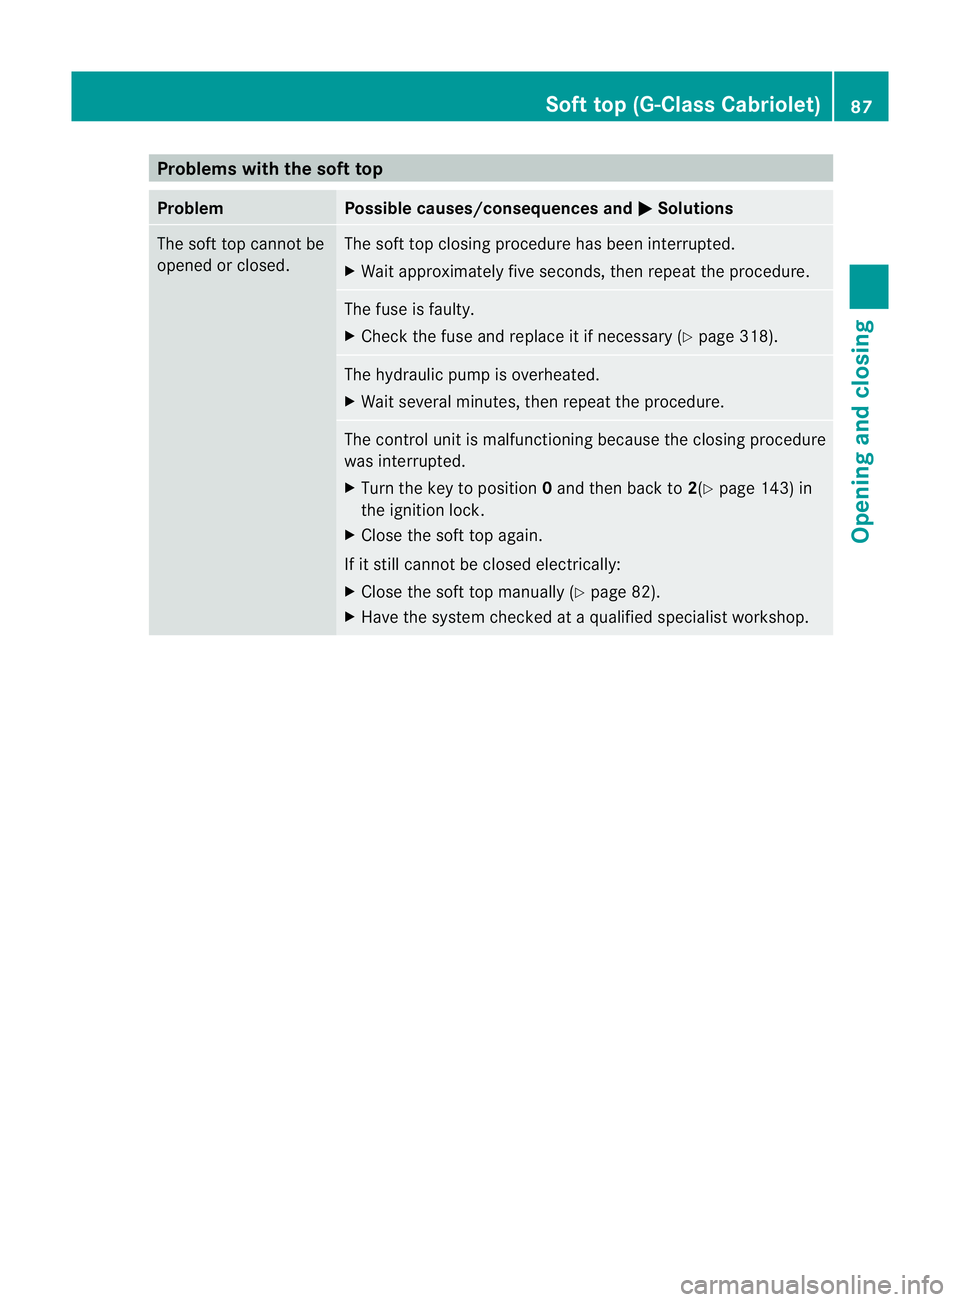
Problems with the soft top
Problem Possible causes/consequences and
M Solutions
The soft top cannot be
opened or closed. The soft top closing procedure has been interrupted.
X Wait approximately five seconds, then repeat the procedure. The fuse is faulty.
X
Check the fuse and replace it if necessary (Y page 318). The hydraulic pump is overheated.
X
Wait several minutes, then repeat the procedure. The control unit is malfunctioning because the closing procedure
was interrupted.
X
Turn the key to position 0and then back to 2(Ypage 143) in
the ignition lock.
X Close the soft top again.
If it still cannot be closed electrically:
X Close the soft top manually (Y page 82).
X Have the system checked at a qualified specialist workshop. Soft top (G-Class Cabriolet)
87Opening and closing Z
Page 161 of 357
X
Turn the fuel filler cap anti-clockwise and
remove it.
AdBlue ®
vehicles: do not confuse the fuel
filler cap with the blue AdBlue ®
filler cap.
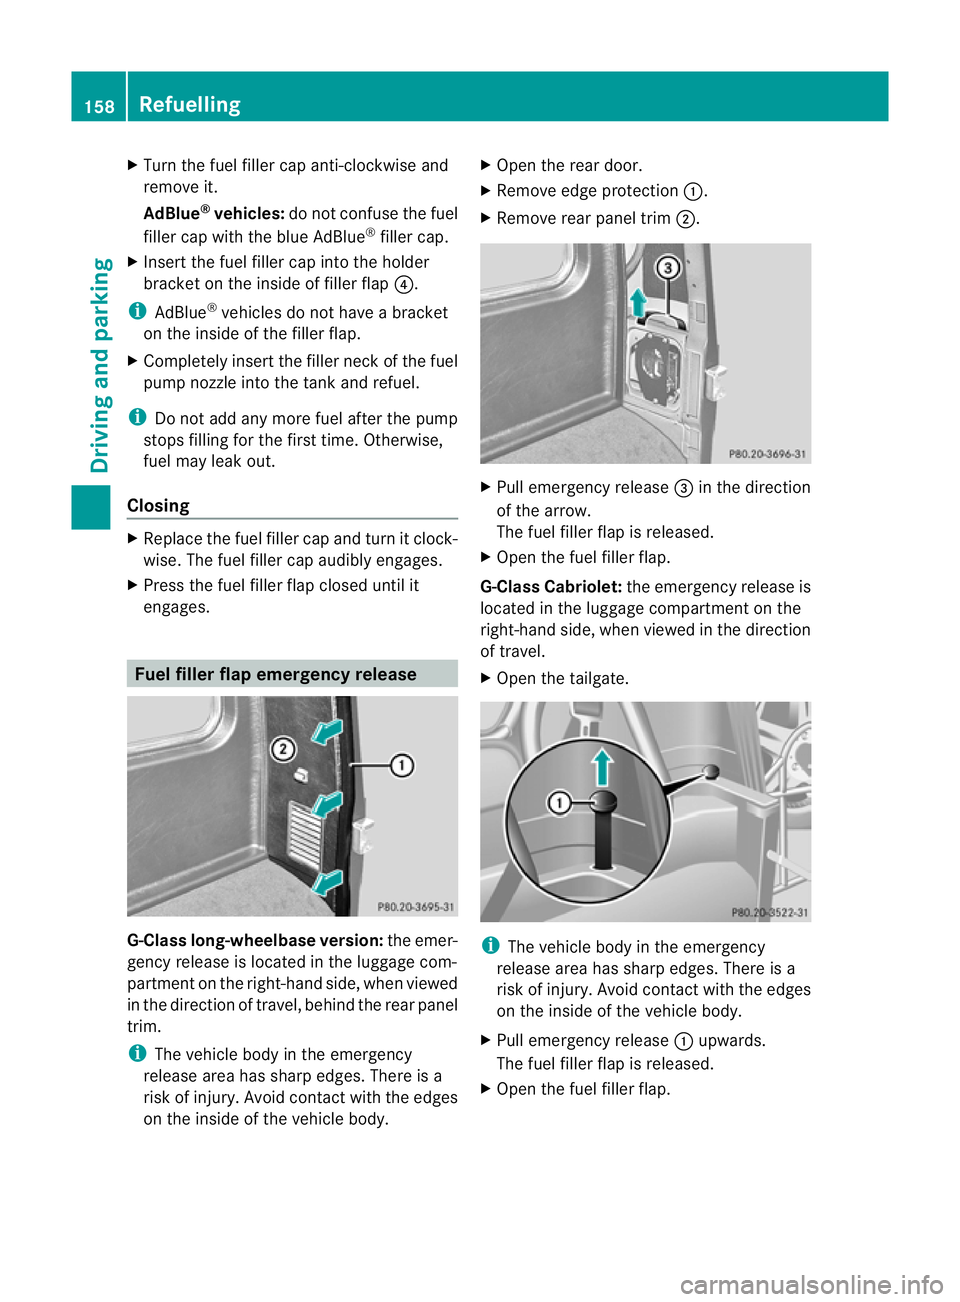
X Insert the fuel filler cap into the holder
bracket on the inside of filler flap ?.
i AdBlue ®
vehicles do not have a bracket
on the inside of the filler flap.
X Completely insert the filler neck of the fuel
pump nozzle into the tank and refuel.
i Do not add any more fuel after the pump
stops filling for the first time. Otherwise,
fuel may leak out.
Closing X
Replace the fuel filler cap and turn it clock-
wise. The fuel filler cap audibly engages.
X Press the fuel filler flap closed until it
engages. Fuel filler flap emergency release
G-Class long-wheelbase version:
the emer-
gency release is located in the luggage com-
partmen tonthe right-hand side, when viewed
in the direction of travel, behind the rear panel
trim.
i The vehicle body in the emergency
release area has sharp edges. There is a
risk of injury. Avoid contact with the edges
on the inside of the vehicle body. X
Open the rear door.
X Remove edge protection :.
X Remove rear panel trim ;. X
Pull emergency release =in the direction
of the arrow.
The fuel filler flap is released.
X Open the fuel filler flap.
G-Class Cabriolet: the emergency release is
located in the luggage compartmentont he
right-hand side, when viewed in the direction
of travel.
X Open the tailgate. i
The vehicle body in the emergency
release area has sharp edges. There is a
risk of injury. Avoid contact with the edges
on the inside of the vehicle body.
X Pull emergency release :upwards.
The fuel filler flap is released.
X Open the fuel filler flap. 158
RefuellingDriving and parking
Page 189 of 357
R
you switch on the respective tur nsignals.
R DISTRONIC PLUS does not detect a danger
of collision.
If these conditions are met, your vehicle is
accelerated. Acceleration will be interrupted
if changing lanes takes too long or if the dis-
tance between your vehicle and the vehicle in
front becomes too small.
i When changing lanes, DISTRONIC PLUS
monitors the left lane for left-hand-drive
vehicles and the right lane for right-hand-
drive vehicles.
Stopping G
WARNING
When leaving the vehicle, even if it is braked
only by DISTRONIC PLUS, it could roll away if:
R there is a malfunction in the system or in
the voltage supply.
R DISTRONIC PLUS has been deactivated
with the cruise control lever, e.g. by a vehi-
cle occupant or fro moutside the vehicle.
R the electrical system in the engine com-
partment, the battery or the fuses have
been tampered with.
R the battery is disconnected.
R the accelerato rpedal has been depressed,
e.g. by a vehicle occupant.
There is a risk of an accident.
If you wish to exit the vehicle, always turn off
DISTRONIC PLUS and secure the vehicle
against rolling away.
If DISTRONIC PLUS detects that the vehicle
in fron tis stopping, it brakes your vehicle until
it is stationary.
Once your vehicle is stationary, it remains
stationary and you do not need to depress the
brake.
i Depending on the specified minimum dis-
tance, your vehicle will come to a standstill
at a sufficient distance behind the vehicle
in front.T he specified minimum distance is
set using the control on the cruise control
lever. On steep uphill or downhill gradients or if
there is a malfunction, the transmission may
also be automatically shifted into position
P.
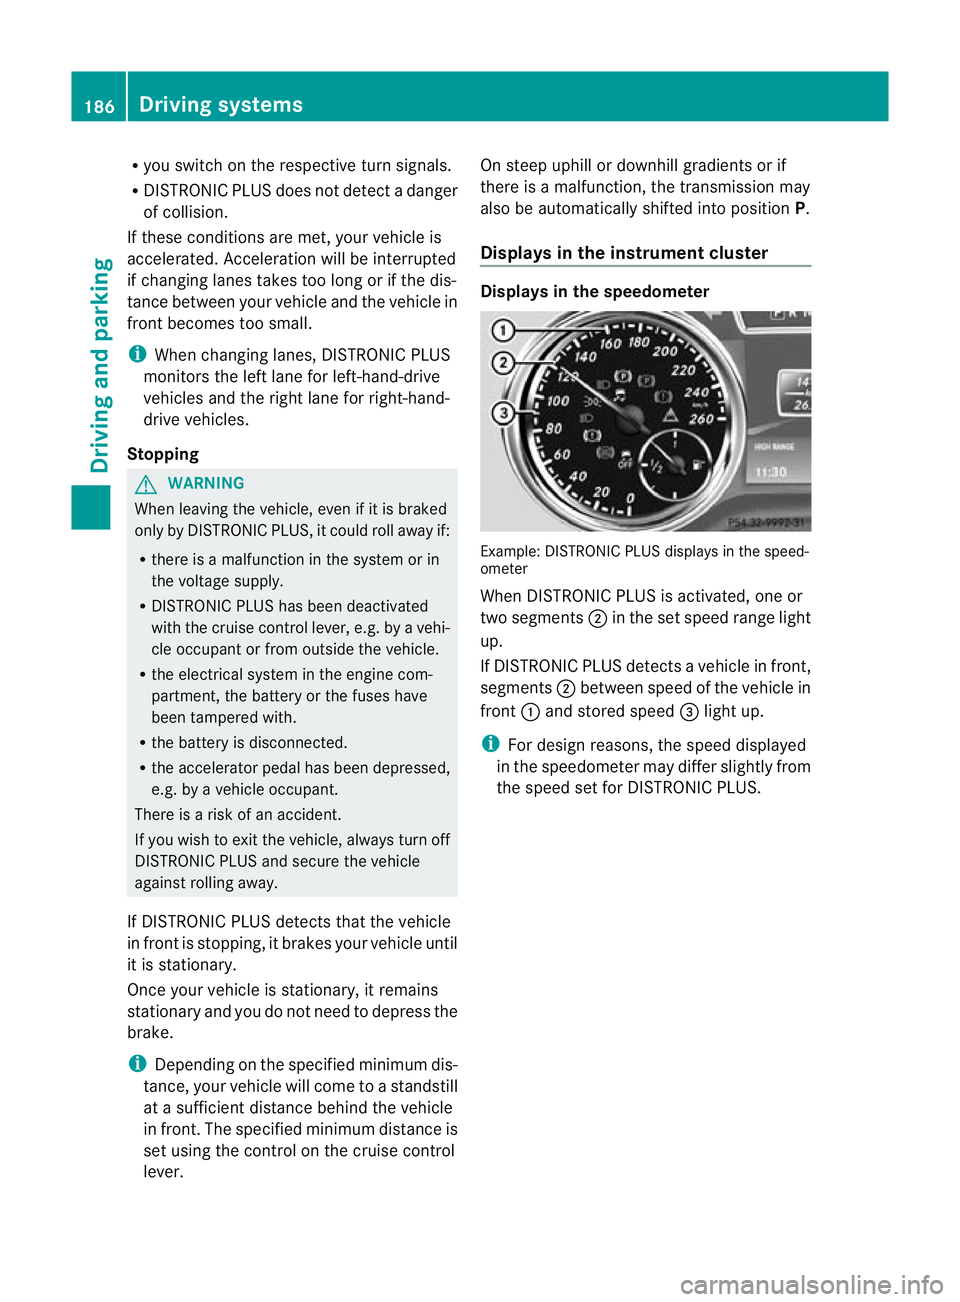
Displays in the instrument cluster Displays in the speedometer
Example: DISTRONIC PLUS displays in the speed-
ometer
When DISTRONIC PLUS is activated, one or
two segments
;in the set speed range light
up.
If DISTRONIC PLUS detectsav ehicle in front,
segments ;between speed of the vehicle in
front :and stored speed =light up.
i For design reasons, the speed displayed
in the speedometer may differ slightly from
the speed set for DISTRONIC PLUS. 186
Driving systemsDriving and parking
Page 199 of 357
X
Make sure that active Blind Spot Assist
(Y page 220) is activated in the on-board
computer.
X Turn the key to position 2in the ignition
lock.
Warning lamps :in the exterior mirrors
light up red for approximately
1.5 seconds and then turn yellow.
Towing atrailer If you attach a trailer, make sure tha
tyou have
correctly established the electrical connec-
tion. This can be accomplished by checking
the trailer lighting. Active Blind Spot Assist is
then deactivated. The indicator lamp lights up
yellow in the exterior mirrors and the ActiveBlind Spot Assist currently unavail‐
able See Owner's Manual message
appears in the multifunction display. HOLD function
General notes The HOLD function can assist the driver in the
following situations:
R
when pulling away, especially on steep
slopes
R when manoeuvring on steep slopes
R when waiting in traffic
The vehicle is kept stationary without the
driver having to depress the brake pedal.
The braking effect is cancelled and the HOLD
function is deactivated when you depress the
accelerator pedal to pull away.
i Do not use the HOLD function when driv-
ing off-road, on steep uphill or downhill gra-
dients or on slippery or loose surfaces. The
HOLD function cannot hold the vehicle on
such surfaces. Activation conditions You can activate the HOLD function if:
R
the vehicle is stationary.
R the engine is running or it has been
switched off by the ECO start/stop func-
tion (AMG vehicles).
R the engine is running.
R the driver's door is closed or your seat belt
is fastened.
R the transmission is in position D,Ror N.
R DISTRONIC PLUS is deactivated.
Activating the HOLD function The vehicle's brakes are applied when the
HOLD function is activated. For this reason,
deactivate the HOLD function while in the car
wash or while towing.
X
Make sure that the activation conditions
are met.
X Depress the brake pedal.
X Quickly depress the brake pedal further
until ë appears in the multifunction dis-
play.
The HOLD function is activated. You can
release the brake pedal.
i If depressing the brake pedal the first
time does not activate the HOLD function,
wait briefly and then try again.
Deactivating the HOLD function G
WARNING
When leaving the vehicle, it can still roll away
despite being braked by the HOLD function if:
R there is a malfunction in the system or in
the voltage supply
R the HOLD function is deactivated by the
accelerator pedal being depressed, e.g. by
a vehicle occupant
R the electrical system in the engine com-
partment, the battery or the fuses are tam-
pered with
R the battery is disconnected 196
Driving systemsDriving and parking
Page 281 of 357
i
You can use the cigarette lighter socket
for accessories up to 180 W
(Y page 278). 12
Vsockets
General notes !
If you are simultaneously using all three
sockets in the vehicle, make sure that you
do not exceed the maximum current draw
of 45 A. Otherwise, you will overload the
fuses.
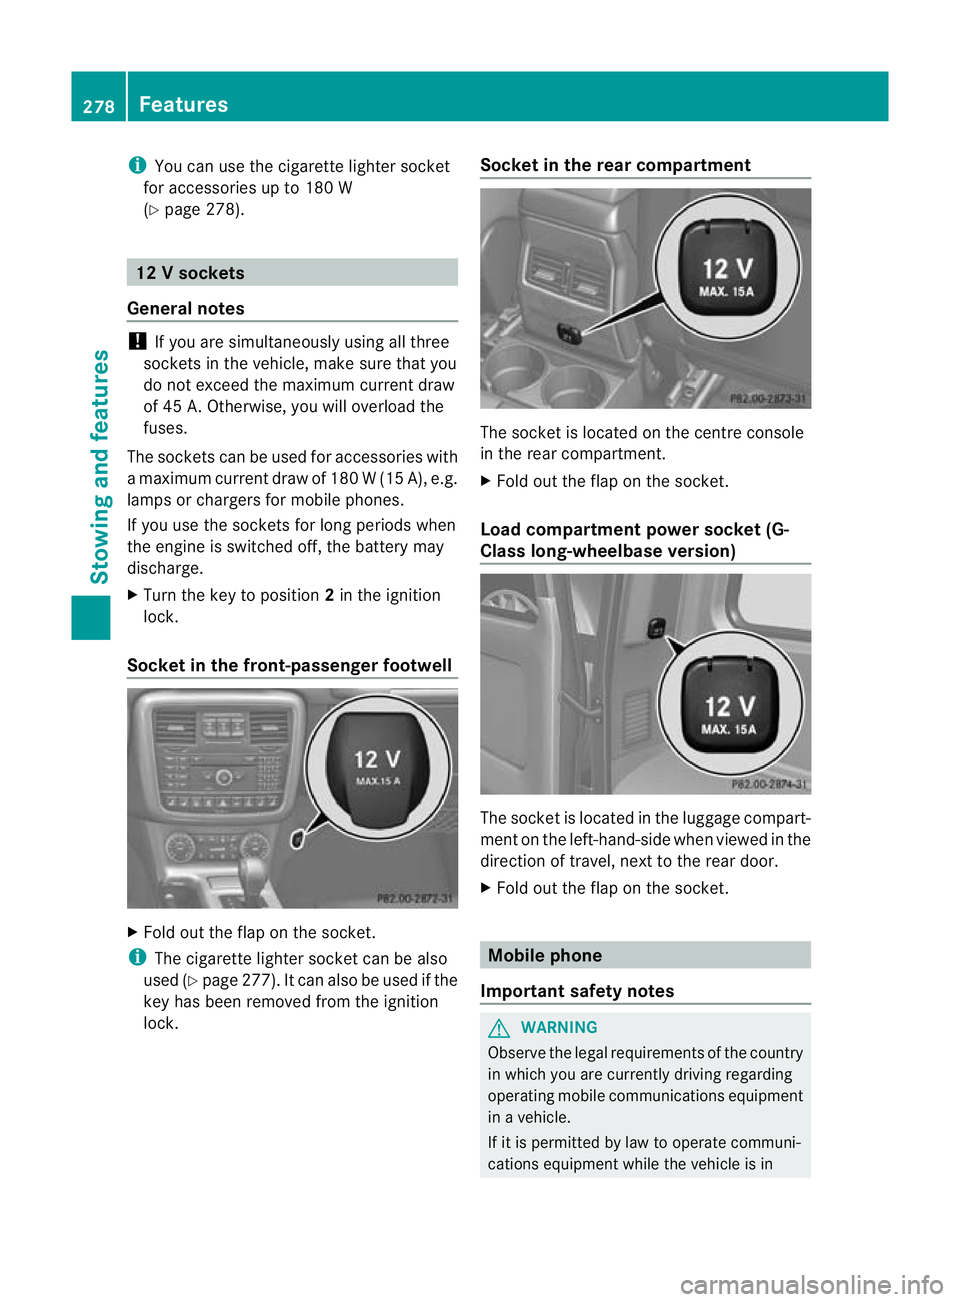
The sockets can be used for accessories with
am aximum current draw of 180 W(15 A), e.g.
lamps or chargers for mobile phones.
If you use the sockets for long periods when
the engine is switched off, the battery may
discharge.
X Turn the key to position 2in the ignition
lock.
Socket in the front-passenge rfootwell X
Fold out the flap on th esocket.
i The cigarette lighter socket can be also
used (Y page 277). It can also be used if the
key has been removed from the ignition
lock. Socket in the rear compartment The socket is located on the centre console
in the rear compartment.
X
Fold out the flap on the socket.
Load compartment power socket (G-
Class long-wheelbase version) The socket is located in the luggage compart-
ment on the left-hand-side when viewed in the
direction of travel, next to the rear door.
X Fold out the flap on the socket. Mobile phone
Important safety notes G
WARNING
Observe the legal requirements of the country
in which you are currently driving regarding
operating mobile communications equipment
in a vehicle.
If it is permitted by law to operate communi-
cations equipment while the vehicle is in 278
FeaturesStowing and features