2012 MERCEDES-BENZ E-CLASS ESTATE charging
[x] Cancel search: chargingPage 9 of 457
Battery (key)
Checking .......................................... 85
Important safety notes ....................85
Replacing ......................................... 85
Battery (vehicle)
Charging ........................................ 369
Display message ............................ 280
Important safety notes ..................367
Jump starting ................................. 370
Belt
see Seat belt
Belt force limiters (activation) ...........43
Belt tensioner Activation ......................................... 43
Function .......................................... .54
Blind Spo tAssist
Activating/deactivating .................257
Display message ............................ 285
Notes/function .............................. 225
Trailer towing ................................. 227
see Active Blind Spot Assist
BlueTEC (AdBlue ®
) ............................. 440
Bluetooth ®
SAP V3 telephone mod-
ule see Separate operating instructions
Bonnet
Active bonnet (pedestrian protec-
tion) ............................................... 344
Closing .......................................... .346
Display message ............................ 295
Opening ......................................... 345
Boot
Emergency release ..........................94
Boot lid
Display message ............................ 294
Opening dimensions ......................444
Boot load (maximum) ........................ 444
Bottle holders .................................... 329
Box (boot) .......................................... .322
Brake Assist System see BAS (Brake Assist System)
Brake fluid
Display message ............................ 272
Notes ............................................. 442
Brake lamps
Adaptive .......................................... .72
Display message ............................ 276Brakes
ABS .................................................. 70
BAS .................................................. 71
BAS PLUS ........................................ 71
Brake fluid (notes) .........................442
Display message ............................ 269
Driving tips .................................... 186
High-performance brake system ....188
Important safety notes ..................186
Parking brake ................................ 184
Warning lamp ................................. 300
Breakdown
see Flat tyre
Bulbs
see Changing bulbs C
Calling up a fault see Display messages
Car
see Vehicle
Care
Automatic car wash .......................351
Carpets .......................................... 357
Display ........................................... 355
Exterior lighting ............................. 354
Gea rors electo rlever .................... 356
High-pressure cleaner .................... 352
Interior ........................................... 355
Matt paintwork .............................. 353
Nigh tView Assist Plus ...................355
Notes ............................................. 350
Paint .............................................. 352
Plastic trim .................................... 356
Reversing camera ..........................354
Roof lining ...................................... 357
Seat bel t........................................ 357
Seat cover ..................................... 356
Sensors ......................................... 354
Steering wheel ............................... 356
Tai lpipes ....................................... 355
Trim pieces .................................... 356
Washing by hand ........................... 352
Wheels ........................................... 353
Windows ........................................ 353
Wiper blades .................................. 353
Wooden trim .................................. 3566
Index
Page 136 of 457
indicator lamp in the multifunction display
remains lit.
X To deactivate: move the combination
switch back to its normal position.
The _ indicator lamp in the instrument
cluster goes out. Headlamps misted up on the inside
The headlamps may mist up on the inside if
there is high atmospheric humidity.
X Switch on the lights and drive off.
The level of moisture diminishes, depend-
ing on the length of the journey and the
weathe rconditions (humidity and temper-
ature).
If the level of moisture does not diminish:
X Have the headlamps checked at a qualified
specialist workshop. Interior lighting
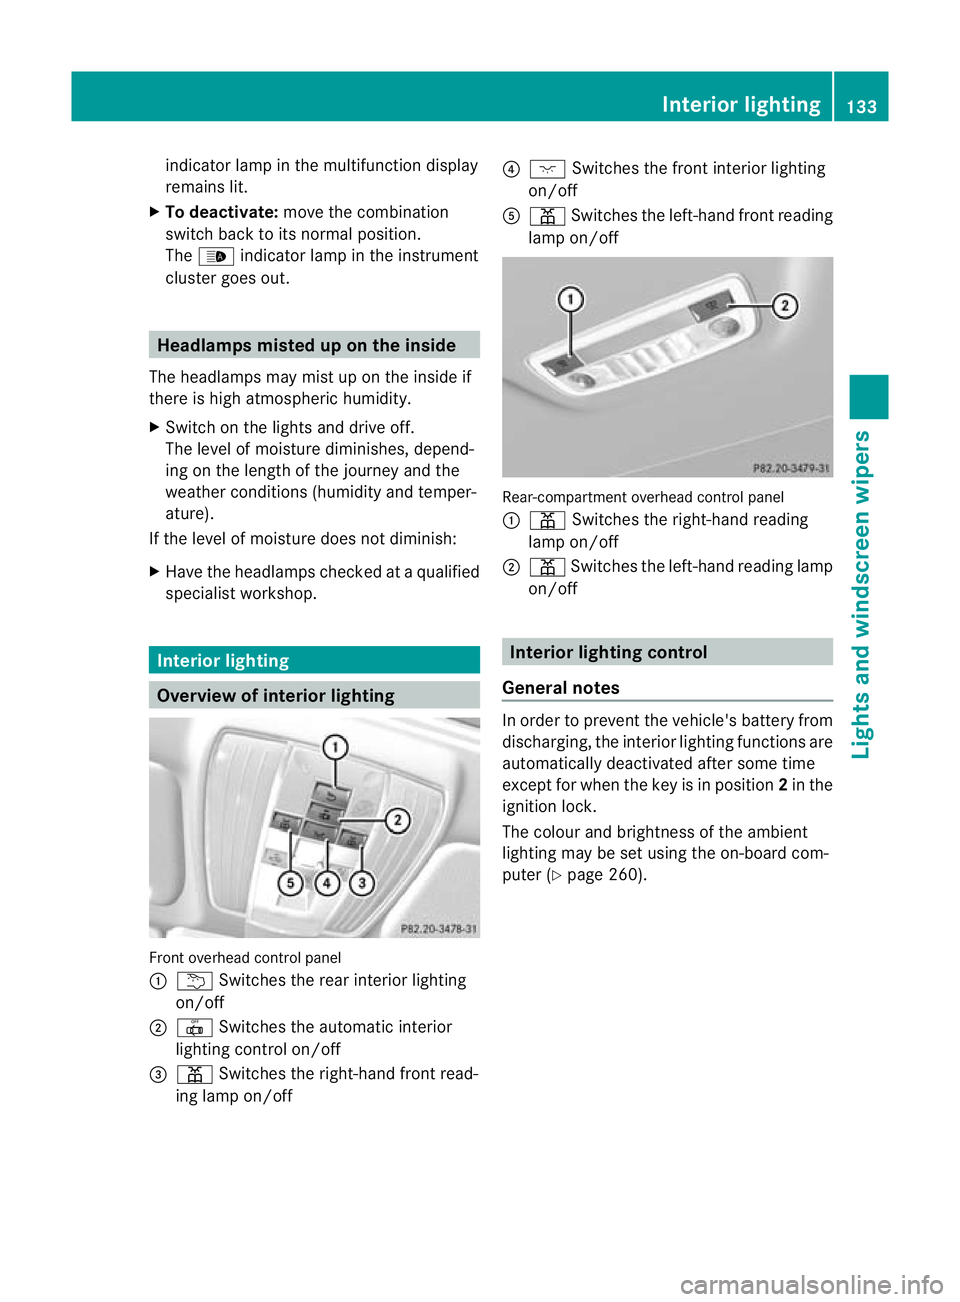
Overview of interior lighting
Front overhead control panel
:
u Switches the rear interior lighting
on/off
; | Switches the automatic interior
lighting control on/off
= p Switches the right-hand front read-
ing lamp on/off ?
c Switches the front interior lighting
on/off
A p Switches the left-hand front reading
lamp on/off Rear-compartment overhead control panel
:
p Switches the right-hand reading
lamp on/off
; p Switches the left-hand reading lamp
on/off Interior lighting control
General notes In order to prevent the vehicle's battery from
discharging, the interior lighting functions are
automatically deactivated after some time
except for when the key is in position
2in the
ignition lock.
The colour and brightness of the ambient
lighting may be set using the on-board com-
puter (Y page 260). Interior lighting
133Lights and windscreen wipers Z
Page 188 of 457
They could also operate vehicle equipment.
There is a risk of an accident and injury.
When leaving the vehicle, always take the key
with you and lock the vehicle. Never leave
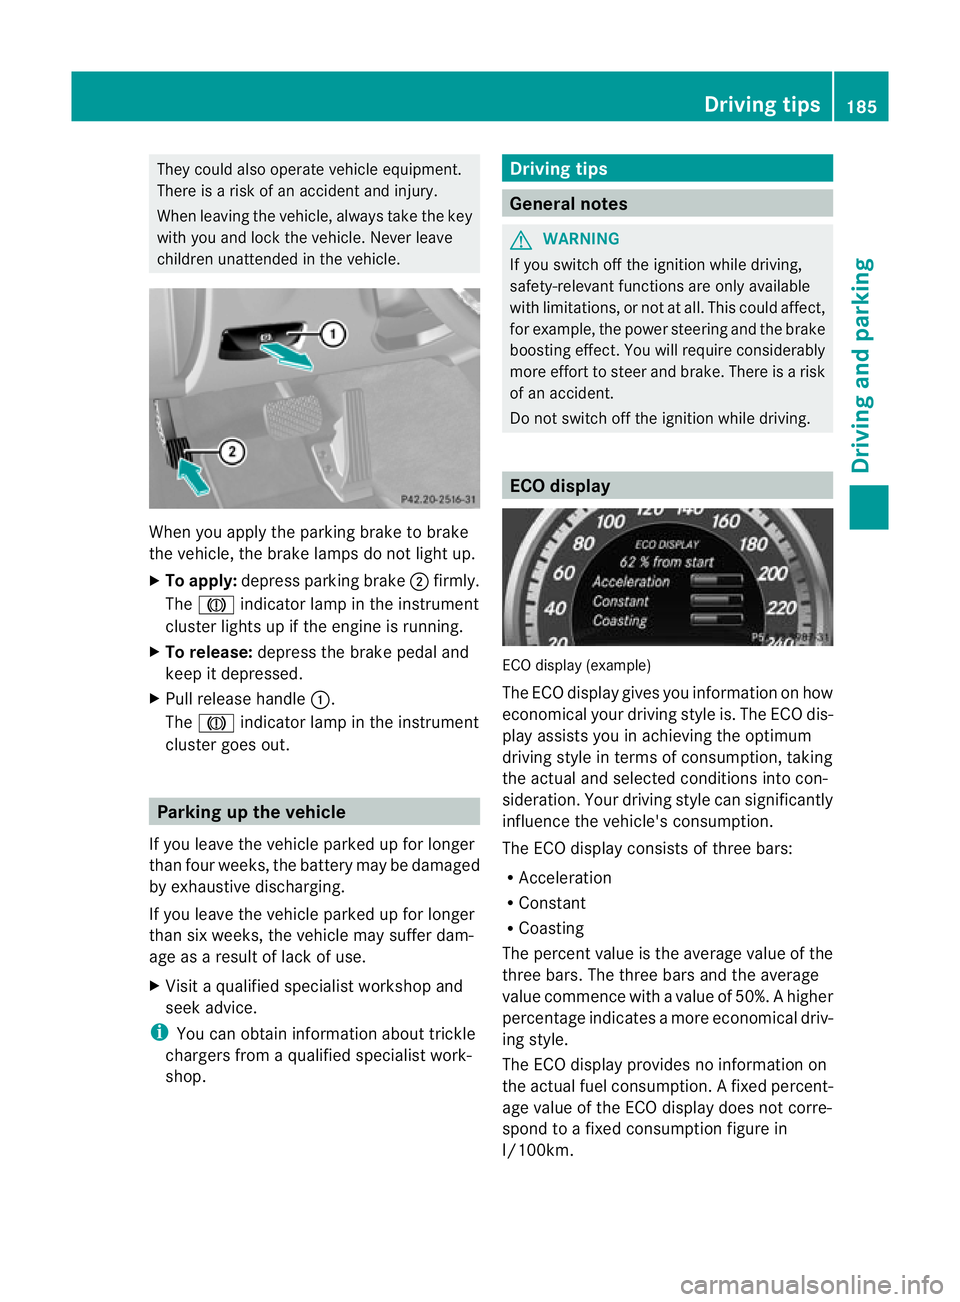
children unattended in the vehicle. When you apply the parking brake to brake
the vehicle, the brake lamps do not light up.
X To apply: depress parking brake ;firmly.
The J indicator lamp in the instrument
cluster lights up if the engine is running.
X To release: depress the brake pedal and
keep it depressed.
X Pull release handle :.
The J indicator lamp in the instrument
cluster goes out. Parking up the vehicle
If you leave the vehicle parked up for longer
than four weeks, the battery may be damaged
by exhaustive discharging.
If you leave the vehicle parked up for longer
than six weeks, the vehicle may suffer dam-
age as a result of lack of use.
X Visit a qualified specialist workshop and
seek advice.
i You can obtain information about trickle
chargers from a qualified specialist work-
shop. Driving tips
General notes
G
WARNING
If you switch off the ignition while driving,
safety-relevan tfunctions are only available
with limitations, or no tatall. This could affect,
for example, the power steering and the brake
boosting effect .You will require considerably
more effort to steer and brake. There is a risk
of an accident.
Do not switch off the ignition while driving. ECO display
ECO display (example)
The ECO display gives you information on how
economical your driving style is. The ECO dis-
play assists you in achieving the optimum
driving style in terms of consumption, taking
the actual and selected conditions into con-
sideration. Your driving style can significantly
influence the vehicle's consumption.
The ECO display consists of three bars:
R Acceleration
R Constant
R Coasting
The percent value is the average value of the
three bars. The three bars and the average
value commence with a value of 50%. Ahigher
percentage indicates a mor eeconomical driv-
ing style.
The ECO display provides no information on
the actual fuel consumption. Afixed percent-
age value of the ECO display does not corre-
spond to a fixed consumption figure in
l/100km. Driving tips
185Driving and parking Z
Page 337 of 457
led bracket (see the separate mobile phone
bracket fitting instructions).
Vehicles with automatic transmission
with DIRECT SELECT lever:
install the
sliding adapter depending on the model of
the mobile phone bracket (Y page 335).
X Insert the mobile phone into the mobile
phone bracket (see the separate installa-
tion instructions for the mobile phone fit-
ting).
i On some mobile phone brackets, you first
have to connec tthe mobile phone via Blue-
tooth ®
to the mobile phone bracket (see
the separate operating instructions for the
mobile phone bracket).
If this is the case, the mobile phone does
not have to be inserted into the bracket for
you to be able to use the telephone func-
tions. However, the charging function and
aerial function are not available.
Operating the mobile phone You can operate the telephone using the
6
and~ buttons on the multifunction
steering wheel. You can operate other mobile
phone functions via the on-board computer
(Y page 254).
When you remove the key from the ignition
lock, the mobile phone stays switched on.
However, you can no longer use the hands-
free system.
If you have an active call and would like to
take the key out of the ignition lock, first
remove the mobile phone from the bracket.
i When using a bracket connected to the
mobile phone via Bluetooth ®
and you wish
to proceed with a call:
Switch to private mode before removing
the key from the ignition lock. Otherwise, it
may take up to 20 seconds, before the
mobile phone separates from the system.
Only then can the telephone call continue.
Information on the necessary steps for set-
ting up "private mode" can be found in the separate mobile phone operating instruc-
tions.
i Not all mobile phones support "private
mode".
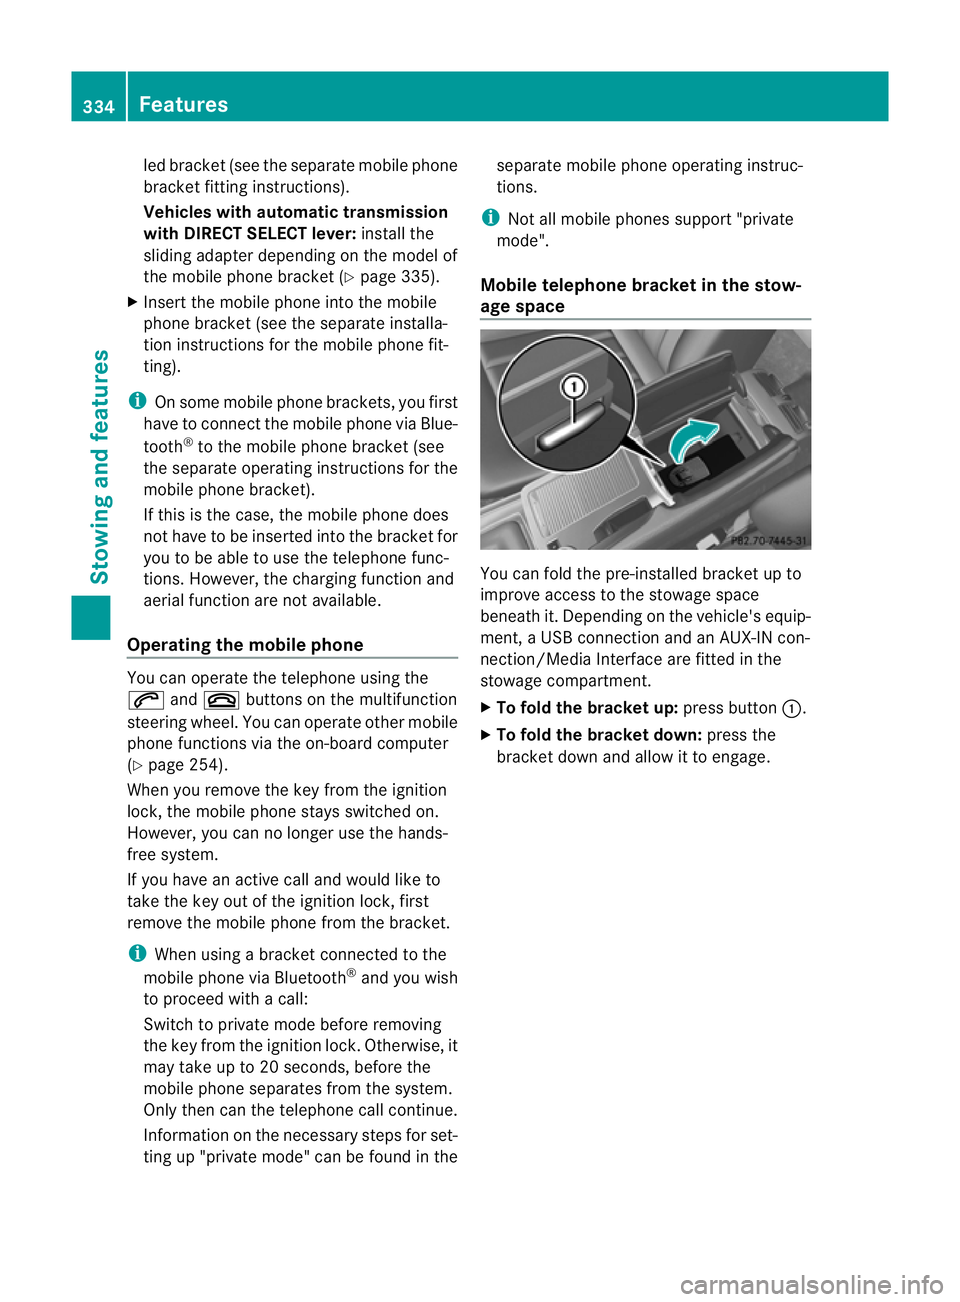
Mobile telephone bracket in the stow-
age space You can fold the pre-installed bracket up to
improve access to the stowage space
beneath it. Depending on the vehicle's equip-
ment, a USB connection and an AUX-IN con-
nection/Media Interface are fitted in the
stowage compartment.
X
To fold the bracket up: press button:.
X To fold the bracket down: press the
bracket down and allow it to engage. 334
FeaturesStowing and features
Page 372 of 457
In order for the battery to achieve the maxi-
mum possible service life, it must always be
sufficiently charged.
The vehicle battery, like other batteries, can
discharge over time if you do not use the
vehicle .Insuch cases, have the battery dis-
connected at a qualified specialist workshop.
You can also charge the battery with a
charge rrecommended by Mercedes-Benz.
For more information, please contact a quali-
fied specialist workshop.
Have the battery charge checked more fre-
quently if you use the vehicle mainly for short
trips or if you leave it standing idle for a
lengthy period. Consult a qualified specialist
workshop if you wish to leave your vehicle
parked up for a long period of time.
i When you park the vehicle, remove the
key if you do not require any electrical con-
sumers. The vehicle will then use very little
energy, thus conserving battery power.
i After an interruption of the power supply,
e.g. the battery was discharged, you have
to:
R set the clock. Information on setting the
clock can be found in the separate oper-
ating instructions.
On vehicles with COMAND Online and a
navigation system, the clock is set auto-
matically.
R reset the function for folding the exterior
mirrors in/out automatically, by folding
the mirrors out once (Y page 120).Charging the battery
G
WARNING
Only charge the battery in a well-ventilated
area. As the battery is being charged, gases
can escape and generate minor explosions.
This could injure you and other persons or
cause damage to the paintwork or acid cor-
rosion on the vehicle. You can obtain information on battery charg-
ers which allow the batter
yto be charged
while still installed from a qualified specialist
workshop. G
WARNING
There is a risk of acid burns during the charg-
ing process due to the gases which escape
from the battery. Do not lean over the battery
during the charging process. G
WARNING
Battery acid is caustic. Avoid contact with the
skin, eyes or clothing.
! Only charge the installed battery with a
battery charger which has been tested and
approved by Mercedes-Benz. These battery
chargers allow the battery to be charged
while still installed in the vehicle.
! Only use battery chargers with a maxi-
mum charging voltage of 14.8 V.
! Only charge the battery using the jump-
start connection point.
The jump-starting connection point is in the
engine compartment (Y page 370).
Read the battery charger's operating instruc-
tions before charging the battery.
X Open the bonnet (Y page 345).
X Connect the battery charger to the positive
terminal and earth point in the same order
as when connecting the donor battery in
the jump-starting procedure
(Y page 370). Battery (vehicle)
369Breakdown assistance Z
Page 373 of 457
Jump-starting
G
WARNING
Hybrid vehicles: it is imperative that you read the "HYBRID" supplement. Otherwise, you may not
recognise dangers. G
WARNING
There is a risk of acid burns when jump-starting a vehicle due to the gases which escape from
the battery. Do not lean over the battery while the engine is being jump-started. G
WARNING
Gases escaping from the battery during jump-starting may cause minor explosions. Avoid cre-
ating sparks. Keep naked flames away from the battery, and do not smoke.
Comply with the important safety precautions when handling batteries. You will find these under
"Battery (vehicle) -important safety notes" in the index. G
WARNING
Non-combusted fuel can collect in the exhaust system and ignite. There is a risk of fire. Avoid
repeated and lengthy starting attempts.
! Vehicles with apetrol engine: avoid repeated and lengthy starting attempts. Otherwise,
the non-combusted fuel may damage the catalytic converter.
Do not use a rapid charging device to start th evehicle. If your vehicle's battery is discharged,
the engine can be jump-started from another vehicle or from a second battery using jump
leads. Observe the following points:
R The battery is not accessible in all vehicles. If the other vehicle's batter yis not accessible,
jump-start the vehicle using a second battery or ajump-starting device.
R vehicles with apetrol engine: only jump-star tthe vehicle when the engine and exhaust
system are cold.
R do not start the engine if the battery is frozen. Let the battery thaw first.
R jump-starting may only be performed from batteries with a nominal voltage of 12 V.
R only use jump leads that have a sufficient cross-section and insulated terminal clamps.
R if the battery is fully discharged, leave the battery that is being used to jump-start connected
for a few minutes before attempting to start. This charges the empty battery a little.
R make sure that the two vehicles do not touch.
Make sure that:
R The jump leads are not damaged.
R Non-insulated parts of the terminal clamps do not come into contact with other metal parts
while the jump leads are connected to the battery.
R the jump leads cannot come into contact with parts such as the V-belt pulley or the fan.
These parts move when the engine is started and while it is running.
X Firmly depress the parking brake.
X Manual transmission: engage neutral.370
Jump-startingBreakdown assistance