2012 MERCEDES-BENZ E-CLASS ESTATE tow
[x] Cancel search: towPage 68 of 457
Fitting side head restraints
X
Slide head restraint ;upwards and posi-
tio nitu pright.
X Slide side head restraints Bfrom the front
to the centre of both head restraint bars
until they engage.
The right -and left-hand lock verification
indicators =must be folded in. The red
surfaces are no longe rvisible.
X Make sure that side head restraint Bis
engaged in both head restraint bars.
X Slide head restraint ;downwards
(Y page 110) until it rests on the upper
edge of side head restraints B.
X Guide the seat belt through seat belt guide
A on the door side on side head restraint
B.
X Secure the child (Y page 62).
Removing the side head restraints
X Take the seat belt out of seat belt guide
A.
X Move head restraint ;upwards.
X Press left or right release button ?and pull
side head restraint Bforward to remove
it.
The left and right lock verification indica-
tors :fold out briefly.
X Adjust head restraint ;(Ypage 110).
i Should a side head restraint be required
for the second integrated child seat, this
can be ordered at any Mercedes-Benz
Service Centre.
Storing the ICS padded play table and
the side head restraint G
WARNING
Secure the ICS padded play table and the side
head restraints in the vehicle as specified;
otherwise, they may com eloose. In the event
of an accident, sudden braking or abrupt
change in direction, they could injure vehicle
occupants or cause damage to the vehicle. When you are not using the ICS padded play
table and the side head restraints, store these
in a suitable place, such as the boot.
For example, on vehicles with TIREFIT, you
can store the side head restraints in the stow-
age compartment under the boot/luggage
compartment floor (Y page 325)/
(Y page 325).
Suitable positioning of the child
restraint systems X
To install a child restraint system on
the front-passenger seat: move the front-
passenger seat to the rearmost and lowest
position and the belt outlet height to the
lowest position.
Key to the letters used in the following table:
XS eat which is unsuitable for children in
this weight category.
US uitable for child restraint systems in the
"Universal" category that are approved
for use in this weigh tcategory.
LS uitable for child restraint systems as rec-
ommended, see the following table of
"Recommended child restraint systems"
(Y page 67).
Front-passenger seat Weight cat-
egories Front-
passenger
airbag is
not disa-
bled: Front-
passenger
front air-
bag is disa-
bled.
Categor
y0:
up to 10 kg X L
Category
0+: up to
13 kg
X L
Category I:
9 to 18 kg
L LChildren in the vehicle
65Safety Z
Page 76 of 457
G
WARNING
If ESP ®
is malfunctioning, ESP ®
is unable to
stabilise the vehicle. In addition, other driving
safety systems are switched off. This increa-
ses the risk of skidding and an accident.
Drive on carefully. Have ESP ®
checked at a
qualified specialist workshop.
! Vehicles with 4MATIC: switch off the igni-
tion when the parking brake is being tested
using a dynamometer.
Application of the brakes by ESP ®
may oth-
erwise destroy the brake system.
Vehicles without 4MATIC: observe the notes
on ESP ®
if the vehicle is being towed with the
rear axle raised (Y page 373).
ESP ®
is deactivated if the åwarning lamp
in the instrument cluster lights up continu-
ously when the engine is running.
If the ÷ warning lamp and the åwarn-
ing lamp are lit continuously, ESP ®
is not
available due to a malfunction.
Observe the information on warning lamps
(Y page 302) and display messages which
may be show ninthe instrumentc luster
(Y page 269).
If ESP ®
detects that the vehicle is deviating
fro mt he direction desired by the driver, one
or more wheels are braked to stabilise the
vehicle. The engine output is also modified to
keep the vehicle on the desired course within
physical limits. ESP ®
assists the driver when
pulling away on wet or slippery roads. ESP ®
can also stabilise the vehicle during braking.
If ESP ®
intervenes, the ÷ESP®
warning
lamp flashes in the instrumentc luster.
If ESP ®
intervenes:
X Do not deactivate ESP ®
under any circum-
stances.
X When pulling away, only depress the accel-
erator pedal as far as is necessary.
X Adapt your driving style to suit the prevail-
ing road and weathe rconditions. i
Only use wheels with the recommended
tyre sizes. Only then will ESP ®
function
properly.
ETS/4ETS (Electronic Traction System) Traction control is part of ESP
®
.
Traction control brakes the drive wheels indi-
vidually if they spin. This enables you to pull
away and accelerate on slippery surfaces, for
example if the road surface is slippery on one
side. On vehicles with 4MATIC, more drive
torque is also transferred to the wheel or
wheels with traction.
Traction control remains active if you deacti-
vate ESP ®
.
Deactivating/activating ESP ®
(except
AMG vehicles) G
WARNING
If you deactivate ESP ®
, ESP ®
no longer sta-
bilises the vehicle. There is an increased risk
of skidding and an accident.
Only deactivate ESP ®
in the situations descri-
bed in the following.
X To deactivate: (Ypage 256).
The å ESP®
OFF warning lamp in the
instrument cluster lights up.
X To activate: (Ypage 256).
The å ESP®
OFF warning lamp in the
instrument cluster goes out.
ESP ®
is activated automatically when the
engine is started.
The ECO start/stop function switches the
engine off automatically if the vehicle stops
moving. When pulling away again, the engine
starts automatically. ESP ®
remains in its pre-
viously selected status. Example: if ESP ®
was
deactivated before the engine was switched
off, ESP ®
remains deactivated when the
engine is switched on again.
If ESP ®
is deactivated and one or more wheels
start to spin, the ÷ESP®
warning lamp in Driving safety systems
73Safety Z
Page 82 of 457
X
To turn the alarm off with the key: press
the % or& button on the key.
The alar mis switched off.
or
X Insert the key into the ignition lock.
The alarm is switched off.
X To stop the alarm using KEYLESS-GO:
grasp the outside door handle. The key
must be outside the vehicle.
The alarm is switched off.
or
X Press the Start/Stop button on the dash-
board. The key must be inside the vehicle.
The alarm is switched off.
The alarm is not switched off, even if you
close the open door that has triggered it, for
example. Tow-away protection
Function An audible and visual alarm is triggered if your
vehicle's angle of inclination is altered while
tow-away protection is primed. This can occur
if the vehicle is jacked up on one side, for
example.
Activating X
Make sure that:
R
the doors are closed.
R the boot lid/tailgate is closed.
Only then is the tow-away protection
primed.
X Lock the vehicle with the key or KEYLESS-
GO.
Tow-away protection is primed after
approximately 30 seconds.
To deactivate X
To switch off: unlock the vehicle with the
key or KEYLESS-GO.
Tow-away protection is switched off auto-
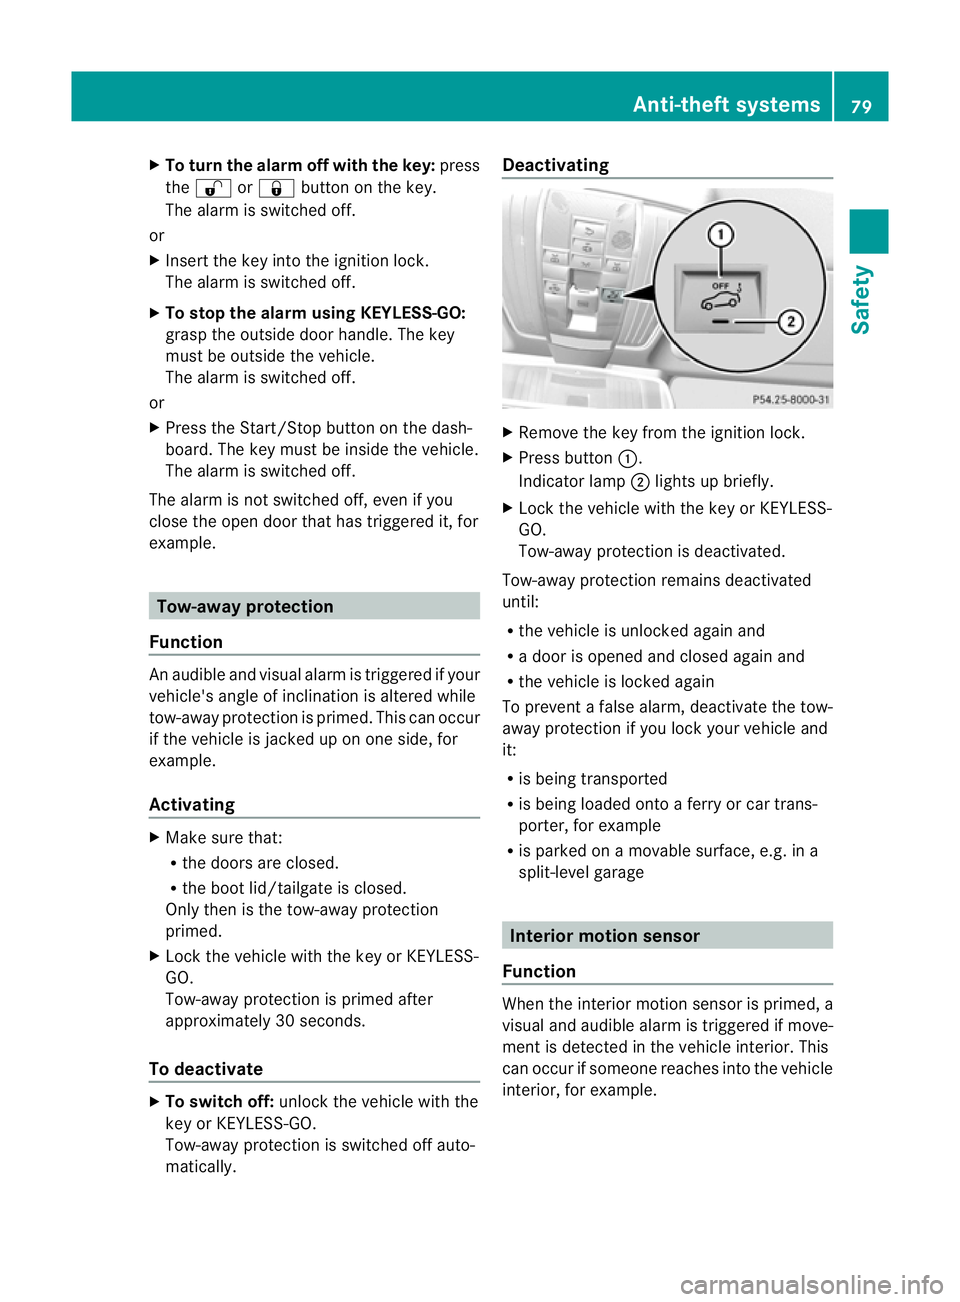
matically. Deactivating
X
Remove the key from the ignition lock.
X Press button :.
Indicator lamp ;lights up briefly.
X Lock the vehicle with the key or KEYLESS-
GO.
Tow-away protection is deactivated.
Tow-away protection remains deactivated
until:
R the vehicle is unlocked againa nd
R a door is opened and closed agai nand
R the vehicle is locked again
To prevent a false alarm, deactivate the tow-
away protection if you lock your vehicle and
it:
R is being transported
R is being loaded onto a ferry or car trans-
porter, for example
R is parked on a movable surface, e.g .ina
split-level garage Interior motion sensor
Function When the interior motion sensor is primed, a
visual and audible alarm is triggered if move-
ment is detected in the vehicle interior. This
can occur if someone reaches into the vehicle
interior, for example. Anti-theft systems
79Safety Z
Page 93 of 457
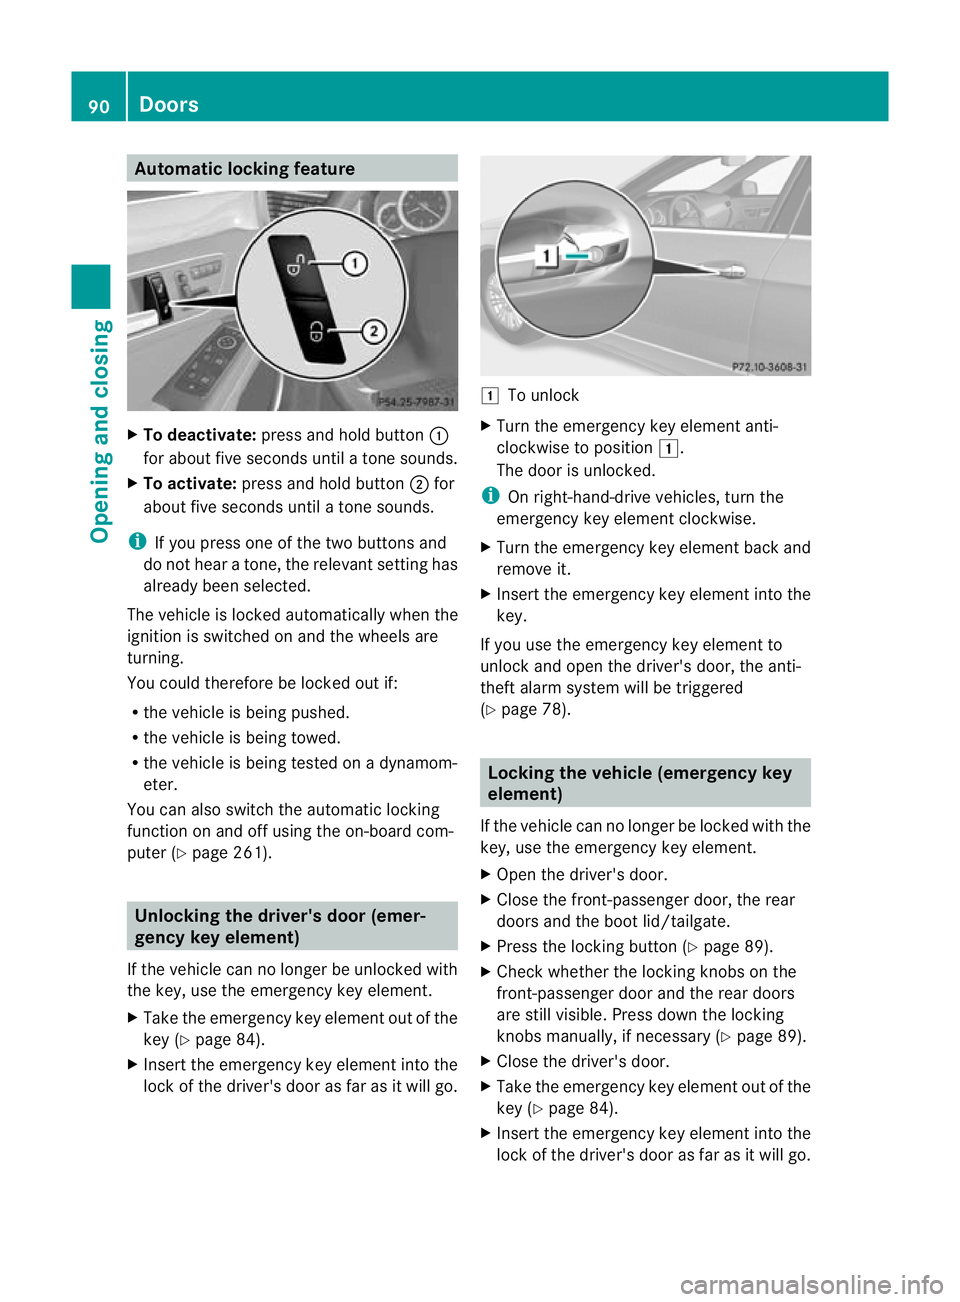
Automatic locking feature
X
To deactivate: press and hold button :
for about five seconds until a tone sounds.
X To activate: press and hold button ;for
about five seconds until a tone sounds.
i If you press one of th etwo buttons and
do not hear a tone, the relevant setting has
already been selected.
The vehicle is locked automatically when the
ignitio nis switched on and the wheels are
turning.
You could therefore be locked out if:
R the vehicle is being pushed.
R the vehicle is being towed.
R the vehicle is being tested on a dynamom-
eter.
You can also switch the automatic locking
function on and off using the on-board com-
puter (Y page 261). Unlocking the driver's door (emer-
gencyk
ey element)
If the vehicle can no longer be unlocked with
the key, use the emergency key element.
X Take the emergency key element out of the
key (Y page 84).
X Inser tthe emergency key element into the
lock of the driver's door as far as it will go. 1
To unlock
X Turn the emergency key element anti-
clockwise to position 1.
The door is unlocked.
i On right-hand-drive vehicles, turn the
emergency key element clockwise.
X Turn the emergency key element back and
remove it.
X Insert the emergency key element into the
key.
If you use the emergency key element to
unlock and open the driver's door, the anti-
theft alarm system will be triggered
(Y page 78). Locking the vehicle (emergency key
element)
If the vehicle can no longer be locked with the
key, use the emergency key element.
X Open the driver's door.
X Close the front-passenger door, the rear
doors and the boot lid/tailgate.
X Press the locking button (Y page 89).
X Check whether the locking knobs on the
front-passenger door and the rear doors
are still visible. Press down the locking
knobs manually, if necessary (Y page 89).
X Close the driver's door.
X Take the emergency key element out of the
key (Y page 84).
X Insert the emergency key element into the
lock of the driver's door as far as it will go. 90
DoorsOpening and closing
Page 117 of 457
The maximum permissible weight may be
reduced by:
R
extensive optional extras
R vehicle load
R towing a trailer
The combined luggage cover and net must be
fitted if you are using the folding bench seat
(Y page 320).
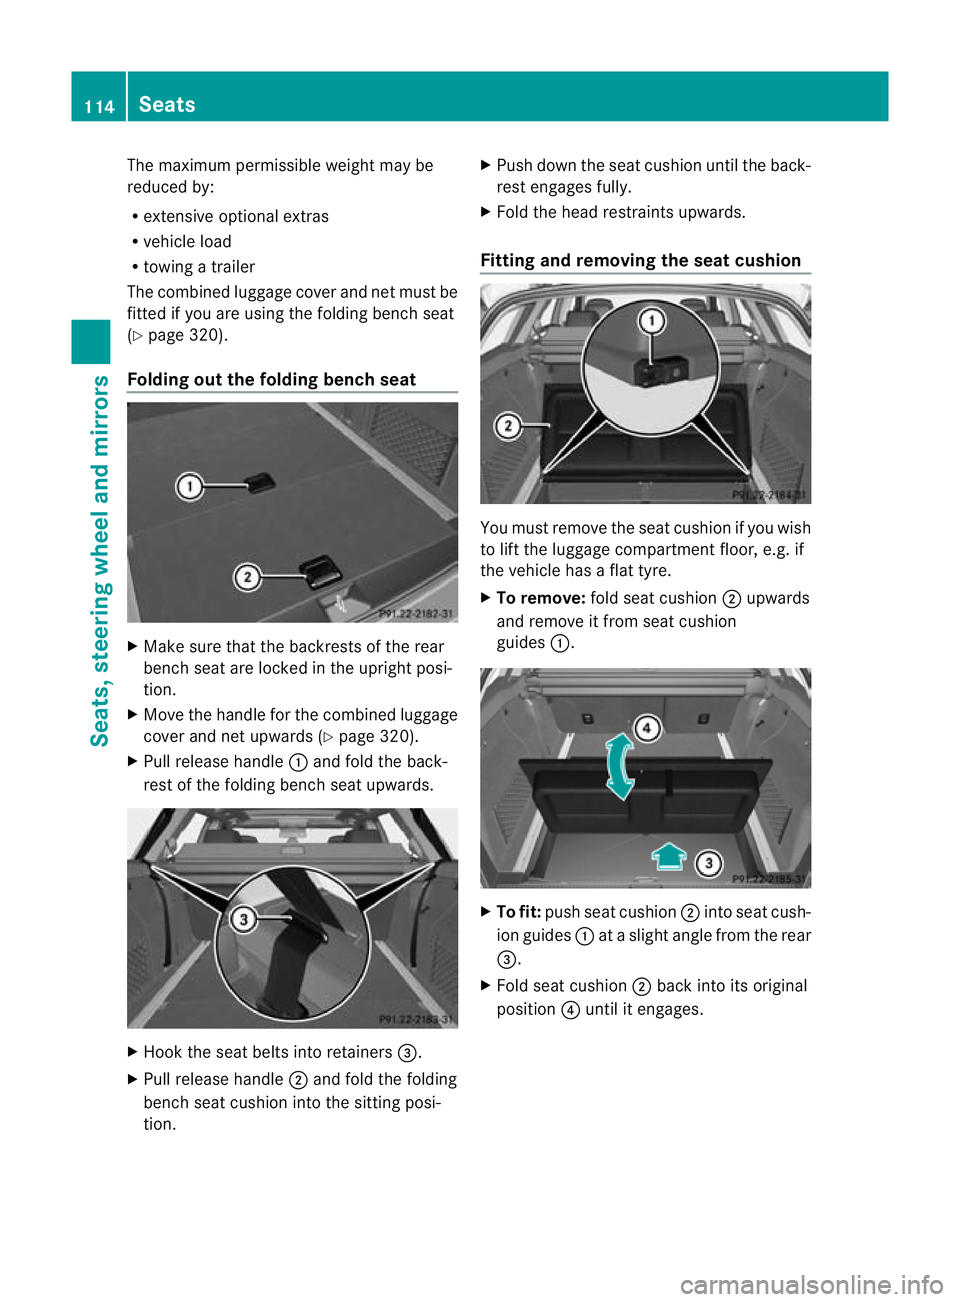
Folding out the folding bench seat X
Make sure that the backrests of the rear
bench seat are locked in the upright posi-
tion.
X Move the handle for the combined luggage
cover and net upwards (Y page 320).
X Pull release handle :and fold the back-
rest of the folding bench seat upwards. X
Hook the seat belts into retainers =.
X Pull release handle ;and fold the folding
bench seat cushion into the sitting posi-
tion. X
Push down the seat cushion until the back-
rest engages fully.
X Fold the head restraints upwards.
Fitting and removing the seat cushion You must remove the seat cushion if you wish
to lift the luggage compartment floor, e.g. if
the vehicle has a flat tyre.
X
To remove: fold seat cushion ;upwards
and remove it from seat cushion
guides :. X
To fit: push seat cushion ;into seat cush-
ion guides :at a slight angle from the rear
=.
X Fold seat cushion ;back into its original
position ?until it engages. 114
SeatsSeats, steering wheel and mirrors
Page 131 of 457
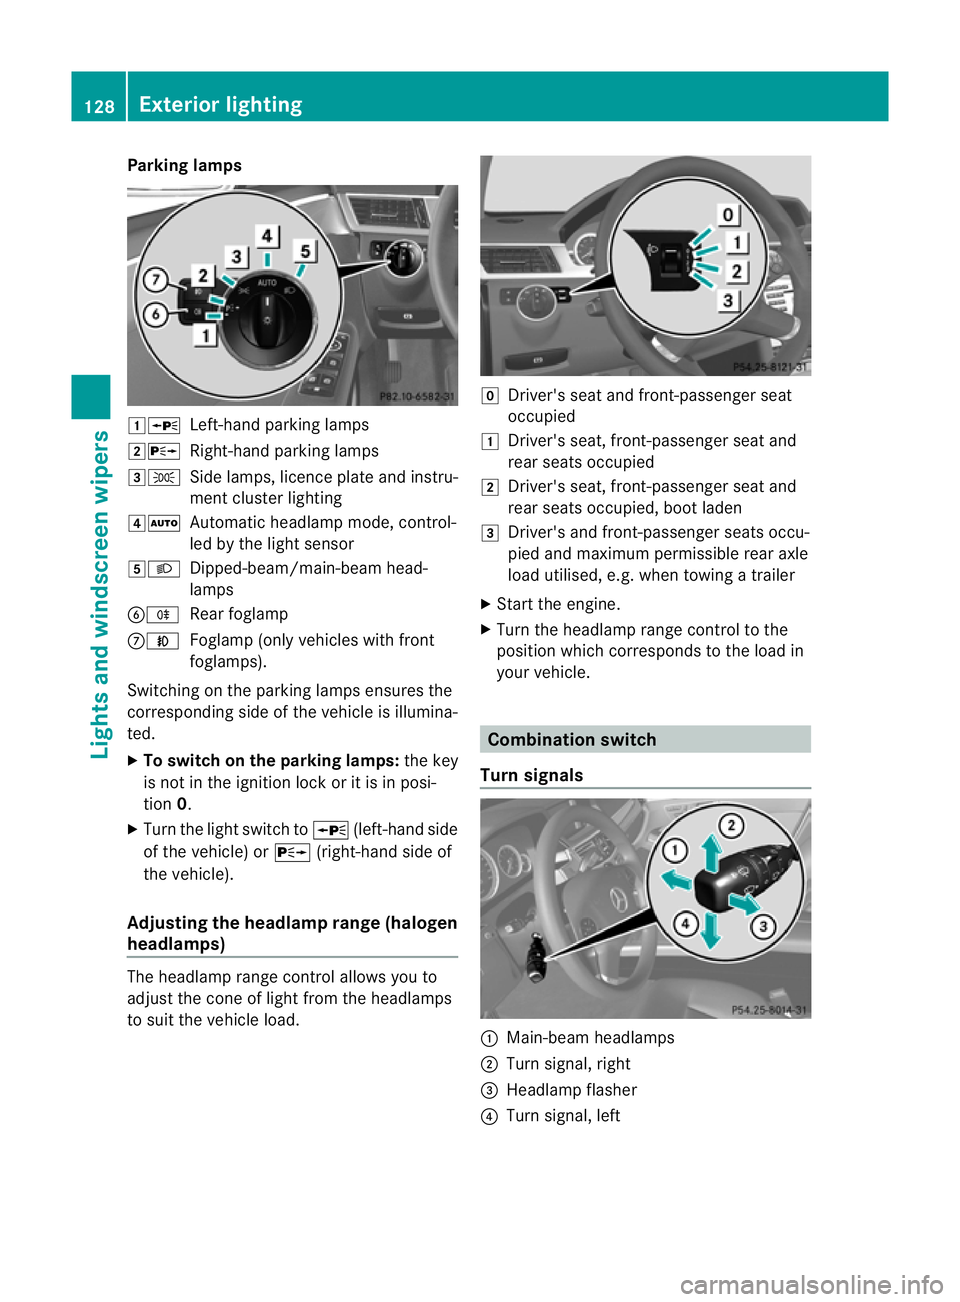
Parking lamps
1W
Left-hand parking lamps
2X Right-hand parking lamps
3T Side lamps, licence plate and instru-
ment cluster lighting
4Ã Automatic headlamp mode, control-
led by the light sensor
5L Dipped-beam/main-beam head-
lamps
BR Rear foglamp
CN Foglamp (only vehicles with front
foglamps).
Switching on the parking lamps ensures the
corresponding side of the vehicle is illumina-
ted.
X To switch on the parking lamps: the key
is not in the ignition lock or it is in posi-
tion 0.
X Turn the light switch to W(left-hand side
of the vehicle) or X(right-hand side of
the vehicle).
Adjusting the headlampr ange (halogen
headlamps) The headlamp range control allows you to
adjust the cone of light from the headlamps
to sui tthe vehicle load. g
Driver's seat and front-passenger seat
occupied
1 Driver's seat, front-passenger seat and
rear seats occupied
2 Driver's seat, front-passenger seat and
rear seats occupied, boot laden
3 Driver's and front-passenger seats occu-
pied and maximum permissible rear axle
load utilised, e.g. when towing a trailer
X Start the engine.
X Turn the headlamp range control to the
position which corresponds to the load in
your vehicle. Combination switch
Turn signals :
Main-beam headlamps
; Turn signal, right
= Headlamp flasher
? Turn signal, left 128
Exterior lightingLights and windscreen wipers
Page 162 of 457
Useful information
............................160
Running-in notes ............................... 160
Driving ............................................... 160
Manual transmission ........................169
Automatic transmission ...................170
Refuelling ........................................... 179
Parking ............................................... 183
Driving tips ........................................ 185
Driving systems ................................ 189
Towing atrailer ................................. 234 159Driving and parking
Page 163 of 457
Useful information
i This Owner's Manual describes all mod-
els, series and optional equipment for your
vehicle that were available at the time of
going to press. National variations are pos-
sible. Note that your vehicle may not be
equipped with all of the functions descri-
bed. This is also the case for systems and
functions relevant to safety.
i Read the information on qualified special-
ist workshops: (Y page 25). Running-in notes
Important safety notes
New and replaced brake pads and discs only
reach their optimum braking effec tafter sev-
eral hundred kilometres of driving. Compen-
sate for this by applying greater force to the
brake pedal. The first 1,500 km
If you treat the engine with sufficient care
from the very start, you will be rewarded with
excellent performance for the remainder of
the engine's life.
R Drive at varying vehicle speeds and engine
speeds for the first 1,500 km.
R Avoid overstraining the vehicle during this
period, e.g. driving at full throttle.
R Change gea ringood time, before the rev
counter needle is Ôof the way to the red
area of the rev counter.
R Do not shift down a gear manually in order
to brake.
Vehicles with automatic transmission:
R Try to avoid depressing the accelerator
pedal beyond the point of resistance (kick-
down).
R The shift ranges 3,2or 1should only be
engaged when driving slowly, e.g. when
driving in mountainous terrain. After 1500 km, you may gradually accelerate
the vehicle to full road and engine speeds.
Additional running-in notes for AMG vehicles:
R
Do not drive at speeds above 140 km/h for
the first 1500 km.
R Only allow the engine to reach a maximum
engine speed of 4500 rpm briefly.
i You should also observe these notes on
running in if the engine or parts of the drive
train on your vehicle have been replaced. AMG vehicles with rear axle differen-
tial lock
Your vehicle is equipped with aself-locking
differential on the rear axle. Change the oil
after a running-in period of 3000 km to
improve protection of the rear axle differen-
tial. This oil change will lengthen the service
life of the differential. Have the oil change
carried out at a qualified specialist workshop. Driving
Important safety notes
G
WARNING
Objects in the driver's footwell can restrict the
pedal travel or obstruct adepressed pedal.
The operating and road safety of the vehicle
is jeopardised. There is a risk of an accident.
Make sure that all objects in the vehicle are
stowed correctly, and that they cannot enter
the driver's footwell. Fit the floormats
securely and as specified in order to ensure
sufficien tclearance for the pedals. Do not use
loose floormats. G
WARNING
Unsuitable footwear can hinde rcorrect usage
of the pedals, e.g.:
R shoes with thick soles
R shoes with high heels
R slippers 160
DrivingDriving and parking