2012 MERCEDES-BENZ E-CLASS ESTATE service
[x] Cancel search: servicePage 52 of 457
The use of non-approved head restraint cov-
ers may prevent NECK-PRO head restraints/
NECK-PRO luxury head restraints from trig-
gering properly. The NECK-PRO head
restraints/NECK-PRO luxury head restraints
can therefore not provide the intended pro-
tection.
Consult a Mercedes-Benz Service Centre
regarding availability.
NECK-PRO head restraints/NECK-PRO luxury
head restraints increase protection of the
driver's and front-passenger's head and
neck.Int he event of a rear collision of a cer-
tain severity, the NECK-PRO head restraints/
NECK-PRO luxury head restraints on the driv-
er's and front-passenger seats are moved for-
wards and upwards. This provides better
head support.
If the NECK-PRO head restraints/NECK-PRO
luxury head restraints have been triggered in
an accident, reset the NECK-PRO head
restraints/NECK-PRO luxury head restraints
on the driver's and front-passenger seats
(Y page 50). Otherwise, the additional pro-
tection will not be available in the event of
another rear-end collision. NECK-PRO head
restraints/NECK-PRO luxury head restraints
that have been triggered are moved forwards
and can no longer be adjusted.
Mercedes-Ben zrecommends having the
NECK-PRO head restraints/NECK-PRO head
restraints checked at a qualified specialist
workshop after a rear-en dcollision. Resetting
atriggered NECK-PRO head
restraint/NECK-PRO luxury head
restraint NECK-PRO head restraints
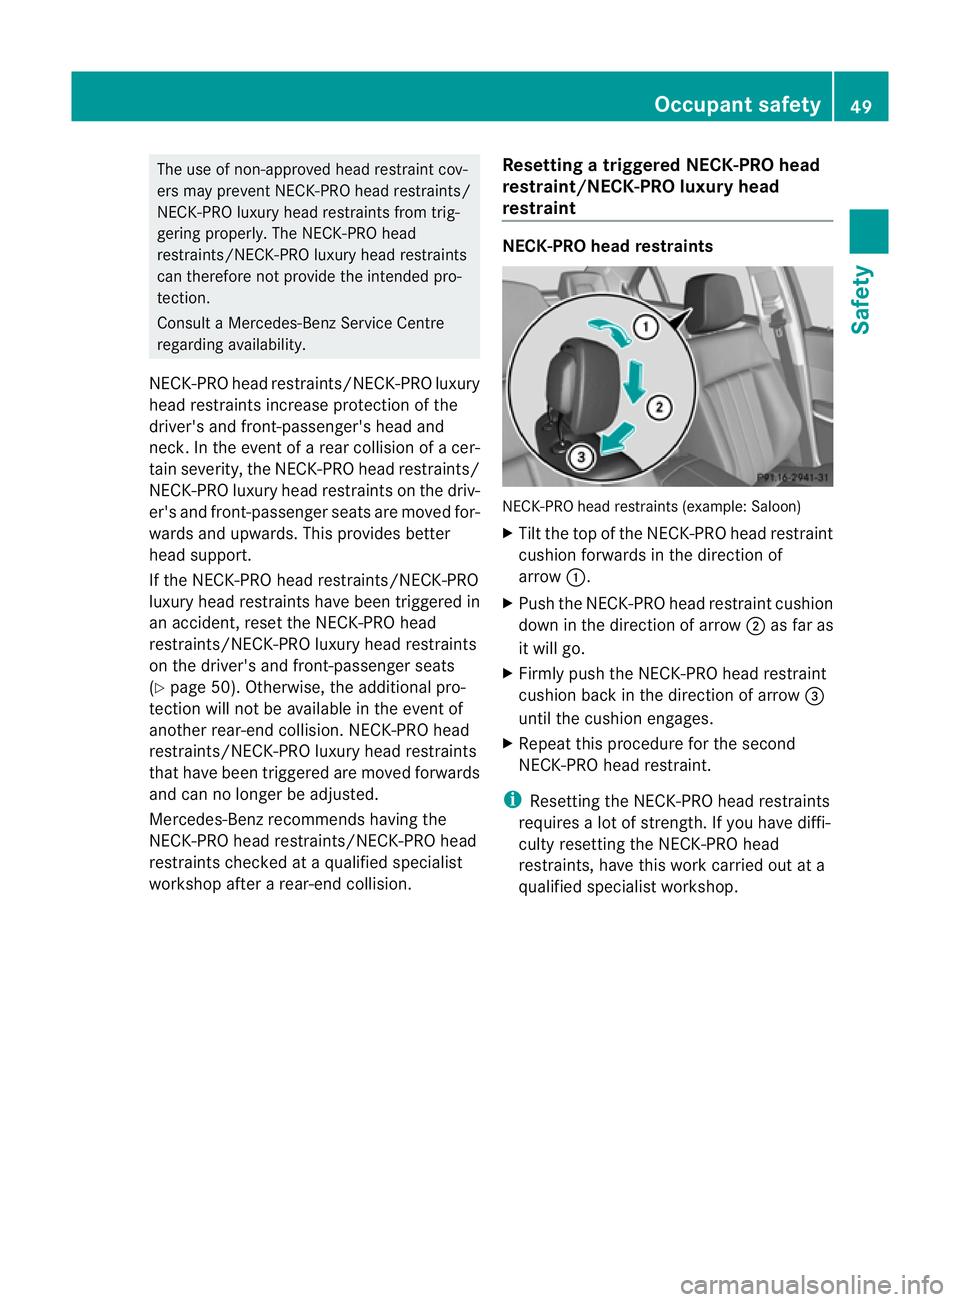
NECK-PRO head restraints (example: Saloon)
X
Tilt the top of the NECK-PRO head restraint
cushion forwards in the directio nof
arrow :.
X Push the NECK-PRO head restraint cushion
down in the direction of arrow ;as far as
it will go.
X Firmly push the NECK-PRO head restraint
cushion back in the direction of arrow =
until the cushion engages.
X Repeat this procedure for the second
NECK-PRO head restraint.
i Resetting the NECK-PRO head restraints
requires a lot of strength. If you have diffi-
culty resetting the NECK-PRO head
restraints, have this work carried out at a
qualified specialist workshop. Occupant safety
49Safety Z
Page 57 of 457
Rear seat belt status indicator
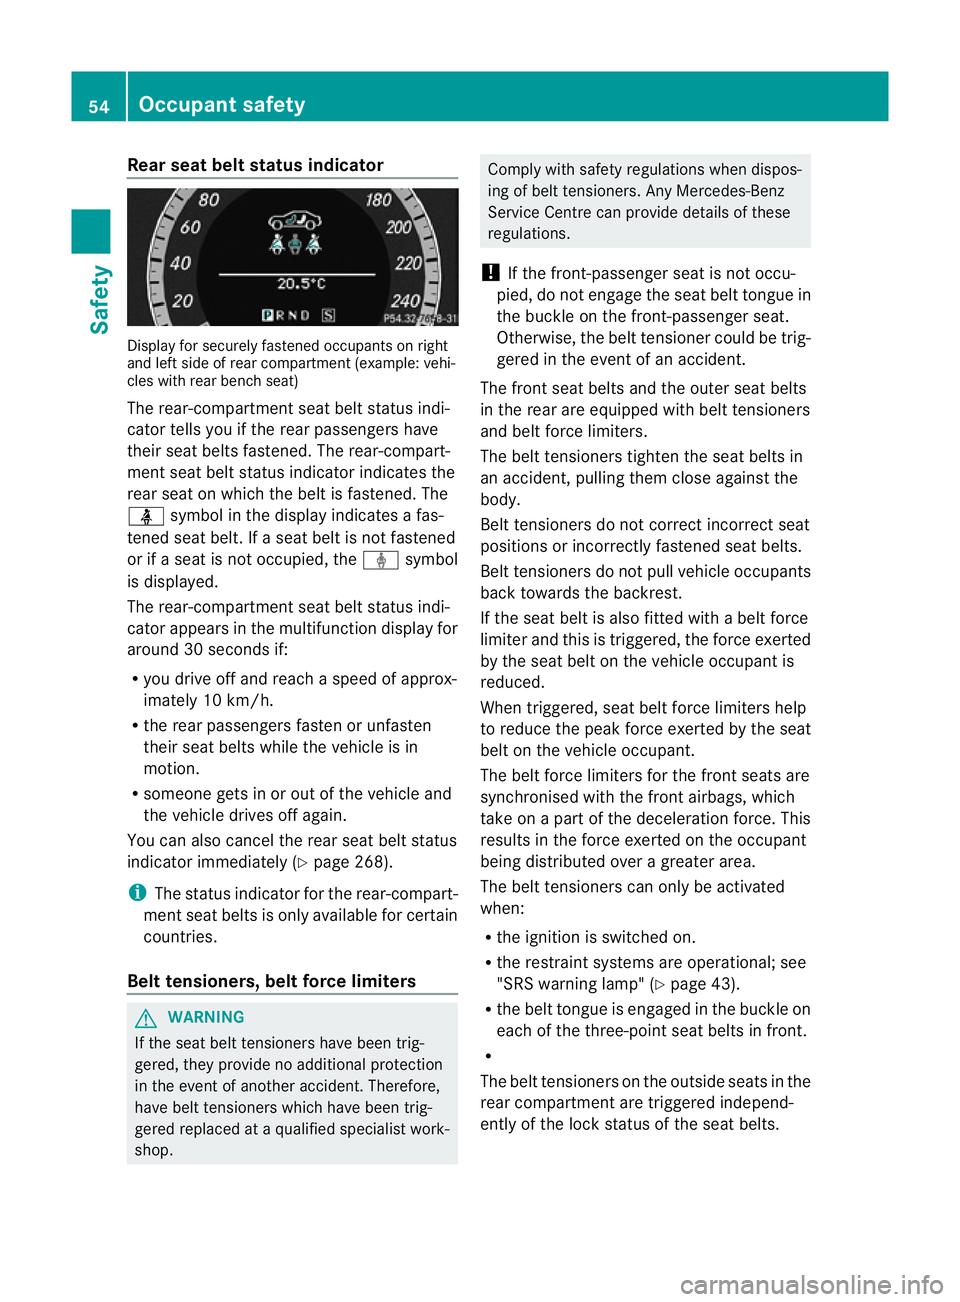
Display for securely fastened occupants on right
and left side of rea rcompartmen t(example: vehi-
cles with rear bench seat)
The rear-compartment seat belt status indi-
cator tells you if the rear passengers have
their seat belts fastened. The rear-compart-
ment seat belt status indicato rindicates the
rea rseat on which the belt is fastened. The
ü symbol in the display indicates a fas-
tened seat belt. If a seat belt is not fastened
or if a seat is not occupied, the ýsymbol
is displayed.
The rear-compartment seat belt status indi-
cator appears in the multifunction display for
around 30 seconds if:
R you drive off and reach a speed of approx-
imately 10 km/h.
R the rear passengers fasten or unfasten
their seat belts while the vehicle is in
motion.
R someone gets in or out of the vehicle and
the vehicle drives off again.
You can also cancel the rear seat belt status
indicator immediately (Y page 268).
i The status indicator for the rear-compart-
ment seat belts is only available for certain
countries.
Belt tensioners, belt force limiters G
WARNING
If the seat belt tensioners have been trig-
gered, they provide no additional protection
in the event of another accident. Therefore,
have belt tensioners which have been trig-
gered replaced at a qualified specialist work-
shop. Comply with safety regulations when dispos-
ing of belt tensioners. Any Mercedes-Benz
Service Centre can provide details of these
regulations.
! If the front-passenger seat is not occu-
pied, do not engage the seat belt tongue in
the buckle on the front-passenger seat.
Otherwise, the belt tensioner could be trig-
gered in the event of an accident.
The fron tseat belts and the outer seat belts
in the rear are equipped with belt tensioners
and belt force limiters.
The belt tensioners tighten the seat belts in
an accident, pulling them close against the
body.
Belt tensioners do not correct incorrect seat
positions or incorrectly fastened seat belts.
Belt tensioners do not pull vehicle occupants
back towards the backrest.
If the seat belt is also fitted with a belt force
limiter and this is triggered, the force exerted
by the seat belt on the vehicle occupan tis
reduced.
When triggered, seat beltf orce limiters help
to reduce the peak force exerted by the seat
belt on the vehicle occupant.
The belt force limiters for the front seats are
synchronised with the front airbags, which
take on a part of the deceleration force. This
results in the force exerted on the occupant
being distributed over a greater area.
The belt tensioners can only be activated
when:
R the ignition is switched on.
R the restraint systems are operational; see
"SRS warning lamp" (Y page 43).
R the belt tongue is engaged in the buckle on
each of the three-point seat belts in front.
R
The belt tensioners on the outside seats in the
rear compartment are triggered independ-
ently of the lock status of the seat belts. 54
Occupant safetySafety
Page 59 of 457
Do not expose the child restraint system to
direct sunlight. Parts of the child restraint sys-
tem could heat up and the child could burn
herself/himself on them.
If a child opens a door, the child or othe
rper-
sons could be injured as a result. They could
get out and injure themselves or be injured by
a passing vehicle.
Observe the general notes on the HOLD func-
tion, which can be found under the same key-
word. G
WARNING
Unsecured or incorrectly positioned loads
increase the risk of injury for children and all
other occupants in the event of:
R an accident
R sudden braking
R a sudden change of direction
Do not transport heavy or hard objects in the
vehicle interior unless they are secured. You
will find further information under "Loading
guidelines" in the index.
If a child is travelling in your vehicle, secure
the child using a child restraint system which
is recommended for Mercedes-Benz vehicles.
The child restraint system must be appropri-
ate to the age, weight and size of the child.
Ideally the child restraint system should be
installed on a suitable rear seat. You can also
secure the child in the integrated child seat
(Y page 61). Make sure that the child is
secured in a child restraint system through-
out the trip.
Mercedes-Benz recommends that you use
the listed child restraint systems
(Y page 67). You can obtain further infor-
mation about the correct child restraint sys-
tem from any Mercedes-Benz Service Centre.
i It is advisable to use Mercedes-Benz care
products to clean child restraint systems.
You can obtain information about this at
any Mercedes-Benz Service Centre. Child restraint system on the front-
passenger seat G
WARNING
If the front-passenger airbag is not disabled:
R a child secured in a child restraint system
on the front-passenger seat could be seri-
ously and even fatally injured by the front-
passenger airbag deploying. This is espe-
cially a risk if the child is in the immediate
vicinity of the front-passenger airbag when
it deploys.
R never secure a child on the front-passenger
seat in a rearward-facing child restraint sys-
tem. Only secure a rearward-facing child
restraint system on a suitable rear seat.
R always move the front-passenger seat to
the rearmost position if you secure a child
in a forward-facing child restraint system
on the front-passenger seat.
The front-passenger airbag is not disabled:
R on vehicles without automatic child seat
recognition on the front-passenger seat
R in vehicles with automatic child seat rec-
ognition in the front-passenger seat, if no
special child restraint system with trans-
ponders for automatic child seat recogni-
tion in the front-passenger seat has been
fitted
R on vehicles with automatic child seat rec-
ognition on the front-passenger seat, if the
PASSENGER AIRBAG OFF indicator lamp
4 is not lit.
To make you aware of this danger, a corre-
sponding warning sticker has been affixed on
the dashboard and on both sides of the sun
visor on the front-passenger side.
Information about recommended child
restraint systems is available at any
Mercedes-Benz Service Centre. 56
Children in the vehicleSafety
Page 64 of 457
Problems with child seat recognition
Problem Possible causes/consequences and
M Solutions
The
4 PASSENGER
AIRBAG OFF indicator
lamp on the centre con-
sole is lit. As
pecial Mercedes-Benz child seat with a transponder for auto-
matic child seat recognition has been fitted to the front-passenger
seat. The front-passenger fron tairbag has therefore been disabled
as desired. The
4 PASSENGER
AIRBAG OFF indicator
lamp on the centre con-
sole is lit.
or
The 6 warning lamp
lights up and/or the
4 PASSENGER AIR-
BAG OFF indicator
lamp does not light up
briefly when you switch
the ignition on. G
Risk of injury
There is no child seat fitted to the front-passenger seat .Automatic
child seat recognition is malfunctioning.
X Remove electronic equipmen tfrom the front-passenge rseat,
e.g.:
R laptop
R mobile phone
R cards with transponders, such as ski passes or access cards
If the 4 PASSENGER AIRBAG OFF indicator lamp is still lit:
X Visit a qualified specialist workshop. Integrated child seat
Important safety notes
G
WARNING
To reduce the risk of serious or even fatal
injury to the child in the event of a sudden
change in direction, braking or an accident:
R you must follow the manufacturer's instal-
lation instructions for the child seat when
fitting the integrated child seat (ICS) pad-
ded play table and side head restraint and
when fastening the seat belt.
R do not modify the integrated child seat, the
ICS padded play table or the side head
restraint. Do not use protective covers.
R make sure that the ICS padded play table
and the side head restraints do not become trapped or damaged. This could happen
when you
- close the doors
- adjust the seat
- store the ICS padded play table and the
side head restraints
- transport heavy objects
R replace the integrated child seat, the pad-
ded play table and the side head restraints
if these were damaged or subjected to
heavy loads during an accident.
R note: children who weigh less than
12.5 kg require a different child restraint
system. Information about other child
restraint systems is available from any
Mercedes-Benz Service Centre.
R the vehicle's rear seat backrest must be
locked in position.
The child seats are integrated into the right
and left-hand rear seat cushions. In conjunc-
tion with the componentsl isted in the follow-
ing table, they comply with the legal require-
ments of ECE R 44.04. Children in the vehicle
61Safety Z
Page 68 of 457
Fitting side head restraints
X
Slide head restraint ;upwards and posi-
tio nitu pright.
X Slide side head restraints Bfrom the front
to the centre of both head restraint bars
until they engage.
The right -and left-hand lock verification
indicators =must be folded in. The red
surfaces are no longe rvisible.
X Make sure that side head restraint Bis
engaged in both head restraint bars.
X Slide head restraint ;downwards
(Y page 110) until it rests on the upper
edge of side head restraints B.
X Guide the seat belt through seat belt guide
A on the door side on side head restraint
B.
X Secure the child (Y page 62).
Removing the side head restraints
X Take the seat belt out of seat belt guide
A.
X Move head restraint ;upwards.
X Press left or right release button ?and pull
side head restraint Bforward to remove
it.
The left and right lock verification indica-
tors :fold out briefly.
X Adjust head restraint ;(Ypage 110).
i Should a side head restraint be required
for the second integrated child seat, this
can be ordered at any Mercedes-Benz
Service Centre.
Storing the ICS padded play table and
the side head restraint G
WARNING
Secure the ICS padded play table and the side
head restraints in the vehicle as specified;
otherwise, they may com eloose. In the event
of an accident, sudden braking or abrupt
change in direction, they could injure vehicle
occupants or cause damage to the vehicle. When you are not using the ICS padded play
table and the side head restraints, store these
in a suitable place, such as the boot.
For example, on vehicles with TIREFIT, you
can store the side head restraints in the stow-
age compartment under the boot/luggage
compartment floor (Y page 325)/
(Y page 325).
Suitable positioning of the child
restraint systems X
To install a child restraint system on
the front-passenger seat: move the front-
passenger seat to the rearmost and lowest
position and the belt outlet height to the
lowest position.
Key to the letters used in the following table:
XS eat which is unsuitable for children in
this weight category.
US uitable for child restraint systems in the
"Universal" category that are approved
for use in this weigh tcategory.
LS uitable for child restraint systems as rec-
ommended, see the following table of
"Recommended child restraint systems"
(Y page 67).
Front-passenger seat Weight cat-
egories Front-
passenger
airbag is
not disa-
bled: Front-
passenger
front air-
bag is disa-
bled.
Categor
y0:
up to 10 kg X L
Category
0+: up to
13 kg
X L
Category I:
9 to 18 kg
L LChildren in the vehicle
65Safety Z
Page 69 of 457
Weight cat-
egories Front-
passenger
airbag is
not disa-
bled: Front-
passenger
front air-
bag is disa-
bled.
Category II:
15 to 25 kg
L L
Group III:
22 to 36 kg
L L
Vehicles with automatic chil
dseat recog-
nition in the front-passenger seat: a "Uni-
versal" category child restrain tsystem with a
transponder fo rautomatic child seat recog-
nition must be fitted when the front-
passenger airbag is disabled. The 4
PASSENGER AIRBAG OFF indicator lamp
must be lit.
Rear seats Weight cat-
egories Left, right Centre
Categor
y0:
up to 10 kg U U
Category
0+: up to
13 kg
U U
Category I:
9 to 18 kg U U
Category II:
15 to 25 kg
U U
Group III:
22 to 36 kg
U U
i
Vehicles with a folding bench sea tinthe
load compartment( Estate):information on
child restraint systems on the folding
bench sea tcan be obtained at any
Mercedes-Benz Service Centre.
"Universal" category child restraint systems
can be recognised by their orange approval
label. Example
:approval label on the child restraint sys-
tem
Suitability of the rear seats for attaching
ISOFIX child restraint systems
Key to the letters used in the following table:
XI SOFIX position tha tis not suitable for
ISOFIX child restraint systems in this
weight category and/or size category.
IUF Suitable for forward-facing ISOFIX child restraint systems that belong to the
"Universal" category which are approved
for use in this weight category.
IL Suitable for ISOFIX child restraint sys- tems as recommended; see the follow-
ing table of "Recommended child
restraint systems" (Y page 67).
Carry-cot weight category Size cate-
gory Equipment Rear seat,
left and
right
F ISO/L1 X
G ISO/L2 X
Weight category 0: up to 10 kg, up to
approximately 6 months
Size cate-
gory Equipment Rear seat,
left and
right
E ISO/R1 IL66
Children in the vehicleSafety
Page 138 of 457
Replacing bulbs
Important safety notes
Xenon bulbs G
DANGER
Xeno nbulbs are unde rhigh voltage. If you
touch the electrical contacts of a xenon bulb,
you could suffe ranelectric shoc kand be seri-
ously or eve nfatally injured. For this reason,
do not remove the cover of xenon bulbs.
Do no tchange the xenon bulbs yourself, but
have them replaced at a qualified workshop.
If your vehicle is equipped with xenon bulbs,
you can recognise this by the following: the
cone of light from the xenon bulbs moves
from the top to the bottom and back again
when you start the engine. For this to be
observed, the lights must be switched on
before starting the engine.
Bulbs and lamps are an important aspect of
vehicle safety. You must therefore make sure
that these function correctly at all times.
Have the headlamp setting checked regularly.
Other bulbs G
WARNING
Bulbs and lamps can be very hot. You should
therefore allow them to cool down before you
change them. Otherwise, you could be burned
if you touch them.
Keep bulbs out of the reach of children. Oth-
erwise, they could damage the bulbs, for
example, and injure themselves.
Never use a bulb which has been dropped.
Such a bulb may break or even explode and
injure you.
Halogen bulbs are pressurised and can
explode when you change them, particularly
if they are very hot. You should therefore wear
eye protection and gloves when you are
changing them.
There are bulbs other than the xenon bulbs
that you cannot replace. Replace only the bulbs listed (Y
page 135). Have the bulbs that
you cannot replace yourself changed at a
qualified specialist workshop.
If you require assistance changing bulbs, con-
sult a qualified specialist workshop.
Do not touch the glass tube of new bulbs with
your bare hands. Even minor contamination
can burn into the glass surface and reduce
the service life of the bulbs. Always use a lint-
free cloth or only touch the base of the bulb
when fitting.
Only use bulbs of the correct type.
If the new bulb still does not light up, consult
a qualified specialist workshop.
Bulbs and lamps are an important aspect of
vehicle safety. You must therefore make sure
that these function correctly at all times.
Have the headlamp setting checked regularly. Overview of bulb replacement
–bulbs
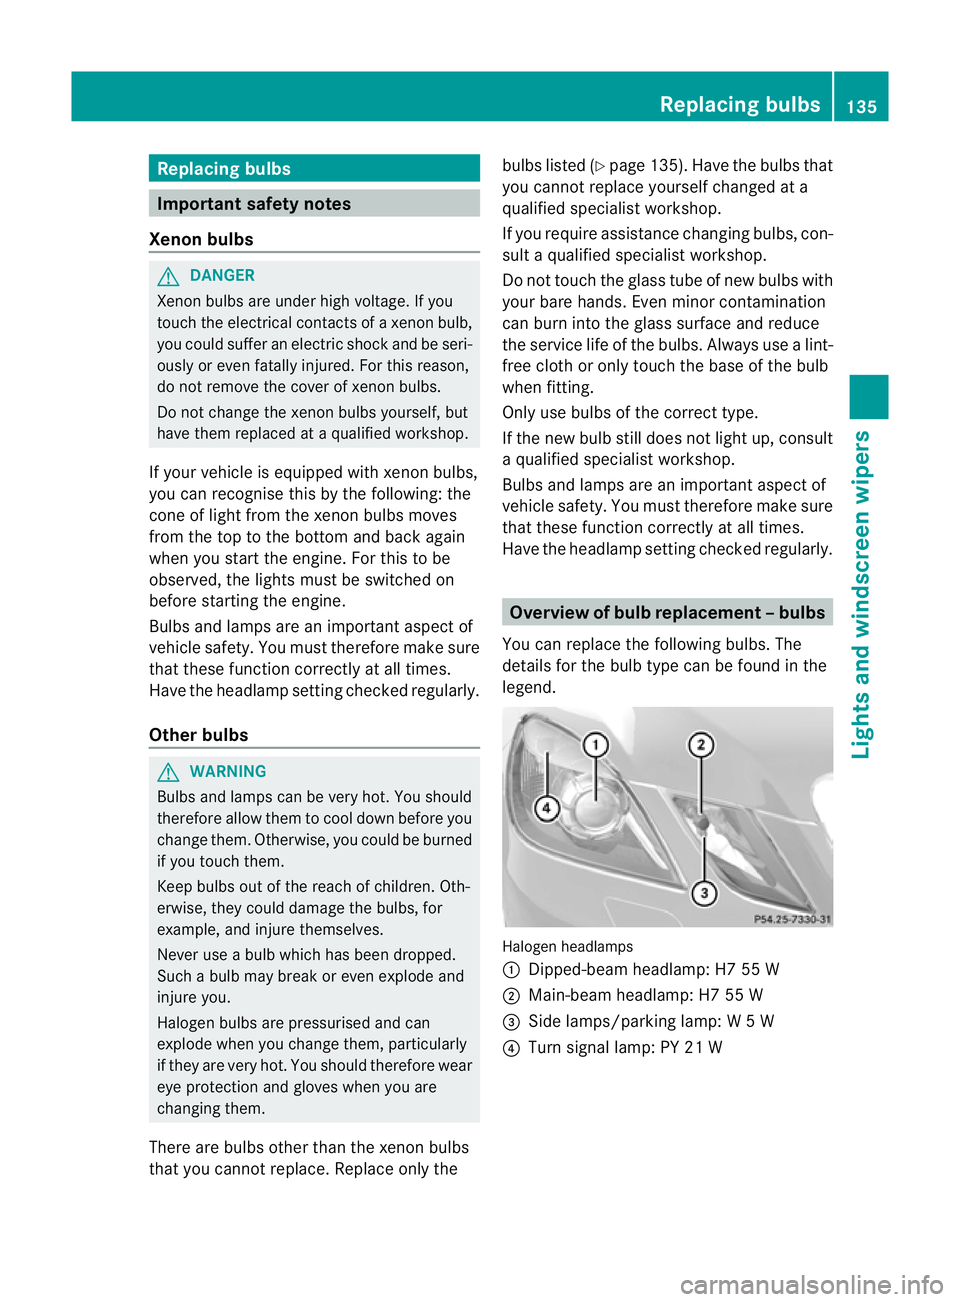
You can replace the following bulbs. The
details for the bulb type can be found in the
legend. Halogen headlamps
:
Dipped-bea mheadlamp: H7 55 W
; Main-beam headlamp: H7 55 W
= Side lamps/parking lamp: W5W
? Turn signal lamp: PY 21 W Replacing bulbs
135Lights and windscreen wipers Z
Page 139 of 457
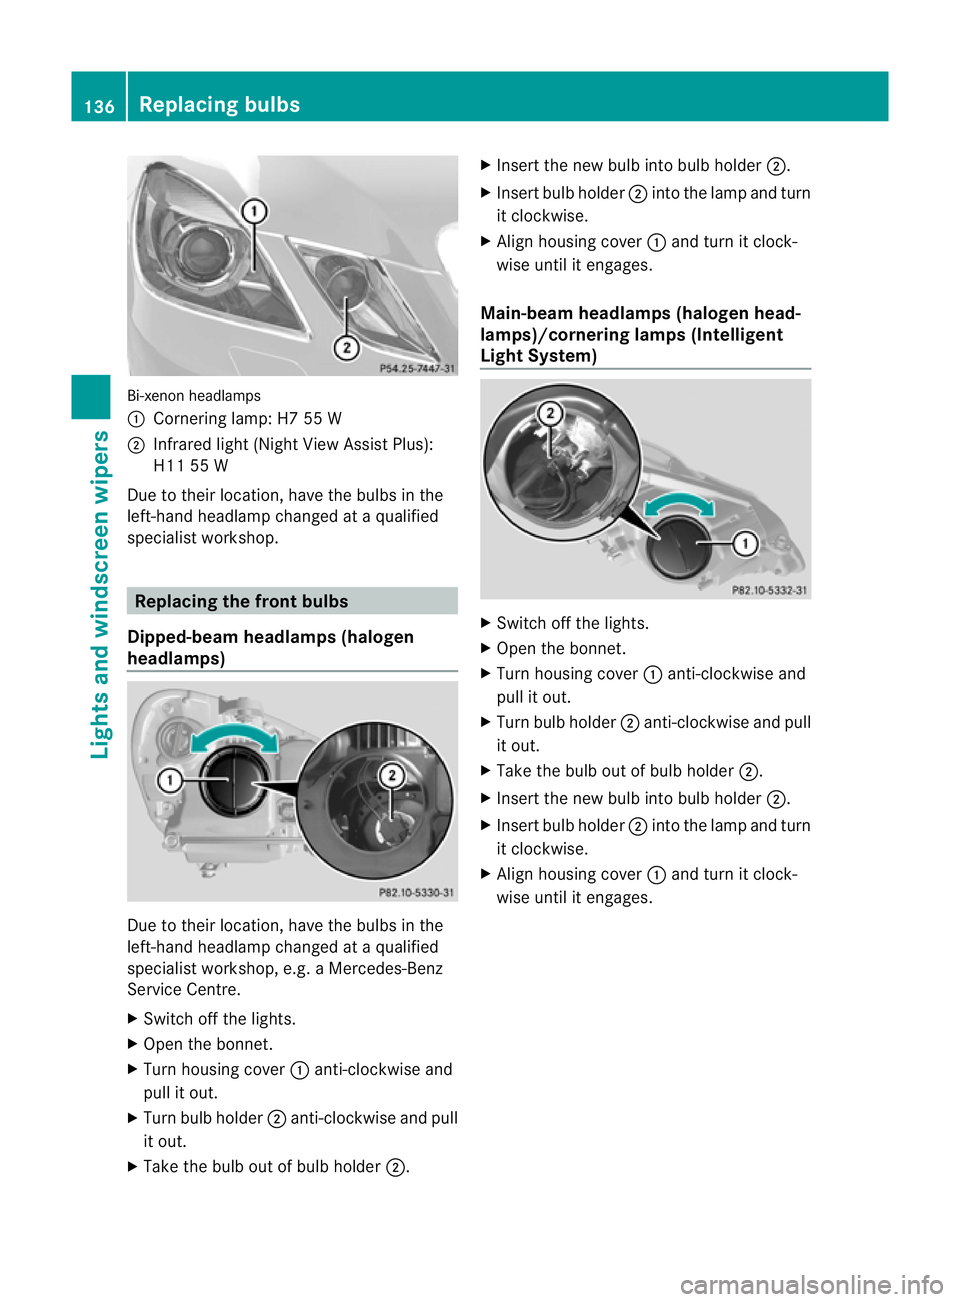
Bi-xeno
nheadlamps
: Cornering lamp: H7 55 W
; Infrared light (Night View Assist Plus):
H11 55 W
Due to their location, have the bulbs in the
left-hand headlamp changed at a qualified
specialist workshop. Replacing the front bulbs
Dipped-beam headlamps (halogen
headlamps) Due to their location, have the bulbs in the
left-hand headlamp changed at a qualified
specialist workshop, e.g. aMercedes-Benz
Service Centre.
X Switch off the lights.
X Open the bonnet.
X Turn housing cover :anti-clockwise and
pull it out.
X Turn bulb holder ;anti-clockwise and pull
it out.
X Take the bulb out of bulb holder ;.X
Inser tthe new bulb into bulb holder ;.
X Insert bulb holder ;into the lamp and turn
it clockwise.
X Align housing cover :and turn it clock-
wise until it engages.
Main-beam headlamps (halogen head-
lamps)/cornering lamps (Intelligent
Light System) X
Switch off the lights.
X Open the bonnet.
X Turn housing cover :anti-clockwise and
pull it out.
X Turn bulb holder ;anti-clockwise and pull
it out.
X Take the bulb out of bulb holder ;.
X Insert the new bulb into bulb holder ;.
X Insert bulb holder ;into the lamp and turn
it clockwise.
X Align housing cover :and turn it clock-
wise until it engages. 136
Replacing bulbsLights and windscreen wipers