2012 MERCEDES-BENZ E-CLASS ESTATE open bonnet
[x] Cancel search: open bonnetPage 347 of 457
Useful information
i This Owner's Manual describes all mod-
els, series and optional equipment for your
vehicle that were available at the time of
going to press. National variations are pos-
sible. Note that your vehicle may not be
equipped with all of the functions descri-
bed. This is also the case for systems and
functions relevant to safety.
i Read the information on qualified special-
ist workshops: (Y page 25). Engine compartment
Bonnet
Active bonnet (pedestrian protection) Operating principle
G
WARNING
If you pull the bonnet release lever and then
neglec tto reset the bonnet, it will not lock at
the front when closed. The bonnet can then
open when the vehicle is in motion and
obscure your field of vision. If you pull the
bonnet release lever, you must reset the bon-
net before driving on.
! Do not try to press down the raised bon-
net at the back. Otherwise, the bonnet
could be damaged.
i The active bonnet is only available in cer-
tain countries. It is available for all models,
except for AMG vehicles.
The active bonnet can reduce the risk of injury
to pedestrians in certain accident situations.
Raising the active bonnet increases the clear-
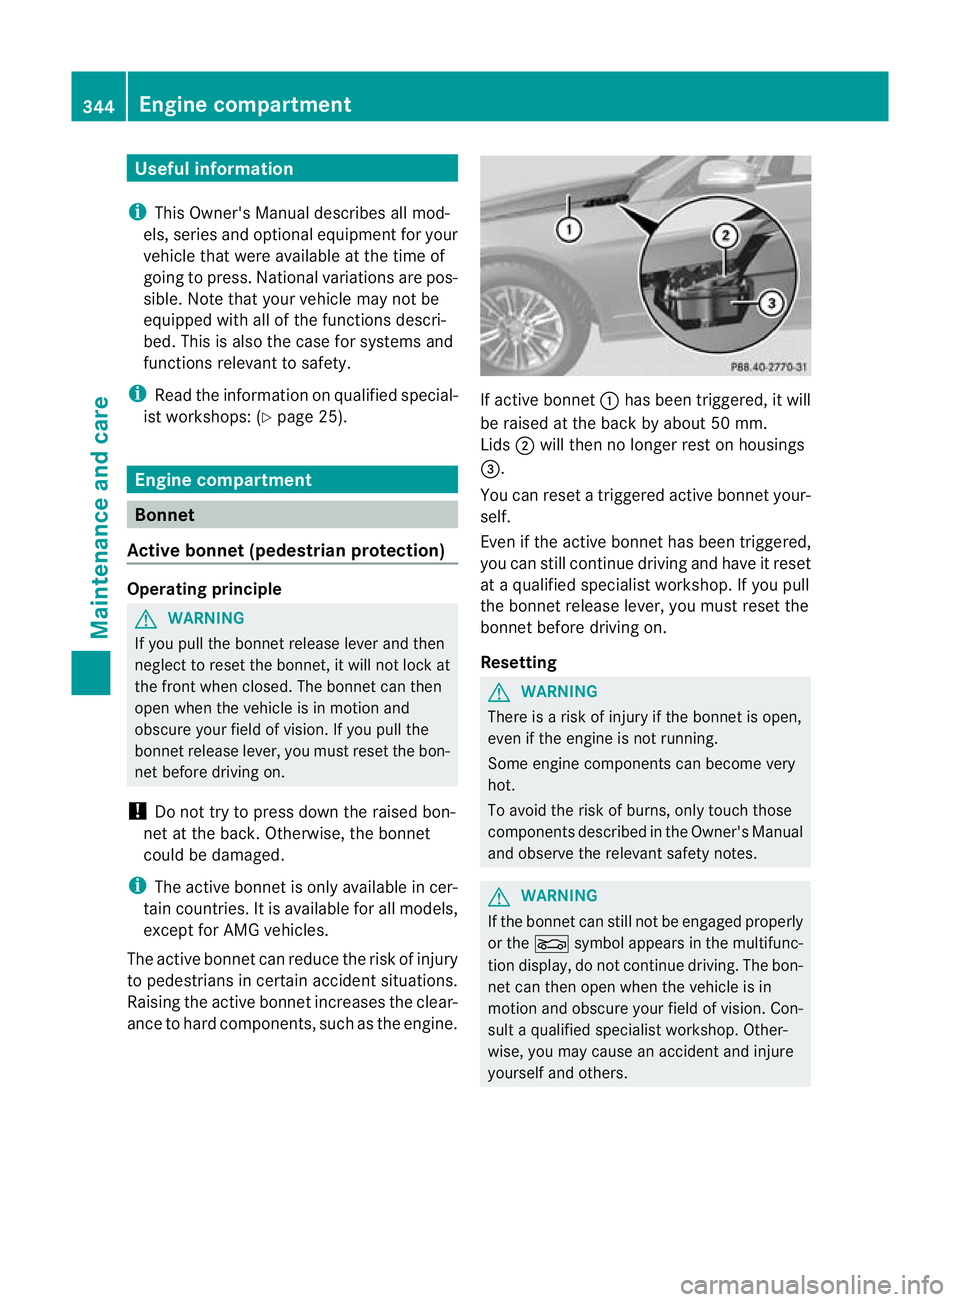
ance to hard components, such as the engine. If active bonnet
:has been triggered, it will
be raised at the back by about 50 mm.
Lids ;will then no longer rest on housings
=.
You can reset a triggered active bonnet your-
self.
Even if the active bonnet has been triggered,
you can still continue driving and have it reset
at a qualified specialist workshop. If you pull
the bonnet release lever, you must reset the
bonnet before driving on.
Resetting G
WARNING
There is a risk of injury if the bonnet is open,
even if the engine is not running.
Some engine components can become very
hot.
To avoid the risk of burns, only touch those
components described in the Owner's Manual
and observe the relevant safety notes. G
WARNING
If the bonnet can still not be engaged properly
or the Lsymbol appears in the multifunc-
tion display, do not continue driving. The bon-
net can then open when the vehicle is in
motion and obscure your field of vision. Con-
sult a qualified specialist workshop. Other-
wise, you may cause an accident and injure
yourself and others. 344
Engine compartmentMaintenance and care
Page 348 of 457
X
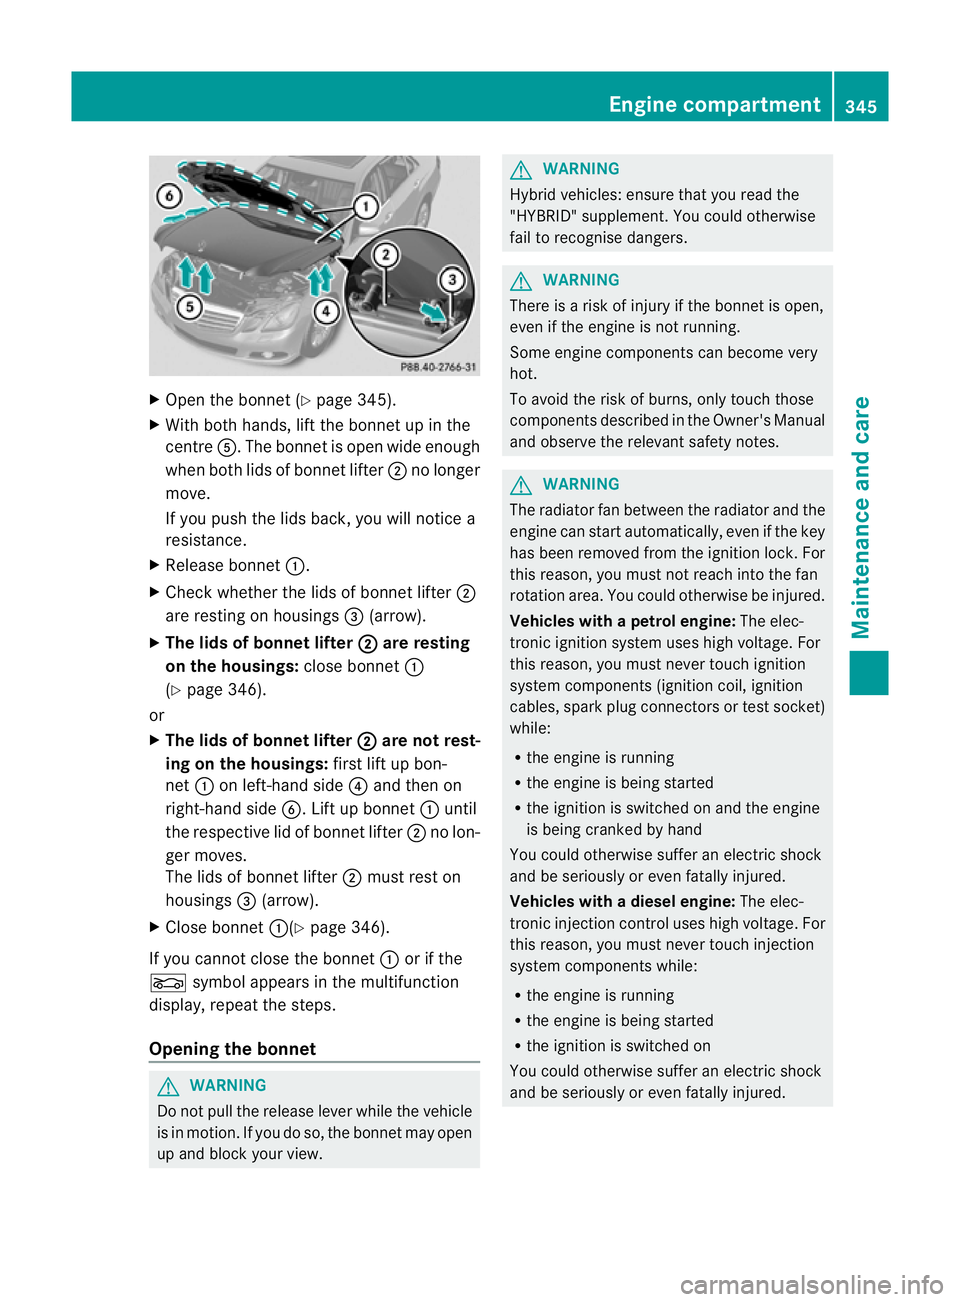
Open the bonnet (Y page 345).
X With both hands, lift the bonnet up in the
centre A.The bonnet is open wide enough
when both lids of bonnet lifter ;no longer
move.
If you push the lids back, you will notice a
resistance.
X Release bonnet :.
X Check whether the lids of bonnet lifter ;
are resting on housings =(arrow).
X The lids of bonnet lifter ; are resting
on the housings: close bonnet:
(Y page 346).
or
X The lids of bonnet lifter ; are not rest-
ing on the housings: first lift up bon-
net :on left-hand side ?and then on
right-hand side B. Lift up bonnet :until
the respective lid of bonnet lifter ;no lon-
ger moves.
The lids of bonnet lifter ;must rest on
housings =(arrow).
X Close bonnet :(Ypage 346).
If you cannot close the bonnet :or if the
L symbol appears in the multifunction
display, repeat the steps.
Opening the bonnet G
WARNING
Do not pull the release lever while the vehicle
is in motion. If you do so, the bonnet may open
up and block your view. G
WARNING
Hybrid vehicles: ensure that you read the
"HYBRID" supplement. You could otherwise
fail to recognise dangers. G
WARNING
There is a risk of injury if the bonnet is open,
even if the engine is not running.
Some engine components can become very
hot.
To avoid the risk of burns, only touch those
components described in the Owner's Manual
and observe the relevant safety notes. G
WARNING
The radiator fan between the radiator and the
engine can start automatically, even if the key
has been removed from the ignition lock. For
this reason, you must not reach into the fan
rotation area. You could otherwise be injured.
Vehicles with apetrol engine: The elec-
tronic ignitio nsystem uses high voltage. For
this reason, you mus tnever touch ignition
system components (ignition coil, ignition
cables, spark plug connectors or test socket)
while:
R the engine is running
R the engine is being started
R the ignition is switched on and the engine
is being cranked by hand
You could otherwise suffer an electric shock
and be seriously or even fatally injured.
Vehicles with adiesel engine: The elec-
tronic injection control uses high voltage. For
this reason, you must never touch injection
system components while:
R the engine is running
R the engine is being started
R the ignition is switched on
You could otherwise suffer an electric shock
and be seriously or even fatally injured. Engine compartment
345Maintenance and care Z
Page 349 of 457
G
WARNING
The windscreen wipers and wiper linkage
could be set in motion.
When the bonnet is open, you or others could
be injured by the wiper linkage.
Make sure that the windscreen wipers are
switched off. Remove the key or make sure
that no ignitio nposition has been selected
with KEYLESS-GO. All indicator lamps must be
off in the instrument panel.
! Make sure that the windscreen wipers are
not folded away from the windscreen. Oth-
erwise, you could damage the windscreen
wipers or the bonnet. X
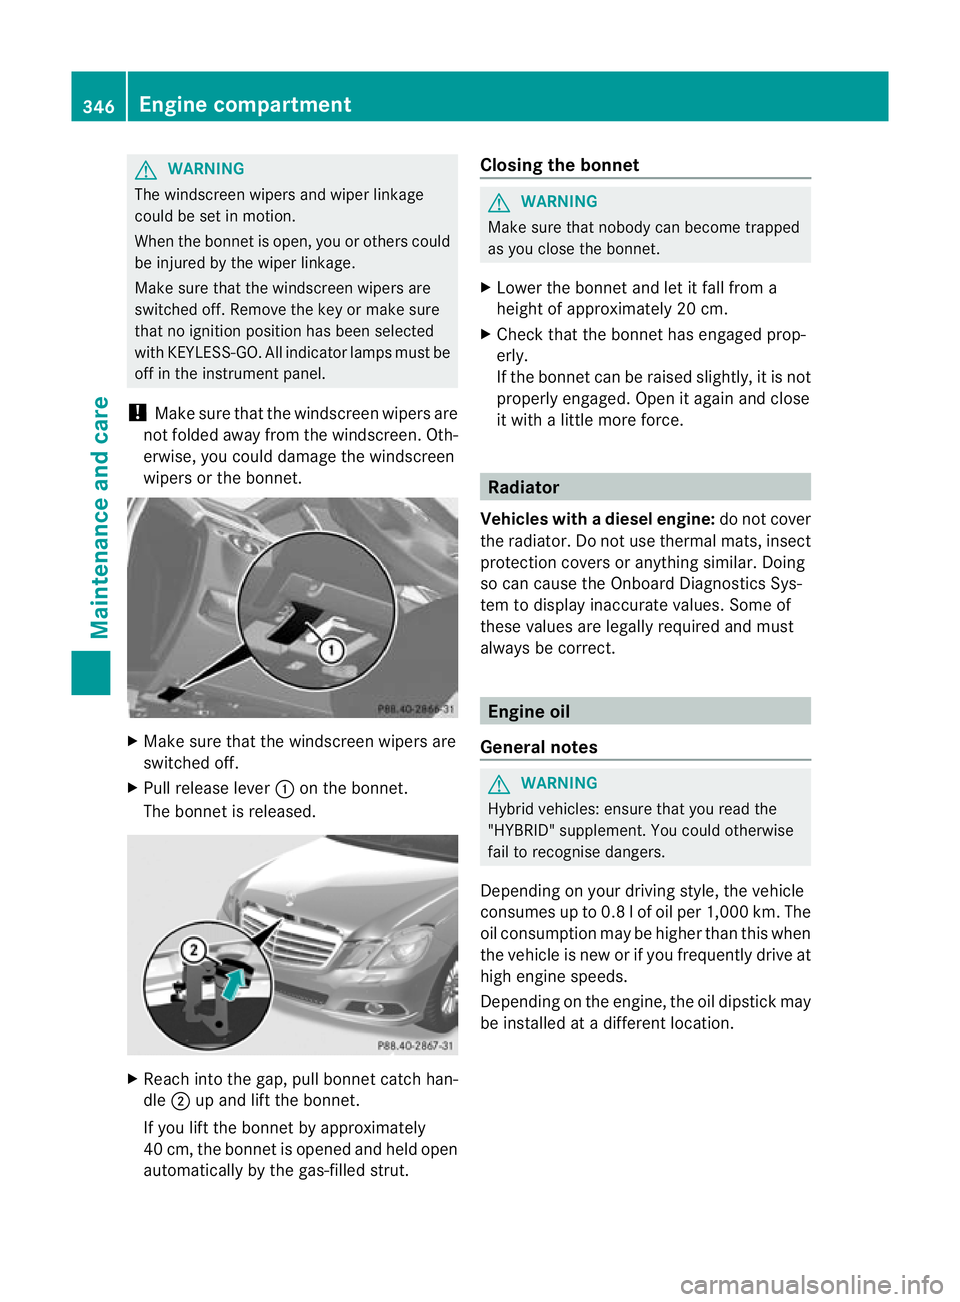
Make sure that the windscreen wipers are
switched off.
X Pull release lever :on the bonnet.
The bonnet is released. X
Reach into the gap, pull bonnet catch han-
dle ;up and lift the bonnet.
If you lift the bonnet by approximately
40 cm, the bonnet is opened and held open
automatically by the gas-filled strut. Closing the bonnet G
WARNING
Make sure that nobody can become trapped
as you close the bonnet.
X Lower the bonnet and let it fall from a
height of approximately 20 cm.
X Check that the bonnet has engaged prop-
erly.
If the bonnet can be raised slightly, it is not
properly engaged. Open it again and close
it with a little more force. Radiator
Vehicles with adiesel engine: do not cover
the radiator .Do not use thermal mats, insect
protection covers or anything similar. Doing
so can cause the Onboard Diagnostics Sys-
tem to display inaccurate values. Some of
these values are legally required and must
always be correct. Engine oil
General notes G
WARNING
Hybrid vehicles: ensure that you read the
"HYBRID" supplement. You could otherwise
fail to recognise dangers.
Depending on your driving style, the vehicle
consumes up to 0.8 l of oil per 1,000 km. The
oil consumption may be higher than this when
the vehicle is new or if you frequently drive at
high engine speeds.
Depending on the engine, the oil dipstick may
be installed at a different location. 346
Engine compartmentMaintenance and care
Page 372 of 457
In order for the battery to achieve the maxi-
mum possible service life, it must always be
sufficiently charged.
The vehicle battery, like other batteries, can
discharge over time if you do not use the
vehicle .Insuch cases, have the battery dis-
connected at a qualified specialist workshop.
You can also charge the battery with a
charge rrecommended by Mercedes-Benz.
For more information, please contact a quali-
fied specialist workshop.
Have the battery charge checked more fre-
quently if you use the vehicle mainly for short
trips or if you leave it standing idle for a
lengthy period. Consult a qualified specialist
workshop if you wish to leave your vehicle
parked up for a long period of time.
i When you park the vehicle, remove the
key if you do not require any electrical con-
sumers. The vehicle will then use very little
energy, thus conserving battery power.
i After an interruption of the power supply,
e.g. the battery was discharged, you have
to:
R set the clock. Information on setting the
clock can be found in the separate oper-
ating instructions.
On vehicles with COMAND Online and a
navigation system, the clock is set auto-
matically.
R reset the function for folding the exterior
mirrors in/out automatically, by folding
the mirrors out once (Y page 120).Charging the battery
G
WARNING
Only charge the battery in a well-ventilated
area. As the battery is being charged, gases
can escape and generate minor explosions.
This could injure you and other persons or
cause damage to the paintwork or acid cor-
rosion on the vehicle. You can obtain information on battery charg-
ers which allow the batter
yto be charged
while still installed from a qualified specialist
workshop. G
WARNING
There is a risk of acid burns during the charg-
ing process due to the gases which escape
from the battery. Do not lean over the battery
during the charging process. G
WARNING
Battery acid is caustic. Avoid contact with the
skin, eyes or clothing.
! Only charge the installed battery with a
battery charger which has been tested and
approved by Mercedes-Benz. These battery
chargers allow the battery to be charged
while still installed in the vehicle.
! Only use battery chargers with a maxi-
mum charging voltage of 14.8 V.
! Only charge the battery using the jump-
start connection point.
The jump-starting connection point is in the
engine compartment (Y page 370).
Read the battery charger's operating instruc-
tions before charging the battery.
X Open the bonnet (Y page 345).
X Connect the battery charger to the positive
terminal and earth point in the same order
as when connecting the donor battery in
the jump-starting procedure
(Y page 370). Battery (vehicle)
369Breakdown assistance Z
Page 374 of 457
X
Automatic transmission: move the selector lever toP.
X Switch off all electrical consumers (e.g. radio, blower, etc.).
X Open the bonnet (Y page 345).
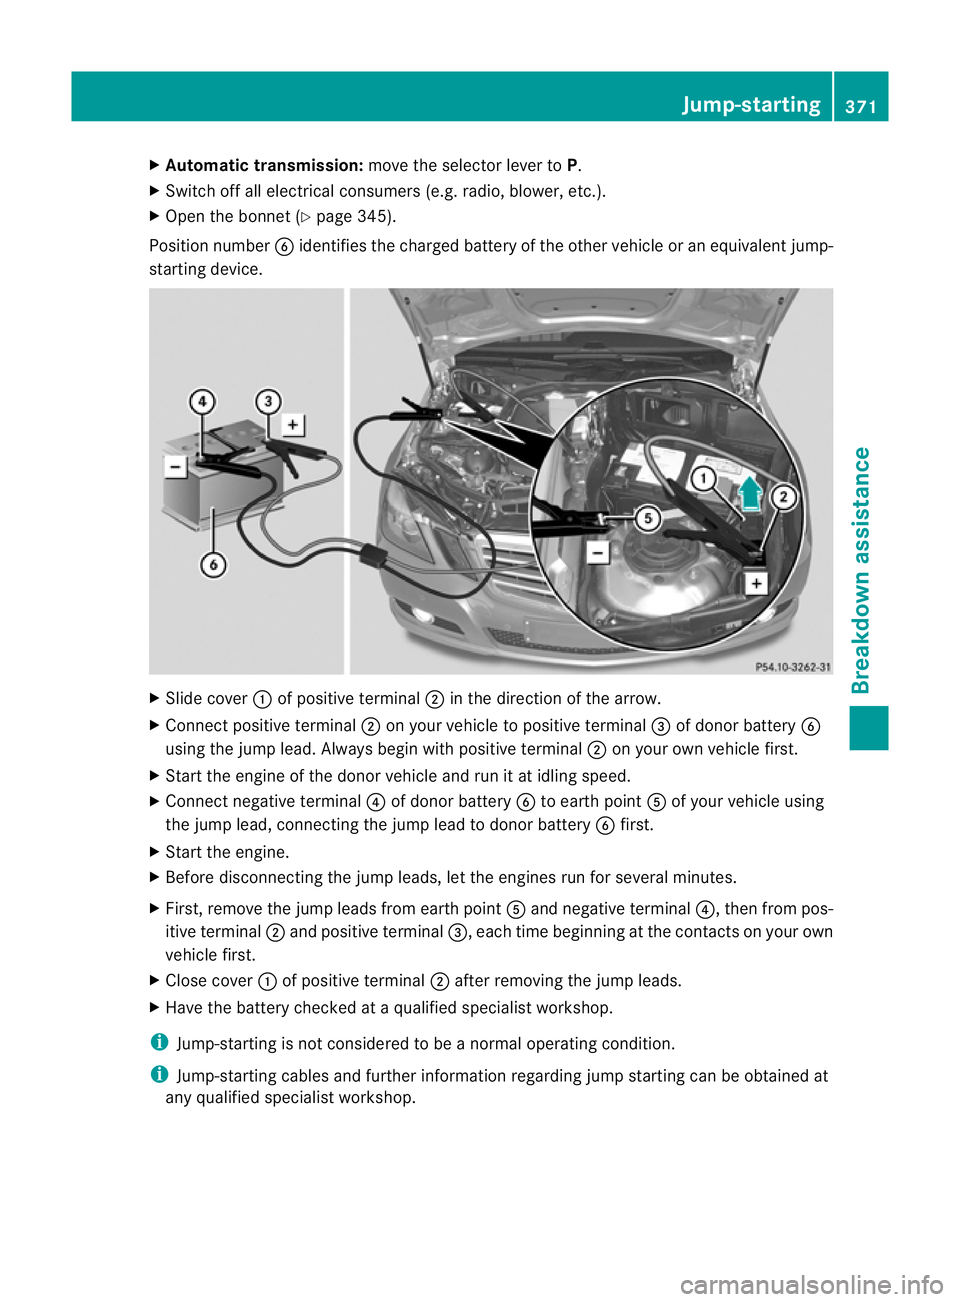
Position number Bidentifies the charged battery of the other vehicle or an equivalen tjump-
starting device. X
Slide cover :of positive terminal ;in the direction of the arrow.
X Connect positive terminal ;on your vehicle to positive terminal =of donor battery B
using the jump lead. Always begin with positive terminal ;on your own vehicle first.
X Start the engine of th edonor vehicle and run it at idling speed.
X Connect negative terminal ?of donor battery Bto earth point Aof your vehicle using
the jump lead, connectingt he jump lead to donor battery Bfirst.
X Start the engine.
X Before disconnecting the jump leads, let the engines run for several minutes.
X First, remove the jump leads from earth point Aand negative terminal ?, then from pos-
itive terminal ;and positive terminal =, each time beginning at the contacts on your own
vehicle first.
X Close cover :of positive terminal ;after removing the jump leads.
X Have the battery checked at a qualified specialist workshop.
i Jump-starting is not considered to be a normal operating condition.
i Jump-starting cables and further information regarding jump starting can be obtained at
any qualified specialist workshop. Jump-starting
371Breakdown assistance Z
Page 379 of 457
Before replacing a fuse
X Secure the vehicle against rolling away
(Y page 183).
X Switch off all electrical consumers.
X Turn the key to position 0in the ignition
lock and remove it (Y page 161).
or
X On vehicles with KEYLESS-GO, make sure
the ignition is switched off (Y page 161).
All indicator lamps in the instrument cluster
must be off.
The fuses are located in various fuse boxes:
R fuse bo xinthe engine compartmentont he
left-hand side of the vehicle, when viewed
in the direction of travel
R fuse box in the boot/luggage compartment
on the right-hand side of the vehicle, when
viewed in the direction of travel
The fuse allocation chart is located in the
vehicle tool kit in the stowage compartment
under the boot/luggage compartmentf loor
(Y page 361). Fuse box in the engine compartment
G
WARNING
Make sure that the windscreen wipers are
turned off and the key is pulled out of the igni-
tion lock before you open the cover of the fuse
box. Otherwise, the windscreen wipers and
the wiper rods above the cover could be set
in motion. This could lead to you or others
being injured by the wiper rods.
! Make sure that no moisture can enter the
fuse box when the cover is open.
! When closing the cover, make sure that it
is lying correctly on the fuse box. Moisture
seeping in or dirt could otherwise impair
the operation of the fuses.
X Make sure that the windscreen wipers are
switched off.
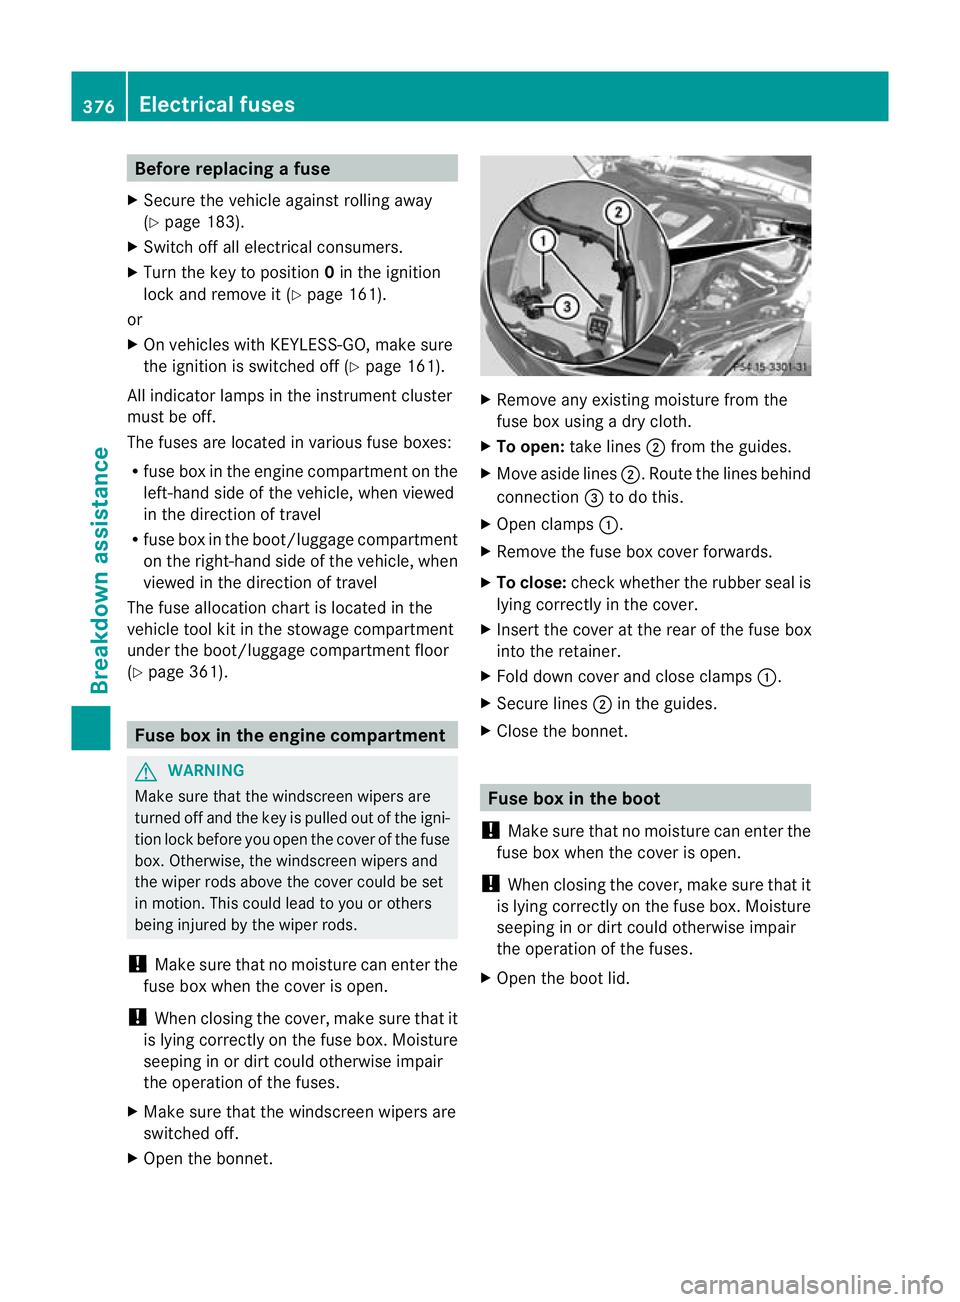
X Open the bonnet. X
Remove any existing moisture fro mthe
fuse box using a dry cloth.
X To open: take lines ;from the guides.
X Move aside lines ;.Route the lines behind
connection =to do this.
X Open clamps :.
X Remove the fuse box cover forwards.
X To close: check whether the rubber seal is
lying correctly in the cover.
X Insert the cover at the rear of the fuse box
into the retainer.
X Fold down cover and close clamps :.
X Secure lines ;in the guides.
X Close the bonnet. Fuse box in the boot
! Make sure that no moisture can enter the
fuse box when the cover is open.
! When closing the cover, make sure that it
is lying correctly on the fuse box. Moisture
seeping in or dirt could otherwise impair
the operation of the fuses.
X Open the boot lid. 376
Electrical fusesBreakdown assistance