2012 MERCEDES-BENZ E-CLASS ESTATE dimensions
[x] Cancel search: dimensionsPage 98 of 457
1
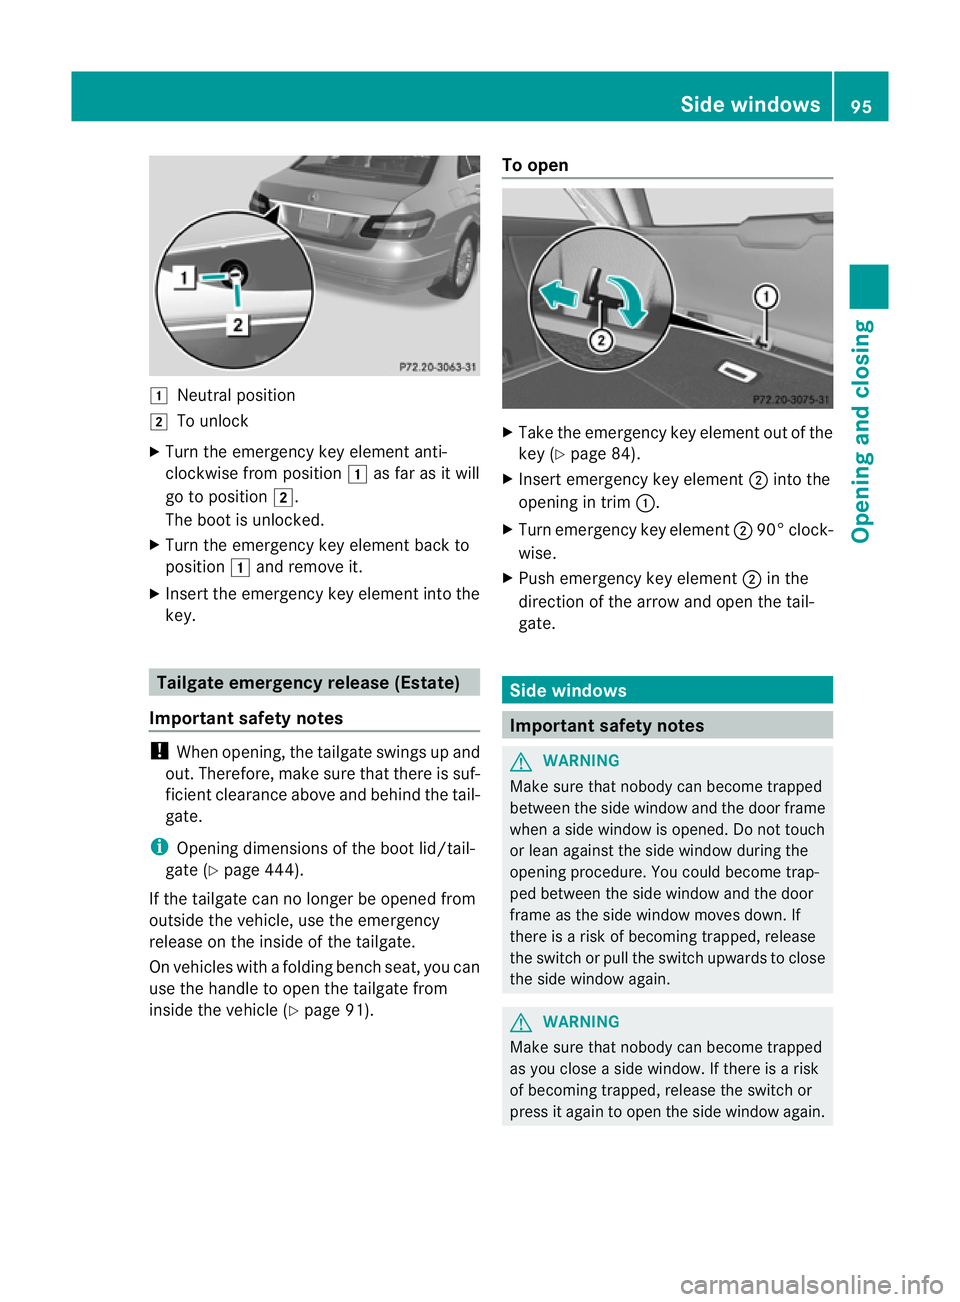
Neutral position
2 To unlock
X Turn the emergency key element anti-
clockwise from position 1as far as it will
go to position 2.
The boot is unlocked.
X Turn the emergency key element back to
position 1and remove it.
X Insert the emergency key element into the
key. Tailgate emergencyr
elease (Estate)
Important safety notes !
When opening, the tailgate swings up and
out .Therefore, make sure that there is suf-
ficient clearance above and behind the tail-
gate.
i Opening dimensions of the boot lid/tail-
gate (Y page 444).
If the tailgate can no longer be opened from
outside the vehicle, use the emergency
release on the inside of the tailgate.
On vehicles with a folding bench seat, you can
use the handle to open the tailgate from
inside the vehicle (Y page 91). To open X
Take the emergency key element out of the
key (Y page 84).
X Insert emergency key element ;into the
opening in trim :.
X Turn emergency key element ;90° clock-
wise.
X Push emergency key element ;in the
direction of the arrow and open the tail-
gate. Side windows
Important safety notes
G
WARNING
Make sure that nobody can become trapped
between the side window and the door frame
when a side window is opened. Do not touch
or lean against the side window during the
opening procedure. You could become trap-
ped between the side window and the door
frame as the side window moves down. If
there is a risk of becoming trapped, release
the switch or pull the switch upwards to close
the side window again. G
WARNING
Make sure that nobody can become trapped
as you close a side window. If there is a risk
of becoming trapped, release the switch or
press it again to open the side window again. Side windows
95Opening and closing Z
Page 239 of 457
Notes on towing
atrailer
General notes !
Use a drawbar noseweigh tas close as
possible to the maximum permissible nose-
weight. Do not use a noseweight of less
than 50kg, otherwise the trailer may come
loose.
Note that the payload and the rear axle load
are reduced by the actual payload.
i When towing a trailer, set the tyre pres-
sure on the rear axle of the towing vehicle
for a maximum load; see the tyre pressure
table in the fuel filler flap (Y page 383).
You will find installation dimensions and loads
in the "Technical data" section
(Y page 447).
The maximum noseweight of the trailer draw-
bar on the ball coupling is 84 kg. The actual
noseweight may however not be higher than
the value which is given on the trailer tow
hitch or trailer identification plates. The low-
est weight applies.
Missing values for the E300 model were not
available at the time of going to print.
Please note that whe ntowing a trailer, PARK-
TRONIC (Y page 211), Parking Guidance
(Y page 215) and Blind Spot Assist
(Y page 225) are only available with limita-
tions, or not at all.
i On vehicles without level control, the
height of the ball coupling will alter accord-
ing to the load placed on the vehicle. If nec-
essary, use a trailer with a height-adjusta-
ble drawbar.
Driving tips i
Observe the notes on ESP ®
trailer stabi-
lisation (Y page 75).
The maximum permissible speed for vehicle/
trailer combinations depends on the type of
trailer. Before beginning the journey, check
the trailer's documents to see what the max-
imum permitted speed is. Observe the legally prescribed maximum speed in the relevant
country.
For certain Mercedes-Benz vehicles, the max-
imum permissible rear axle load is increased
when towing a trailer. Refer to the "Technical
data" section to find out whether this applies
to your vehicle. If you utilise any of the added
maximum rear axle load when towing a trailer,
the vehicle/trailer combination may not
exceed a maximum speed of 100 km/h for
reasons concerning the operating permit.
This also applies in countries in which the
permissible maximum speed for vehicle/
trailer combinations is above 100 km/h.
When towing a trailer, your vehicle's handling
characteristics will be different in comparison
to when driving without a trailer and it will
consume more fuel.
Change into a lower gear in good time on long
and steep downhill gradients.
On long and steep downhill gradients, espe-
cially if the vehicle is laden or towing a trailer,
you must select shift range
1,2or 3.
i This also applies if you have activated
cruise control, SPEEDTRONIC or DIS-
TRONIC PLUS.
This will use the braking effect of the engine,
so less braking will be required to prevent the
vehicle from gaining speed. This relieves the
load on the brake system and prevents the
brakes from overheating and wearing too
quickly. If you need additional braking,
depress the brake pedal repeatedly rather
than continuously.
Driving tips If the trailer swings from side to side:
X
Do not accelerate.
X Do not countersteer.
X Brake if necessary. 236
Towing
atrailerDriving an d parking
Page 327 of 457
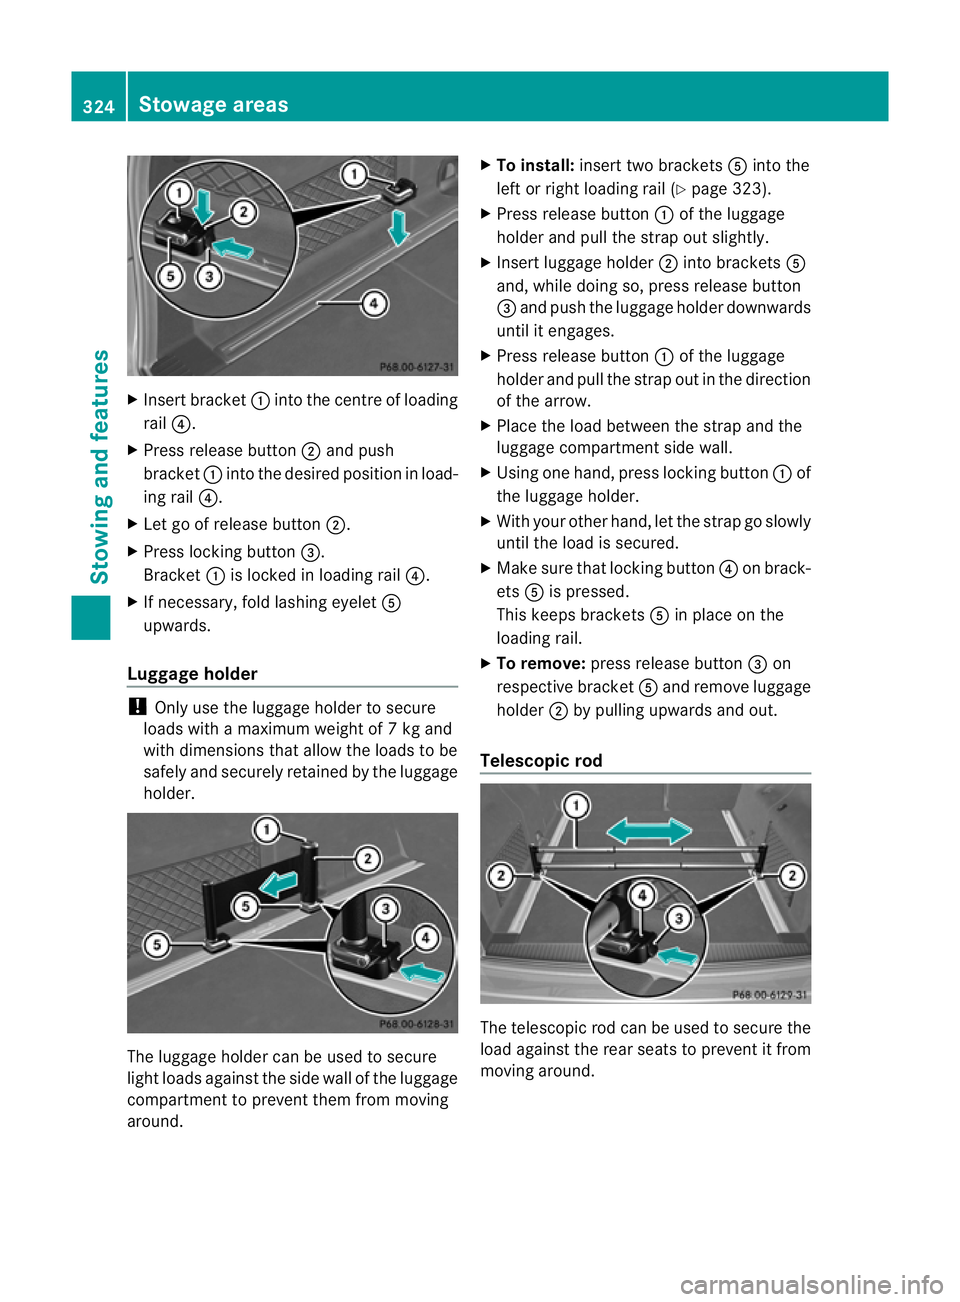
X
Insert bracket :into the centre of loading
rail ?.
X Press release button ;and push
bracket :into the desired positio ninload-
ing rail ?.
X Let go of release button ;.
X Press locking button =.
Bracket :is locked in loading rail ?.
X If necessary, fold lashing eyelet A
upwards.
Luggage holder !
Only use the luggage holder to secure
loads with a maximum weight of 7kg and
with dimensions that allow the loads to be
safely and securely retained by the luggage
holder. The luggage holder can be used to secure
light loads against the side wall of the luggage
compartment to prevent them from moving
around. X
To install: insert two brackets Ainto the
left or right loading rail (Y page 323).
X Press release button :of the luggage
holder and pull the strap out slightly.
X Insert luggage holder ;into brackets A
and, while doing so, press release button
= and push the luggage holder downwards
until it engages.
X Press release button :of the luggage
holder and pull the strap out in the direction
of the arrow.
X Place the load between the strap and the
luggage compartment side wall.
X Using one hand, press locking button :of
the luggage holder.
X With your other hand, let the strap go slowly
until the load is secured.
X Make sure that locking button ?on brack-
ets Ais pressed.
This keeps brackets Ain place on the
loading rail.
X To remove: press release button =on
respective bracket Aand remove luggage
holder ;by pulling upwards and out.
Telescopic rod The telescopic rod can be used to secure the
load against the rear seats to prevent it from
moving around.324
Stowage areasStowing and features
Page 383 of 457
Useful information
i This Owner's Manual describes all mod-
els, series and optional equipment for your
vehicle that were available at the time of
going to press. National variations are pos-
sible. Note that your vehicle may not be
equipped with all of the functions descri-
bed. This is also the case for systems and
functions relevant to safety.
i Read the information on qualified special-
ist workshops: (Y page 25). Important safety notes
G
WARNING
If wheels and tyres of the wrong size are used,
the wheel brakes or suspension components
may be damaged. There is arisk of accident.
Always replace wheels and tyres with those
that fulfil the specifications of the original part
(designation, manufacturer, model). G
WARNING
Af lat tyre severely impairs the driving, steer-
ing and braking characteristics of the vehicle.
There is a risk of accident.
Tyres without run-flat characteristics:
R do not drive with aflat tyre.
R immediately replace the flat tyre with your
emergency spare wheel or spare wheel, or
consult a qualified specialist workshop.
Tyres with run-flat characteristics:
R pay attention to the information and warn-
ing notices on MOExtended tyres (tyres
with run-flat characteristics).
Accessories that are not approved for your
vehicle by Mercedes-Ben zorare not being
used correctly can impair the operating
safety. Before purchasing and using non-approved
accessories, visit a qualified specialist work-
shop and enquire about:
R suitability
R legal stipulations
R factory recommendations
Information on the dimensions and types of
wheels and tyres for yourv ehicle can be
found under "Wheel/tyre combinations"
(Y page 393).
Information on air pressure for the tyres on
your vehicle can be found:
R on the tyre pressure label on the fuel filler
flap (Y page 180)
R under "Tyre pressure" (Y page 383)
R in the "Tyre pressure" section
Modification work on the brake system and
wheels is not permitted. The use of wheel
spacers or brake dust shields is not permit-
ted. This invalidates the general operating
permit for the vehicle.
i Further information on wheels and tyres
can be obtained at any qualified specialist
workshop. Operation
Information on driving
Check the tyre pressures when the vehicle is
heavily laden and, if necessary, adjust.
While driving, pay attention to vibrations,
noises and unusual handling characteristics,
e.g. pulling to one side. This may indicate that
the wheels or tyres are damaged. If you sus-
pect that a tyre is defective, reduce your
speed immediately. Stop the vehicle as soon
as possible to chec kthe wheels and tyres for
damage. Hidden tyre damage could also be
causing the unusual handling characteristics.
If you find no signs of damage, have the tyres
and wheels checked at a qualified specialist
workshop.
When parking your vehicle, make sure that
the tyres do not get deformed by the kerb or 380
OperationWheels and tyres
Page 391 of 457
After you have driven for a few minutes, the
system checks whether the current tyre
pressures are withi
nthe specified range.
The new tyre pressures are then accepted
as reference values and monitored.
If you wish to cancel the restart:
X Press the %button.
The tyre pressure values stored at the last
restart will continue to be monitored.
Radio type approval for the tyre pres-
sure monitor In certain countries, a radio type approval for
the tyre pressure monitor may be required.
The radio type approval number for the tyre
pressure monitor can be found online at:
http://www.mercedes-benz.de/
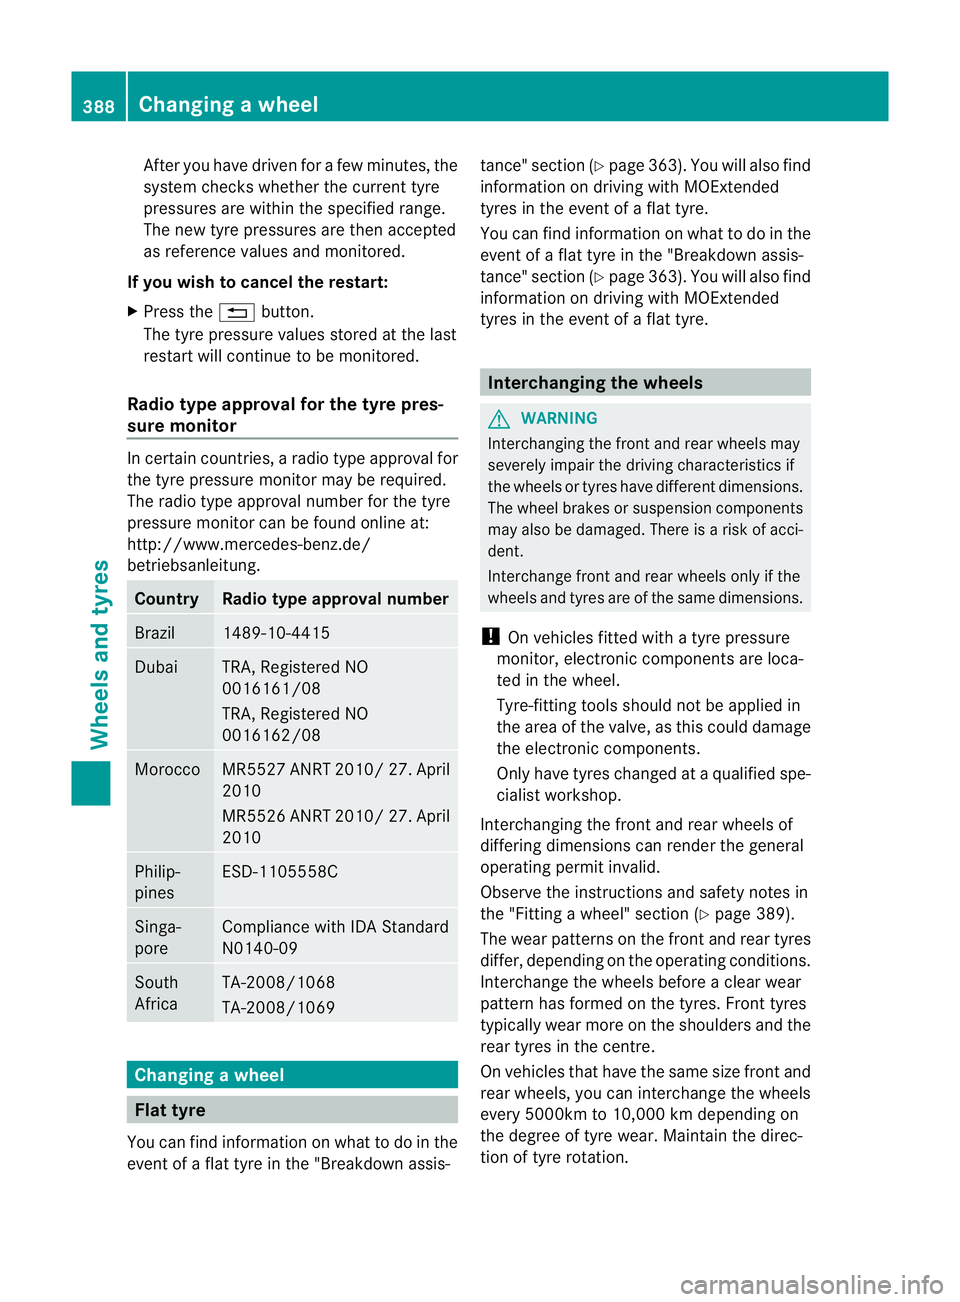
betriebsanleitung. Country Radio type approval number
Brazil 1489-10-4415
Dubai TRA, Registered NO
0016161/08
TRA, Registered NO
0016162/08
Morocco MR5527 ANRT 2010/ 27. April
2010
MR5526 ANRT 2010/ 27. April
2010
Philip-
pines ESD-1105558C
Singa-
pore Compliance with IDA Standard
N0140-09
South
Africa TA-2008/1068
TA-2008/1069
Changing
awheel Flat tyre
You can find information on wha tto do in the
event of a flat tyre in the "Breakdown assis- tance" section (Y
page 363). You will also find
information on driving with MOExtended
tyres in the event of a flat tyre.
You can find information on what to do in the
event of a flat tyre in the "Breakdown assis-
tance" section (Y page 363). You will also find
information on driving with MOExtended
tyres in the event of a flat tyre. Interchanging the wheels
G
WARNING
Interchanging the front and rear wheels may
severely impair the driving characteristics if
the wheels or tyres have different dimensions.
The wheel brakes or suspension components
may also be damaged. There is a risk of acci-
dent.
Interchange front and rear wheels only if the
wheels and tyres are of the same dimensions.
! On vehicles fitted with a tyre pressure
monitor, electronic components are loca-
ted in the wheel.
Tyre-fitting tools should not be applied in
the area of the valve, as this could damage
the electronic components.
Only have tyres changed at a qualified spe-
cialist workshop.
Interchanging the front and rear wheels of
differing dimensions can render the general
operating permit invalid.
Observe the instructions and safety notes in
the "Fitting a wheel" section (Y page 389).
The wear patterns on the front and rear tyres
differ, depending on the operating conditions.
Interchange the wheels before a clear wear
pattern has formed on the tyres. Front tyres
typically wear more on the shoulders and the
rear tyres in the centre.
On vehicles that have the same size front and
rear wheels, you can interchange the wheels
every 5000km to 10,000 km depending on
the degree of tyre wear. Maintain the direc-
tion of tyre rotation. 388
Changing
awheelWheels and tyres
Page 428 of 457
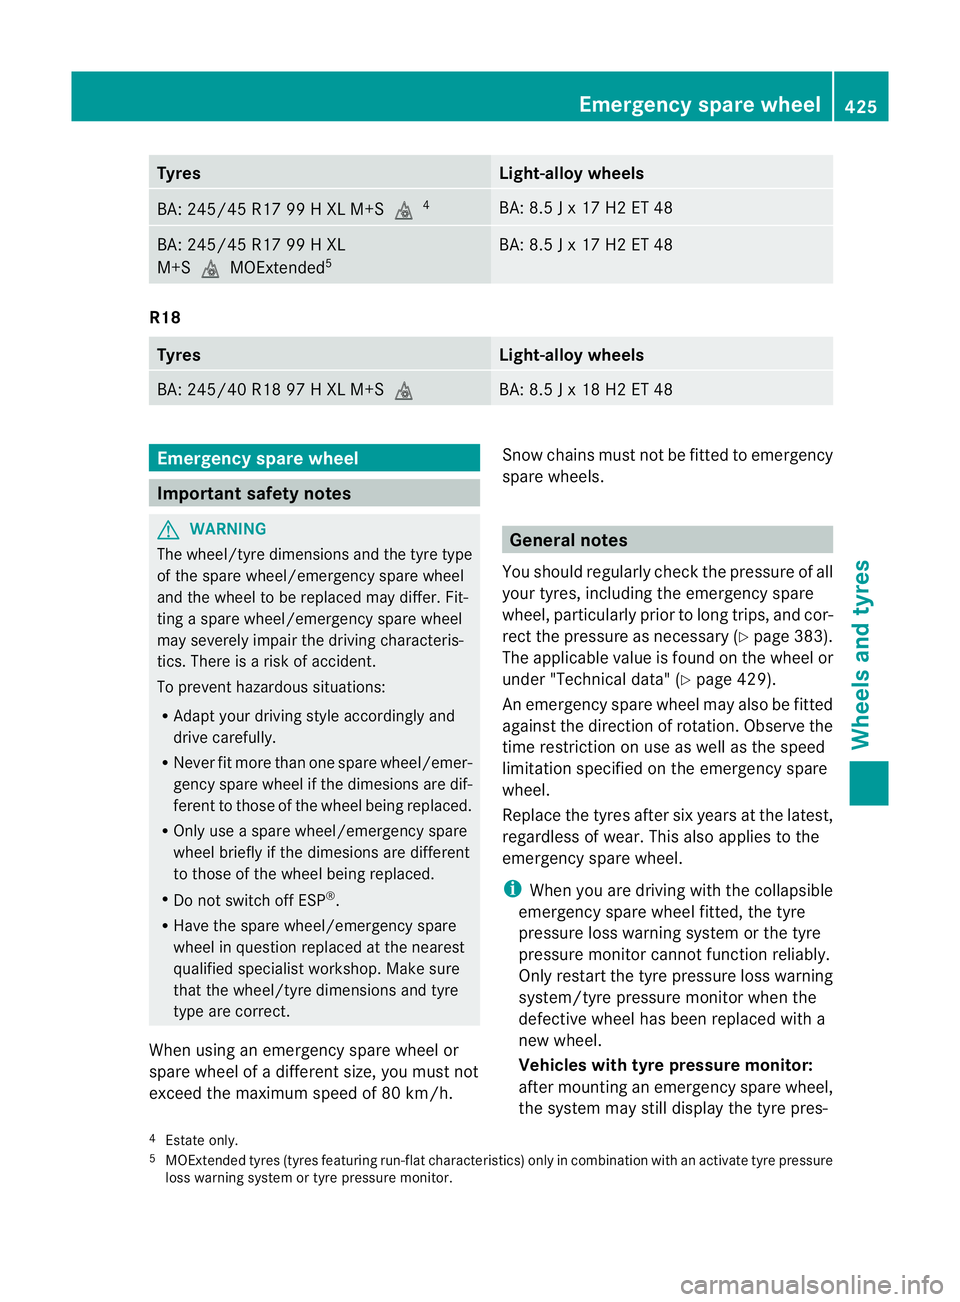
Tyres Light-alloy wheels
BA: 245/45 R17 99 H XL M+S
i4 BA: 8.5 J x 17 H2 ET 48
BA: 245/45 R17 99 H XL
M+S
iMOExtended 5 BA: 8.5 J x 17 H2 ET 48
R18
Tyres Light-alloy wheels
BA: 245/40 R18 97 H XL M+S
i BA: 8.5 J x 18 H2 ET 48
Emergenc
yspare wheel Important safety notes
G
WARNING
The wheel/tyre dimensions and the tyre type
of the spare wheel/emergency spare wheel
and the wheel to be replaced may differ .Fit-
ting a spare wheel/emergency spare wheel
may severely impair the driving characteris-
tics. There is a risk of accident.
To prevent hazardous situations:
R Adapt your driving style accordingly and
drive carefully.
R Never fit more than one spare wheel/emer-
gency spare wheel if the dimesions are dif-
ferent to those of the wheel being replaced.
R Only use a spare wheel/emergency spare
wheel briefly if the dimesions are different
to those of the wheel being replaced.
R Do not switch off ESP ®
.
R Have the spare wheel/emergency spare
wheel in question replaced at the nearest
qualified specialist workshop. Make sure
that the wheel/tyre dimensions and tyre
type are correct.
When using an emergency spare wheel or
spare wheel of a differen tsize, you must not
exceed the maximum speed of 80 km/h. Snow chains must not be fitted to emergency
spare wheels. General notes
You should regularly chec kthe pressure of all
your tyres, including the emergency spare
wheel, particularly prior to long trips, and cor-
rect the pressure as necessary (Y page 383).
The applicable value is found on the wheel or
under "Technical data" (Y page 429).
An emergency spare wheel may also be fitted
against the direction of rotation. Observe the
time restriction on use as well as the speed
limitation specified on the emergency spare
wheel.
Replace the tyres after six years at the latest,
regardless of wear. This also applies to the
emergency spare wheel.
i When you are driving with the collapsible
emergency spare wheel fitted, the tyre
pressure loss warning system or the tyre
pressure monitor cannot function reliably.
Only restart the tyre pressure loss warning
system/tyre pressure monitor when the
defective wheel has been replaced with a
new wheel.
Vehicles with tyre pressure monitor:
after mounting an emergency spare wheel,
the system may still display the tyre pres-
4 Estate only.
5 MOExtended tyres (tyres featuring run-flat characteristics) only in combination with an activate tyre pressure
loss warning system or tyre pressure monitor. Emergency spare wheel
425Wheels and tyres Z
Page 447 of 457
At temperatures below freezing:
X
Fill the washe rfluid reservoir with a mixture
of water and washer fluid, e.g. MB Winter-
Fit.
Adapt the mixing ratio to the outside temper-
ature.
R Down to Ò10 †: mix 1 part MB WinterFit
with 2parts water.
R Down to Ò20 †: mix 1 part MB WinterFit
with 1 part water.
R Down to Ò29 †: mix 2 parts MB WinterFit
with 1 part water.
i Add washe rfluid concentrate, e.g. MB
SummerFit or MB WinterFit, to the washer
fluid all year round. Vehicle data
General notes
Please note that for the specified vehicle
data:
R the heights specified may vary as a result
of:
-tyres
- load
- conditio nofthe suspension
- optional equipment
R items of optional equipment increase the
unladen weight and reduce the maximum
payload. The unladen weight is specified in
accordance with EC directive and includes:
-driver (68 kg)
- luggage (7 kg)
- all fluids (fuel tank 90% full)
R vehicle-specific weight information can be
found on the vehicle identification plate
(Y page 435).
R only for certain countries: you can find vehi-
cle-specific vehicle data in the COC docu-
ments (CERTIFICATE OF CONFORMITY).
These documents are delivered with your
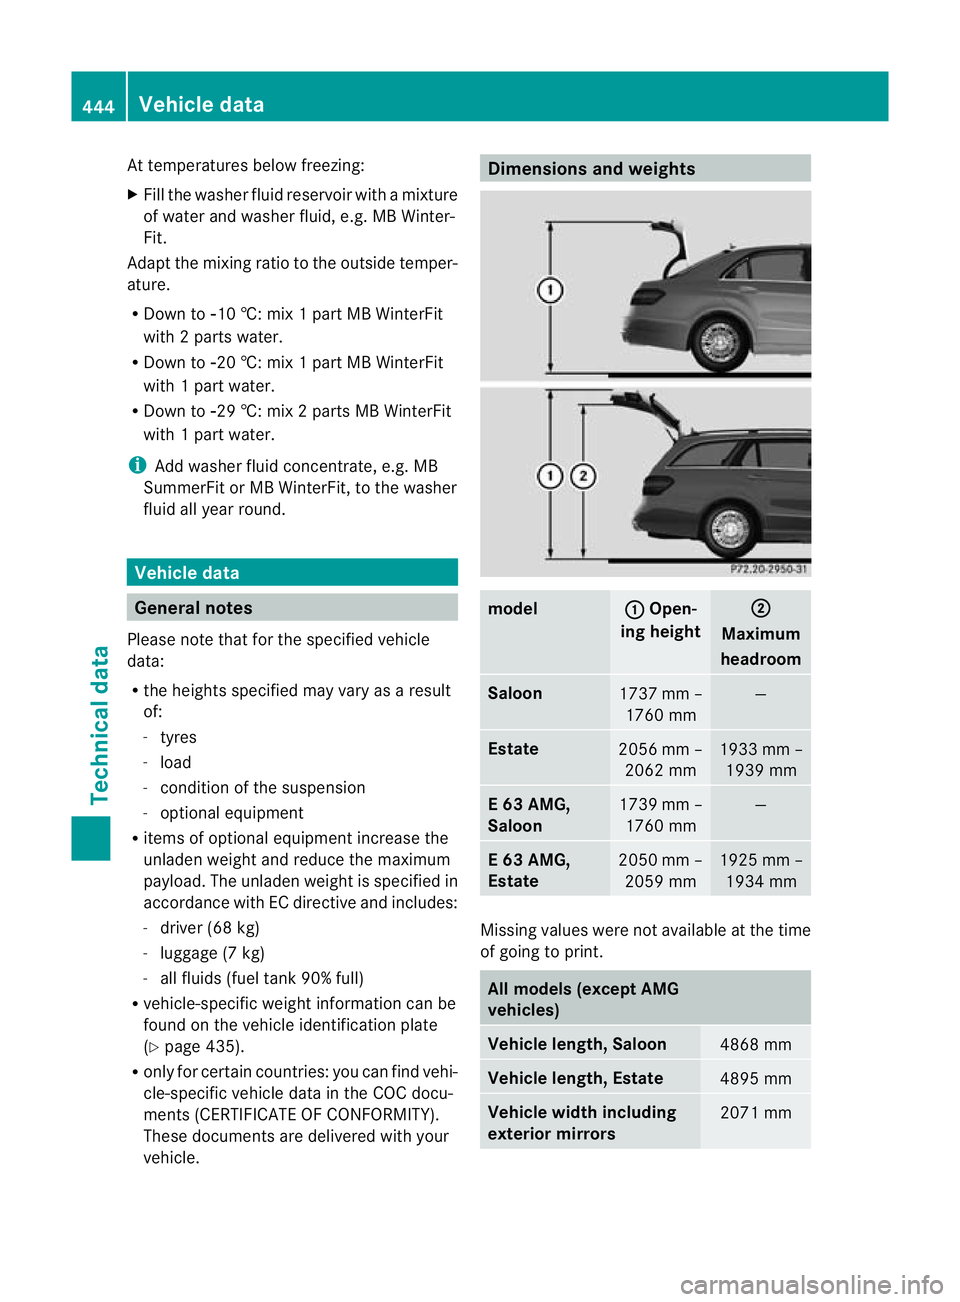
vehicle. Dimensions and weights
model : Open-
ing height ;
Maximum
headroom Saloon
1737 mm –
1760 mm —
Estate
2056 mm –
2062 mm 1933 mm –
1939 mm E 63 AMG,
Saloon
1739 mm –
1760 mm —
E 63 AMG,
Estate
2050 mm –
2059 mm 1925 mm –
1934 mm Missing values were not available at the time
of going to print.
All models (except AMG
vehicles)
Vehicle length, Saloon
4868 mm
Vehicle length, Estate
4895 mm
Vehicle width including
exterior mirrors
2071 mm444
Vehicle dataTechnical data
Page 450 of 457
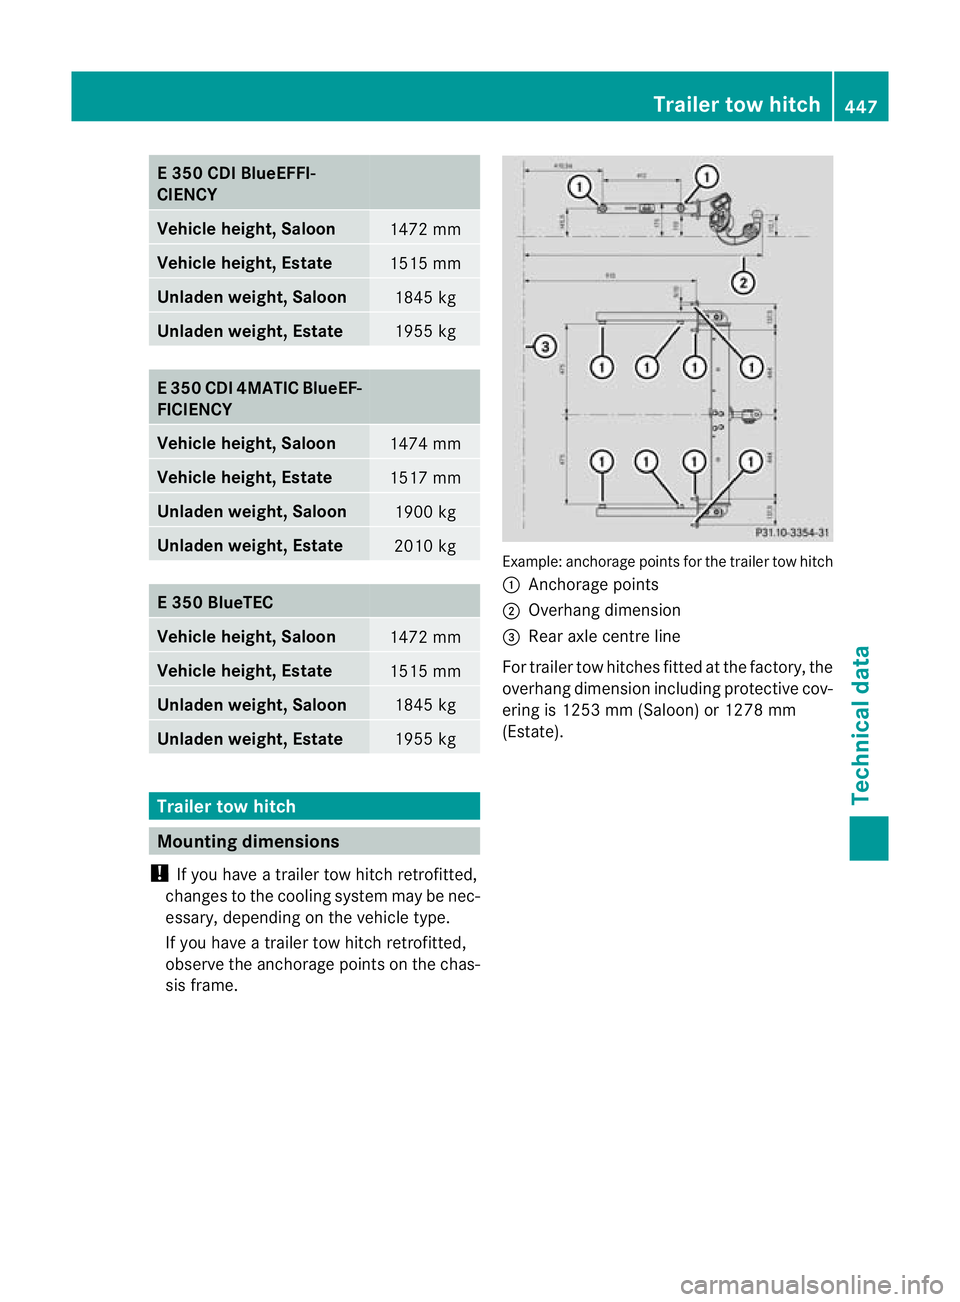
E 350 CDI BlueEFFI-
CIENCY
Vehicle height, Saloon
1472 mm
Vehicle height, Estate
1515 mm
Unladen weight
,Saloon 1845 kg
Unladen weight, Estate
1955 kg
E 350 CDI 4MATIC BlueEF-
FICIENCY
Vehicle height, Saloon
1474 mm
Vehicle height, Estate
1517 mm
Unladen weight, Saloon
1900 kg
Unladen weight, Estate
2010 kg
E 350 BlueTEC
Vehicle height, Saloon
1472 mm
Vehicle height, Estate
1515 mm
Unladen weight, Saloon
1845 kg
Unladen weight, Estate
1955 kg
Trailer tow hitch
Mounting dimensions
! If you have a trailer tow hitch retrofitted,
changes to the cooling system may be nec-
essary, depending on the vehicle type.
If you have a trailer tow hitch retrofitted,
observe the anchorage points on the chas-
sis frame. Example: anchorage points for the trailer tow hitch
:
Anchorage points
; Overhang dimension
= Rea raxle centre line
For traile rtow hitches fitted at the factory, the
overhang dimension including protective cov-
ering is 1253 mm (Saloon) or 1278 mm
(Estate). Trailer tow hitch
447Technical data Z