2012 MERCEDES-BENZ E-CLASS ESTATE ECO mode
[x] Cancel search: ECO modePage 146 of 457
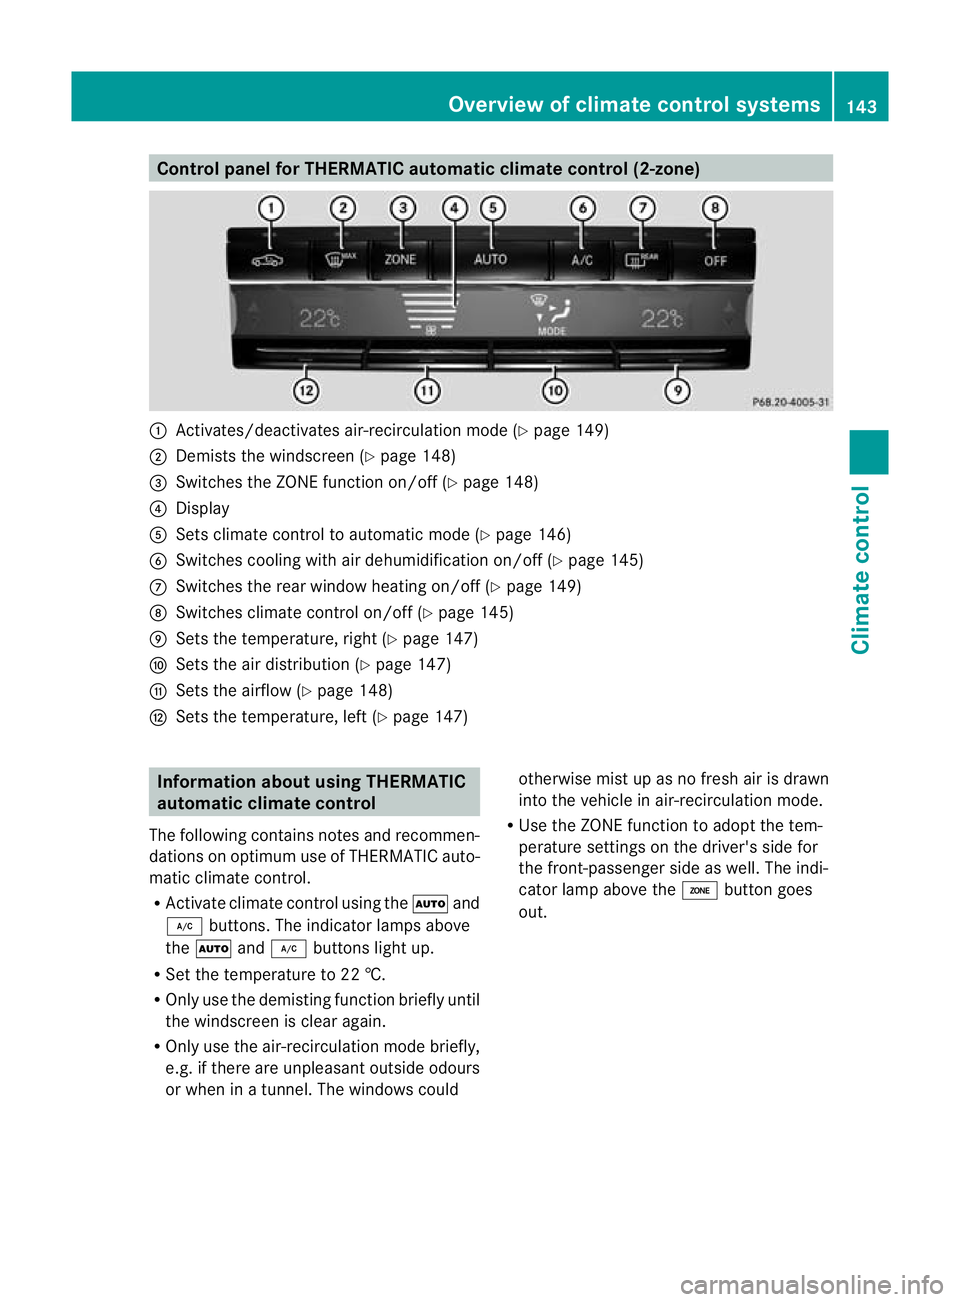
Control panel for THERMATIC automatic climate control (2-zone)
:
Activates/deactivates air-recirculation mode (Y page 149)
; Demists the windscreen (Y page 148)
= Switches the ZONE function on/off (Y page 148)
? Display
A Sets climate control to automatic mod e(Ypage 146)
B Switches cooling with air dehumidification on/off ( Ypage 145)
C Switches the rear window heating on/off (Y page 149)
D Switches climate control on/off (Y page 145)
E Sets the temperature, right (Y page 147)
F Sets the air distribution (Y page 147)
G Sets the airflow (Y page 148)
H Sets the temperature, left (Y page 147)Information about using THERMATIC
automatic climate control
The following contains notes and recommen-
dations on optimum use of THERMATIC auto-
matic climate control.
R Activate climate contro lusing the Ãand
¿ buttons. The indicator lamps above
the à and¿ buttons light up.
R Set the temperature to 22 †.
R Only use the demisting function briefly until
the windscreen is clear again.
R Only use the air-recirculation mode briefly,
e.g. if there are unpleasant outside odours
or when in a tunnel. The windows could otherwise mist up as no fresh air is drawn
into the vehicle in air-recirculation mode.
R Use the ZONE function to adopt the tem-
perature settings on the driver's side for
the front-passenger side as well.T he indi-
cator lamp above the ábutton goes
out. Overview of climate control systems
143Climate control Z
Page 148 of 457
N
Reduces the airflow ( Ypage 148)
O To reduce the temperature (Y page 147)Information about using
THERMOTRONIC automatic climate
control
The following contains instructions and rec-
ommendations to enable you to get the most
out of your THERMOTRONIC automati ccli-
mate control.
R Activate climate control using the Ãand
¿ buttons .The indicator lamps above
the à and¿ buttons light up.
R In automatic mode, you can also use the
ñ button to set a climate mode
(FOCUS/MEDIUM/DIFFUSE). The
MEDIUM level is recommended.
R Set the temperature to 22 †.
R Only use the demisting function briefly until
the windscreen is clear again.
R Only use the air-recirculation mode briefly,
e.g. if there are unpleasant outside odours
or when in a tunnel. The windows could
otherwise mist up as no fresh air is drawn
into the vehicle in air-recirculation mode.
R Use the ZONE function to adopt the tem-
perature settings on the driver's side for
the front-passenger side and the rear com-
partment as well. The indicator lamp above
the á button goes out.
R Use the residual heat function if you want
to heat or ventilate the vehicle interior
when the ignition is switched off. The resid-
ual heat function can only be activated or
deactivated with the ignition switched off. Operating the climate control system
Switching climate control on/off
Points to observe before use i
If climate control is switched off, the air
supply and air circulation are also switched off. Only use this setting for a brief period.
The windows could otherwise mist up.
i Switch on climate control primarily using
the à button (Y page 146).
Switching on/off X
Turn the key to position 2in the ignition
lock.
X To switch on: press theÃbutton.
The indicator lamp above the Ãbutton
lights up. Airflow and air distribution are set
to automatic mode.
or
X Press the ^button.
The indicator lamp above the ^button
goes out. The previous settings are reacti-
vated.
X To switch off: press the^button.
The indicator lamp above the ^button
lights up. Activating/deactivating the cooling
with air dehumidification function
Points to observe before use G
WARNING
If the "cooling with air dehumidification" func-
tion is deactivated, the air inside the vehicle
will not be cooled (during warm weather) or
dehumidified. The windows could mist up
more quickly. This may prevent you from
observing the traffic conditions, thereby caus-
ing an accident.
The cooling with air dehumidification function
is only available when the engine is running.
The air inside the vehicle is cooled and dehu-
midified according to the temperature selec-
ted. Operating the climate control system
145Climate control Z
Page 152 of 457
X
THERMATIC automatic climate control:
press temperature button EorH up or
down (Y page 143).
THERMOTRONIC automatic climate
control: press temperature button For
J up or down (Y page 144).
or
X THERMATIC automatic climate control:
press switch Gup or down (Y page 143).
THERMOTRONIC automatic climate
control: press button Hup or down
(Y page 144). Demisting the windows
Windows misted up on the inside X
Activate the ¿cooling with ai rdehu-
midification function.
X Activate automatic mode Ã.
X If the windows continue to mist up, activate
the demisting function (Y page 148).
i You should only select this setting until
the windscreen is clear again.
Windows misted up on the outside X
THERMATIC automatic climat econtrol:
press switch Fup or down ( Ypage 143)
until the PorO symbol appears in
the display.
X THERMOTRONIC automatic climate
control: press button Iup or down
(Y page 144) until the PorO symbol
appears in the display.
i You should only selec tthis setting until
the windscreen is clear again. Rear window heating
Switching on/off G
WARNING
Clear all windows of ice or snow before setting
off. Otherwise, impaired visibility could
endanger you and others.
The rear window heating has ahigh current
draw. You should therefore switch it off as
soon as the window is clear .Itotherwise
switches off automatically after several
minutes.
If the battery voltage is too low, the rea rwin-
dow heating may switch off.
X Turn the key to position 2in the ignition
lock.
X Press the ¤button.
The indicator lamp above the ¤button
lights up or goes out.
Problems with the rea rwindow heating The rear window heating has switched off
prematurely or cannot be activated.
X
Switch off any consumers that are not
required, e.g. reading lamps or interior
lighting.
When the battery is sufficiently charged,
the rear window heating is activated again
automatically. Activating/deactivating air-recircula-
tion mode
G
WARNING
Only switch over to air-recirculatio nmode
briefly at low outside temperatures. Other-
wise, the windows could mist up, thus impair-
ing visibility and endangering yourself and
others. This may prevent you from observing
the traffic conditions, thereby causing an
accident.
You can deactivate the flow of fresh air if
unpleasant odours are entering the vehicle Operating the climate control system
149Climate control Z
Page 153 of 457
from outside. The aira
lready inside the vehi-
cle will the nbe recirculated.
The operation of air-recirculation mode is the
same for all control panels.
X Turn the key to position 2in the ignition
lock.
X To activate: press thegbutton.
The indicator lamp above the gbutton
lights up.
i In the event of high pollution levels 2
or at
high outside temperatures, air-recircula-
tion mode is automatically activated. When
air-recirculation mode is activated auto-
matically, the indicator lamp above the
g button does not light up.
Outside air is added after about
30 minutes.
X To deactivate: press thegbutton.
The indicator lamp above the gbutton
goes out.
i Air-recirculation mode deactivates auto-
matically:
R after approximately five minutes at out-
side temperatures below approximately
5 †
R after approximately five minutes if cool-
ing with air dehumidification is deactiva-
ted
R after approximately 30 minutes at out-
side temperatures above approximately
5 † Convenience opening/closing using
the air-recirculation button
G
WARNING
Make sure that nobody can become trapped
between the side window and the door frame
as the side windows are opened and closed.
Make sure that all objects and body parts are
clear of the side windows when they are being
opened or closed. You or the objects could be
drawn in or become trapped between the side window and the door frame as the window
moves. If there is
arisk of entrapment, oper-
ate the Wswitch to move the side window
in the opposite direction.
Make sure that nobody can become trapped
as the sliding sunroof/panorama sliding sun-
roof is opened and closed. If there is a risk of
entrapment, operate the 3switch to move
the sliding sunroof/panorama sliding sunroof
in the opposite direction.
X Convenience closing feature: press and
hold the gbutton until the side win-
dows and the sliding sunroof/panorama
sliding sunroof are closed.
The indicator lamp above the gbutton
lights up. Air-recirculatio nmode is activa-
ted.
X Convenience opening feature: press and
hold the gbutton until the side win-
dows and the sliding sunroof/panorama
sliding sunroof are opened. The side win-
dows and the sliding sunroof/panorama
sliding sunroof move back to their original
position.
The indicator lamp above the gbutton
goes out. Air-recirculation mode is deacti-
vated.
i If you open the side windows or the sliding
sunroof/panorama sliding sunroof man-
ually after closing them with the conveni-
ence closing feature, they will remain in this
position when opened using the conveni-
ence opening feature. Activating/deactivating the residual
heat function
The residual heat function is only available
with THERMOTRONIC automatic climate con-
trol.
It is possible to make use of the residual heat
of the engine to continue heating the station-
ary vehicle for up to 30 minutes after the
2 THERMOTRONIC automatic climate control only. 150
Operating the climate control systemClimate control
Page 166 of 457
30seconds after a cold start. The sound of
the engine may change during this time.
Manual transmission X
Depress the brake pedal and keep it
depressed.
X Fully depress the clutch pedal.
X Shift to neutral N.
i You can only start the engine whe nthe
clutch pedal is fully depressed.
Automatic transmission X
Shift the transmission to position P.
The transmission position displayint he
multifunction display shows P.
i You can also start the engine when the
transmission is in position N.
Starting procedure with the key i
To start the engine using the key instead
of KEYLESS-GO, pull the Start/Stop button
out of the ignition lock.
X To start a petrol engine: turn the key to
position 3in the ignition lock
(Y page 161) and release it as soon as the
engine is running.
X To startad iesel engine: turn the key to
position 2in the ignition lock
(Y page 161).
The % preglow indicator lamp in the
instrumen tcluster lights up.
X When the %erlischt, den Schlüssel auf
Stellung 3(Ypage 161) and release it as
soon as the engine is running.
i You can start the engine without preglow
if the engine is warm.
i Vehicles with automatic transmis-
sion: you can also use the touch-star tfunc-
tion .To do this, turn the key to position
3(Y page 161) and release it immediately.
The engine then starts automatically. Using KEYLESS-GO to startt
he engine G
WARNING
You rvehicle can be started using a valid KEY-
LESS-GO key. For this reason, children should
never be left unsupervised in the vehicle.
Always take the key with you when leaving the
vehicle, even if you are only leaving it for a
short time.
i The Start/Stop button can be used to
start the vehicle manually without inserting
the key into the ignition lock. The key must
be in the vehicle and the Start/Stop button
must be inserted in the ignition lock. This
mode for starting the engine operates inde-
pendently of the ECO start/stop automatic
engine start function.
X Depress the brake pedal and keep it
depressed.
X To star tapetrol engine: press the Start/
Stop button (Y page 161) once.
The engine starts.
X To start adiesel engine: press the Start/
Stop button (Y page 161) once.
Preglow is activated and the engine starts. Pulling away
Manual transmission !
Change gear in good time and avoid spin-
ning the wheels. Otherwise, you could dam-
age the vehicle.
X Depress the brake pedal and keep it
depressed.
X Fully depress the clutch pedal.
X Shift to either first gear or reverse gear R.
X Release the parking brake (Y page 184).
X Release the brake pedal.
X Slowly release the clutch pedal and gently
depress the accelerato rpedal.
i Follow the shift recommendations in the
multifunction display for an economical
driving style (Y page 170). Driving
163Driving and parking Z
Page 182 of 457
Problems with the transmission
Problem Possible causes/consequences and
M Solutions
The transmission has
problems shifting gear. The transmission is losing oil.
X
Have the transmission checked at a qualified specialist work-
shop immediately. The acceleration ability
is deteriorating.
The transmission no
longer changes gear. The transmission is in emergency mode.
It is only possible to shift into secondgear and reverse gear.
X Stop.
X Shift the transmission to position P.
X Switch off the engine.
X Wait at least ten seconds before restarting the engine.
X Shift the transmission to position Dor R.
If D is selected, the transmission shifts into secondgear; ifRis
selected, the transmission shifts into reverse gear.
X Have the transmission checked at a qualified specialist work-
shop immediately. Releasing the parking lock manually
i
The following description does not apply
to vehicles with a DIRECT SELECT lever and
AMG vehicles.
X Apply the parking brake.
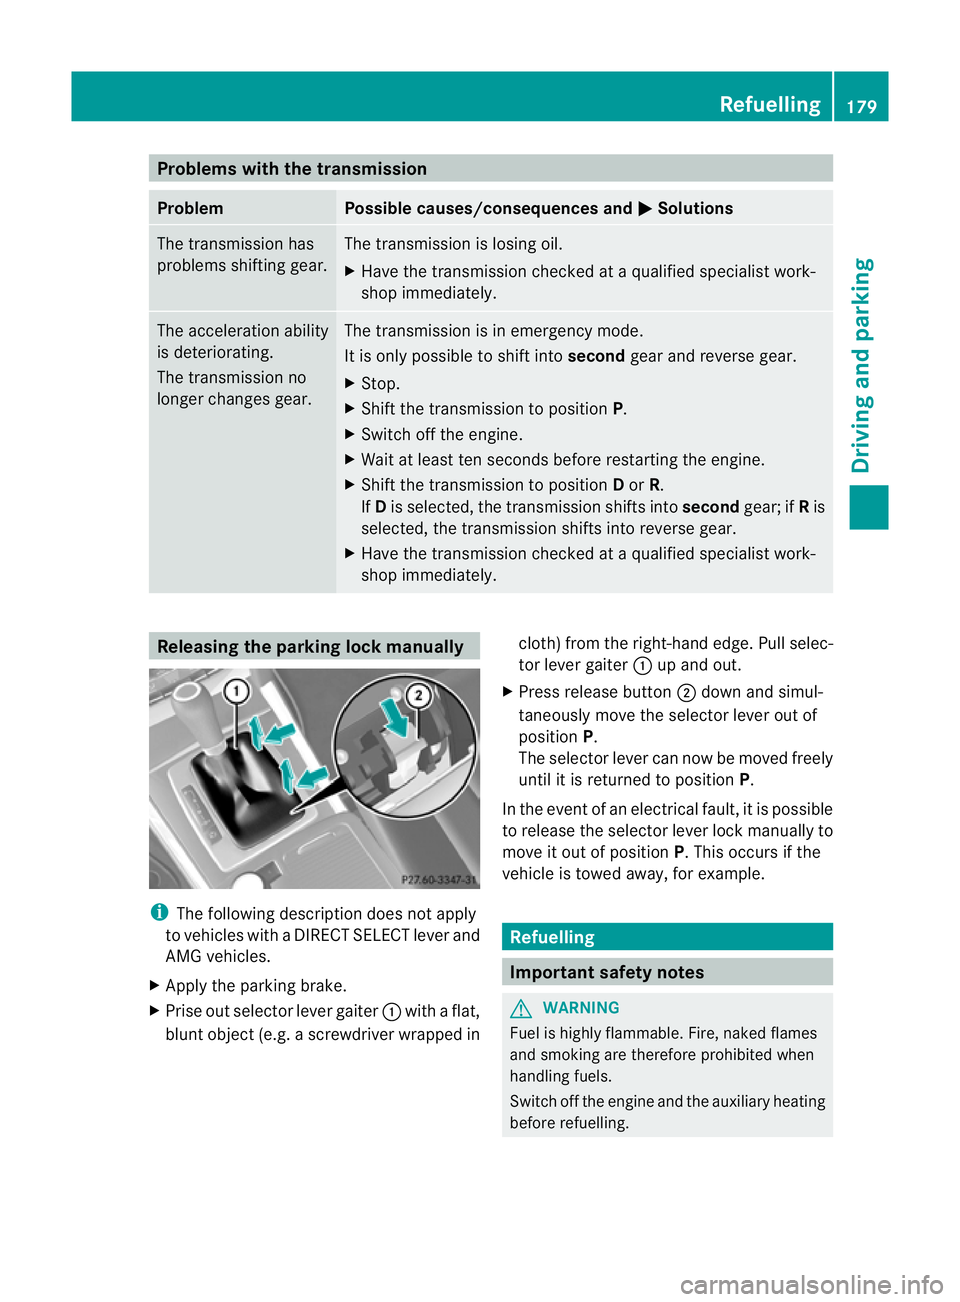
X Prise out selector lever gaiter :with a flat,
blunt object (e.g. a screwdriver wrapped in cloth) from the right-hand edge. Pull selec-
tor lever gaiter
:up and out.
X Press release button ;down and simul-
taneously move the selector lever out of
position P.
The selector lever can now be moved freely
until it is returned to position P.
In the event of an electrical fault, it is possible
to release the selector lever lock manually to
move it out of position P. This occurs if the
vehicle is towed away, for example. Refuelling
Important safety notes
G
WARNING
Fuel is highly flammable. Fire, naked flames
and smoking are therefore prohibited when
handling fuels.
Switch off the engine and the auxiliary heating
before refuelling. Refuelling
179Driving and parking Z
Page 189 of 457
Apart from driving style, consumption is
dependent on many factors such as:
R load
R tyre pressure
R cold start
R selected route
R numbe rofconsumers that are switched on
These variable are not included in the ECO
display.
Your driving style is evaluated on the basis of
the following three categories:
Acceleration (evaluation of all accelera-
tion processes) The bar fills up: The bar depletes:
Moderate accelera-
tion, espeically at
higher speeds Sporty acceleration
Constant (evaluation of the driving style
at any point in time)
The bar fills up: The bar depletes:
Constant speed and
avoidance of unnec-
essary acceleration
and deceleration
processes Fluctuations in
speed
Coasting (evaluation of total decelera-
tion)
The bar fills up: The bar depletes:
Drive with care,
keep your distance
from the vehicle
ahead and remove
your foot from the
accelerator pedal in
good time: the vehi-
cle can coast with-
out braking Frequent braking i
An economical driving style depends in
particular on driving at moderate speeds.
Achieving a higher value in the categories
"Acceleration" and "Constant":
R observe the gearshift recommendations.
R drive in drive program E(vehicles with
automatic transmission).
i On long journeys at constant speed, such
as on the motorway, only the "Constant"
category bar changes.
i The ECO display sums up the driving
behaviour from the start to the end of the
journey. As a result, the bars change
dynamically at the start of the journey. Dur-
ing long journeys there are fewer changes.
For more dynamic changes, perform a man-
ual reset.
For further information on ECO display, see
(Y page 250). Short journeys
! Vehicles with adiesel particle filter: if
the vehicle is mostly driven for short dis-
tances, it is possible that malfunctions may
occur during the automatic cleaning of the
diesel particle filter. This may lead to fuel
collecting in the engine oil and cause
engine failure. Therefore, if you frequently
drive short distances, you should take a 20
minute trip on a motorway or rural road at
least every 500km. Brakes
Important safety notes G
WARNING
If you shift down on a slippery road surface in
an attempt to increase the engine's braking
effect, the drive wheels could lose their grip.
This increases the risk of skidding and having
an accident. 186
Driving tipsDriving and parking
Page 190 of 457
Do not shift down for additional engine brak-
ing on a slippery road surface.
Downhill gradients On long and steep downhill gradients, espe-
cially if the vehicle is lade
nortowing a trailer,
you must shift to a lower gear in good time or
select shift range 1,2or 3on vehicles with
automatic transmission.
i This also applies if you have activated
cruise control, SPEEDTRONIC or DIS-
TRONIC PLUS.
This will use the braking effect of the engine,
so less braking will be required to prevent the
vehicle from gaining speed. This relieves the
load on the brake system and prevents the
brakes from overheating and wearing too
quickly.
Heavy and light loads G
WARNING
The braking system can overheat if you leave
your foot on the brake pedal while driving.
This increases the braking distance and could
even cause the braking system to fail. There
is a risk of an accident.
Never use the brake pedal as a footrest. Do
not simultaneously depress both the brake
pedal and the accelerator pedal while driving.
! Depressing the brake pedal constantly
results in excessive and premature wear to
the brake pads.
If the brakes have been subjected to a heavy
load, do not stop the vehicle immediately, but
drive on for a short while. This allows the air-
flow to cool the brakes more quickly.
If the brakes have been used only moderately,
you should occasionally test their effective-
ness. To do this, brake more firmly from a
higher speed. This improves the grip of the
brakes. Wet road surfaces If you have driven for a long time in heavy rain
without braking, there may be a delayed reac-
tion from the brakes when braking for the first
time. This may also occur after the vehicle has
been washed or driven through deep water.
You have to depress the brake pedal more
firmly. Maintain a greater distance from the
vehicle in front.
After driving on a wet road or having the vehi-
cle washed, brake firmly while paying atten-
tion to the traffic conditions. This will warm
up the brake discs, thereby drying them more
quickly and protecting them against corro-
sion.
Limited braking performance on salt-
treated roads If you drive on salted roads, a layer of salt
residue may form on the brake discs and
brake pads. This can result in a significantly
longer braking distance.
R
Brake occasionally to remove any possible
salt residue. Make sure that you do not
endanger other road users when doing so.
R Carefully depress the brake pedal and the
beginning and end of a journey.
R Maintain a greater distance to the vehicle
ahead.
New brake pads/linings New and replaced brake pads and discs only
reach their optimum braking effect after sev-
eral hundred kilometres of driving. Compen-
sate for this by applying greater force to the
brake pedal.
For safety reasons, Mercedes-Benz recom-
mends that you only have brake pads/linings
fitted to your vehicle which have been
approved for Mercedes-Benz vehicles or
which correspond to an equivalent quality
standard. Brake pads/linings which have not
been approved for Mercedes-Benz vehicles or
which are not of an equivalent quality could
affect your vehicle's operating safety. Driving tips
187Driving and parking Z