2012 MERCEDES-BENZ E-CLASS COUPE towing
[x] Cancel search: towingPage 225 of 389
On long and steep downhill gradients, espe-
cially if the vehicle is laden or towing a trailer,
you must select shift range
1,2or 3.
i This also applies if you have activated
cruise control, SPEEDTRONIC or DIS-
TRONIC PLUS.
This will use the braking effect of the engine,
so less braking will be required to prevent the
vehicle from gaining speed. This relieves the
load on the brake system and prevents the
brakes from overheating and wearing too
quickly. If you need additional braking,
depress the brake pedal repeatedly rather
than continuously.
Driving tips If the trailer swings from side to side:
X
Do not accelerate.
X Do not countersteer.
X Brake if necessary.
R Maintain a greater distance from the vehi-
cle in front than when driving without a
trailer.
R Avoid braking abruptly. If possible, brake
gently at first to allowt he trailer to run on.
Then, increase the braking force rapidly.
R The values given for gradient-climbing
capabilities from a standstill refer to sea
level. When driving in mountainous areas,
note that the power output of the engine,
and consequently the vehicle's gradient-
climbing capability, decrease with increas-
ing altitude. Folding out the ball coupling
G
WARNING
If the ball coupling is not correctly engaged,
the trailer can detach. There is a risk of an
accident.
Always engage the ball coupling as described. G
WARNING
If you release the ball coupling or it does not
engage correctly when folding in, it will swing
out. Within pivoting range of the ball coupling,
there is an increased risk of an accident and
injury.
Only release the ball coupling if the pivoting
range is unobstructed. Always make sure that
the ball coupling engages when folding in. Before you can tow a trailer with your vehicle,
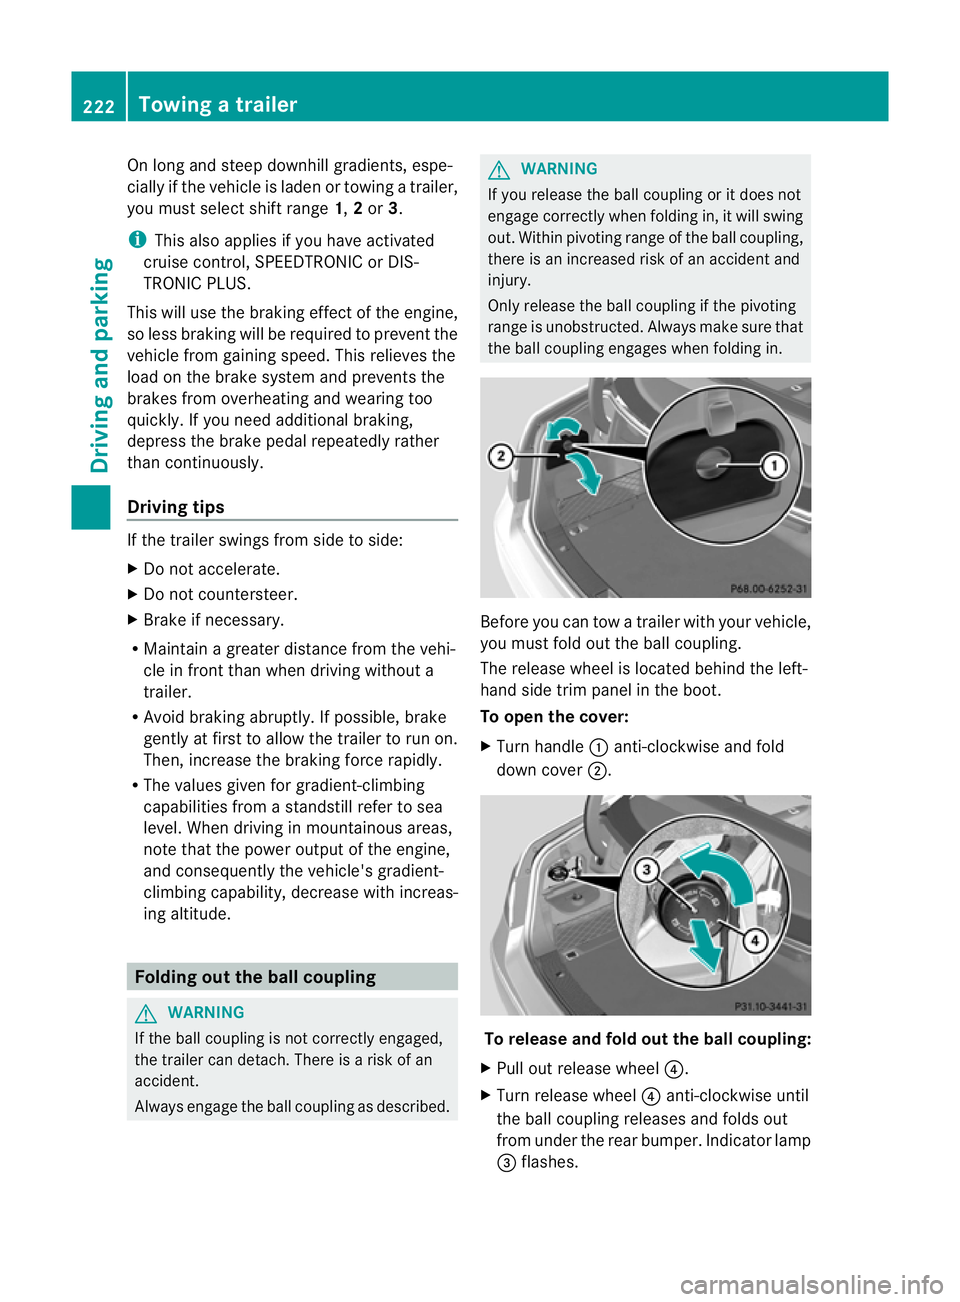
you must fold out the ball coupling.
The release wheel is located behind the left-
hand side trim panel in the boot.
To open the cover:
X
Turn handle :anti-clockwise and fold
down cover ;. To release and fold out the ball coupling:
X Pull out release wheel ?.
X Turn release wheel ?anti-clockwise until
the ball coupling releases and folds out
from under the rear bumper. Indicator lamp
= flashes. 222
Towing
atrailerDriving an d parking
Page 226 of 389

X
Pull the ball coupling in the direction of the
arrow until it engages in a vertical position.
Indicator lamp =goes out. The power
socket folds down automatically.
The multifunction display shows the
Trailer hitch Check lock mech. dis-
play message until the ball coupling is
engaged.
X Remove the protective covering from the
ball coupling and store it in a safe place.
X Make sure that the ball of the ball coupling
is clean and greased. Coupling up a trailer
G
WARNING
If you uncouple a trailer with an engaged over-
run brake, you could trap your hand between
the vehicle and the trailer drawbar. This poses
a risk of injury.
Do not uncouple a trailer with an engaged
overrun brake.
X Make sure that the transmission is in posi-
tion P.
X Apply the parking brake.
X Position the trailer level behind the vehicle.
X Couple up the trailer.
X Establish the electrical connection
between the vehicle and the trailer.
X Check that the trailer lighting system is
working. Uncoupling
atrailer G
WARNING
If you uncouple a trailer with an engaged over-
ru nb rake, you could trap yourh and between
the vehicle and the trailer drawbar .This poses
a risk of injury.
Do not uncouple a trailer with an engaged
overrun brake. G
WARNING
Vehicles with level control:
If you disconnectt he trailer cable, the vehicle
is lowered. This can cause you or others to
become trapped between the vehicle body
and tyres, or underneath the vehicle. This
poses a risk of injury.
Make sure that no-one is in the immediate
vicinity of the wheel arch or underneath the
vehicle when disconnecting the trailer cable.
! Do not disconnect a trailer with an
engaged overrun brake. Otherwise, your
vehicle could be damaged by the rebound-
ing of the overrun brake.
X Make sure that the transmission is in posi-
tion P.
X Apply the parking brake.
X Secure the trailer against rolling away.
X Remove the trailer cable and decouple the
trailer. Folding in the ball coupling
G
WARNING
If you release the ball coupling or it does not
engage correctly when folding in, it will swing
out. Within pivoting range of the ball coupling,
there is an increased risk of an accident and
injury.
Only release the ball coupling if the pivoting
range is unobstructed. Always make sure that
the ball coupling engages when folding in. Towing
atrailer
223Driving an d parking Z
Page 227 of 389
X
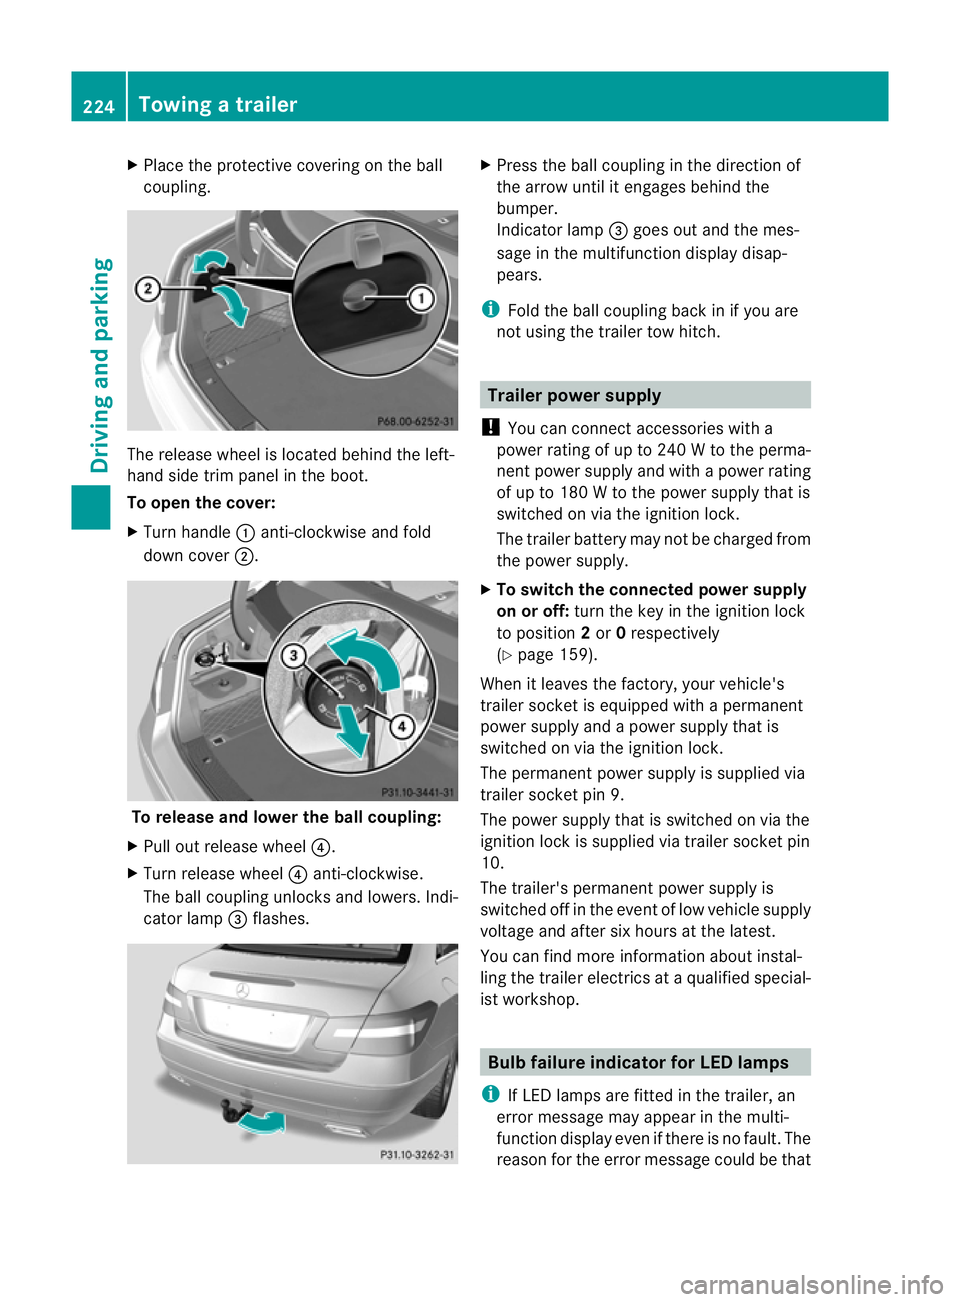
Place the protective covering on the ball
coupling. The release wheel is located behind the left-
hand side trim panel in the boot.
To open the cover:
X
Turn handle :anti-clockwise and fold
down cover ;. To release and lower the ball coupling:
X Pull out release wheel ?.
X Turn release wheel ?anti-clockwise.
The ball coupling unlocks and lowers. Indi-
cator lamp =flashes. X
Press the ball coupling in the direction of
the arrow until it engages behind the
bumper.
Indicator lamp =goes out and the mes-
sage in the multifunction display disap-
pears.
i Fold the ball coupling back in if you are
not using the trailer tow hitch. Trailer power supply
! You can connect accessories with a
power rating of up to 240 W to the perma-
nent power supply and with a power rating
of up to 180 W to the power supply that is
switched on via the ignition lock.
The trailer battery may not be charged from
the power supply.
X To switch the connected power supply
on or off: turn the key in the ignition lock
to position 2or 0respectively
(Y page 159).
When it leaves the factory, your vehicle's
trailer socket is equipped with a permanent
power supply and a power supply that is
switched on via the ignition lock.
The permanen tpower supply is supplied via
trailer socket pin 9.
The power supply that is switched on via the
ignition lock is supplied via trailer socket pin
10.
The trailer's permanent power supply is
switched off in the event of low vehicle supply
voltage and after six hours at the latest.
You can find more information about instal-
ling the trailer electric sataqualified special-
ist workshop. Bulb failure indicator for LED lamps
i If LED lamps are fitted in the trailer, an
error message may appear in the multi-
function display even if there is no fault. The
reason for the error message could be that 224
Towing
atrailerDriving an d parking
Page 228 of 389
the current has fallen below the minimum
of 50 mA.
To ensure reliable operatio nofthe bulb failure
indicator, each LED chain in the trailer lighting
must be guaranteed a minimum current of
50 mA. Trailer with 7-pin connector
General notes Trailers with 7-pin connector:
you can
make a connection to the 13-pin connector
on the ball coupling using an adapter plug or,
if necessary, an adapter cable. Both can be
obtained in a qualified specialist workshop.
Fitting the adapter !
Make sure that there is sufficient cable
play so that the cable cannot become
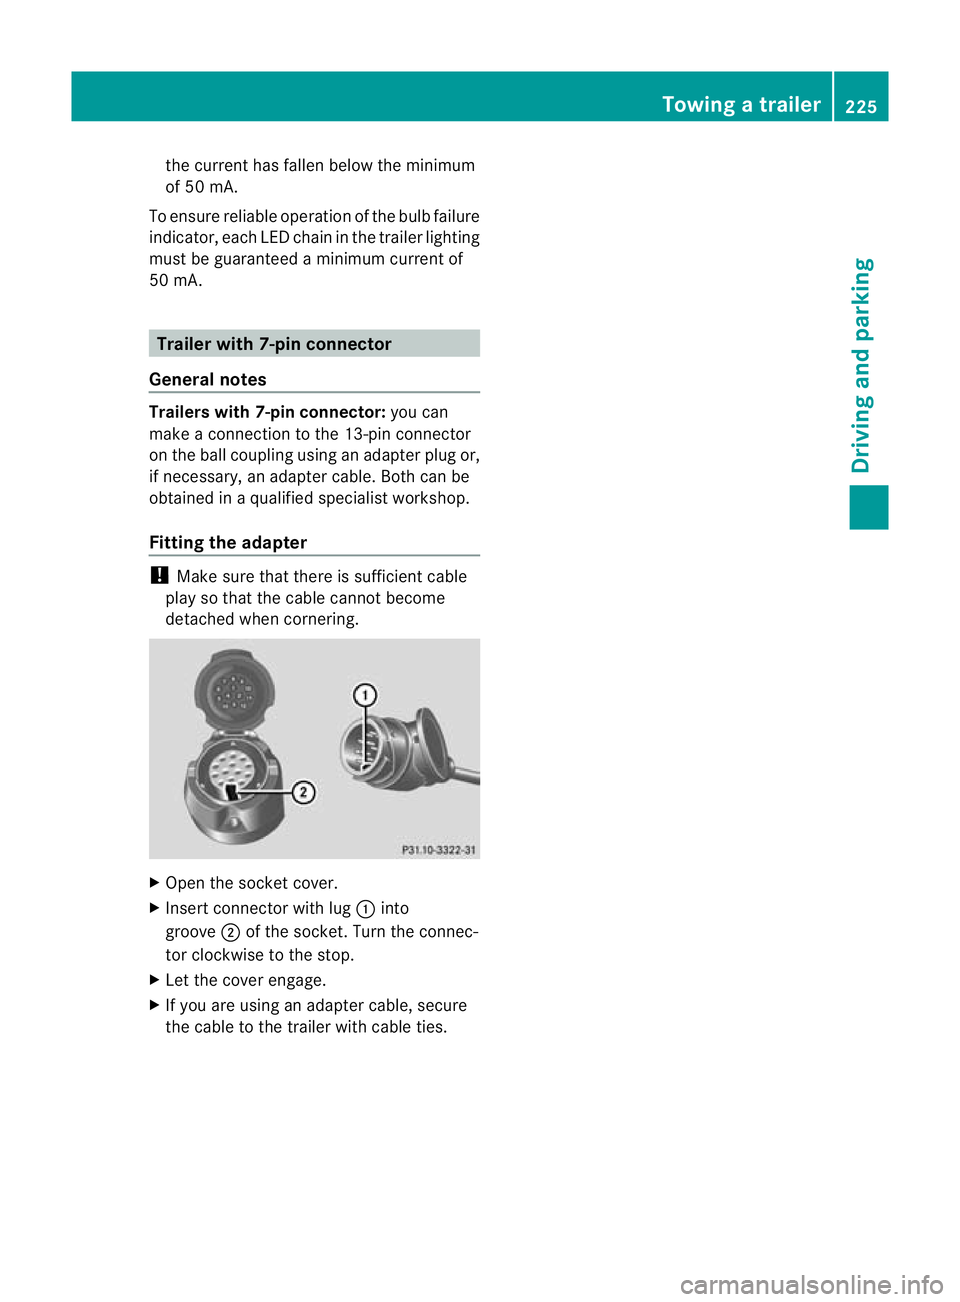
detached when cornering. X
Open the socket cover.
X Insert connector with lug :into
groove ;of the socket. Turn the connec-
tor clockwise to the stop.
X Let the cover engage.
X If you are using an adapter cable, secure
the cable to the trailer with cable ties. Towing
atrailer
225Driving an d parking Z
Page 267 of 389
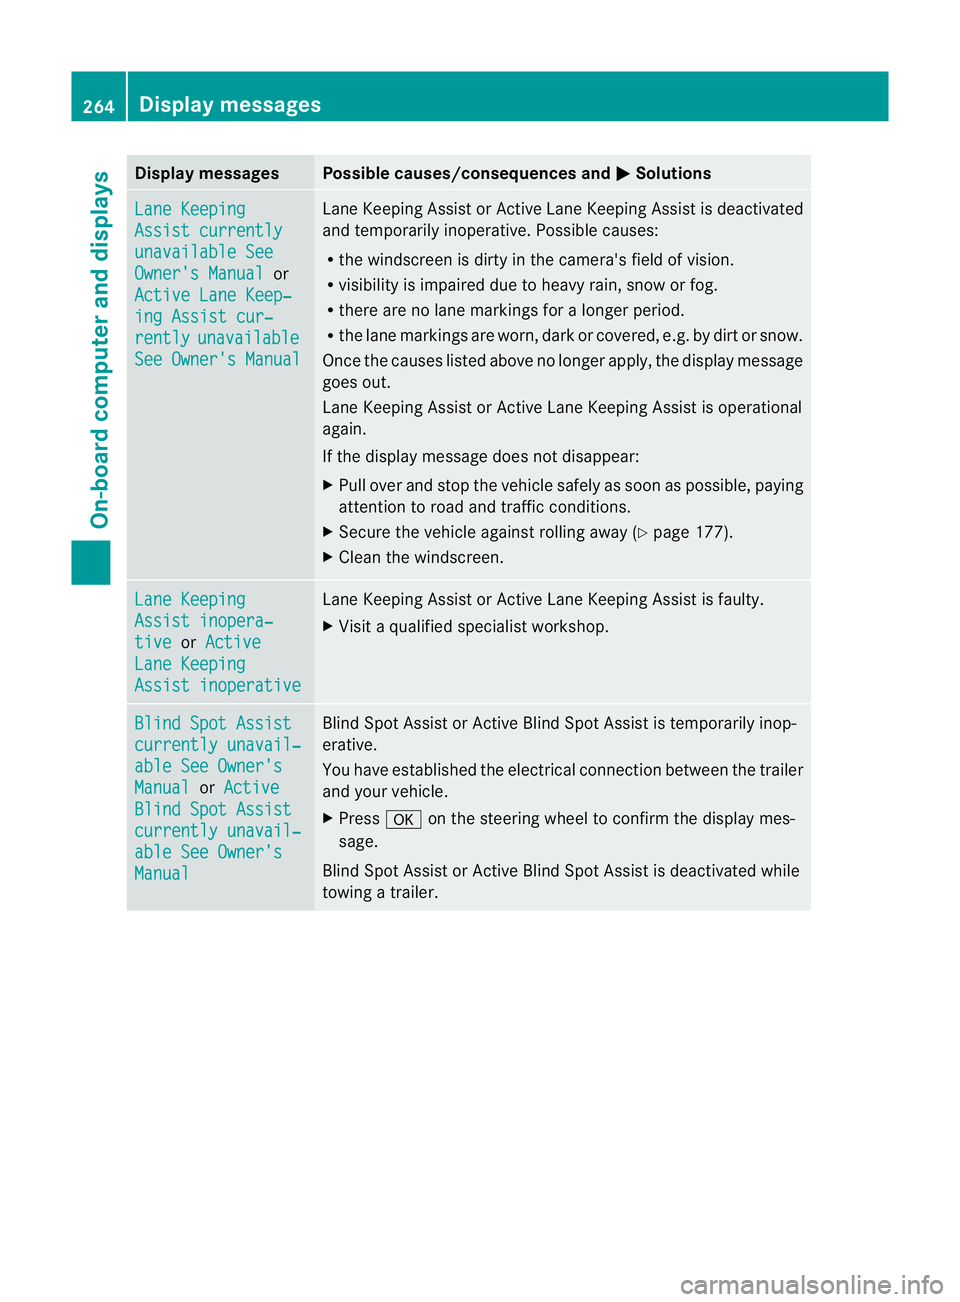
Display messages Possible causes/consequences and
M Solutions
Lane Keeping
Assist currently
unavailable See
Owner's Manual or
Active Lane Keep‐ ing Assist cur‐
rently unavailable
See Owner's Manual Lane Keeping Assis
torActive Lane Keeping Assist is deactivated
and temporarily inoperative .Possible causes:
R the windscreen is dirty in the camera's field of vision.
R visibility is impaired due to heavy rain, snow or fog.
R there are no lane markings for a longer period.
R the lane markings are worn, dark or covered, e.g. by dirt or snow.
Once the causes listed above no longer apply, the display message
goes out.
Lane Keeping Assist or Active Lane Keeping Assist is operational
again.
If the display message does not disappear:
X Pull over and stop the vehicle safely as soon as possible, paying
attention to road and traffic conditions.
X Secure the vehicle against rolling away (Y page 177).
X Clean the windscreen. Lane Keeping
Assist inopera‐
tive or
Active Lane Keeping
Assist inoperative Lane Keeping Assist or Active Lane Keeping Assist is faulty.
X
Visit a qualified specialist workshop. Blind Spot Assist
currently unavail‐
able See Owner's
Manual or
Active Blind Spot Assist
currently unavail‐
able See Owner's
Manual Blind Spot Assist or Active Blind Spot Assist is temporarily inop-
erative.
You have established the electrical connection between the trailer
and your vehicle.
X
Press aon the steering wheel to confirm the display mes-
sage.
Blind Spot Assist or Active Blind Spot Assist is deactivated while
towing a trailer. 264
Display messagesOn-board computer and displays
Page 288 of 389
Useful information
............................286
Stowage areas .................................. 286
Features ............................................. 291 285Stowing and features
Page 289 of 389
Useful information
i This Owner's Manual describes all mod-
els, series and optional equipment for your
vehicle that were available at the time of
going to press. National variations are pos-
sible. Note that your vehicle may not be
equipped with all of the functions descri-
bed. This is also the case for systems and
functions relevant to safety.
i Read the information on qualified special-
ist workshops: (Y page 23). Stowage areas
Loading guidelines (Coupé)
G
WARNING
Secure and position the load as described in
the loading guidelines.
Otherwise, vehicle occupants could
be injured by the load being thrown around in
the even tofsharp braking, a sudden change
in direction or an accident.
You will find further information in the "Secur-
ing a load" section.
Even if you follow all the loading guidelines,
the load will increase the risk of injury in the
event of an accident. G
WARNING
Keep the boot lid closed while the vehicle is
in operation. Otherwise, you could be pois-
oned by exhaust fumes entering the vehicle.
The handling characteristics of a laden vehi-
cle are dependent on the distribution of the
load within the vehicle. For this reason, you
should observe the following notes when
transporting a load:
R when transporting a load, never exceed the
maximum permissible gross vehicle weight or the permissible axle loads for the vehicle
(including occupants).
R position heavy loads as far forwards as pos-
sible and as low down in the boot as pos-
sible.
R the load must not protrude above the upper
edge of the seat backrests.
R always place the load against the rear or
front seat backrests. Make sure that the
seat backrests are securely locked into
place.
R always place the load behind unoccupied
seats if possible.
R secure the load with sufficiently strong and
wear-resistant lashing material. pad sharp
edges for protection.
i Load restraints are available at any quali-
fied specialist workshop, e.g. a Mercedes-
Benz Service Centre. Stowage compartments
Important safety notes G
WARNING
The stowage compartments must be closed
when items are stored in them. Luggage nets
are not designed to secure heavy items of
luggage.
You or other vehicle occupants could be
injured by objects being thrown around if you:
R brake sharply
R change direction suddenly
R are involved in an accident
Sharp-edged and fragile objects must not be
placed in the luggage net.
Do not place hard objects in the map pockets.
Objects must not protrude from the map
pockets. 286
Stowage areasStowing and features
Page 290 of 389
Glove compartment
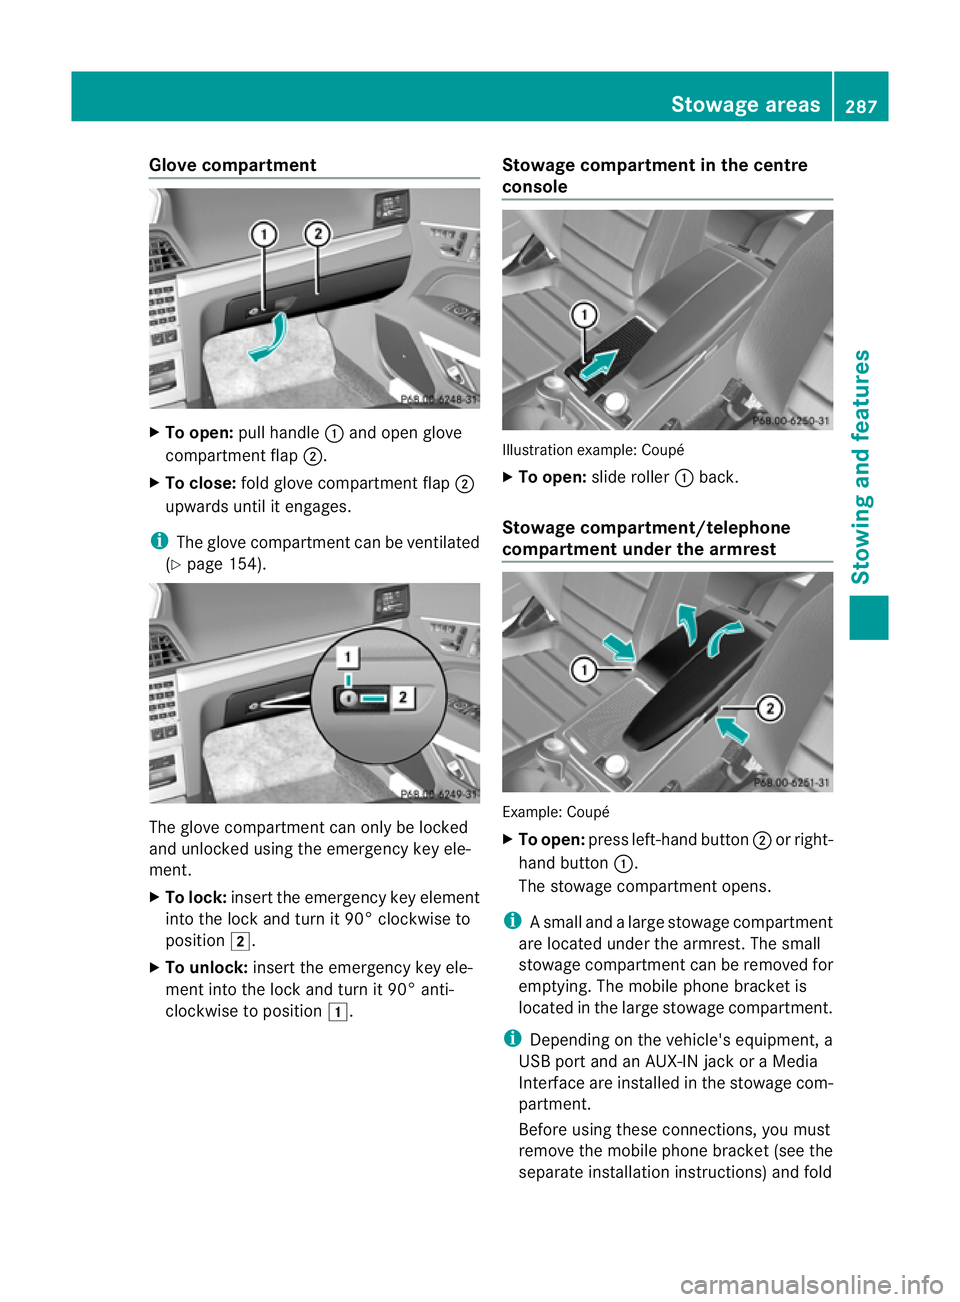
X
To open: pull handle :and open glove
compartment flap ;.
X To close: fold glove compartment flap ;
upwards until it engages.
i The glove compartment can be ventilated
(Y page 154). The glove compartment can only be locked
and unlocked using the emergency key ele-
ment.
X To lock: insert the emergency key element
into the lock and turn it 90° clockwise to
position 2.
X To unlock: insert the emergency key ele-
ment into the lock and turn it 90° anti-
clockwise to position 1. Stowage compartment in the centre
console Illustration example: Coupé
X
To open: slide roller :back.
Stowage compartment/telephone
compartment under the armrest Example: Coupé
X
To open: press left-hand button ;or right-
hand button :.
The stowage compartment opens.
i Asmall and a large stowage compartment
are located under the armrest. The small
stowage compartment can be removed for
emptying. The mobile phone bracket is
located in the large stowage compartment.
i Depending on the vehicle's equipment, a
USB port and an AUX-IN jack or a Media
Interface are installed in the stowage com-
partment.
Before using these connections, you must
remove the mobile phone bracket (see the
separate installation instructions) and fold Stowage areas
287Stowing and features Z