2012 MERCEDES-BENZ E-CLASS COUPE towing
[x] Cancel search: towingPage 22 of 389
Turn signal
see Turn signals
Turn signals
Changing bulb s(front) ................... 135
Switching on/off ........................... 126
TV
Operating (on-board computer) .....237
see Separate operating instructions
Two-way radio
Frequencies ................................... 369
Installatio n..................................... 369
Transmission output (maximum) .... 369
Type identification plate
see Vehicle identification plate
Tyre pressure
Display message ............................ 269
Not reached (TIREFIT) ....................327
Reached (TIREFIT) ..........................327
Recommended ............................... 343
Tyre pressure loss warning
Important safety notes ..................344
Restarting ...................................... 345
Tyres
Changing awheel .......................... 346
Checking ........................................ 341
Direction of rotatio n...................... 346
Display message ............................ 269
Important safety notes ..................340
MOExtended tyres .........................342
Replacing ....................................... 346
Service life ..................................... 341
Storing ........................................... 346
Tyr esize (data) .............................. 350
Tyr etread ...................................... 341
see Flat tyre U
Unladen weight ................................. 378
Unlocking Emergency unlocking .......................84
From inside the vehicle (central
unlocking button) ............................. 83 V
Vanity mirror (in sun visor) ..............293
Variable SPEEDTRONIC see SPEEDTRONIC
Vehicle
Correct use ...................................... 24
Data acquisition ............................... 24
Display message ............................ 270
Electronics ..................................... 369
Equipment ....................................... 22
Implied warranty .............................. 24
Individua lsettings .......................... 242
Leaving parked up .........................179
Locking (in an emergency) ...............84
Locking (key )................................... 77
Lowering ........................................ 350
Pulling away ................................... 161
Raising ........................................... 348
Registration ..................................... 24
Securing from rolling away ............347
Towing away .................................. 333
Tow-starting ................................... 333
Transporting .................................. 335
Unlocking (in an emergency) ...........84
Unlocking (key )................................ 77
Vehicle data ................................... 378
Vehicle data ....................................... 378
Vehicle dimensions ...........................378
Vehicle emergency locking ................84
Vehicle identification number see VIN
Vehicle identification plate ..............371
Vehicle tool kit .................................. 323
Vehicle weights ................................. 378
Video Operating the DVD ......................... 237
VIN ...................................................... 371 W
Warning and indicator lamps ABS ................................................ 277
Brakes ........................................... 277
Distance warning signa l................. 283
ESP ®
.............................................. 278
ESP ®
OFF ....................................... 279
Fuel tank ........................................ 281 Index
19
Page 129 of 389

Parking lamps
1W
Left-hand parking lamps
2X Right-hand parking lamps
3T Side lamps, licence plate and instru-
ment cluster lighting
4Ã Automatic headlamp mode, control-
led by the light sensor
5L Dipped-beam/main-beam head-
lamps
BR Rear foglamp
CN Foglamps (only vehicles with front
foglamps).
Switching on the parking lamps ensures the
corresponding side of the vehicle is illumina-
ted.
X To switch on the parking lamps: the key
is not in the ignition lock or it is in posi-
tion 0.
X Turn the light switch to W(left-hand side
of the vehicle) or X(right-hand side of
the vehicle).
Adjusting the headlampr ange (halogen
headlamps) The headlamp range control allows you to
adjust the cone of light from the headlamps
to sui tthe vehicle load. g
Driver's seat and front-passenger seat
occupied
1 Driver's seat, front-passenger seat and
rear seats occupied
2 Driver's seat, front-passenger seat and
rear seats occupied, boot laden
3 Driver's and front-passenger seats occu-
pied and maximum permissible rear axle
load utilised, e.g. when towing a trailer
X Start the engine.
X Turn the headlamp range control to the
position which corresponds to the load in
your vehicle. Combination switch
Turn signals :
Main-beam headlamps
; Turn signal, right
= Headlamp flasher
? Turn signal, left 126
Exterior lightingLights and windscreen wipers
Page 160 of 389
Useful information
............................158
Running-in notes ............................... 158
Driving ............................................... 158
Manual transmission ........................166
Automatic transmission ...................167
Refuelling ........................................... 173
Parking ............................................... 177
Driving tips ........................................ 179
Driving systems ................................ 182
Towing atrailer ................................. 220 157Driving and parking
Page 172 of 389
R
the positio nofthe accelerator pedal
R the road speed Driving tips
Accelerator pedal position Your style of driving influences how the auto-
matic transmission shifts gear:
R little throttle: early upshifts
R more throttle: late upshifts
Double-clutch function E 350 BlueEFFICIENCY and E 500 BlueEF-
FICIENCY only:
when shifting down, the dou-
ble-clutch function is active regardless of the
currently selected drive program. The double-
clutch function reduces load change reac-
tions and is conducive to a sporty driving
style. The sound generated by the double-
clutch function depends on the drive program
selected.
Kickdown Use kickdown for maximum acceleration.
X
Depress the accelerator pedal beyond the
pressure point.
The transmission shifts to a lower gear
depending on the engine speed.
X Ease off the accelerator pedal once the
desired speed is reached.
The automatic transmission shifts back up.
Towing atrailer X
Drive in the middle of the engine speed
range on uphill gradients.
X Shift down to shift range 3or
2(Y page 170) depending on the uphill or
downhill gradient, eve nifcruise control,
DISTRONIC PLUS or SPEEDTRONIC is acti-
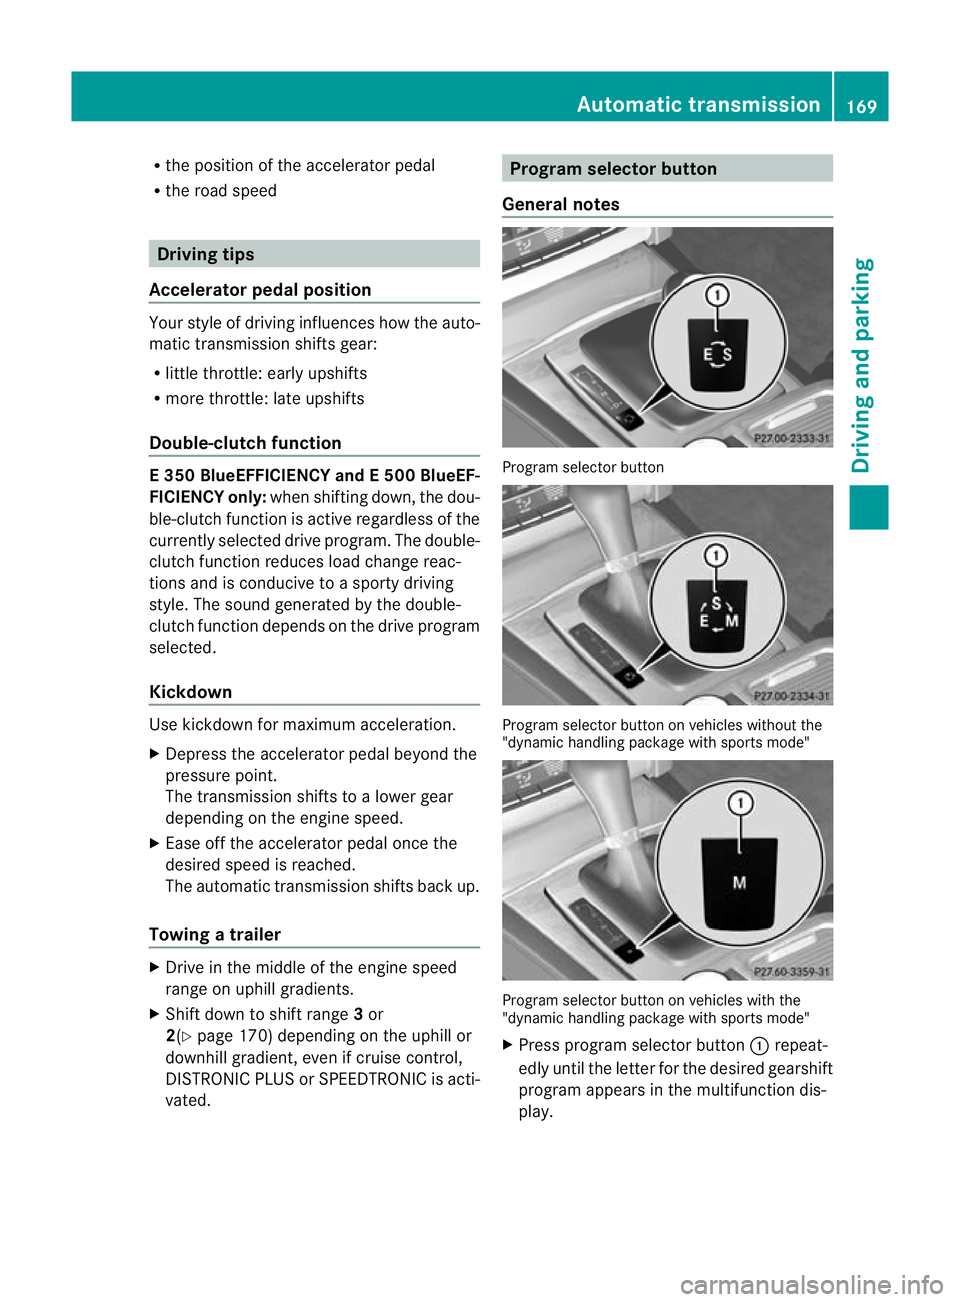
vated. Program selector button
General notes Progra
mselector button Program selecto
rbutton on vehicles without the
"dynamic handling package with sports mode" Program selecto
rbutton on vehicles with the
"dynamic handling package with sports mode"
X Press program selecto rbutton :repeat-
edly until the lette rfor the desired gearshift
program appears in the multifunction dis-
play. Automatic transmission
169Driving and parking Z
Page 183 of 389

Coasting (evaluation of total decelera-
tion)
The bar fills up: The bar depletes:
Drive with care,
keep your distance
from the vehicle
ahead and remove
your foot from the
accelerato
rpedal in
good time: the vehi-
cle can coast with-
out braking Frequent braking
i
An economical driving style depends in
particular on driving at moderate speeds.
Achieving a higher value in the categories
"Acceleration" and "Constant":
R observe the gearshift recommendations.
R drive in drive program E(vehicles with
automatic transmission).
i On long journeys at constan tspeed, such
as on the motorway, only the "Constant"
category bar changes.
i The ECO display sums up the driving
behaviour from the start to the end of the
journey. As a result, the bars change
dynamically at the start of the journey. Dur-
ing long journeys there are fewer changes.
For more dynamic changes, perfor maman-
ual reset.
For further informatio nonECO display, see
(Y page 234). Short journeys
! Vehicles with adiesel particle filter: if
the vehicle is mostly driven for short dis-
tances, it is possible that malfunctions may
occur during the automatic cleaning of the
diesel particle filter. This may lead to fuel
collecting in the engine oil and cause
engine failure. Therefore, if you frequently
drive short distances, you should take a 20 minute trip on a motorway or rural road at
least every 500km. Braking
Important safety notes G
WARNING
If you shift down on a slippery road surface in
an attempt to increase the engine's braking
effect, the drive wheels could lose their grip.
This increases the risk of skidding and having
an accident.
Do not shift down for additional engine brak-
ing on a slippery road surface.
Downhill gradients On long and steep downhill gradients, espe-
cially if the vehicle is laden or towing a trailer,
you must shift to a lower gear in good time or
select shift range 1,2or 3on vehicles with
automatic transmission.
i This also applies if you have activated
cruise control, SPEEDTRONIC or DIS-
TRONIC PLUS.
This will use the braking effect of the engine,
so less braking will be required to prevent the
vehicle from gaining speed. This relieves the
load on the brake syste mand prevents the
brakes from overheating and wearing too
quickly.
Heavy and light loads G
WARNING
The braking system can overheat if you leave
your foo tonthe brake pedal while driving.
This increases the braking distance and could
even cause the braking system to fail. There
is a risk of an accident.
Never use the brake pedal as a footrest.Do
not simultaneously depress both the brake
pedal and the accelerato rpedal while driving. 180
Driving tipsDriving and parking
Page 186 of 389
or winding roads). You may otherwise
cause an accident.
R on slippery roads. The drive wheels may
lose their grip when braking or accelerating
and the vehicle may skid.
R when there is low visibility, e.g. due to fog,
heavy rain or snow.
General notes Cruise control maintains a constant road
speed for you. It brakes automatically in order
to avoid exceeding the set speed. You must
select a low gear in good time on long and
steep downhill gradients, especially if the
vehicle is laden or towing a trailer. On vehicles
with automatic transmission, select shift
range 1,2or 3.B y doing so, you will make
use of the braking effec tofthe engine. This
relieves the load on the brake system and
prevents the brakes from overheating and
wearing too quickly.
Use cruise control only if road and traffic con-
ditions make it appropriate to maintain a
steady speed for a prolonged period. You can
store any road speed above 30 km/h.
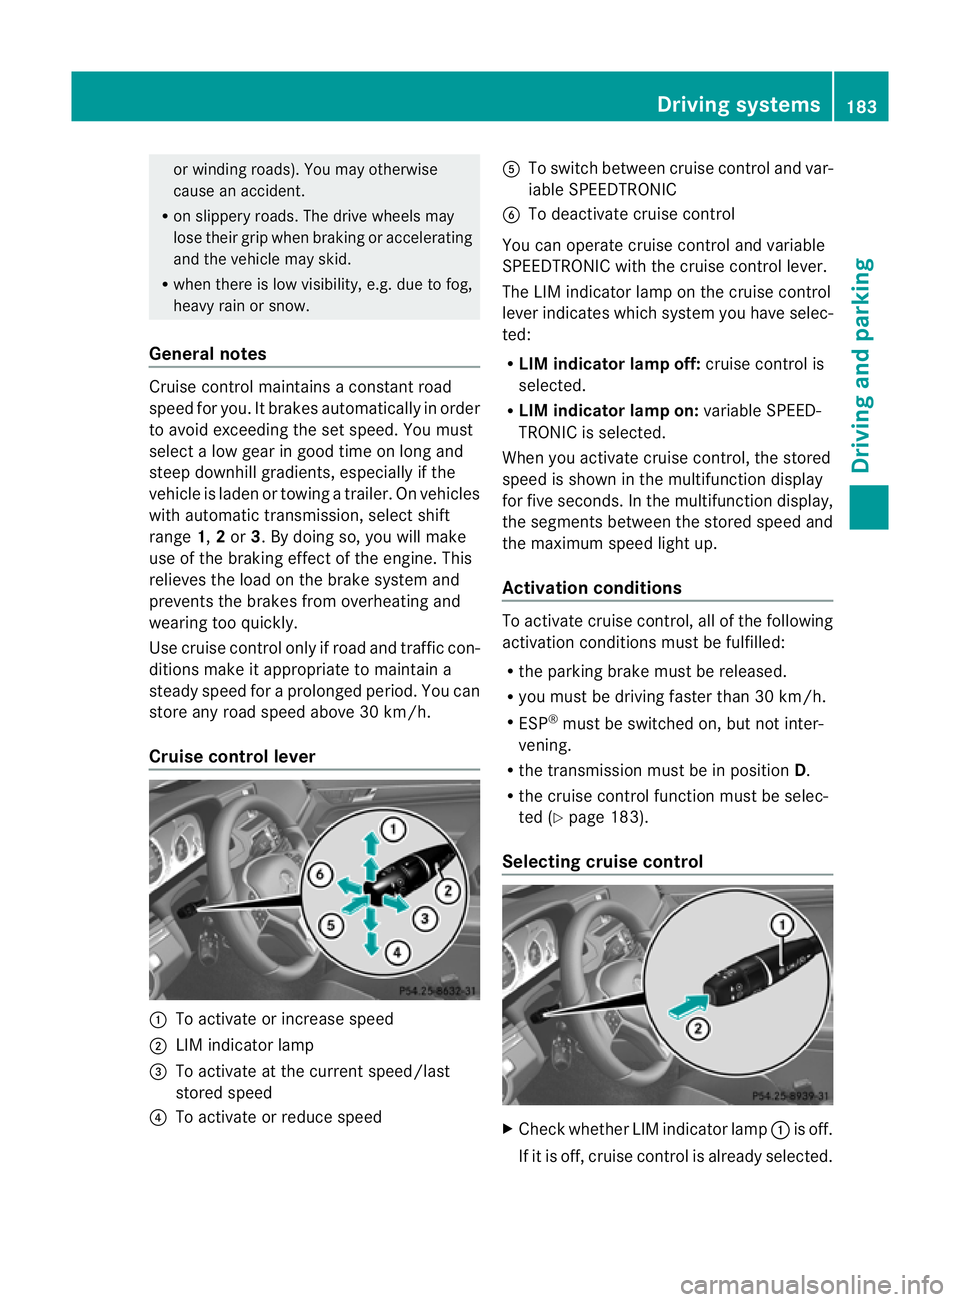
Cruise control lever :
To activate or increase speed
; LIM indicator lamp
= To activate at the current speed/last
stored speed
? To activate or reduce speed A
To switch between cruise control and var-
iable SPEEDTRONIC
B To deactivate cruise control
You can operate cruise control and variable
SPEEDTRONIC with the cruise control lever.
The LIM indicator lamp on the cruise control
lever indicates which system you have selec-
ted:
R LIM indicator lamp off: cruise control is
selected.
R LIM indicator lamp on: variable SPEED-
TRONIC is selected.
When you activate cruise control, the stored
speed is shown in the multifunction display
for five seconds. In the multifunction display,
the segments between the stored speed and
the maximum speed light up.
Activation conditions To activate cruise control, all of the following
activation conditions must be fulfilled:
R
the parking brake must be released.
R you must be driving faster than 30 km/h.
R ESP ®
must be switched on, but not inter-
vening.
R the transmission must be in position D.
R the cruise control function must be selec-
ted (Y page 183).
Selecting cruise control X
Check whether LIM indicator lamp :is off.
If it is off, cruise control is already selected. Driving systems
183Driving and parking Z
Page 189 of 389
G
WARNING
SPEEDTRONIC is only an aid designed to
assist driving. You are responsible for the
vehicle's speed and for braking in good time.
SPEEDTRONIC brakes automatically so that
you do not exceed the set speed. On long and
steep downhill gradients, especially if the
vehicle is laden or towing a trailer, you must
select shift range 1,2or 3in good time. By
doing so, you will make use of the braking
effect of the engine. This relieves the load on
the brake system and prevents the brakes
from overheating and wearing too quickly. If
you need additional braking, depress the
brake pedal repeatedly rather than continu-
ously.
You can set a variable or permanent limit
speed:
R variable for speed limits, e.g. in built-up
areas
R permanent for long-term speed restric-
tions, e.g. when driving with winter tyres
fitted (Y page 188)
i The speed indicated in the speedometer
may diffe rslightly fro mthe limit speed
stored.
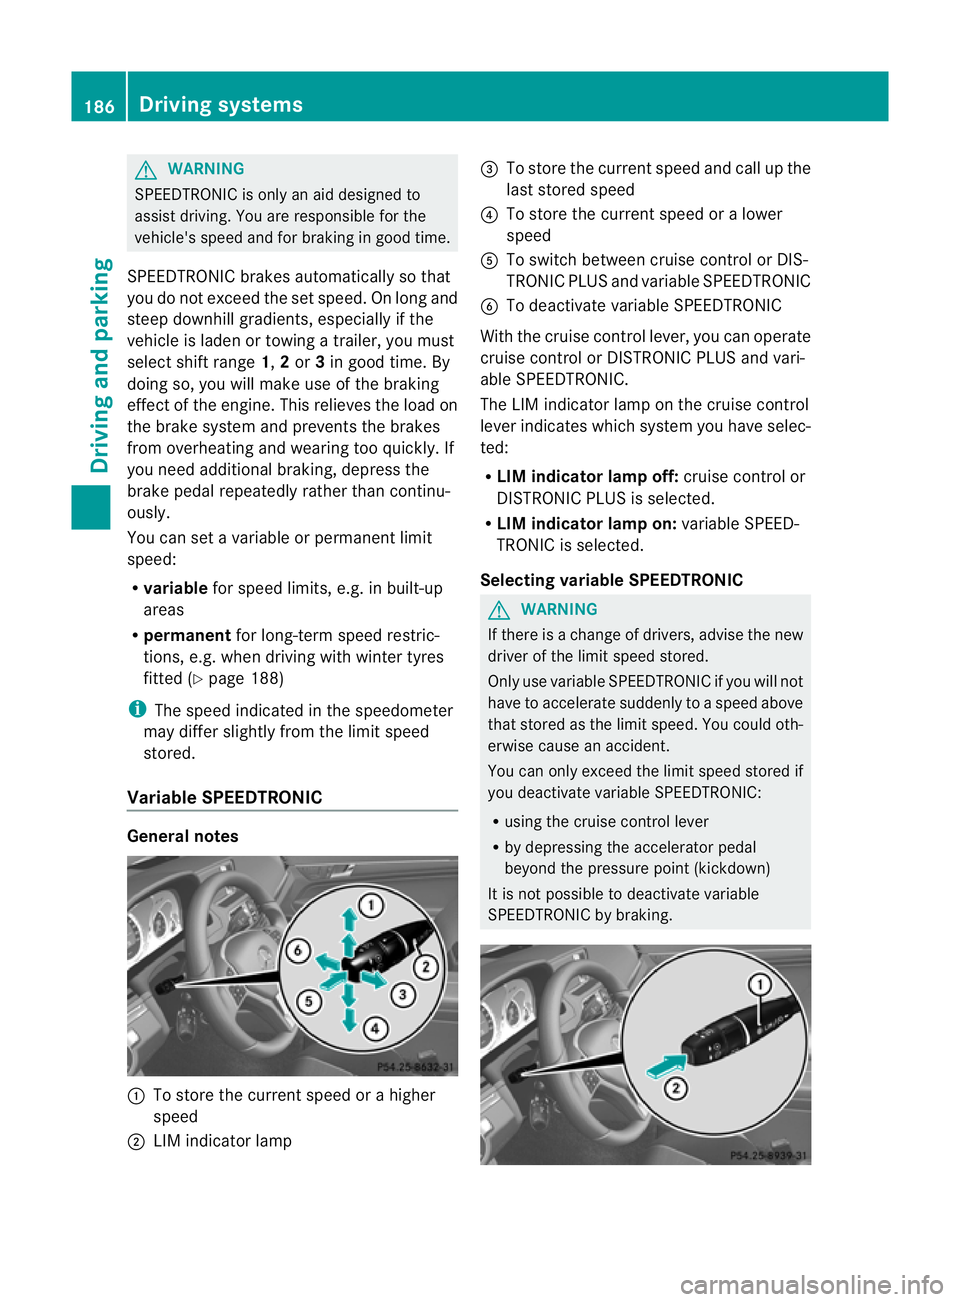
Variable SPEEDTRONIC General notes
:
To store the current speed or a higher
speed
; LIM indicator lamp =
To store the current speed and call up the
last stored speed
? To store the current speed or a lower
speed
A To switch between cruise control or DIS-
TRONIC PLUS and variable SPEEDTRONIC
B To deactivate variable SPEEDTRONIC
With the cruise control lever, you can operate
cruise control or DISTRONIC PLUS and vari-
able SPEEDTRONIC.
The LIM indicator lamp on the cruise control
lever indicates which system you have selec-
ted:
R LIM indicator lamp off: cruise control or
DISTRONIC PLUS is selected.
R LIM indicator lamp on: variable SPEED-
TRONIC is selected.
Selecting variable SPEEDTRONIC G
WARNING
If there is a change of drivers, advise the new
driver of the limit speed stored.
Only use variable SPEEDTRONIC if you will not
have to accelerate suddenly to a speed above
that stored as the limit speed. You could oth-
erwise cause an accident.
You can only exceed the limit speed stored if
you deactivate variable SPEEDTRONIC:
R using the cruise control lever
R by depressing the accelerator pedal
beyond the pressure point (kickdown)
It is not possible to deactivate variable
SPEEDTRONIC by braking. 186
Driving systemsDriving and parking
Page 192 of 389

G
WARNING
DISTRONIC PLUS cannot take account of road
and traffic conditions. If DISTRONIC does not
recognise or no longer recognises the vehicle
in front, do not activate DISTRONIC or, if it is
already active, deactivate it. This is especially
the case:
R before corners
R on filter lanes
R when changing to a lane with faster moving
traffic
R in comple xdriving situations or where lanes
are diverted, e.g. at roadworks on a motor-
way
DISTRONIC PLUS otherwise maintains the
current speed set by you or accelerates up to
the set speed.
DISTRONIC PLUS cannot take account of
weather conditions. Deactivate, or do not
activate, DISTRONIC PLUS:
R if the roads are slippery, snow-covered or
icy. The wheels could lose their grip when
braking or accelerating. The vehicle could
start to skid.
R if the sensors are dirty or there is poor vis-
ibility, e.g. due to snow, rain or fog. Dis-
tance control may be impaired.
Always pay attention to traffic conditions
even when DISTRONIC PLUS is activated.
Otherwise, you may fail to recognise dangers
in time, cause an accident and injure yourself
and others. G
WARNING
DISTRONIC PLUS brakes yourv ehicle up to a
maximum of 4 m/s 2
depending on its speed.
This corresponds to approximately 40% of
your vehicle's maximum braking power. You
must also apply the brakes yourself if this
braking power is not sufficient.
If DISTRONIC PLUS detects a risk of collision
with avehicle in front, an intermittent warning
tone sounds. In addition, the ·distance
warning lamp in the instrument cluster lights
up. Brake to avoid a collision. General notes DISTRONIC PLUS regulates the speed and
automatically helps you maintain the dis-
tance to the vehicle detected in front. DIS-
TRONIC PLUS brakes automatically so that
the set speed is not exceeded.
On long and steep downhill gradients, espe-
cially if the vehicle is laden or towing a trailer,
you must select shift range
1,2or 3in good
time. By doing so, you will make use of the
braking effec tofthe engine. This relieves the
load on the brake system and prevents the
brakes from overheating and wearing too
quickly.
If DISTRONIC PLUS detects a slower-moving
vehicle in front, your vehicle is braked in order
to maintain the preset distance to the vehicle
in front.
If you want DISTRONIC PLUS to assist you,
the radar sensor system must be activated
(Y page 245) and operational.
The radar sensor system is switched off auto-
matically in the vicinity of radio telescope
facilities (Y page 382).
If there is no vehicle in front, DISTRONIC
PLUS operates in the same way as cruise
control in the speed range between
30 km/h and 200 km/h. If avehicle is driving
in front of you, DISTRONIC operates in the
speed range between 0km/h and
200 km/h.
Do not use DISTRONIC PLUS on roads with
steep gradients. Driving systems
189Driving and parking Z