2012 MERCEDES-BENZ E-CLASS COUPE roof
[x] Cancel search: roofPage 51 of 389

lision
.You can recognise when NECK-PRO
head restraints have been triggered by the
fact that they have moved forwards and can
no longer be adjusted.
Mercedes-Benz recommends that you have
the NECK-PRO head restraints checked at a
qualified specialist workshop after a rear-end
collision.
Resetting triggered NECK-PRO head
restraints NECK-PRO head restraint (example: Coupé)
X
Tilt the top of the NECK-PRO head restraint
cushion forwards in the direction of
arrow :.
X Push the NECK-PRO head restraint cushion
down in the direction of arrow ;as far as
it will go.
X Firmly push the NECK-PRO head restraint
cushion back in the direction of arrow =
until the cushion engages.
X Repeat this procedure for the second
NECK-PRO head restraint.
i Resetting the NECK-PRO head restraints
requires a lot of strength. If you have diffi-
culty resetting the NECK-PRO head
restraints, have this work carried out at a
qualified specialist workshop. PRE-SAFE
®
(anticipatory occupant
protection) G
WARNING
When adjusting the seat, make sure that
nobody can become trapped.
! Make sure that there are no objects in the
footwell or behind the seats when moving
the seat back. There is a risk that the seats
and/or the objects could be damaged.
PRE-SAFE ®
takes pre-emptive measures to
protec toccupants in certain hazardous sit-
uations.
PRE-SAFE ®
intervenes:
R when BAS activates, e.g. in emergency
braking situations
R when BAS PLUS intervenes powerfully on
vehicles with DISTRONIC PLUS
R if, on vehicles with DISTRONIC PLUS, the
radar sensor system detects an imminent
danger of collision in certain situations
R in critical driving situations, e.g. when phys-
ical limits are exceeded and the vehicle
understeers or oversteers severely
PRE-SAFE ®
takes the following measures
depending on the hazardous situation detec-
ted:
R the front sea tbelts are pre-tensioned.
R vehicles with the memory function: the
front-passenger seat is adjusted if it is in an
unfavourable position.
R vehicles with a multicontour seat: the air
pressure in the side bolsters of the seat
cushion and backrest is increased.
R if the vehicle skids, the fron tside windows
and, on the Coupé, the panorama sliding
sunroof, are closed so that only a small gap
remains.
If the hazardous situation passes without
resulting in an accident, PRE-SAFE ®
slackens
the belt pretensioning. The air pressure in the
side bolsters on the multicontour seat is
reduced again. All settings made by PRE-
SAFE ®
can then be reversed. 48
Occupant safetySafety
Page 66 of 389

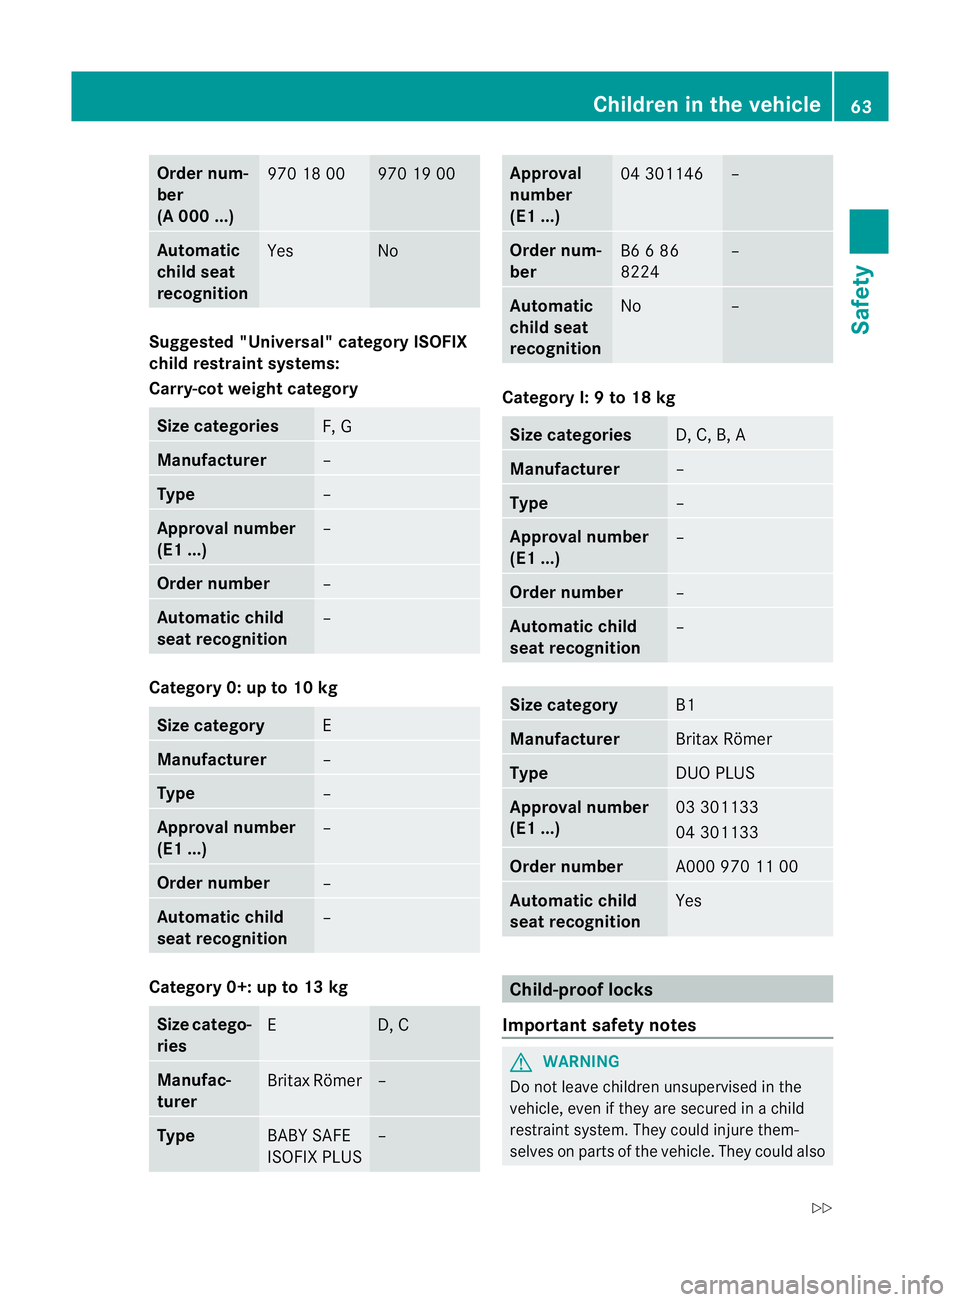
Order num-
ber
(A 000 ...)
970 18 00 970 19 00
Automatic
child seat
recognition
Yes No
Suggested "Universal" category ISOFIX
child restraint systems:
Carry-cot weight category
Size categories
F, G
Manufacturer
–
Type
–
Approval number
(E1 ...)
–
Order number
–
Automatic child
seat recognition
–
Category 0: up to 10 kg
Size category
E
Manufacturer
–
Type
–
Approval number
(E1 ...)
–
Order number
–
Automatic child
seat recognition
–
Category 0+: up to 13 kg
Size catego-
ries
E D, C
Manufac-
turer
Britax Römer –
Type
BABY SAFE
ISOFIX PLUS – Approval
number
(E1 ...)
04 301146 –
Order num-
ber
B6 6 86
8224 –
Automatic
child seat
recognition
No –
Category I: 9 to 18 kg
Size categories
D, C, B, A
Manufacturer
–
Type
–
Approval number
(E1 ...)
–
Order number
–
Automatic child
seat recognition
–
Size category
B1
Manufacturer
Britax Römer
Type
DUO PLUS
Approval number
(E1 ...)
03 301133
04 301133
Order number
A000 970 11 00
Automatic child
seat recognition
Yes
Child-proof locks
Important safety notes G
WARNING
Do not leave children unsupervised in the
vehicle, even if they are secured in a child
restraint system. They could injure them-
selves on parts of the vehicle. They could also Children in the vehicle
63Safety
Z
Page 75 of 389

Activating
X
Make sure that:
R
the doors are closed.
R the boot lid is closed.
Only then is the tow-away protection
primed.
X Lock the vehicle with the key or KEYLESS-
GO.
Tow-away protection is primed after
approximately 30 seconds.
To deactivate X
To switch off: unlockthe vehicle with the
key or KEYLESS-GO.
Tow-away protection is switched off auto-
matically.
Deactivating X
Remove the key from the ignition lock.
X Press button :.
Indicator lamp ;lights up briefly.
X Lock the vehicle with the key or KEYLESS-
GO.
Tow-away protection is deactivated.
Tow-away protection remains deactivated
until:
R the vehicle is unlocked again and
R a door is opened and closed again and
R the vehicle is locked again To prevent a false alarm, deactivate the tow-
away protection if you lock your vehicle and
it:
R
is being transported
R is being loaded onto a ferry or car trans-
porter, for example
R is parked on a movable surface, e.g. in a
split-level garage Interior motion sensor
Function When the interior motion sensor is primed, a
visual and audible alarm is triggered if move-
ment is detected in the vehicle interior. This
can occur if someone reaches into the vehicle
interior, for example.
Activating
X
Make sure that:
R
the side windows are closed.
R the panorama sliding sunroof is closed
(Coupé).
This will prevent false alarms.
X Cabriolet: make sure that the roof is
closed.
X Make sure that:
R
the doors are closed.
R the panorama sliding sunroof is closed
(Coupé).
R the boot lid is closed.
Only then is the interior motion sensor
primed.
X Lock the vehicle with the key or KEYLESS-
GO.
The interior motion sensor is primed after
approximately 30 seconds.
i Cabriolet: in some countries, the interior
motion sensor is primed even if the soft top
is open. You should only park the vehicle
when the soft top is closed. Otherwise, fall-
ing leaves or insects, for example, could
trigger a false alarm. 72
Anti-theft systemsSafety
Page 76 of 389

To deactivate
X
Unlock the vehicle with the key or KEY-
LESS-GO.
The interio rmotion sensor is switched off
automatically.
Deactivating X
Remove the key from the ignition lock.
X Press button :.
Indicator lamp ;flashes briefly.
X Lock the vehicle with the key or KEYLESS-
GO.
The interior motion sensor is deactivated.
The interior motion sensor remains deactiva-
ted until:
R the vehicle is unlocked again and
R a door is opened and closed again and
R the vehicle is locked again
To prevent a false alarm, deactivate the inte-
rior motion sensor if you lock your vehicle
and:
R people or animals remain in the vehicle.
R the side windows remain open.
R the panorama sliding sunroof remains open
(Coupé).
i UK only: your vehicle is equipped with a
double lock function. The doors cannot be
opened from the inside if the vehicle was
locked with the key or with KEYLESS-GO
(Y page 83). Deactivate the interior
motion sensor before you lock the vehicle.
The doors can then be opened from the inside after the vehicle has been locked
from the outside. Observe the "Important
safety notes" (Y
page 82). Anti-theft systems
73Safety Z
Page 78 of 389

Useful information
..............................76
Key ....................................................... 76
Doors .................................................... 82
Boot ...................................................... 85
Side windows ...................................... 87
Soft top (Cabriolet) .............................92
Sliding sunroof (Coupé) ....................103 75Opening and closing
Page 93 of 389

Convenience opening (Coupé)
General notes You can ventilate the vehicle before you start
driving
.To do this, the key is used to carry out
the following functions simultaneously:
R unlock the vehicle
R open the side windows
R open the panorama sliding sunroof and the
roller sunblind
R switch on the seat ventilation for the driv-
er's seat
i The convenience opening feature can
only be operated using the key. The key
must be close to the driver's door handle.
Convenience opening feature X
Point the tip of the key at the driver's door
handle.
X Press and hold the %button until the
side windows and the panorama sunroof
are in the desired position.
If the roller sunblind of the panorama slid-
ing sunroof is closed, the roller sunblind is
opened first.
X Press and hold the %button again until
the panorama sliding sunroof is in the
desired position.
X To interrupt convenience opening:
release the %button. Convenience closing (Coupé)
Important safety notes G
WARNING
When using the convenience closing feature,
make sure that nobody can become trapped.
Proceed as follows if there is a risk of entrap-
ment: With the key:
R
release the &button.
R press and hold the %button until the
side windows and the panorama sliding
sunroof open again.
With KEYLESS-GO:
R release the sensor surface on the door han-
dle.
R pull the door handle immediately and hold
it.
The side windows and the panorama sliding
sunroof open.
When you lock the vehicle, you can simulta-
neously:
R close the side windows
R close the panorama sliding sunroof
On vehicles with a panorama sliding sunroof,
you can then close the roller sunblind.
Using the key The key must be close to the driver's door
handle.
X
Point the tip of the key at the driver's door
handle.
X Press and hold the &button until the
side windows and the panorama sliding
sunroof are fully closed.
X Make sure that all the side windows and the
panorama sliding sunroof are closed.
On vehicles with a panorama sliding sunroof:
X Press and hold the &button again until
the roller sunblind of the panorama sliding
sunroof closes.
X To interrupt convenience closing:
release the &button.
Using KEYLESS-GO The KEYLESS-GO key must be outside the
vehicle. All the doors must be closed.90
Side windowsOpening and closing
Page 94 of 389

X
Touch recessed sensor surface :on the
door handle until the side windows and the
panorama sliding sunroof are fully closed.
i Make sure you only touch recessed sen-
sor surface :.
X Make sure that all the side windows and the
panorama sliding sunroof are closed.
On vehicles with a panorama sliding sunroof:
X Touch recessed sensor surface :on the
door handle again until the roller sunblind
of the panorama sliding sunroof closes.
X To interrupt convenience closing:
release recessed sensor surface :on the
door handle. Resetting the side windows
If a side window can no longer be closed fully,
you must reset it.
X Close all doors.
X Turn the key to position 1or 2in the ignition
lock.
X Pull the corresponding switch on the door
control panel until the side window is com-
pletely closed. (Y page 88)
X Hold the switch for an additional second. If the side window opens again slightly:
X
Immediately pull the corresponding switch
on the door control panel until the side win-
dow is completely closed (Y page 88).
X Hold the switch for an additional second.
X If the corresponding side window remains
closed after the button has been released,
the side window has been reset correctly.
If this is not the case, repeat the steps
above again. Side windows
91Opening and closing Z
Page 100 of 389

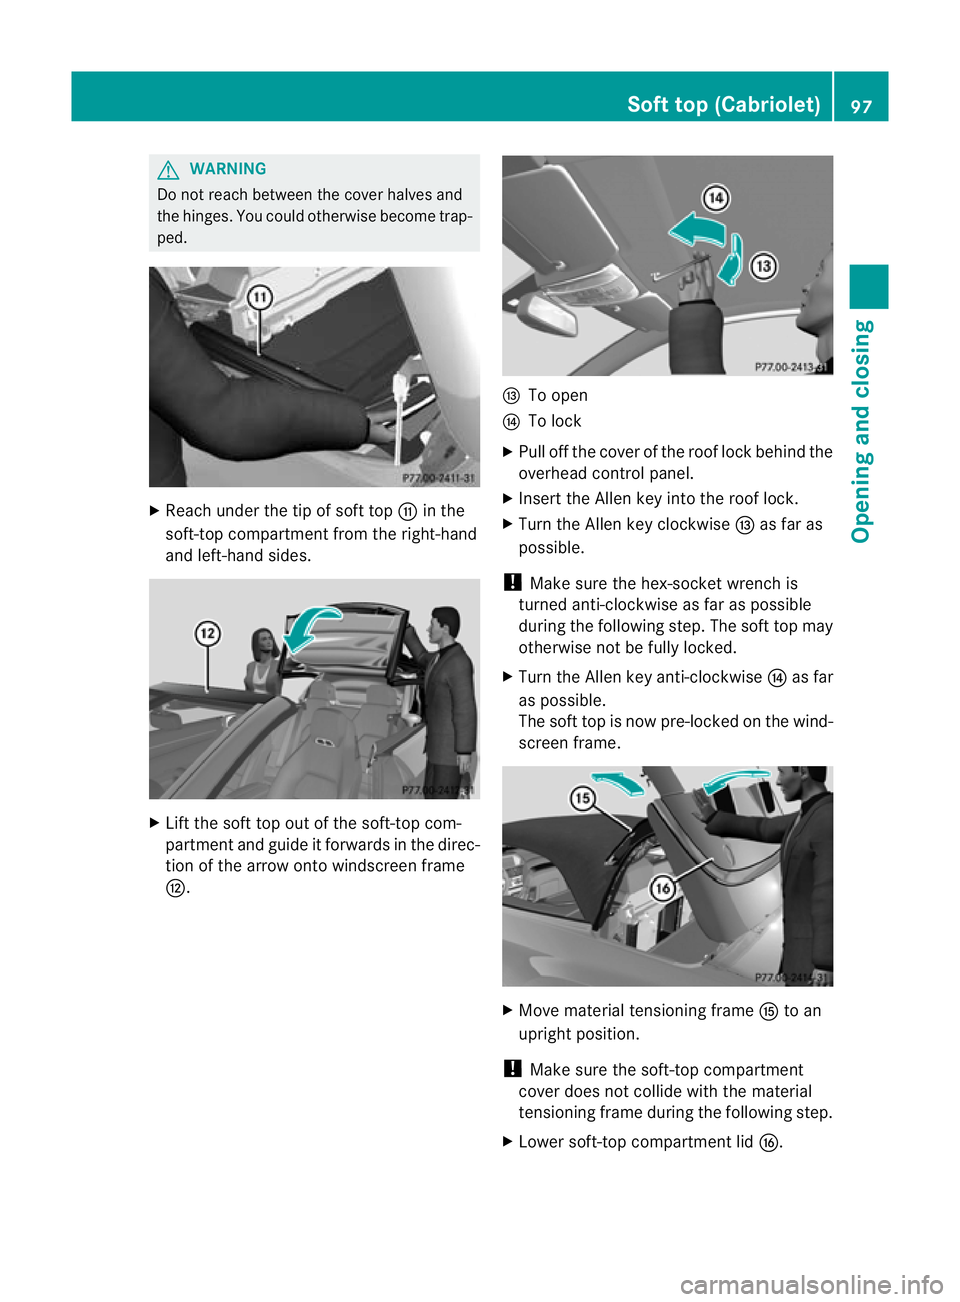
G
WARNING
Do not reach between the cover halves and
the hinges .You could otherwise become trap-
ped. X
Reach under the tip of soft top Gin the
soft-top compartment from the right-hand
and left-hand sides. X
Lift the soft top out of the soft-top com-
partment and guide it forwards in the direc-
tion of the arrow onto windscreen frame
H. I
To open
J To lock
X Pull off the cover of the roof lock behind the
overhead control panel.
X Insert the Allen key into the roof lock.
X Turn the Allen key clockwise Ias far as
possible.
! Make sure the hex-socket wrench is
turned anti-clockwise as far as possible
during the following step. The soft top may
otherwise not be fully locked.
X Turn the Allen key anti-clockwise Jas far
as possible.
The soft top is now pre-locked on the wind-
screen frame. X
Move material tensioning frame Kto an
upright position.
! Make sure the soft-top compartment
cover does not collide with the material
tensioning frame during the following step.
X Lower soft-top compartment lid L. Soft top (Cabriolet)
97Opening and closing Z