2012 MERCEDES-BENZ CLS SHOOTING BRAKE headlamp
[x] Cancel search: headlampPage 127 of 405
change them. Otherwise, you could be burned
if you touch them.
Keep bulbs ou
tofthe reach of children. Oth-
erwise, they could damage the bulbs, for
example, and injure themselves.
Never use a bulb which has been dropped.
Such a bulb may break or even explode and
injure you.
Halogen bulbs are pressurised and can
explode when you change them, particularly
if they are very hot. You should therefore wear
eye protection and gloves when you are
changing them.
There are bulbs other than xenon and LED
bulbs that you cannot replace. Replace only
the bulbs listed (Y page 124). Have the bulbs
that you cannot replace yourself changed at
a qualified specialist workshop.
If you require assistance changing bulbs, con-
sult a qualified specialist workshop.
Do not touch the glass tube of new bulbs with
your bare hands. Even minor contamination
can burn into the glass surface and reduce
the service life of the bulbs. Always use a lint-
free cloth or only touch the base of the bulb
when fitting.
Only use bulbs of the correct type.
If the new bulb still does not light up, consult
a qualified specialist workshop.
Bulbs and lamps are an important aspect of
vehicle safety. You must therefore make sure
that these function correctly at all times.
Have the headlamp setting checked regularly. Overview of bulb replacement
–bulbs
You can replace the following bulbs. The
details for the bulb type can be found in the
legend. Tail lamps
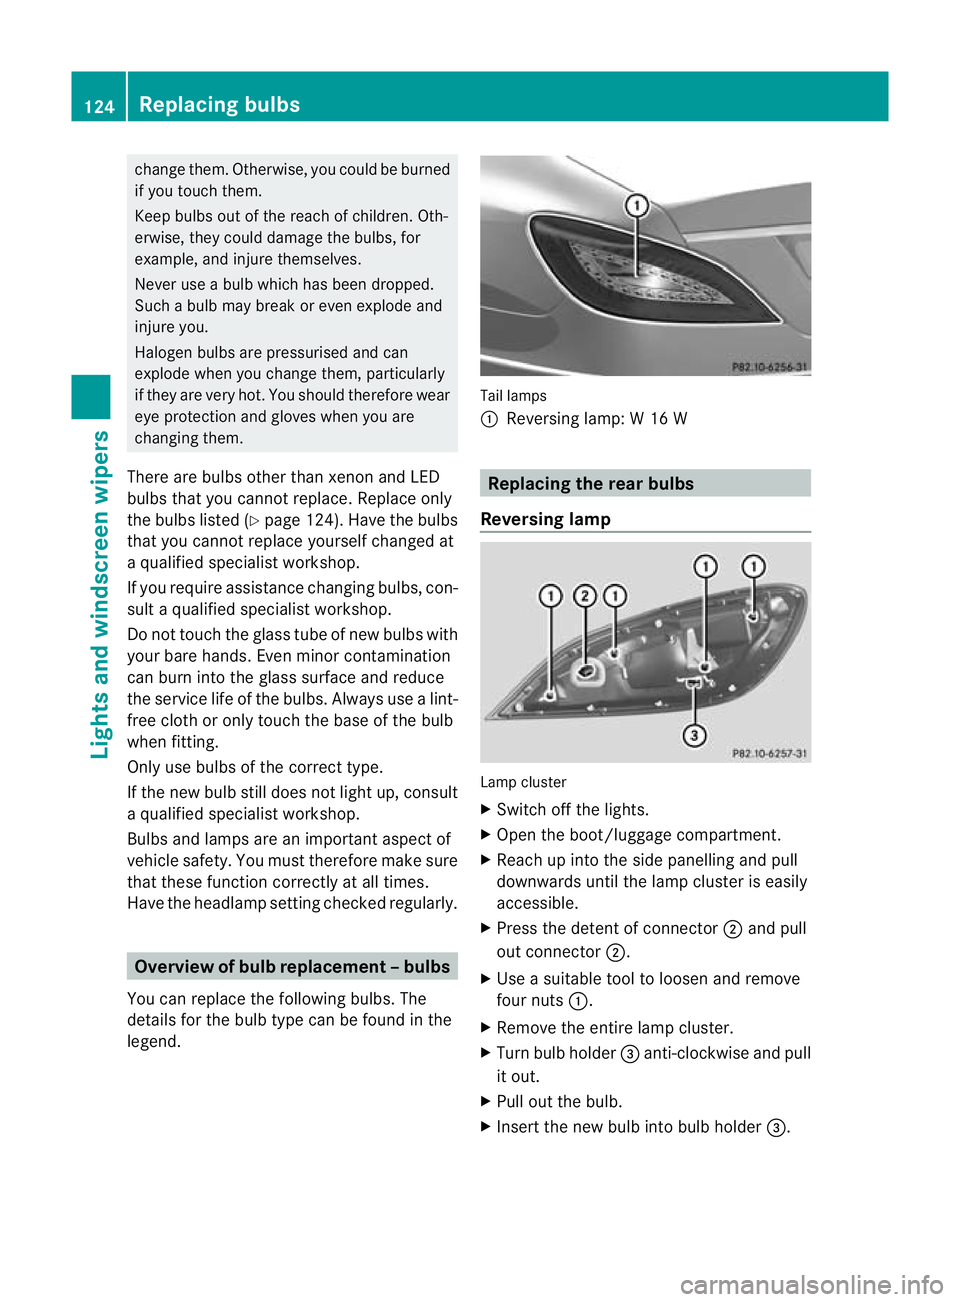
:
Reversing lamp: W 16 W Replacing the rear bulbs
Reversing lamp Lamp cluster
X
Switch off the lights.
X Open the boot/luggage compartment.
X Reach up into the side panelling and pull
downwards until the lamp cluster is easily
accessible.
X Press the detent of connector ;and pull
out connector ;.
X Use a suitable tool to loosen and remove
four nuts :.
X Remove the entire lamp cluster.
X Turn bulb holder =anti-clockwise and pull
it out.
X Pull out the bulb.
X Insert the new bulb into bulb holder =.124
Replacing bulbsLights and windscreen wipers
Page 208 of 405
Permanently showing detected traffic
signs in the multifunction display
X Display Speed Limit Assist using the on-
board computer (Y page 236).
At raffic sign indicating a speed limi torthe
end of a speed limit :appears in the mul-
tifunction display as soon as it is detected.
Traffic sign indicating a speed limit :is
generally displayed until:
R a traffic sign indicating the end of the
speed limit is detected.
R you make a turn.
R you leave or enter a town.
R the road type changes (e.g. motorway,
country road).
R you have travelled a certain minimum
distance without the traffic sign being
repeated or detected again.
i You can also activate Speed Limit Assist
using COMAND APS. The maximum per-
missible speed is then shown in the
COMAND display; see the COMAND APS
operating instructions. Night View Assist Plus
Important safety notes G
WARNING
Night View Assist Plus is only an aid designed
to assist driving and does not relieve you of
the responsibility to pay attention. Continue
to look through the windscreen instead of
relying on the Night View Assist Plus display.
You are responsible for safety and must drive
in accordance with traffic conditions. You
could otherwise endanger yourself and oth-
ers. The system may be impaired or may not func-
tion if:
R
there is poor visibility, e.g. due to snow,
rain, fog or spray.
R the windscreen is dirty, misted up or cov-
ered, for instance by a sticker, in the vicinity
of the camera.
R on bends, on uphill gradients or downhill
gradients. G
WARNING
Night View Assist Plus does not detect
objects in the immediate vicinity of the vehi-
cle. Look through the windscreen when
manoeuvring. Make sure that there are no
people or animals in the area in which you are
manoeuvring. In addition to the illumination provided by the
normal headlamps, Night View Assist Plus
uses infrared light to illuminate the road.
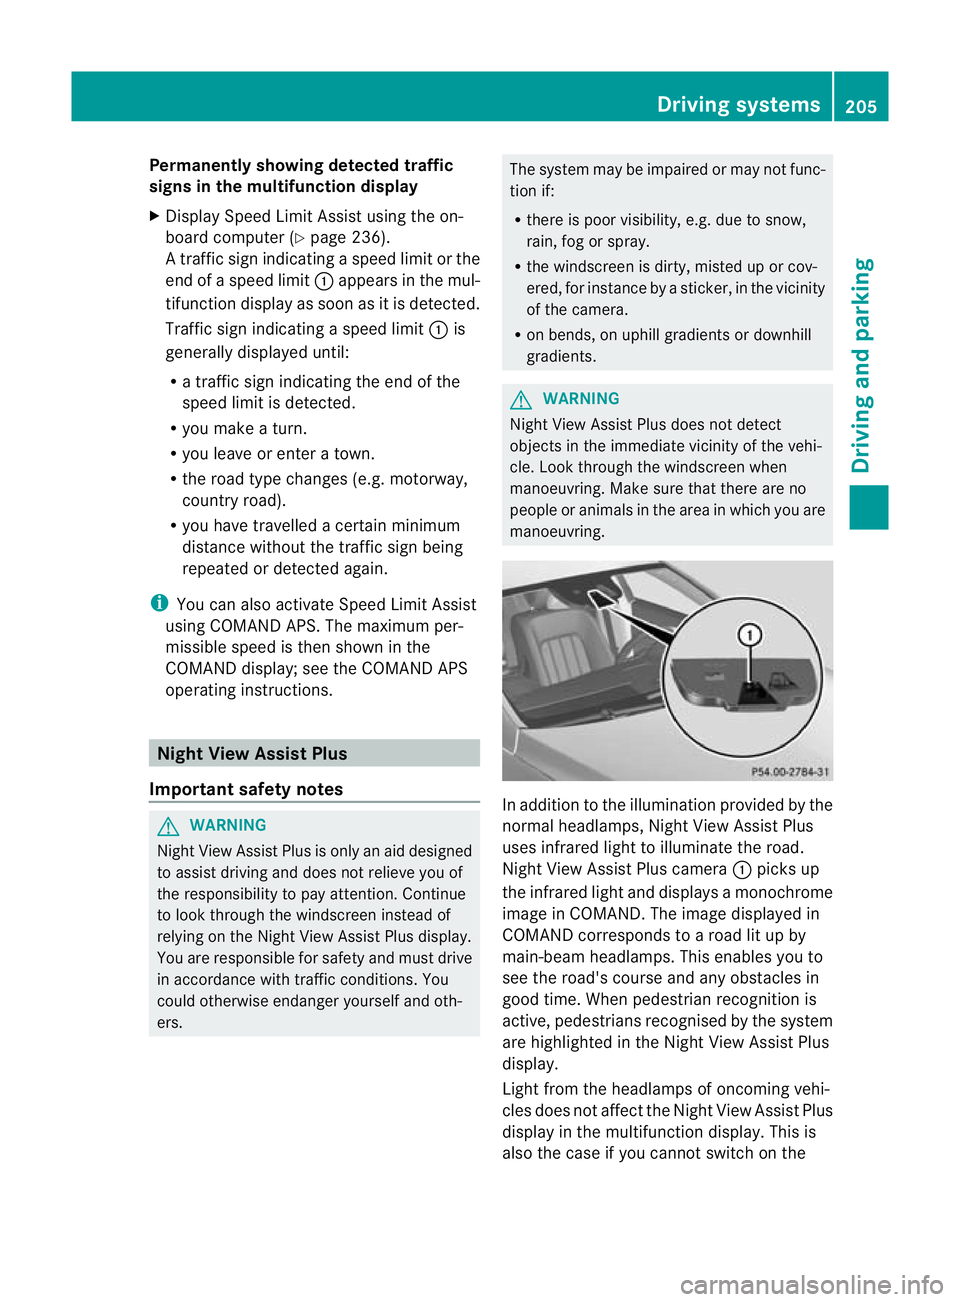
Night View Assist Plus camera
:picks up
the infrared light and displays a monochrome
image in COMAND. The image displayed in
COMAND corresponds to a road lit up by
main-beam headlamps. This enables you to
see the road's course and any obstacles in
good time. When pedestrian recognition is
active, pedestrians recognised by the system
are highlighted in the Night View Assist Plus
display.
Light from the headlamps of oncoming vehi-
cles does not affect the Night View Assist Plus
display in the multifunction display. This is
also the case if you cannot switch on the Driving systems
205Driving and parking Z
Page 209 of 405
main-bea
mheadlamps due to oncoming traf-
fic.
i Infrared light is not visible to the human
eye and therefore does not dazzle. Night
View Assist Plus can therefore remain
switched on even if there is oncoming traf-
fic.
Activating Night View Assist Plus Activation conditions
You can only activate Night View Assist Plus
if:
R the key is in position 2in the ignition lock.
R it is dark.
R the light switch is in the ÃorL posi-
tion.
R reverse gear has not been engaged.
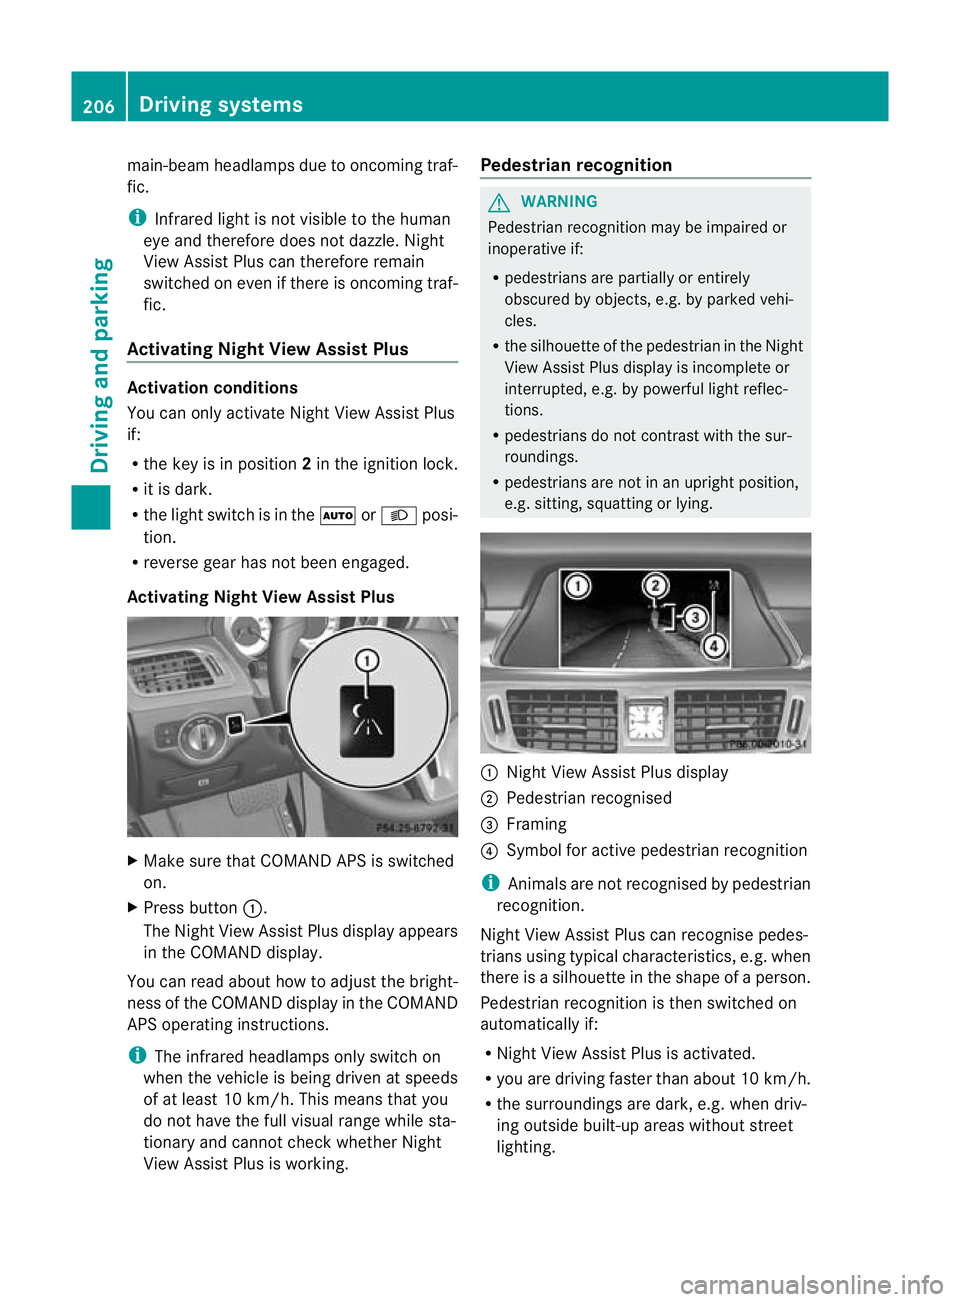
Activating Night View Assist Plus X
Make sure that COMAND APS is switched
on.
X Press button :.
The Night View Assist Plus display appears
in the COMAND display.
You can read about how to adjust the bright-
ness of the COMAND display in the COMAND
APS operating instructions.
i The infrared headlamps only switch on
when the vehicle is being driven at speeds
of at least 10 km/h. This means that you
do not have the full visual range while sta-
tionary and cannot check whether Night
View Assist Plus is working. Pedestrian recognition G
WARNING
Pedestrian recognition may be impaired or
inoperative if:
R pedestrians are partially or entirely
obscured by objects, e.g. by parked vehi-
cles.
R the silhouette of the pedestrian in the Night
View Assist Plus display is incomplete or
interrupted, e.g. by powerful light reflec-
tions.
R pedestrians do not contrast with the sur-
roundings.
R pedestrians are not in an upright position,
e.g. sitting, squatting or lying. :
Night View Assist Plus display
; Pedestrian recognised
= Framing
? Symbol for active pedestrian recognition
i Animals are not recognised by pedestrian
recognition.
Night View Assist Plus can recognise pedes-
trians using typical characteristics, e.g. when
there is a silhouette in the shape of a person.
Pedestrian recognition is then switched on
automatically if:
R Night View Assist Plus is activated.
R you are driving faster than about 10 km/h.
R the surroundings are dark, e.g .when driv-
ing outside built-up areas without street
lighting. 206
Driving systemsDriving and parking
Page 243 of 405
![MERCEDES-BENZ CLS SHOOTING BRAKE 2012 Owners Manual X
Press ato confirm.
X Press the :or9 button to select the
Permanent display: function.
You will see the selected setting: outsidetemperature or
Dig. speedo [mph] .
X Press the abutton to save the set MERCEDES-BENZ CLS SHOOTING BRAKE 2012 Owners Manual X
Press ato confirm.
X Press the :or9 button to select the
Permanent display: function.
You will see the selected setting: outsidetemperature or
Dig. speedo [mph] .
X Press the abutton to save the set](/manual-img/4/55492/w960_55492-242.png)
X
Press ato confirm.
X Press the :or9 button to select the
Permanent display: function.
You will see the selected setting: outsidetemperature or
Dig. speedo [mph] .
X Press the abutton to save the setting.
i Speed is displayed in mph.
i Vehicles for the United Kingdom: this
function is unavailable.
Lights Setting the brightness for the instrument
cluster lighting and switches
The lighting in the instrument cluster, in the
displays and the controls in the vehicle inte-
rior can be adjusted using the BrightnessDisplay/switches: function.
X Press the =or; button on the steer-
ing wheel to select the Settings menu.
X Press the :or9 button to select the
Light submenu.
X Press ato confirm.
X Press the :or9 button to select the
Brightness Display/Switches: func-
tion.
You will see the selected setting.
X Press ato confirm.
X Press the :or9 button to adjust the
brightness to any level from Level 1 to
Level 5 (bright).
X Press the aor% button to save the
setting.
If the light switch is set to Ã,Tor
L, the brightness is dependent upon
the brightness of the ambient light.
i The light sensor in the instrument cluster
automatically controls the brightness of
the multifunction display.
In daylight, the displays in the instrument
cluster are not illuminated. Switching the Daytime driving lights on/
off
The
Day lights function can only be
switched on with the engine turned off.
X Press the =or; button on the steer-
ing wheel to select the Settings menu.
X Press the :or9 button to select the
Light submenu.
X Press ato confirm.
X Press the :or9 button to select the
Day lights: function.
If the Day lights: function has been
switched on, the cone of light and the
W symbol in the multifunction display
are shown in red.
X Press the abutton to save the setting.
Further information on daytime driving lights
(Y page 115).
Switching the Intelligent Light System
on/off
X Press the =or; button on the steer-
ing wheel to select the Settings menu.
X Press the :or9 button to select the
Light submenu.
X Press ato confirm.
X Press the :or9 button to select the
Intell. Light System function.
If the Intell. Light System function has
been switched on, the cone of light and the
L symbol in the multifunction display
are shown in red.
X Press the abutton to save the setting.
When you activate Intell. Light System ,
you activate the following functions:
R motorway mode
R active light function
R cornering light function
R extended range foglamps
If you set the dipped-beam headlamps for
driving on the right/left, the multifunction
display shows the Intell. Light System:
system inoperative Inactive for240
Menus and submenusOn-board computer and displays
Page 244 of 405
left-side traffic or
Intell. Light System: System inoperative Inactive
for right-side traffic (Y
page 241)
display message instead of the Intell.Light System function in the
Light sub-
menu.
Further information on the Intelligent Light
System (Y page 119).
Setting the dipped-beam headlamps for
driving on the left/right
X Press the =or; button on the steer-
ing wheel to select the Settings menu.
X Press the :or9 button to select the
Light submenu.
X Press ato confirm.
X Press the :or9 button to select the
Dipped beams Setting for: function.
You will see the selected setting: Right-side traffic or
Left-side traffic .
X Press the abutton to save the setting.
If you change the setting, conversion does
not take place until the next time the vehi-
cle is stationary.
This function is only available on vehicles with
the Intelligent Light System.
You can use this function to switch between
symmetrical and asymmetrical dipped beam
(Y page 114).
If you set the dipped-beam headlamps for
driving on the right/left, then motorway
mode and the extended range foglamps are
unavailable.
Aq ualified specialist workshop can set the
dipped-beam headlamps for driving on the
right or left .
Switching Adaptive Highbeam Assis ton/
off
X Press the =or; button on the steer-
ing wheel to select the Settings menu.
X Press the :or9 button to select the
Light submenu.
X Press ato confirm. X
Press the :or9 button to select the
Adapt. main beam function.
If the Adapt. main beam function has
been switched on, the cone of light and the
_ symbol in the upper multifunction
display are shown in red.
X Press the abutton to save the setting.
For further information about Adaptive High-
beam Assist, see (Y page 121).
Setting the brightness of the ambient
lighting
X Press the =or; button on the steer-
ing wheel to select the Settings menu.
X Press the :or9 button to select the
Light submenu.
X Press ato confirm.
X Press the :or9 button to select the
Amb. light +/- function.
You will see the selected setting.
X Press ato confirm.
X Press the :or9 button to adjust the
brightness to any level from Off to
Level 5 (bright).
X Press the aor% button to save the
setting.
Setting the ambient lighting colour
X Press the =or; button on the steer-
ing wheel to select the Settings menu.
X Press the :or9 button to select the
Light submenu.
X Press ato confirm.
X Press the :or9 button to select the
Ambient light colour function.
X Press ato confirm.
X Press the :or9 button to set the
colour to SOLAR ,
NEUTRAL or
POLAR .
X Press the aor% button to save the
setting. Menus and submenus
241On-board computer and displays Z
Page 245 of 405
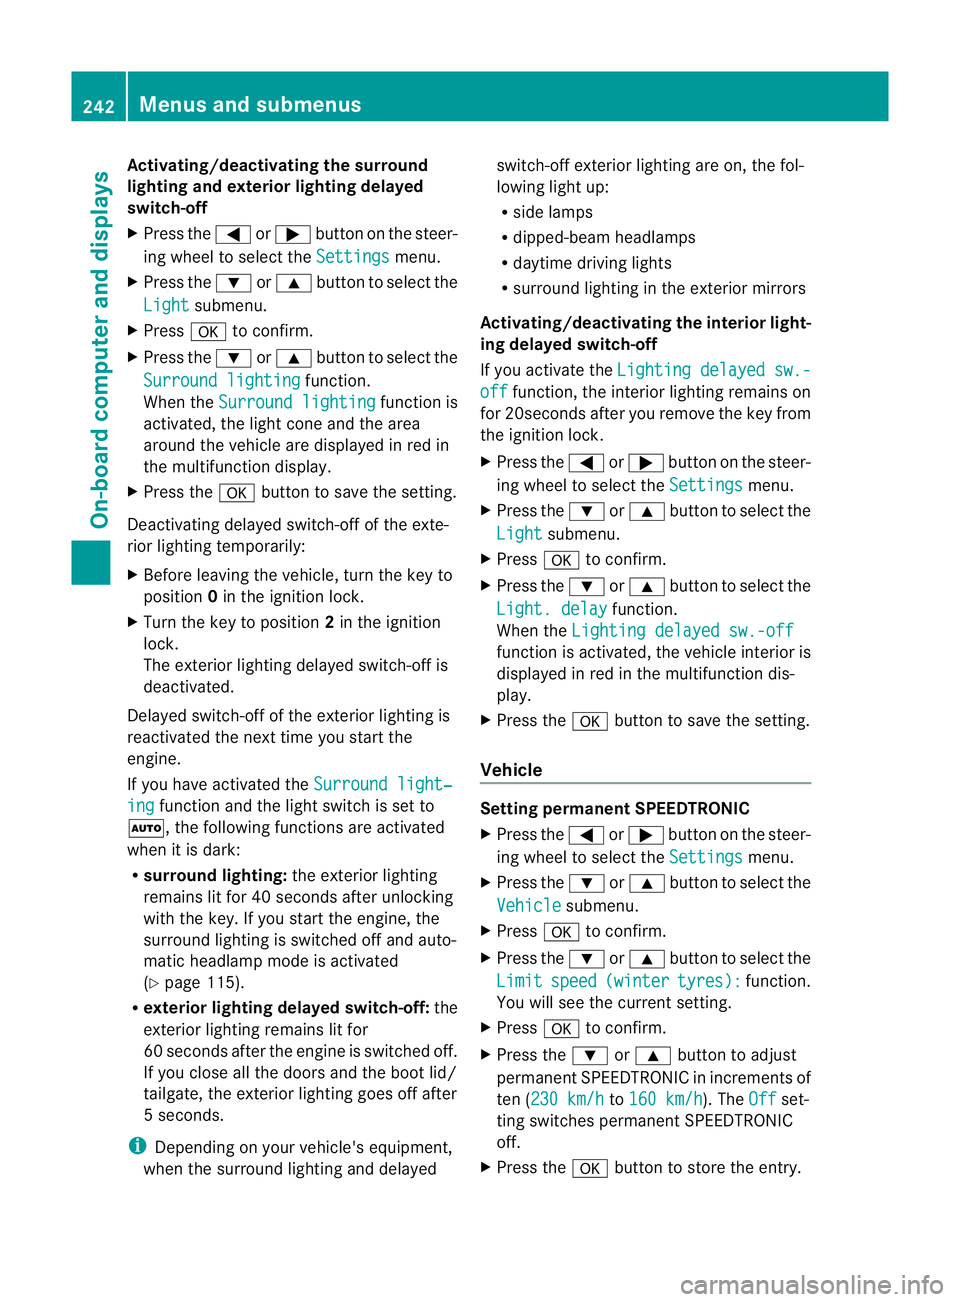
Activating/deactivating the surround
lighting and exterior lightin
gdelayed
switch-off
X Press the =or; button on the steer-
ing wheel to selec tthe Settings menu.
X Press the :or9 button to select the
Light submenu.
X Press ato confirm.
X Press the :or9 button to select the
Surround lighting function.
When the Surround lighting function is
activated, the light cone and the area
around the vehicle are displayed in red in
the multifunction display.
X Press the abutton to save the setting.
Deactivating delayed switch-off of the exte-
rior lighting temporarily:
X Before leaving the vehicle, turn the key to
position 0in the ignition lock.
X Turn the key to position 2in the ignition
lock.
The exterior lighting delayed switch-off is
deactivated.
Delayed switch-off of the exterior lighting is
reactivated the next time you start the
engine.
If you have activated the Surround light‐ing function and the light switch is set to
Ã, the following functions are activated
when it is dark:
R surround lighting: the exterior lighting
remains lit for 40 seconds after unlocking
with the key. If you start the engine, the
surround lighting is switched off and auto-
matic headlamp mode is activated
(Y page 115).
R exterior lighting delayed switch-off: the
exterior lighting remains lit for
60 seconds after the engine is switched off.
If you close all the doors and the boot lid/
tailgate, the exterior lighting goes off after
5s econds.
i Depending on your vehicle's equipment,
when the surround lighting and delayed switch-off exterior lighting are on, the fol-
lowing light up:
R
side lamps
R dipped-beam headlamps
R daytime driving lights
R surround lighting in the exterior mirrors
Activating/deactivating the interior light-
ing delayed switch-off
If you activate the Lighting delayed sw.- off function, the interior lighting remains on
for 20seconds after you remove the key from
the ignition lock.
X Press the =or; button on the steer-
ing wheel to select the Settings menu.
X Press the :or9 button to select the
Light submenu.
X Press ato confirm.
X Press the :or9 button to select the
Light. delay function.
When the Lighting delayed sw.-off function is activated, the vehicle interior is
displayed in red in the multifunction dis-
play.
X Press the abutton to save the setting.
Vehicle Setting permanent SPEEDTRONIC
X
Press the =or; button on the steer-
ing wheel to select the Settings menu.
X Press the :or9 button to select the
Vehicle submenu.
X Press ato confirm.
X Press the :or9 button to select the
Limit speed (winter tyres): function.
You will see the curren tsetting.
X Press ato confirm.
X Press the :or9 button to adjust
permanent SPEEDTRONIC in increment sof
ten ( 230 km/h to
160 km/h ). The
Off set-
ting switches permanent SPEEDTRONIC
off.
X Press the abutton to store the entry. 242
Menus and submenusOn-board computer and displays
Page 258 of 405
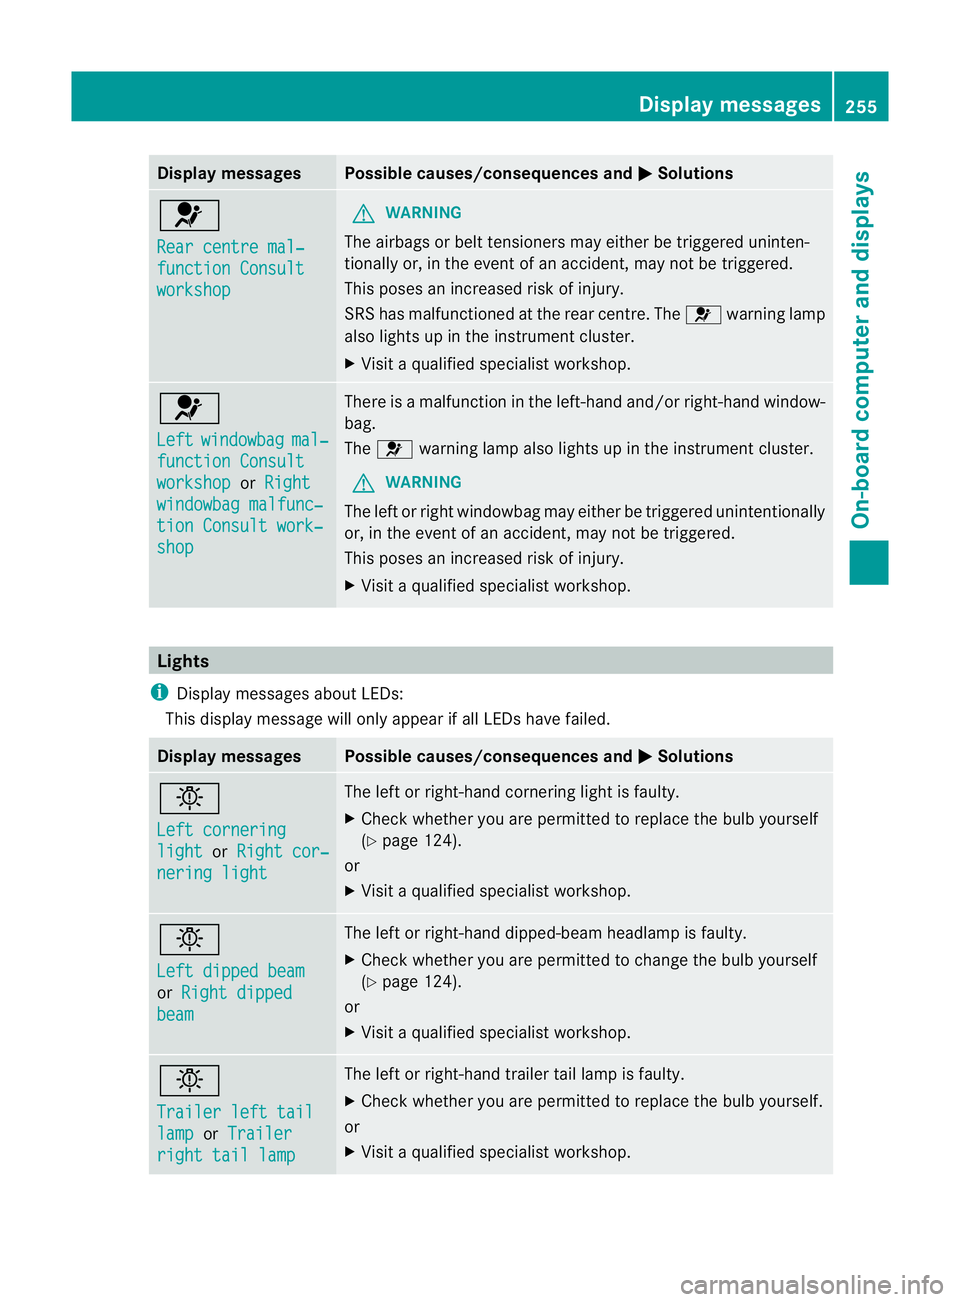
Display messages Possible causes/consequences and
M Solutions
6
Rear centre mal‐
function Consult
workshop G
WARNING
The airbags or belt tensioners may either be triggered uninten-
tionally or, in the event of an accident, may no tbe triggered.
This poses an increased risk of injury.
SRS has malfunctioned at the rear centre. The 6warning lamp
also lights up in the instrument cluster.
X Visit a qualified specialist workshop. 6
Left
windowbag mal‐
function Consult
workshop or
Right windowbag malfunc‐
tion Consult work‐
shop There is a malfunction in the left-hand and/or right-hand window-
bag.
The
6 warning lamp also lights up in the instrument cluster.
G WARNING
The left or right windowbag may either be triggered unintentionally
or, in the event of an accident, may not be triggered.
This poses an increased risk of injury.
X Visit a qualified specialist workshop. Lights
i Display messages about LEDs:
This display message will only appear if all LEDs have failed. Display messages Possible causes/consequences and
M Solutions
b
Left cornering
light or
Right cor‐ nering light The left or right-hand cornering light is faulty.
X
Check whether you are permitted to replace the bulb yourself
(Y page 124).
or
X Visit a qualified specialist workshop. b
Left dipped beam
or
Right dipped beam The left or right-hand dipped-beam headlamp is faulty.
X
Check whether you are permitted to change the bulb yourself
(Y page 124).
or
X Visit a qualified specialist workshop. b
Trailer left tail
lamp or
Trailer right tail lamp The left or right-hand trailer tail lamp is faulty.
X
Check whether you are permitted to replace the bulb yourself.
or
X Visit a qualified specialist workshop. Display messages
255On-board computer and displays Z
Page 279 of 405
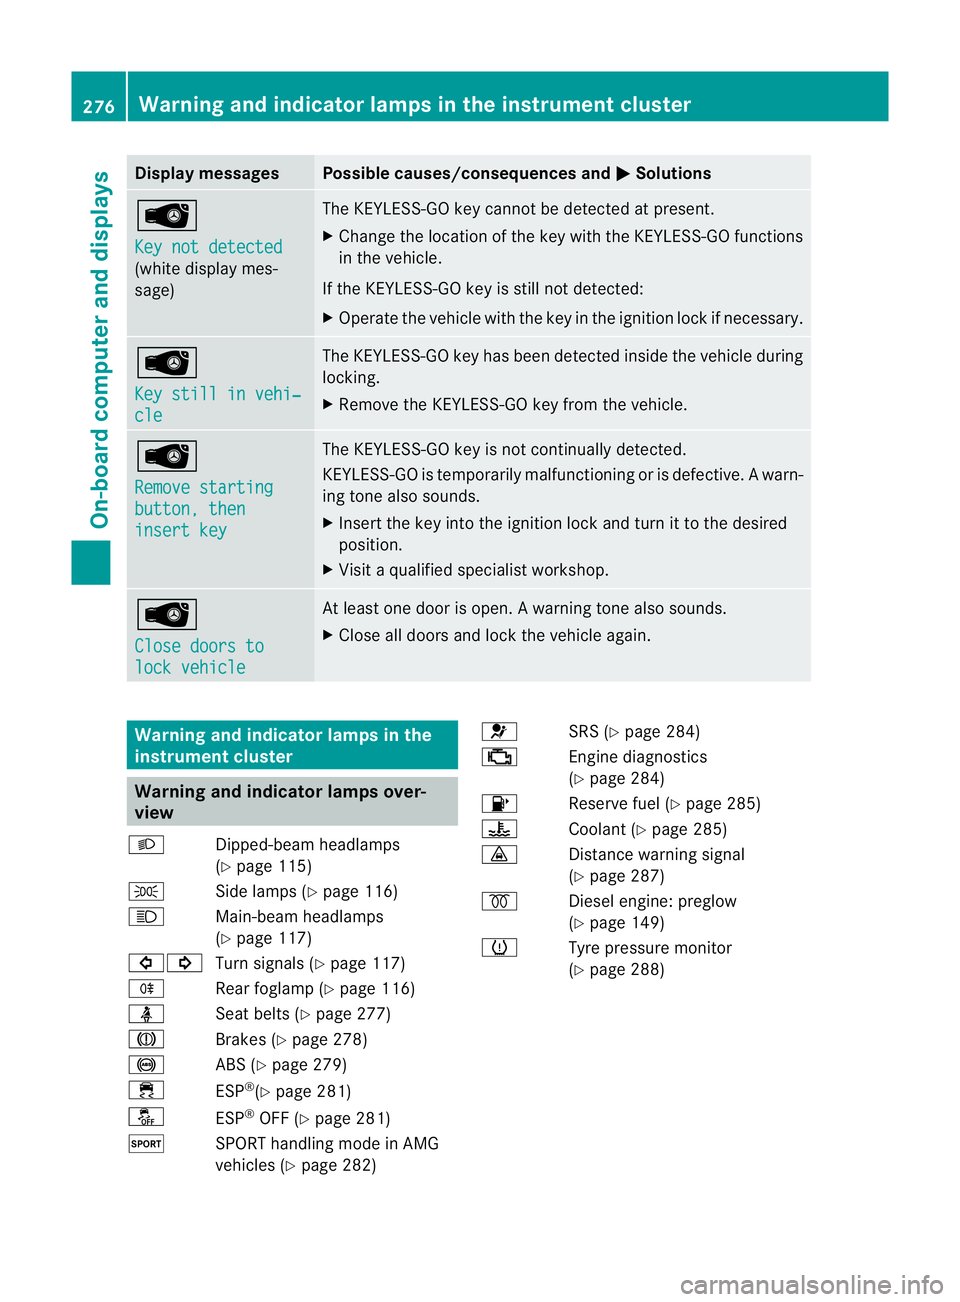
Display messages Possible causes/consequences and
M Solutions
Â
Key not detected
(white display mes-
sage) The KEYLESS-GO key cannot be detected at present.
X
Change the location of th ekey with the KEYLESS-GO functions
in the vehicle.
If the KEYLESS-GO key is still not detected:
X Operate the vehicle with the key in the ignition lock if necessary. Â
Key still in vehi‐
cle The KEYLESS-GO key has been detected inside the vehicle during
locking.
X
Remove the KEYLESS-GO key from the vehicle. Â
Remove starting
button, then
insert key The KEYLESS-GO key is not continually detected.
KEYLESS-GO is temporarily malfunctioning or is defective.
Awarn-
ing tone also sounds.
X Insert the key into the ignition lock and turn it to the desired
position.
X Visi taqualified specialist workshop. Â
Close doors to
lock vehicle At least one door is open.
Awarning tone also sounds.
X Close all doors and loc kthe vehicle again. Warning and indicator lamps in the
instrument cluster
Warning and indicator lamps over-
view
L Dipped-beam headlamps
(Ypage 115)
T Side lamps (Y page 116)
K Main-beam headlamps
(Ypage 117)
#! Turn signals (Y page 117)
R Rear foglamp (Y page 116)
ü Seat belts (Y page 277)
J Brakes (Ypage 278)
! ABS (Ypage 279)
÷ ESP®
(Y page 281)
å ESP®
OFF (Y page 281)
M SPORT handling mode in AMG
vehicles (Ypage 282) 6
SRS (Ypage 284)
; Engine diagnostics
(Ypage 284)
8 Reserve fuel (Y page 285)
? Coolant (Ypage 285)
· Distance warning signal
(Ypage 287)
% Diesel engine: preglow
(Ypage 149)
h Tyre pressure monitor
(Y page 288) 276
Warning and indicator lamps in the instrument clusterOn-board computer and displays