2012 MERCEDES-BENZ CLS SHOOTING BRAKE wheel
[x] Cancel search: wheelPage 378 of 405
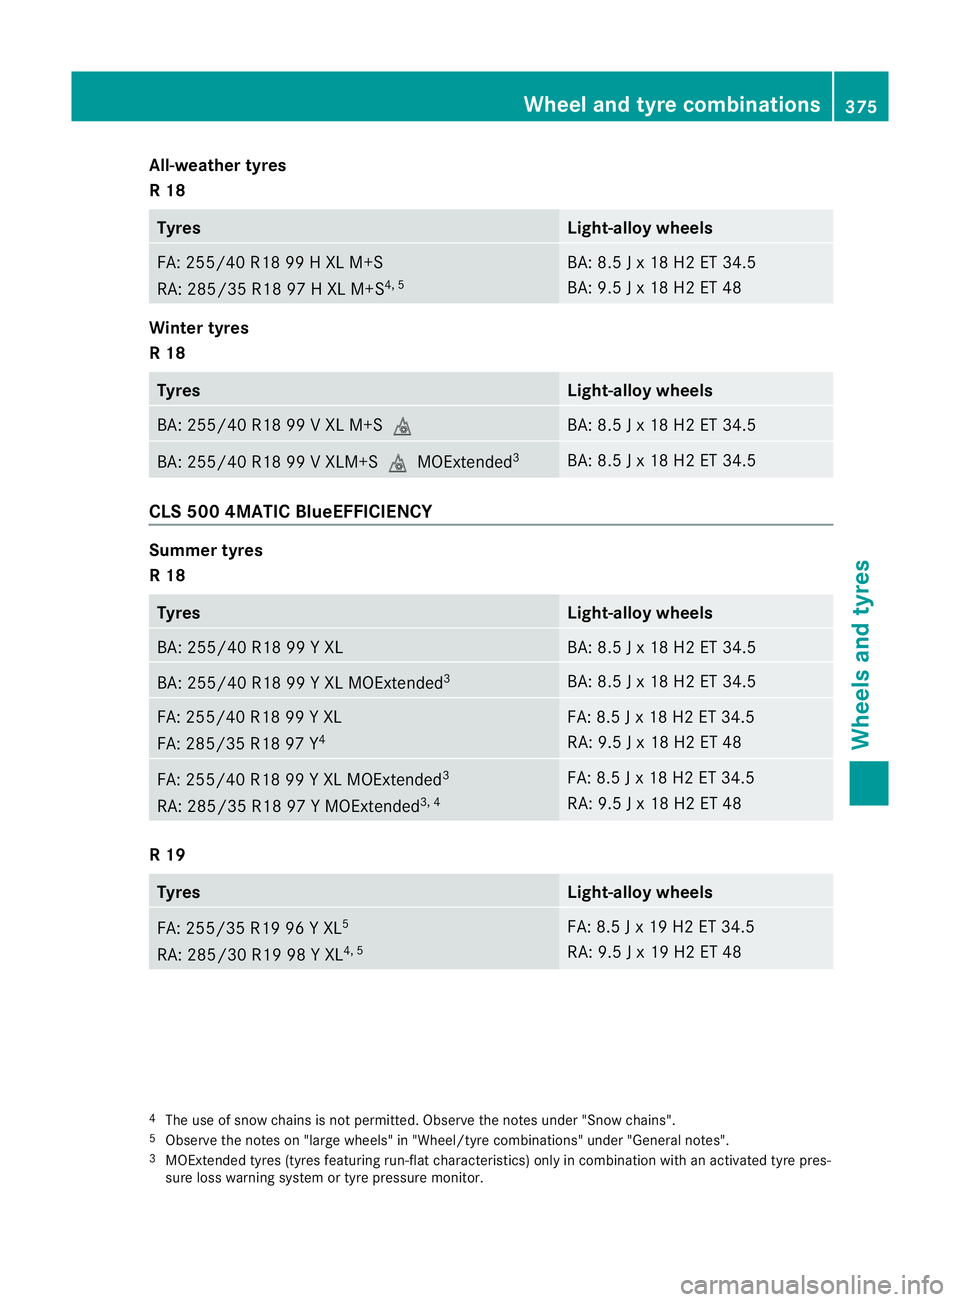
All-weather tyres
R 18
Tyres Light-allo
ywheels FA: 255/40 R18 99 H XL M+S
RA: 285/35 R18 97 H XL M+S
4, 5 BA: 8.5 J x 18 H2 ET 34.5
BA: 9.5 J x 18 H2 ET 48
Winter tyres
R 18
Tyres Light-alloy wheels
BA: 255/40 R18 99 V XL M+S
i BA: 8.5 J x 18 H2 ET 34.5
BA: 255/40 R18 99 V XLM+S
iMOExtended3 BA: 8.5 J x 18 H2 ET 34.5
CLS 500 4MATIC BlueEFFICIENCY
Summer tyres
R 18
Tyres Light-alloy wheels
BA: 255/40 R18 99 Y XL BA: 8.5 J x 18 H2 ET 34.5
BA: 255/40 R18 99 Y XL MOExtended
3 BA: 8.5 J x 18 H2 ET 34.5
FA: 255/40 R18 99 Y XL
FA: 285/35 R18 97 Y
4 FA: 8.5 J x 18 H2 ET 34.5
RA: 9.5 J x 18 H2 ET 48
FA: 255/40 R18 99 Y XL MOExtended
3
RA: 285/35 R18 97 Y MOExtended 3, 4 FA: 8.5 J x 18 H2 ET 34.5
RA: 9.5 J x 18 H2 ET 48
R 19
Tyres Light-alloy wheels
FA: 255/35 R19 96 Y XL
5
RA: 285/30 R19 98 Y XL 4, 5 FA: 8.5 J x 19 H2 ET 34.5
RA: 9.5 J x 19 H2 ET 48
4
The use of snow chains is not permitted. Observe the notes under "Snow chains".
5 Observe the notes on "large wheels" in "Wheel/tyre combinations" under "General notes".
3 MOExtended tyres (tyres featuring run-fla tcharacteristics) only in combination with an activated tyre pres-
sure loss warning system or tyre pressure monitor. Wheel and tyre combinations
375Wheels and tyres Z
Page 379 of 405
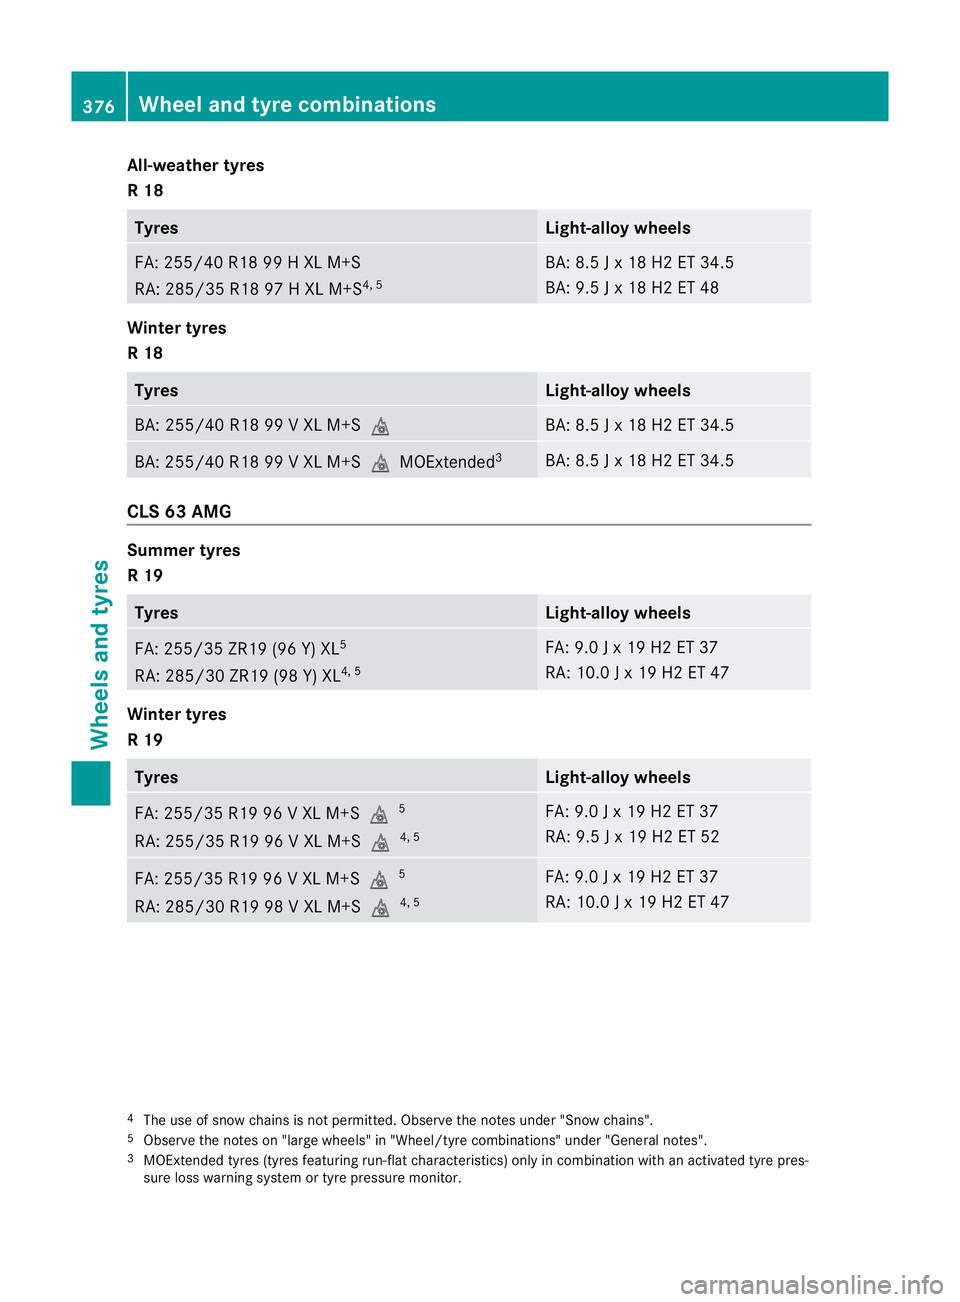
All-weather tyres
R 18
Tyres Light-allo
ywheels FA: 255/40 R18 99 H XL M+S
RA: 285/35 R18 97 H XL M+S
4, 5 BA: 8.5 J x 18 H2 ET 34.5
BA: 9.5 J x 18 H2 ET 48
Winter tyres
R 18
Tyres Light-alloy wheels
BA: 255/40 R18 99 V XL M+S
i BA: 8.5 J x 18 H2 ET 34.5
BA: 255/40 R18 99 V XL M+S
iMOExtended3 BA: 8.5 J x 18 H2 ET 34.5
CLS 63 AMG
Summer tyres
R 19
Tyres Light-alloy wheels
FA: 255/35 ZR19 (96 Y) XL
5
RA: 285/30 ZR19 (98 Y) XL 4, 5 FA: 9.0 J x 19 H2 ET 37
RA: 10.0 J x 19 H2 ET 47
Winter tyres
R 19
Tyres Light-alloy wheels
FA: 255/35 R19 96 V XL M+S
i5
RA: 255/35 R19 96 V XL M+S i4, 5 FA: 9.0 J x 19 H2 ET 37
RA: 9.5 J x 19 H2 ET 52
FA: 255/35 R19 96 V XL M+S
i5
RA: 285/30 R19 98 V XL M+S i4, 5 FA: 9.0 J x 19 H2 ET 37
RA: 10.0 J x 19 H2 ET 47
4
The use of snow chains is not permitted. Observe the notes under "Snow chains".
5 Observe the notes on "large wheels" in "Wheel/tyre combinations" under "General notes".
3 MOExtended tyres (tyres featuring run-fla tcharacteristics) only in combination with an activated tyre pres-
sure loss warning system or tyre pressure monitor. 376
Wheel and tyre combinationsWheels and tyres
Page 380 of 405
Emergency spare wheel
Important safety notes
G
WARNING
The wheel/tyre dimensions and the tyre type
of the spare wheel/emergency spare wheel
and the wheel to be replaced may differ. Fit-
ting a spare wheel/emergency spare wheel
may severely impair the driving characteris-
tics. There is a risk of accident.
To prevent hazardous situations:
R Adap tyour driving style accordingly and
drive carefully.
R Never fit more than one spare wheel/emer-
gency spare wheel if the dimesions are dif-
ferent to those of the wheel being replaced.
R Only use a spare wheel/emergency spare
wheel briefly if the dimesions are different
to those of the wheel being replaced.
R Do not switch off ESP ®
.
R Have the spare wheel/emergency spare
wheel in question replaced at the nearest
qualified specialist workshop. Make sure
that the wheel/tyre dimensions and tyre
type are correct.
When using an emergency spare wheel or
spare wheel of a different size, you must not
exceed the maximum speed of 80 km/h.
Snow chains must not be fitted to emergency
spare wheels. General notes
You should regularly check the pressure of all
your tyres, including the emergency spare
wheel, particularly prior to long trips, and cor-
rect the pressure as necessary (Y page 357).
The applicable value is found on the wheel or
under "Technical data" (Y page 380).
An emergency spare wheel may also be fitted
against the direction of rotation .Observe the
time restriction on use as well as the speed
limitation specified on the emergency spare
wheel. Replace the tyres after six years at the latest,
regardless of wear. This also applies to the
emergency spare wheel.
i
When you are driving with the collapsible
emergency spare wheel fitted, the tyre
pressure loss warning system or the tyre
pressure monitor cannot function reliably.
Only restart the tyre pressure loss warning
system/tyre pressure monitor when the
defective wheel has been replaced with a
new wheel.
Vehicles with tyre pressure monitor:
after mounting an emergency spare wheel,
the system may still display the tyre pres-
sure of the removed wheel for a few
minutes. The value displayed for the moun-
ted emergency spare wheel is not the same
as the current tyre pressure of the emer-
gency spare wheel. Removing the "Minispare" emer-
gency spare wheel/collapsible emer-
gency spare wheel
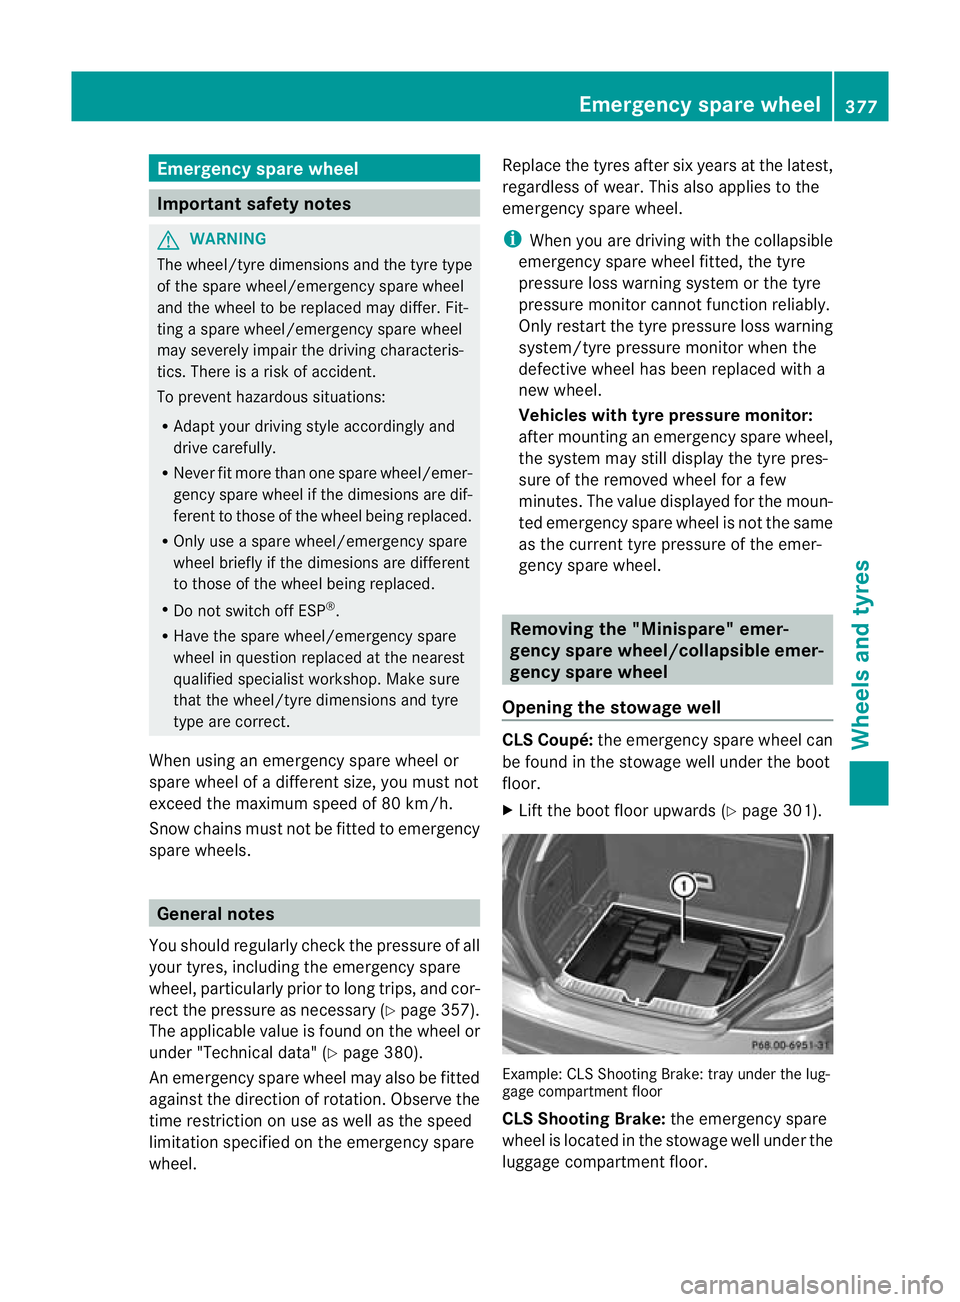
Opening the stowage well CLS Coupé:
the emergency spare wheel can
be found in the stowage well under the boot
floor.
X Lift the boot floor upwards (Y page 301). Example: CLS Shooting Brake: tray under the lug-
gage compartment floor
CLS Shooting Brake:
the emergency spare
wheel is located in the stowage well under the
luggage compartment floor. Emergency spare wheel
377Wheels and tyres Z
Page 381 of 405
X
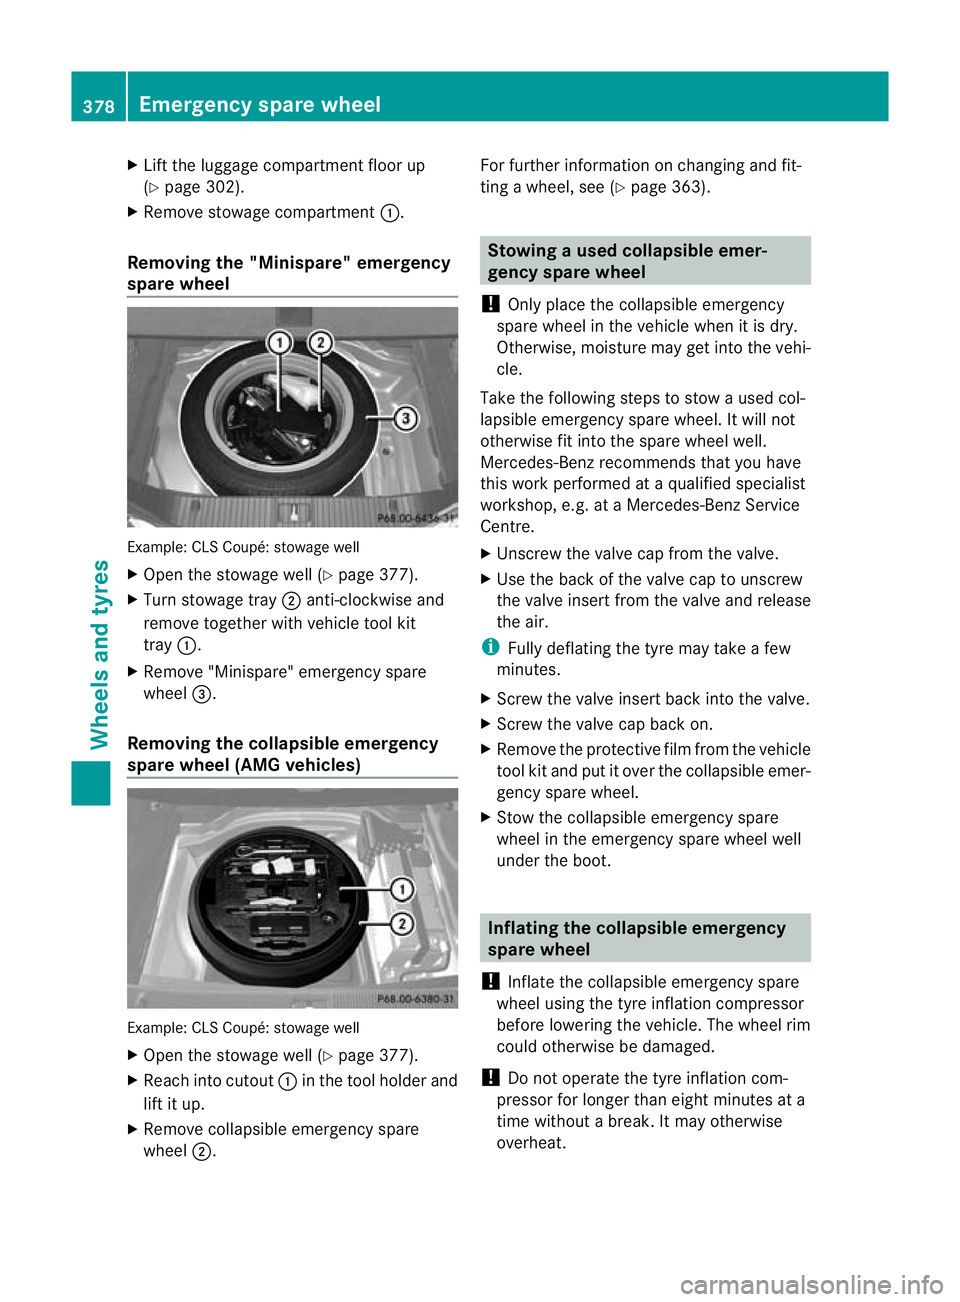
Lift the luggage compartment floor up
(Y page 302).
X Remove stowage compartment :.
Removing the "Minispare" emergency
spare wheel Example: CLS Coupé: stowage well
X Open the stowage well (Y page 377).
X Turn stowage tray ;anti-clockwise and
remove together with vehicle tool kit
tray :.
X Remove "Minispare" emergency spare
wheel =.
Removing the collapsible emergency
spare wheel (AMG vehicles) Example: CLS Coupé: stowage well
X Open the stowage well (Y page 377).
X Reach into cutout :in the tool holdera nd
lift it up.
X Remove collapsible emergency spare
wheel ;. For further information on changing and fit-
ting a wheel, see (Y
page 363). Stowing
aused collapsible emer-
gency spare wheel
! Only place the collapsible emergency
spare wheel in the vehicle when it is dry.
Otherwise, moisture may get into the vehi-
cle.
Take the following steps to stow a used col-
lapsible emergency spare wheel. It will not
otherwise fit into the spare wheel well.
Mercedes-Benz recommends that you have
this work performed at aqualified specialist
workshop, e.g. at a Mercedes-Ben zService
Centre.
X Unscrew the valve cap from the valve.
X Use the back of the valve cap to unscrew
the valve insert from the valve and release
the air.
i Fully deflating the tyre may take a few
minutes.
X Screw the valve insert back into the valve.
X Screw the valve cap back on.
X Remove the protective film from the vehicle
tool kit and put it over the collapsible emer-
gency spare wheel.
X Stow the collapsible emergency spare
wheel in the emergency spare wheel well
under the boot. Inflating the collapsible emergency
spare wheel
! Inflate the collapsible emergency spare
wheel using the tyre inflation compressor
before lowering the vehicle. The wheel rim
could otherwise be damaged.
! Do not operate the tyre inflation com-
pressor for longer than eight minutes at a
time without a break. It may otherwise
overheat. 378
Emergency spare wheelWheels and tyres
Page 382 of 405
The tyre inflation compressor can be oper-
ated again once it has cooled down. X
Mount the collapsible emergency spare
wheel as described (Y page 362).
The collapsible emergency spare wheel
must be mounted before it is inflated.
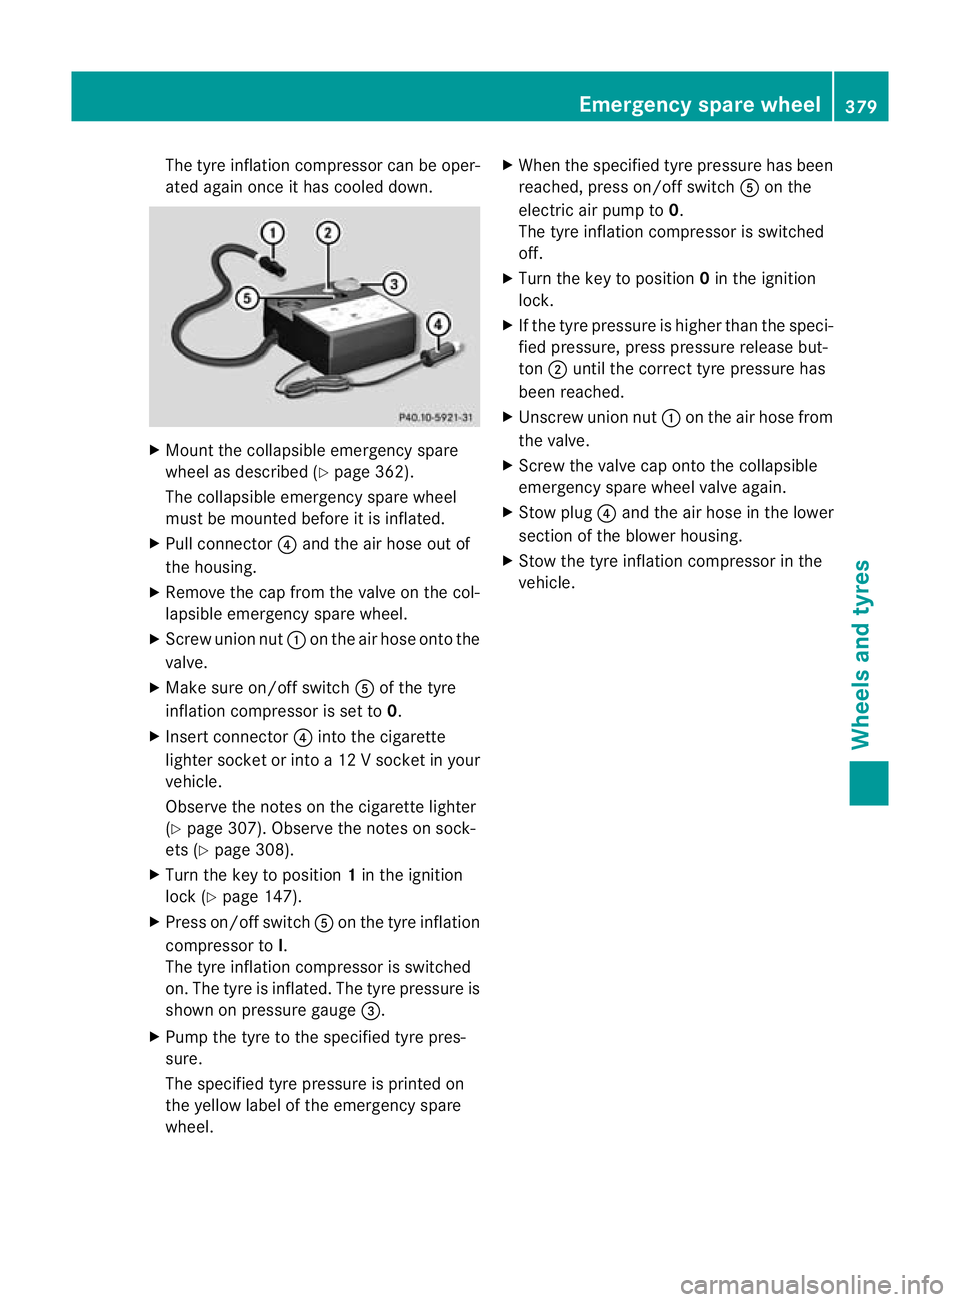
X Pull connector ?and the air hose out of
the housing.
X Remove the cap from the valve on the col-
lapsible emergency spare wheel.
X Screw union nut :on the air hose onto the
valve.
X Make sure on/of fswitch Aof the tyre
inflatio ncompressor is set to 0.
X Insert connector ?into the cigarette
lighter socket or into a 12 Vsocket in your
vehicle.
Observe the notes on the cigarette lighter
(Y page 307). Observe the notes on sock-
ets (Y page 308).
X Turn the key to position 1in the ignition
lock (Y page 147).
X Press on/offs witchAon the tyre inflation
compressor to I.
The tyre inflatio ncompressor is switched
on. The tyre is inflated. The tyre pressure is
shown on pressure gauge =.
X Pump the tyre to the specified tyre pres-
sure.
The specified tyre pressure is printed on
the yellow label of the emergency spare
wheel. X
When the specified tyre pressure has been
reached, press on/offs witchAon the
electric air pump to 0.
The tyre inflatio ncompressor is switched
off.
X Turn the key to position 0in the ignition
lock.
X If the tyre pressure is higher than the speci-
fied pressure, press pressure release but-
ton ;until the correct tyre pressure has
been reached.
X Unscrew union nut :on the air hose from
the valve.
X Screw the valve cap ontot he collapsible
emergency spare wheel valve again.
X Stow plug ?and the air hose in the lower
section of the blower housing.
X Stow the tyre inflation compressor in the
vehicle. Emergency spare wheel
379Wheels and tyres Z
Page 383 of 405
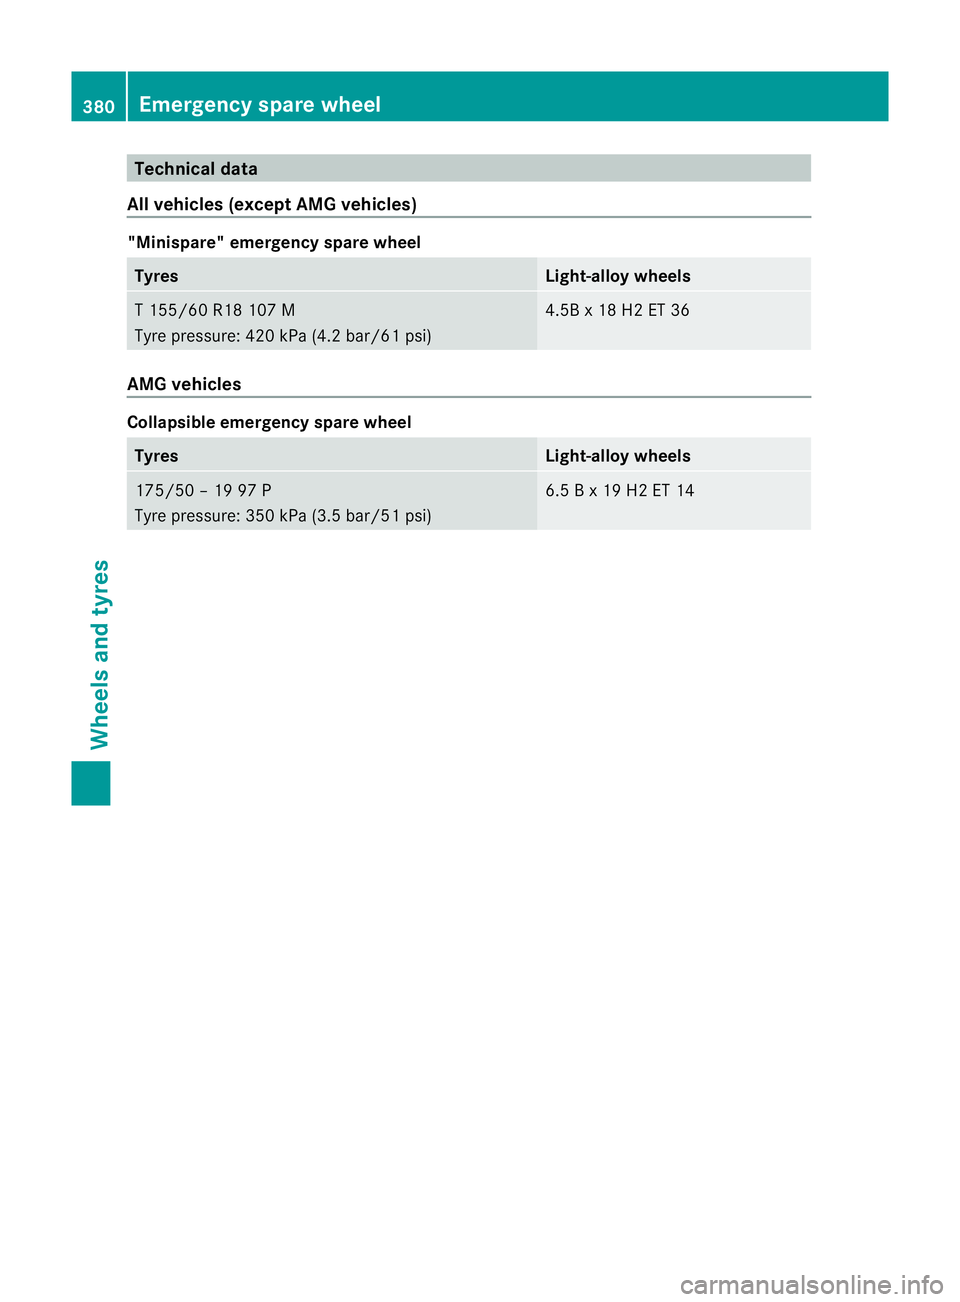
Technical data
All vehicles (except AM Gvehicles) "Minispare" emergency spare wheel
Tyres Light-alloy wheels
T 155/60 R18 107 M
Tyre pressure: 420 kPa (4.2 bar/61 psi) 4.5B x 18 H2 ET 36
AMG vehicles
Collapsible emergency spare wheel
Tyres Light-alloy wheels
175/50 – 19 97 P
Tyre pressure: 350 kPa (3.5 bar/51 psi) 6.5 B x 19 H2 ET 14380
Emergency spare wheelWheels and tyres
Page 385 of 405
Useful information
i This Owner's Manual describes all mod-
els, series and optional equipment for your
vehicle that were available at the time of
going to press. National variations are pos-
sible. Note that your vehicle may not be
equipped with all of the functions descri-
bed. This is also the case for systems and
functions relevant to safety.
i Read the information on qualified special-
ist workshops: (Y page 24). Information on technical data
You can find current technical data on the
Internet at:
http://www.mercedes-benz.com
i The technical data was determined in
accordance with EC Directives. All data
applies to the vehicle's standard equip-
ment. The data may therefore differ for
vehicles with optional equipment .You can
obtain further information from a
Mercedes-Benz Service Centre. Genuine Mercedes-Benz parts
G
WARNING
Driving safety may be impaired if non-
approved parts, tyres and wheels or safety-
relevant accessories are used.
This could lead to malfunctions in safety-rel-
evant systems, e.g. the brake system. This
could cause you to lose control of your vehicle
and cause an accident.
For this reason, Mercedes-Benz recommends
that you use genuine Mercedes-Benz parts or
parts of equal quality. Only use tyres, wheels
and accessories that have been specifically
approved for your vehicle. H
Environmental note
Daimler AG also supplies reconditioned
assemblies and parts which are of the same
quality as new parts. For these, the same war-
ranty applies as for new parts.
! Airbags and seat belt tensioners, as well
as control units and sensors for these
restraint systems, may be installed in the
following areas of your vehicle:
R doors
R door pillars
R door sills
R seats
R dashboard
R instrument cluster
R centre console
Do not install accessories such as audio
systems in these areas. Do not carry out
repairs or welding. You could impair the
operating efficiency of the restraint sys-
tems.
Have accessories retrofitted at a qualified
specialist workshop.
Mercedes-Benz tests genuine parts and con-
version parts and accessories that have been
specifically approved for your vehicle for their
reliability, safety and suitability. Despite
ongoing market research, Mercedes-Benz is
unable to assess other parts. Mercedes-Benz
accepts no responsibility for the use of parts
that have been independently or officially
approved.
In Germany, certain parts are only officially
approved for installation or modification if
they comply with legal requirements. This
also applies to some other countries. All gen-
uine Mercedes-Benz parts meet the approval
requirements. The use of non-approved parts
may invalidate the vehicle's general operating
permit. 382
Genuine Mercedes-Benz partsTechnical data
Page 397 of 405
At temperatures below freezing:
X
Fill the washe rfluid reservoir with a mixture
of water and washer fluid, e.g. MB Winter-
Fit.
Adapt the mixing ratio to the outside temper-
ature.
R Down to Ò10 †: mix 1 part MB WinterFit to
2 parts water.
R Down to Ò20 †: mix 1 part MB WinterFit to
1 part water.
R Down to Ò29 †: mix 2 parts MB WinterFit
to 1 part water.
i Add washer fluid concentrate, e.g. MB
SummerFit or MB WinterFit, to the washer
fluid all year round. Vehicle data
General notes
Please note that for the specified vehicle
data:
R the heights specified may vary as a result
of:
-Tyres
- Load
- Condition of the suspension
- Optional equipment
R items of optional equipmen tincrease the
unladen weight and reduce the maximum
payload. The unladen weight is specified in
accordance with EC directive and includes:
- driver (68 kg)
- luggage (7 kg)
- all fluids (fuel tank 90% full)
R vehicle-specific weight informatio ncan be
found on the vehicle identification plate
(Y page 384).
R only for certain countries :you can find vehi-
cle-specific vehicle data in the COC docu-
ments (CERTIFICATE OF CONFORMITY).
These documents are delivered with your
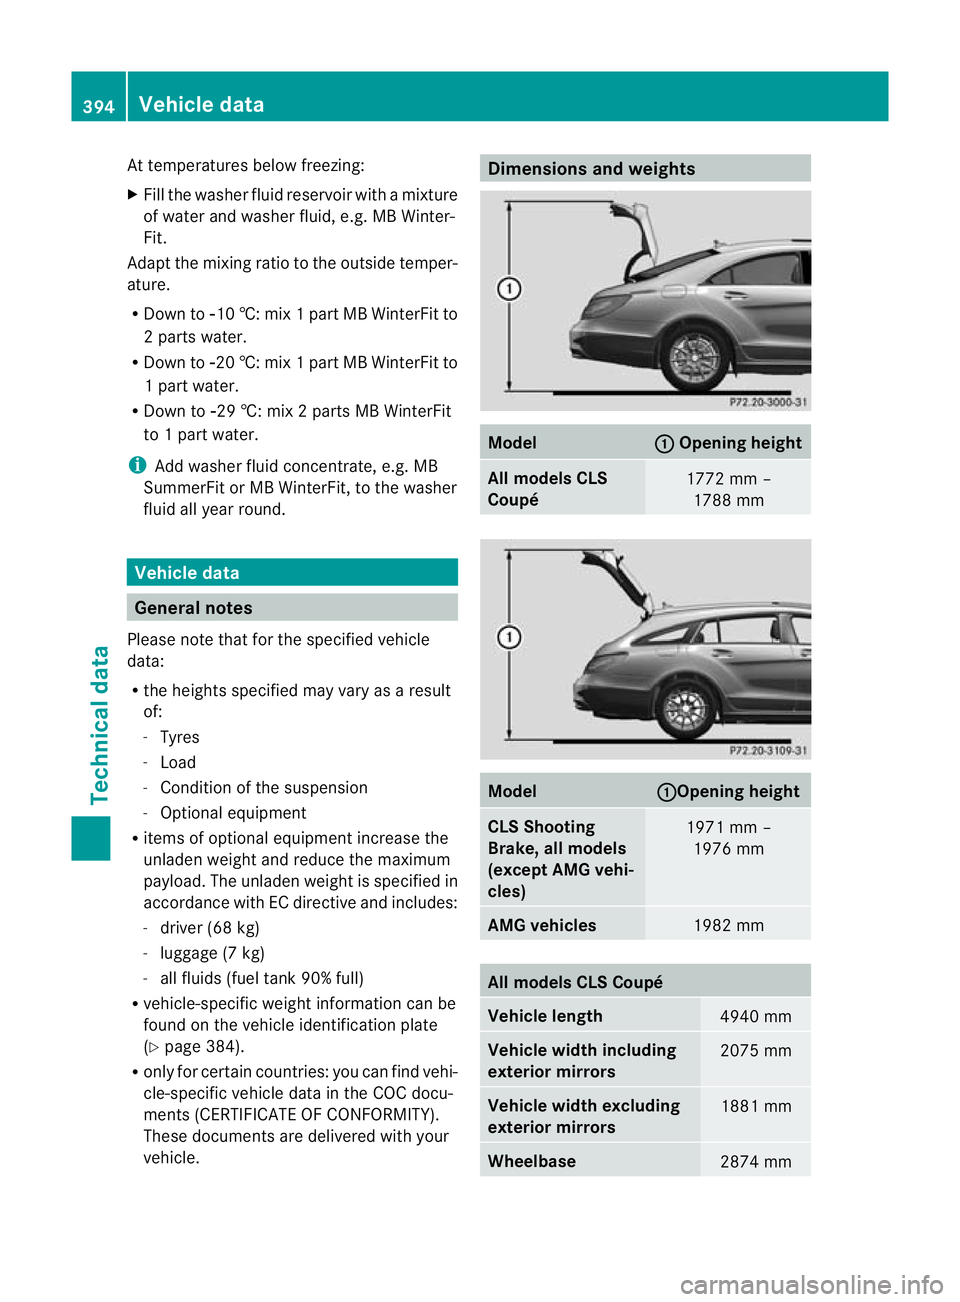
vehicle. Dimensions and weights
Model : Opening height
All models CLS
Coupé
1772 mm –
1788 mm Model : Opening height
CLS Shooting
Brake, all models
(except AMG vehi-
cles)
1971 mm –
1976 mm AMG vehicles
1982 mm
All models CLS Coupé
Vehicle length
4940 mm
Vehicle width including
exterior mirrors
2075 mm
Vehicle width excluding
exterior mirrors
1881 mm
Wheelbase
2874 mm394
Vehicle dataTechnical data