2012 MERCEDES-BENZ CLS COUPE warning
[x] Cancel search: warningPage 301 of 373
Checking th
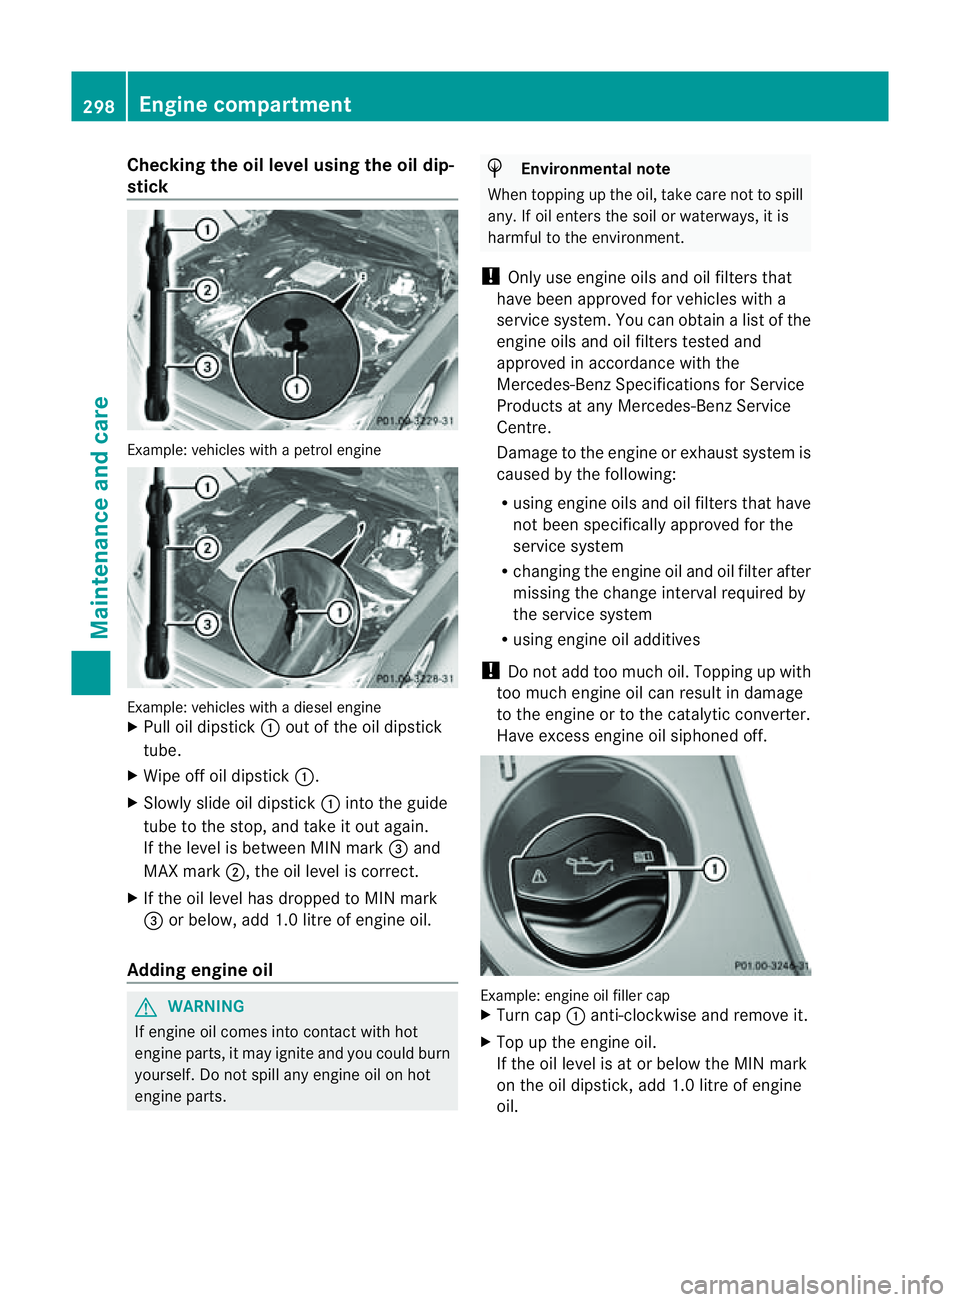
eoil level usin gthe oil dip-
stick Example
:vehicles with apetrol engine Example: vehicles with
adiesel engine
X Pull oil dipstick :out of the oil dipstick
tube.
X Wipe off oil dipstick :.
X Slowly slide oil dipstick :into the guide
tube to the stop, and take it out again.
If the level is between MIN mark =and
MAX mark ;,the oil level is correct.
X If the oil level has dropped to MIN mark
= or below, add 1.0 litre of engine oil.
Adding engine oil G
WARNING
If engine oil comes into contact with hot
engine parts, it may ignite and you could burn
yourself. Do not spill any engine oil on hot
engine parts. H
Environmental note
When topping up the oil, take care not to spill
any. If oil enters the soil or waterways, it is
harmful to the environment.
! Only use engine oils and oil filters that
have been approved for vehicles with a
service system. You can obtain alist of the
engine oils and oil filters tested and
approved in accordance with the
Mercedes-Benz Specification sfor Service
Product satany Mercedes-Benz Service
Centre.
Damage to the engine or exhaust system is
caused by the following:
R using engine oils and oil filters that have
not been specifically approved for the
service system
R changin gthe engine oil and oil filter after
missing the change interval required by
the service system
R using engine oil additives
! Do not add too much oil. Topping up with
too much engine oil can result in damage
to the engine or to the catalytic converter.
Have exces sengine oil siphoned off. Example: engine oil filler cap
X
Turn cap :anti-clockwise and remove it.
X Top up the engine oil.
If the oil level is at or below the MIN mark
on the oil dipstick ,add 1.0 litre of engine
oil. 298
Engine compartmentMaintenance and care
Page 302 of 373
X
Replac ecap : on th efiller neck and turn
clockwise.
Mak esuret hatthe cap locks securel yinto
place.
X Chec kthe oil level again with the oil dip-
stick (Y page 298).
For further information on engine oil, see
(Y page 363). Other service products
Checking the coolant level G
WARNING
The cooling system is pressurised. Therefore,
only unscrew the cap once the engine has
cooled down. The coolant temperature gauge
must display less than 70 †.Otherwise, you
could be scalded if hot coolant escapes. X
Park the vehicl eonalevel surface.
Onl ycheck the coolant level if the vehicle
is on alevel surface and the engine has
coole ddown.
X Turn the key to position 2in the ignition
lock (Y page 141).
On vehicles with KEYLESS-GO, press the
Start/Stop button twice (Y page 141).
X Check the coolant temperatur edisplay in
the instrument cluster.
Th ec oolant temperatur emustbeb elow
70 †.
X Turn the key to position 0(Y page 141) in
the ignition lock. X
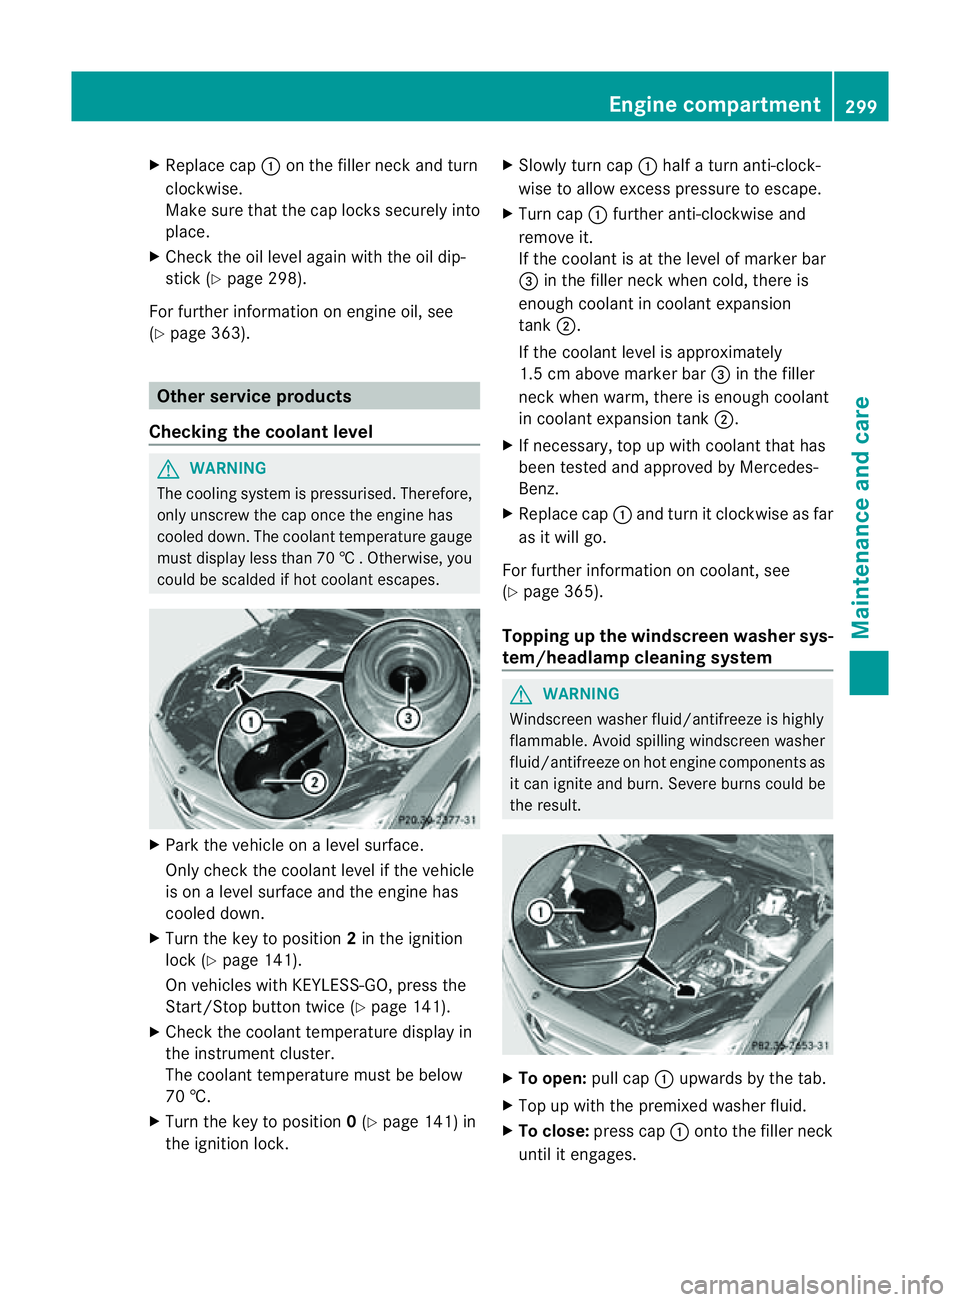
Slowl yturnc ap : half aturna nti-clock-
wise to allow exces spressure to escape.
X Turn cap :further anti-clockwis eand
remove it.
If th ecoolan tisatt heleve lofm arkerbar
= in th efille rneck when cold, ther eis
enough coolant in coolant expansion
tank ;.
If the coolant level is approximately
1.5 cm above marker bar =in the filler
neckw hen warm, there is enough coolant
in coolant expansion tank ;.
X If necessary, top up with coolant that has
been tested and approved by Mercedes-
Benz.
X Replace cap :and turn it clockwise as far
as it will go.
For further information on coolant, see
(Y page 365).
Topping up the windscreen washer sys-
tem/headlam pcleaning system G
WARNING
Windscreen washer fluid/antifreez eishighly
flammable. Avoid spilling windscreen washer
fluid/antifreez eonhot engin ecomponent sas
it can ignit eand burn. Severe burns could be
the result. X
To open: pull cap:upwards by the tab.
X Top up with the premixed washer fluid.
X To close: press cap :ontothe filler neck
until it engages. Engine compartment
299Maintenance and care Z
Page 304 of 373
Special service requirements
Arduous operating condition
sorincreased
loads on the vehicle will require some service
work to be performed more often than for a
vehicle in normal use. Such arduousc ondi-
tions include regular city driving with frequent
intermediate stops and use in mountainous
terrain or on poor road surfaces.
For example, if the vehicle is used under ardu-
ous operating conditions, have air filters,
engine oil and oil filters changed frequently
and check the wheels often.F urther informa-
tion can be obtaine dataqualified specialist
workshop, e.g. aMercedes-Ben zService
Centre.
Driving abroad
An extensive Mercedes-BenzS ervice network
is also available in other countries. The
Service Hotline's curren ttelephone numbers
for use when you are abroad are to be found
in the "Mercedes-Benz Service24h" section
of the Service Booklet. Care
General notes
H
Environmental note
Dispose of empty packagin gand cleaning
cloth sinane nvironmentally responsible man-
ner.
! For cleanin gyour vehicle, do not use any
of the following:
R dry, rough or hard cloths
R abrasive cleanin gagents
R solvents
R cleanin gagents containin gsolvents
Do not scrub.
Do not touch the surfaces or protective
films with hard objects, e.g. aring or ice
scraper. You could otherwise scratch or
damage the surfaces and protective film. !
Do not park up the vehicle for an extended
period straight after cleanin git, particularly
after having cleaned the wheels with wheel
cleaner. Wheel cleaners could cause
increased corrosion of the brake discs and
brake pads/linings. For this reason, you
should drive for afew minutes after clean-
ing. Braking heats the brake discs and the
brake pads/linings, thus drying them. The
vehicle can then be parked up.
Regular care of your vehicle is acondition for
retaining the quality in the long term.
Use care product sand cleanin gagents rec-
ommended and approved by Mercedes-Benz. Washing the vehicle and cleaning the
paintwork
Automatic car wash G
WARNING
Braking efficiency is reduced after washing
the vehicle. This could cause an accident. For
this reason, following acar wash, drive with
particular care until the brakes are dry. G
WARNING
The vehicle is braked when the HOLD function
or DISTRONIC PLUS is activated. Therefore,
deactivat ethe HOLD function and DISTRONIC
PLUS before the vehicle is washed in an auto-
matic car wash.
! Make sure that:
R the side windows and sliding sunroof are
closed completely.
R the blower for the ventilation/heating is
switched off (OFF button is depressed).
R the windscreen wiper switch is at posi-
tion 0.
The vehicle could otherwise be damaged.
! In car washes with atowing mechanism,
make sure that the automatic transmission
is in transmission position N,otherwise the
vehicle could be damaged. Care
301Maintenance and care Z
Page 305 of 373
R
Vehicles with akey:
do not remove the key from the ignition
lock. Do not open the driver's door or
front-passenger door when the engine is
switched off. Otherwise, the automatic
transmission selects park position P
automatically and locks the wheels. You
can prevent this by shifting the auto-
matic transmission to Nbeforehand.
R Vehicles with KEYLESS-GO:
do not open the driver's door or front-
passenger door when the engine is
switched off. Otherwise, the automatic
transmission selects park position P
automatically and locks the wheels.
Observe the following to make sure that the
automatic transmission stays in position N:
X Make sure the vehicle is stationary and the
ignition is switched off.
X Turn the key to position 2(Ypage 141) in
the ignition lock.
Use the key instead of the Start/Stop but-
ton on vehicles with KEYLESS-GO.
X Depress and hold the brake pedal.
X Shift the automatic transmission to posi-
tion N.
X Release the brake pedal.
X Release the electric parking brake.
X Switch off the ignition and leave the key in
the ignition lock.
You can wash the vehicle in an automatic car
wash from the very start.
Wash off excess dirt before cleaning the vehi-
cle in an automatic car wash.
After using an automatic car wash, wipe off
wax from the windscreen and the wiper
blades. This will prevent smears and reduce
wiping noises caused by residueont he wind-
screen.
Washing by hand In some countries, washing by hand is only
allowed at specially equipped washing bays. Observe the legal requirements for each indi-
vidual country.
X Do not use hot water and do not wash the
vehicle in direct sunlight.
X Use asoft sponge to clean.
X Use amild cleaning agent, such as acar
shampoo approved by Mercedes-Benz.
X Thoroughly hose down the vehicle with a
gentle jet of water.
X Do not point the water jet directly towards
the air inlet.
X Use plenty of water and rinse out the
sponge frequently.
X Rinse the vehicle with clean water and dry
thoroughly with achamois.
X Do not let the cleaning agent dry on the
paintwork.
When using the vehicle in winter, remove all
traces of road salt deposits carefully and as
soon as possible.
High-pressure cleaninge quipment G
WARNING
Do not use high-pressure cleaners with circu-
lar-jet nozzles (dirt grinders) to clean your
vehicle, in particular the tyres. You could oth-
erwise damage the tyres and cause an acci-
dent.
! Always maintain adistance of at least
30 cm between the vehicle and the high-
pressure cleaner nozzle. Information about
the correct distance is available from the
equipment manufacturer.
Move the high-pressure cleaner nozzle
around when cleaning your vehicle.
Do not aim directly at any of the following:
R tyres
R door gaps, roof gaps, jointse tc.
R electrical components
R battery
R connectors
R lights 302
CareMaintenance and care
Page 307 of 373
Cleaning th
ewindows G
WARNING
Switch off th ewindscree nwipers and remove
the key fro mthe ignition lock before cleaning
the windscreen or the wiper blades. On vehi-
cles with KEYLESS-GO, press the Start/Stop
button repeatedly until all indicator lamps in
the instrument cluster have gone off. The
windscreen wipers could otherwise move and
injure you.
! Do not use dry cloths, abrasive products,
solvents or cleaning agents containing sol-
ventstoc lean the inside of the windows.
Do not touch the insides of the windows
with hard objects, e.g. an ice scraper or
ring. There is otherwise arisk of damaging
the windows.
! Cleant he water drainage channels of the
windscreen and the rear window at regular
intervals. Deposits such as leaves, petals
and pollen may under certain circumstan-
ces prevent water from draining away.T his
can lead to corrosion damage and damage
to electronic components.
X Cleant he inside and outside of the win-
dows with adamp cloth and acleaning
agent that is recommended and approved
by Mercedes-Benz.
Cleaningt he wiper blades G
WARNING
Switch off the windscreen wipers and remove
the key from the ignition lock before cleaning
the windscreen or the wiper blades. On vehi-
cles with KEYLESS-GO, press the Start/Stop
button repeatedly until all indicator lamps in
the instrumentc luster have gone off. The
windscreen wipers could otherwise move and
injure you.
! Do not pull on the wiper blade. Otherwise,
the wiper blade could be damaged.
! Do not clean wiper blades too often and
do not rub them too hard. Otherwise, the graphite coating could be damaged. This
could cause wiper noise.
! Hold the wiper arm securely when folding
back. The windscreen could be damaged if
the wiper arm hits against it suddenly.
X Fold the wiper arms away from the wind-
screen.
X Carefully clean the wiper blades with a
damp cloth.
X Fold the windscreen wipers back again
before switching on the ignition.
Cleaningt he exterior lighting !
Only use cleaning agents or cleaning
cloths that are suitable for plastic lenses.
Unsuitable cleaning agents or cleaning
cloths could scratchord amage the plastic
lenses of the exterior lighting.
X Cleant he plastic lenses of the exterior
lighting using awet sponge and amild
cleaning agent, e.g. Mercedes-Ben zcar
shampoo or cleanin gcloths.
Mirror turn signal !
Only use cleanin gagents or cleaning
cloth sthata re suitable for plastic lenses.
Unsuitable cleanin gagents or cleaning
cloth scould scratch or damag ethe plastic
lenses of th emirror tur nsignals.
X Clean the plastic lenses of the mirror turn
signals in the exterior mirror housing using
aw et sponge and mild cleanin gagent, e.g.
Mercedes-Benz car shampoo or cleaning
cloths.
Cleaning the sensors !
If you clean th esensor swithah igh-pres-
sure cleaner, mak esure that you keep a
distanc eofatl east 30 cm between the
vehicle and th ehigh-pressure cleane rnoz-
zle. Information about the correc tdistance
is available from the equipment manufac-
turer. 304
CareMaintenance and care
Page 309 of 373
X
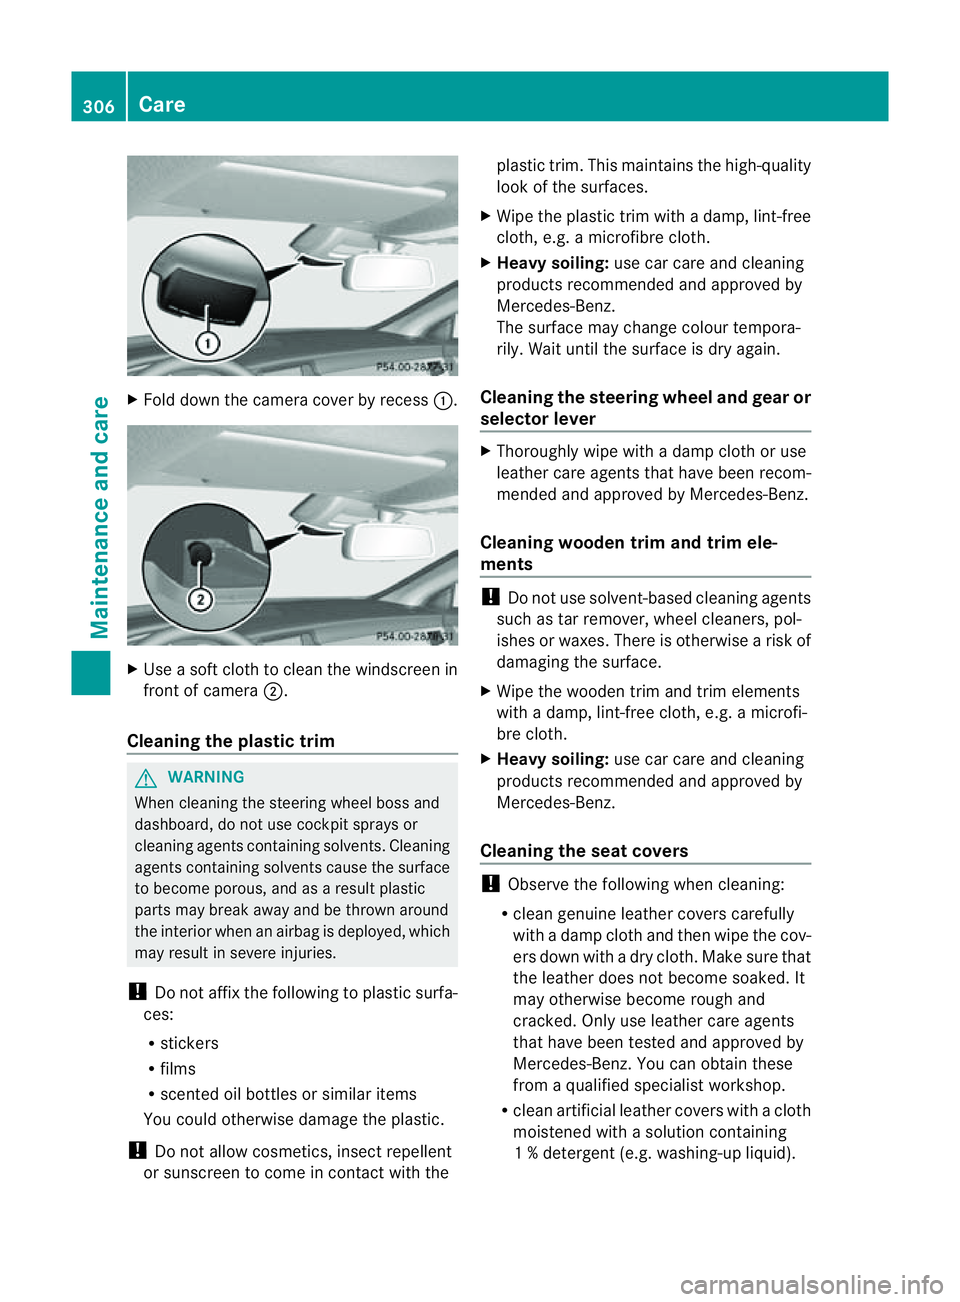
Fold dow nthe camera cover by recess :.X
Use asoft cloth to clean the windscreen in
front of camera ;.
Cleaningt he plastic trim G
WARNING
When cleaning the steering wheel boss and
dashboard, do not use cockpit sprays or
cleaning agents containing solvents. Cleaning
agents containing solvents cause the surface
to become porous, and as aresult plastic
parts may break away and be thrown around
the interior when an airbag is deployed, which
may result in severe injuries.
! Do not affix the following to plastic surfa-
ces:
R stickers
R films
R scented oil bottles or similar items
You could otherwise damage the plastic.
! Do not allow cosmetics, insect repellent
or sunscreen to come in contact with the plastic trim
.This maintains the high-quality
look of the surfaces.
X Wipe the plastic trim with adamp, lint-free
cloth, e.g. amicrofibre cloth.
X Heavy soiling: use car care and cleaning
products recommended and approved by
Mercedes-Benz.
The surface may change colour tempora-
rily. Wait until the surface is dry again.
Cleaningt he steering wheel and gear or
selector lever X
Thoroughly wipe with adamp cloth or use
leather care agents that have been recom-
mended and approved by Mercedes-Benz.
Cleaningw ooden trim and trim ele-
ments !
Do not use solvent-based cleaning agents
such as tar remover, wheel cleaners, pol-
ishes or waxes. There is otherwise arisk of
damaging the surface.
X Wipe the wooden trim and trim elements
with adamp, lint-free cloth, e.g. amicrofi-
bre cloth.
X Heavy soiling: use car care and cleaning
products recommended and approved by
Mercedes-Benz.
Cleaningt he seat covers !
Observe the following when cleaning:
R clean genuine leather covers carefully
with adamp cloth and then wipe the cov-
ers down with adry cloth. Make sure that
the leather does not become soaked. It
may otherwise become rough and
cracked. Only use leather care agents
that have been tested and approved by
Mercedes-Benz. You can obtain these
from aqualified specialist workshop.
R clean artificial leather covers with acloth
moistened with asolution containing
1%d etergen t(e.g. washing-up liquid). 306
CareMaintenance and care
Page 313 of 373
Useful information
i This Owner's Manual describes all mod-
els, series and optional equipment for your
vehicle that were available at the time of
going to press. National variation sare pos-
sible. Not ethat your vehicle may not be
equipped with all of the function sdescri-
bed. This is also the case for system sand
function srelevan ttosafety.
i Read the information on qualified special-
ist workshops: (Y page 23). Wher
ewillIfind...? Warning triangle
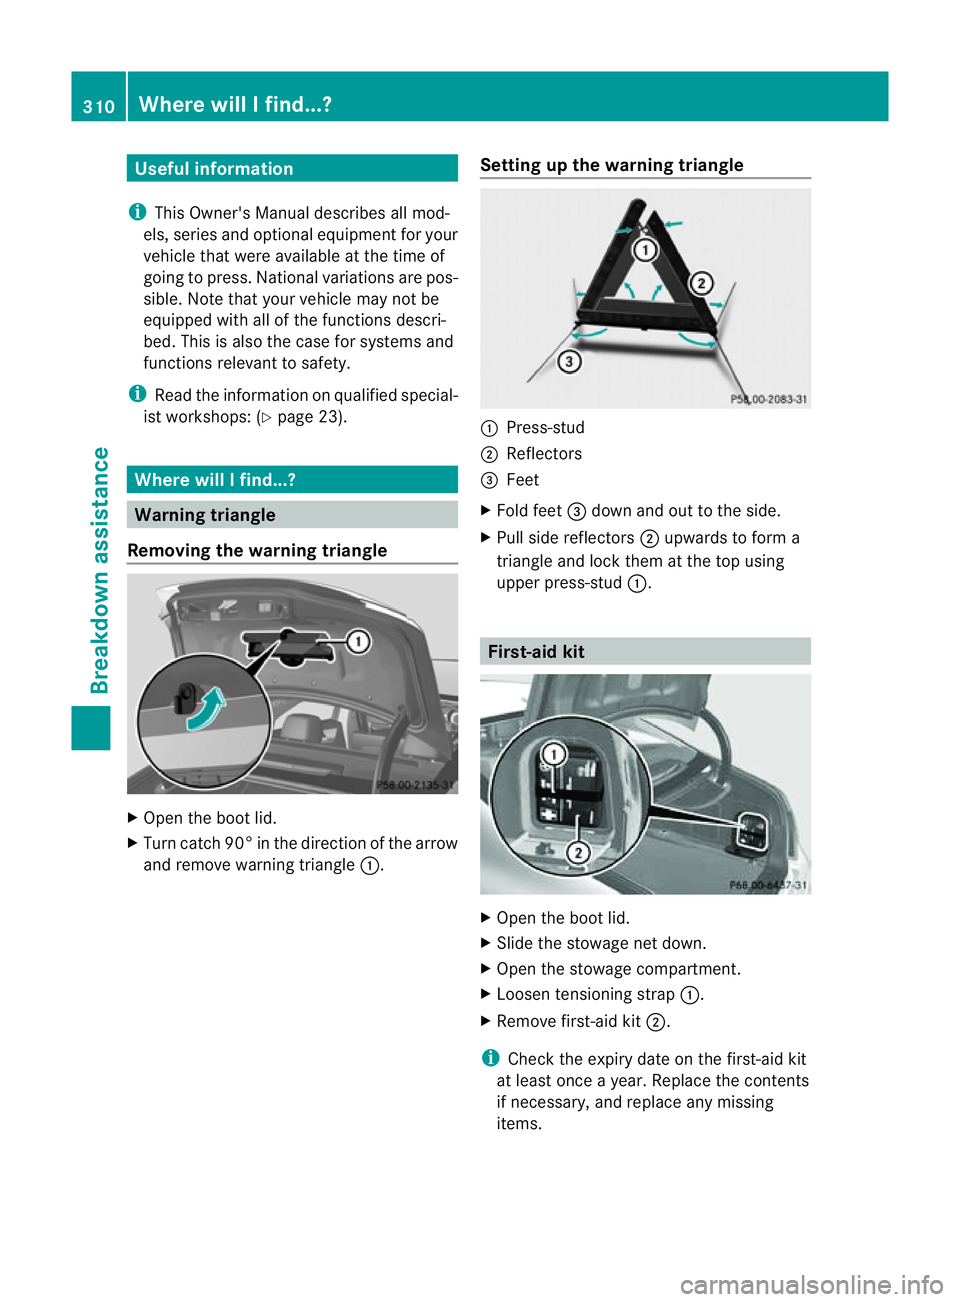
Removing the warning triangle X
Open the boot lid.
X Turn catc h90° in the direction of the arrow
and remove warning triangle :.Settin
gupthe warning triangle :
Press-stud
; Reflectors
= Feet
X Fold feet =dow nand ou ttothe side.
X Pull side reflectors ;upwards to form a
triangle and lock them at the top using
upper press-stud :. First-aid kit
X
Open the boot lid.
X Slide the stowage net down.
X Open the stowage compartment.
X Loosen tensioning strap :.
X Remove first-aid kit ;.
i Check the expiry date on the first-aid kit
at least once ayear. Replace the contents
if necessary, and replace any missing
items. 310
Where will
Ifind...?Breakdown assistance
Page 315 of 373
The vehicle tool kit contains:
R
Foldable wheel chock
R Fuse allocation chart
R Jack
R Centrin gpin
R One pair of gloves
R Wheel wrench
R Towing eye
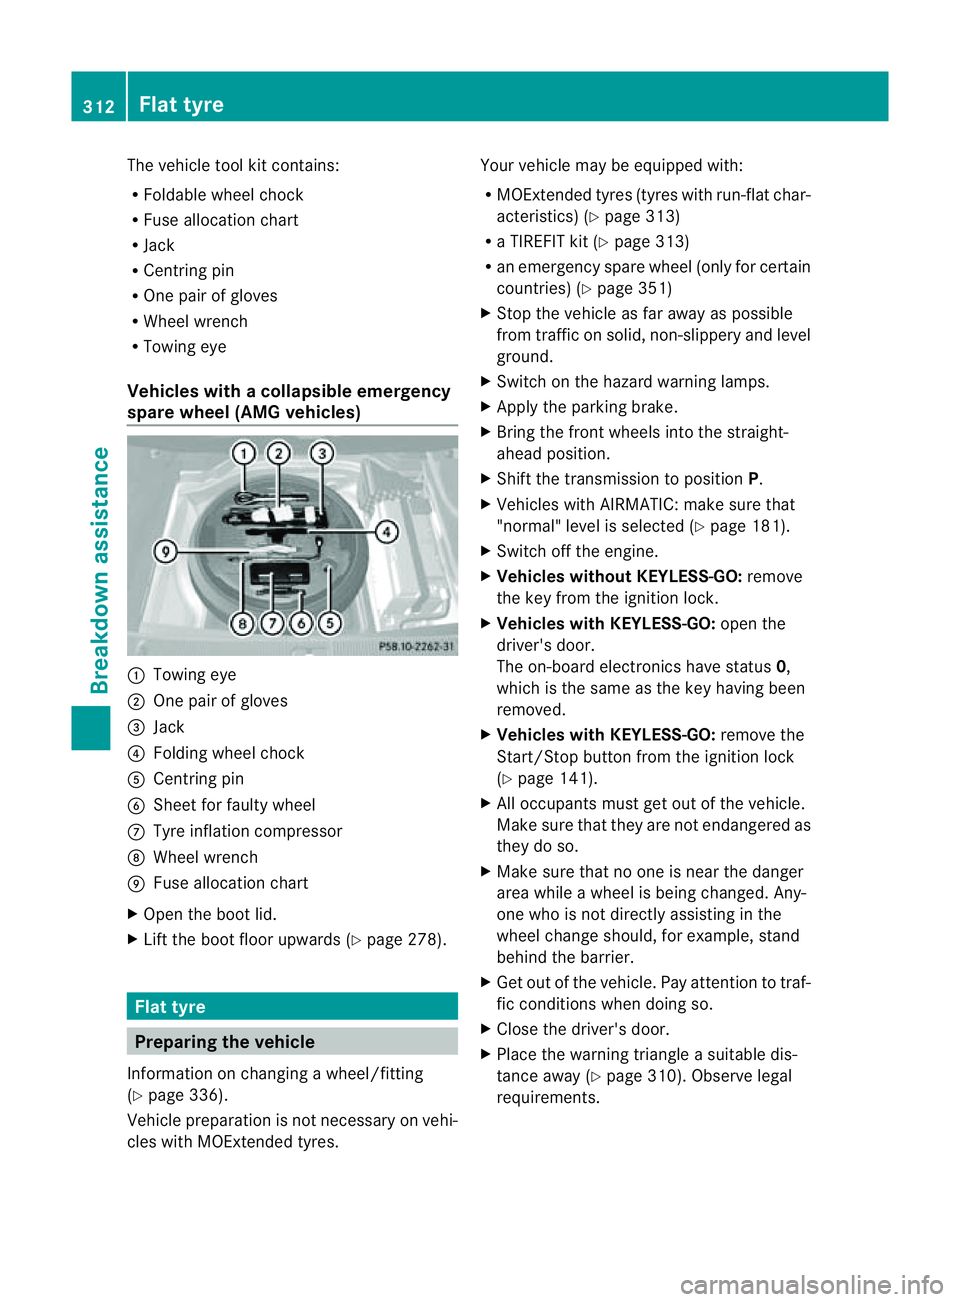
Vehicles with acollapsible emergency
spare wheel (AMG vehicles) :
Towin geye
; Onep air of gloves
= Jack
? Folding wheel chock
A Centrin gpin
B Sheet for fault ywheel
C Tyre inflatio ncompressor
D Wheel wrench
E Fuse allocation chart
X Open the boot lid.
X Lift the boot floor upwards (Y page 278).Flat tyre
Preparing the vehicle
Information on changing awheel/fitting
(Y page 336).
Vehicle preparation is not necessary on vehi-
cles with MOExtended tyres. Your vehicle may be equipped with:
R
MOExtended tyres (tyres with run-flat char-
acteristics) (Y page 313)
R aT IREFIT kit (Y page 313)
R an emergenc yspare wheel (only for certain
countries) (Y page 351)
X Stop the vehicle as far away as possible
from traffic on solid, non-slippery and level
ground.
X Switch on the hazard warning lamps.
X Apply the parking brake.
X Bring the front wheels into the straight-
ahead position.
X Shift the transmission to position P.
X Vehicles with AIRMATIC: make sure that
"normal" level is selected (Y page 181).
X Switch off the engine.
X Vehicles without KEYLESS-GO: remove
the key from the ignition lock.
X Vehicles with KEYLESS-GO: open the
driver's door.
The on-board electronics have status 0,
which is the same as the key having been
removed.
X Vehicles with KEYLESS-GO: remove the
Start/Stop button from the ignition lock
(Y page 141).
X All occupant smust get out of the vehicle.
Make sure that they are not endangered as
they do so.
X Make sure that no one is near the danger
area while awheel is being changed. Any-
one who is not directly assisting in the
wheel change should, for example, stand
behind the barrier.
X Get out of the vehicle. Pay attention to traf-
fic conditions when doing so.
X Close the driver's door.
X Place the warning triangle asuitable dis-
tancea way (Y page 310). Observe legal
requirements. 312
Flat tyreBreakdown assistance