2012 MERCEDES-BENZ C-Class SEDAN Pre safe
[x] Cancel search: Pre safePage 76 of 356

Removing the mechanical keyXPush release catch : in the direction of
the arrow and at the same time, remove
mechanical key ; from the SmartKey.
SmartKey battery
Important safety notes
Have the batteries changed at a qualified
specialist workshop.
GWARNING
Batteries contain toxic substances.
Swallowing batteries can lead to serious
health issues or death.
Keep batteries out of the reach of children.
Seek medical attention immediately if a
battery is swallowed.
GWARNING
The SmartKey batteries contain perchlorate
material, which may require special handling
and regard for the environment. Observe
government disposal guidelines. California
residents, see www.dtsc.ca.gov/
HazardousWaste/Perchlorate/
index.cfm .
Checking the batteryXPress the & or % button.
The battery is working properly if battery
check lamp : lights up briefly
If battery check lamp : does not light up
briefly during the test, the battery is
discharged.
XChanging the battery ( Y page 74)
i
You can obtain the battery at a qualified
specialist workshop.
i If the SmartKey battery is checked within
the signal reception range of the vehicle,
pressing the & or % button locks or
unlocks the vehicle.
Changing the battery
You require a CR 2025 3 V cell battery.
XTake the mechanical key out of the
SmartKey ( Y page 73).XPress mechanical key ; into the opening
in the SmartKey in the direction of the74SmartKeyOpening/closing
Page 83 of 356

Runlocked with the mechanical key
R opened with the emergency release button
Opening and closing manually
Opening
XPress the % button on the SmartKey.XPull handle :.XRaise the trunk lid.
Closing
GWARNING
To prevent possible personal injury, always
keep hands and fingers away from the trunk
opening when closing the trunk lid. Be
especially careful when small children are
around.
XPull the trunk lid down using recess :.XIf necessary, lock the vehicle with
the & button on the SmartKey(Y page 70) or with KEYLESS-GO
( Y page 71).
i
If a KEYLESS-GO key is detected in the
trunk, the trunk lid cannot be locked and
then opens again.
Opening automatically from outside
Important safety notes
GWARNING
Make sure the trunk lid is closed when the
engine is running and while driving. Among
other dangers, deadly carbon monoxide (CO)
gases may enter the vehicle interior resulting
in unconsciousness and death.
! The trunk lid swings upwards when
opened. Therefore, make sure that there is
sufficient clearance above the trunk lid.
To open the trunk lid completely, a minimum
clearance of 5.90 ft (1.80 m) above the
ground is necessary.
Opening
You can open the trunk lid automatically
using the SmartKey or the handle in the trunk
lid.
XPress and hold the F button on the
SmartKey until the trunk lid opens.
or
XWhen the trunk is unlocked, pull the trunk
lid handle and let it go again immediately.
Closing
Opening automatically from the
inside
GWARNING
Make sure the trunk lid is closed when the
engine is running and while driving. Among
other dangers, deadly carbon monoxide (CO)
Trunk81Opening/closingZ
Page 85 of 356

XBriefly press emergency release
button :.
The trunk lid unlocks and opens.
The trunk lid can be unlocked and opened
with the trunk lid emergency release when
the vehicle is stationary or while driving.
Trunk lid emergency release light:
R emergency release button : flashes for
30 minutes after the trunk lid is opened.
R emergency release button : flashes for
60 minutes after the trunk lid is closed.
The trunk lid emergency release does not
open the trunk lid if the battery is
disconnected or discharged.
Side windows
Important safety notes
GWARNING
When opening or closing the door windows,
make sure that there is no danger of anyone
being harmed by the opening/closing
procedure.
The door windows are equipped with
automatic operation and the anti-entrapment
feature. If in automatic mode a door window
encounters an obstruction that blocks its
path, the anti-entrapment feature will stop the
door window and open it slightly.
The door windows operate differently when
the switch is pulled. See the "Problems with
door windows" section for details.
The closing of the door windows can be
immediately halted by releasing the switch or,
if the switch was pulled past the resistance
point and released, by either pressing or
pulling the respective switch.
If a door window encounters an obstruction
that blocks its path in a circumstance where
you are closing the windows by pressing and
holding the & button on the SmartKey or
by pressing and holding the lock button
(vehicles with KEYLESS-GO) on an outside
door handle, the anti-entrapment feature will
not operate.
Activate the override switch when children
are riding in the back seats of the vehicle. The
children may otherwise injure themselves,
e.g. by becoming trapped in the door window
opening.GWARNING
Do not keep any part of your body up against
the window pane when opening a window. The
downward motion of the pane may pull that
part of your body down between the window
pane and the door frame and trap it there. If
there is a risk of entrapment, release the
switch and pull it to close the window.
Opening and closing the side
windows
:Front left;Front right=Rear right?Rear leftSide windows83Opening/closingZ
Page 88 of 356

Problems with the side windows
Problem: a side window cannot be closed
because it is blocked by objects, e.g.
leaves in the window guide.XRemove the objects.XClose the side window.
Problem: a side window cannot be closed
and you cannot see the cause.
GWARNING
Closing the side windows with increased force
or without the anti-entrapment feature could
lead to serious or even fatal injury. Make sure
that nobody can become trapped when
closing the side windows.
If a side window is obstructed during closing
and reopens again slightly:
XImmediately after the window blocks, pull
the corresponding switch again until the
side window has closed.
The side window is closed with increased
force.
If a side window is obstructed again during
closing and reopens again slightly:
XImmediately after the window blocks, pull
the corresponding switch again until the
side window has closed.
The side window is closed without the anti-
entrapment feature.GWARNING
Pulling and holding the switch to close the
door window immediately after it had been
blocked two times will cause the door window
to close without the anti-entrapment feature
for as long as you hold the switch.
Sliding sunroof
Important safety notes
Your vehicle may be equipped with a sliding
sunroof or a panorama roof with power tilt/
sliding panel. In the following section, the
term "sliding sunroof" refers to both types of
sliding sunroof.GWARNING
When opening or closing the sliding sunroof,
make sure that there is no danger of anyone
being harmed by the opening/closing
procedure.
The sliding sunroof is equipped with
automatic operation and the anti-entrapment
feature. If the movement of the sliding sunroof
is blocked during the closing procedure, the
sliding sunroof will stop and open slightly.
The sliding sunroof operates differently when
the sliding sunroof switch is pressed and held.
See the "Problems with the sliding sunroof"
section for more details.
The opening/closing procedure of the sliding
sunroof can be immediately halted by
releasing the sliding sunroof switch or, if the
sliding sunroof switch was moved past the
resistance point and released, by moving the
sliding sunroof switch in any direction.
GWARNING
The sliding sunroof is made out of glass. In the
event of an accident, the glass may shatter.
This may result in an opening in the roof.
In a vehicle rollover, occupants not wearing
their seat belts or not wearing them properly
may be thrown out of the opening. Such an
opening also presents a potential for injury for
occupants wearing their seat belts properly,
as entire body parts or portions of them may
protrude from the passenger compartment.
! Only open the sliding sunroof if it is free
of snow and ice. Otherwise, malfunctions
may occur.
Do not allow anything to protrude from the
sliding sunroof. Otherwise, the seals could
be damaged.
! The weather can change abruptly. It could
start to rain or snow. Make sure that the
sliding sunroof is closed when you leave the
vehicle. The vehicle electronics can be
86Sliding sunroofOpening/closing
Page 94 of 356

Useful information
i This Operator's Manual describes all
models and all standard and optional
equipment of your vehicle available at the
time of publication of the Operator's
Manual. Country-specific differences are
possible. Please note that your vehicle may
not be equipped with all features
described. This also applies to safety-
related systems and functions.
i Please read the information on qualified
specialist workshops ( Y page 24).
Correct driver's seat position
Observe the safety guidelines on seat
adjustment ( Y page 93).
XCheck whether you have adjusted seat =
properly.
Manual and electrical seat adjustment
( Y page 94)
Electrical seat adjustment ( Y page 94)
When adjusting the seat, make sure:
R you are as far away from the driver's air
bag as possible.
R you are sitting in a normal upright
position.R you can fasten the seat belt properly.
R you have moved the backrest to an
almost vertical position.
R you have set the seat cushion angle so
that your thighs are gently supported.
R you can depress the pedals properly.XCheck whether the head restraint is
adjusted properly ( Y page 95).
When doing so, make sure that you have
adjusted the head restraint so that the back
of your head is supported at eye level by
the center of the head restraint.
Observe the safety guidelines on steering
wheel adjustment ( Y page 99).
XCheck whether steering wheel : is
adjusted properly.
Adjusting the steering wheel
manually( Y page 99)
Adjusting the steering wheel electrically
( Y page 100)
When adjusting the steering wheel, make
sure:
R you can hold the steering wheel with your
arms slightly bent.
R you can move your legs freely.
R you can see all the displays in the
instrument cluster clearly.
Observe the safety guidelines for seat belts
( Y page 48).
XCheck whether you have fastened seat
belt ; properly ( Y page 50).
The seat belt should:
R fit snugly across your body
R be routed across the middle of your
shoulder
R be routed in your pelvic area across the
hip jointsXBefore starting off, adjust the rear-view
mirror and the exterior mirrors92Correct driver's seat positionSeats, steering wheel and mirrors
Page 98 of 356

XPush or pull the lower edge of the head
restraint in the direction of the arrow.
Adjusting the head restraint height
electrically 4
XTo adjust the head restraint height:
slide
the switch for head restraint adjustment
( Y page 94) up or down in the direction of
the arrow.
Adjusting luxury head restraints
GWARNING
When folding back the side cushions, never
reach between the side cushion and the
mounting post. You could otherwise be
trapped.
XTo adjust the side bolsters of the head
restraint: push or pull right and/or left-
hand side bolster : into the desired
position.XTo adjust the angle of the head
restraint: push or pull the head restraint in
the direction of arrow ;.
Rear seat head restraints
GWARNING
For safety reasons, always drive with the rear
head restraints in the upright position when
the rear seats are occupied.
Keep the area around head restraints clear of
articles (e.g. clothing) to not obstruct the
folding operation of the head restraints.GWARNING
For your protection, drive only with properly
positioned head restraints.
Adjust the head restraint in such a way that it
is as close to the head as possible and the
center of the head restraint supports the back
of the head at eye level. This will reduce the
potential for injury to the head and neck in the
event of an accident or similar situation.
With a rear seat occupied, make sure to move
the respective head restraint up from the
lowest non-use position and have the
occupant adjust the head restraint properly.
Do not drive the vehicle without the seat head
restraints installed when the rear seats are
occupied. Head restraints are intended to
help reduce injuries during an accident.
Adjusting the rear seat head restraint
height
If the head restraint is fully lowered, it is
necessary to press release catch :.
XTo raise: pull the head restraint up to the
desired position.XTo lower: press release catch : and push
the head restraint down until it is in the
desired position.4 For vehicles with memory function only.96SeatsSeats, steering wheel and mirrors
Page 101 of 356
iIf the battery voltage is too low, the seat
ventilation may switch off.XMake sure that the SmartKey is in position
2 in the ignition lock.XTo switch on: press button : repeatedly
until the desired ventilation level is set.
i You can open the side windows and the
sliding sunroof using the "Convenience
opening" feature ( Y page 84). The seat
ventilation of the driver's seat
automatically switches to the highest level.
XTo switch off: press button : repeatedly
until all the indicator lamps go out.
Problems with the seat ventilation
The seat ventilation has switched off
prematurely or cannot be switched on. The
vehicle's electrical system voltage is too low
because too many electrical consumers are
switched on.
XSwitch off electrical consumers which you
do not need, such as the rear window
defroster or interior lighting.
Steering wheel
Important safety notes
GWARNING
Do not adjust the steering wheel while driving.
Adjusting the steering wheel while driving, or
driving without the steering wheel adjustment
feature locked could cause the driver to lose
control of the vehicle.
The electrical steering wheel adjustment
feature can be operated at any time.
Therefore, do not leave children unattended
in the vehicle, or with access to an unlocked
vehicle. A child's unsupervised access to a
vehicle could result in an accident and/or
serious personal injury.
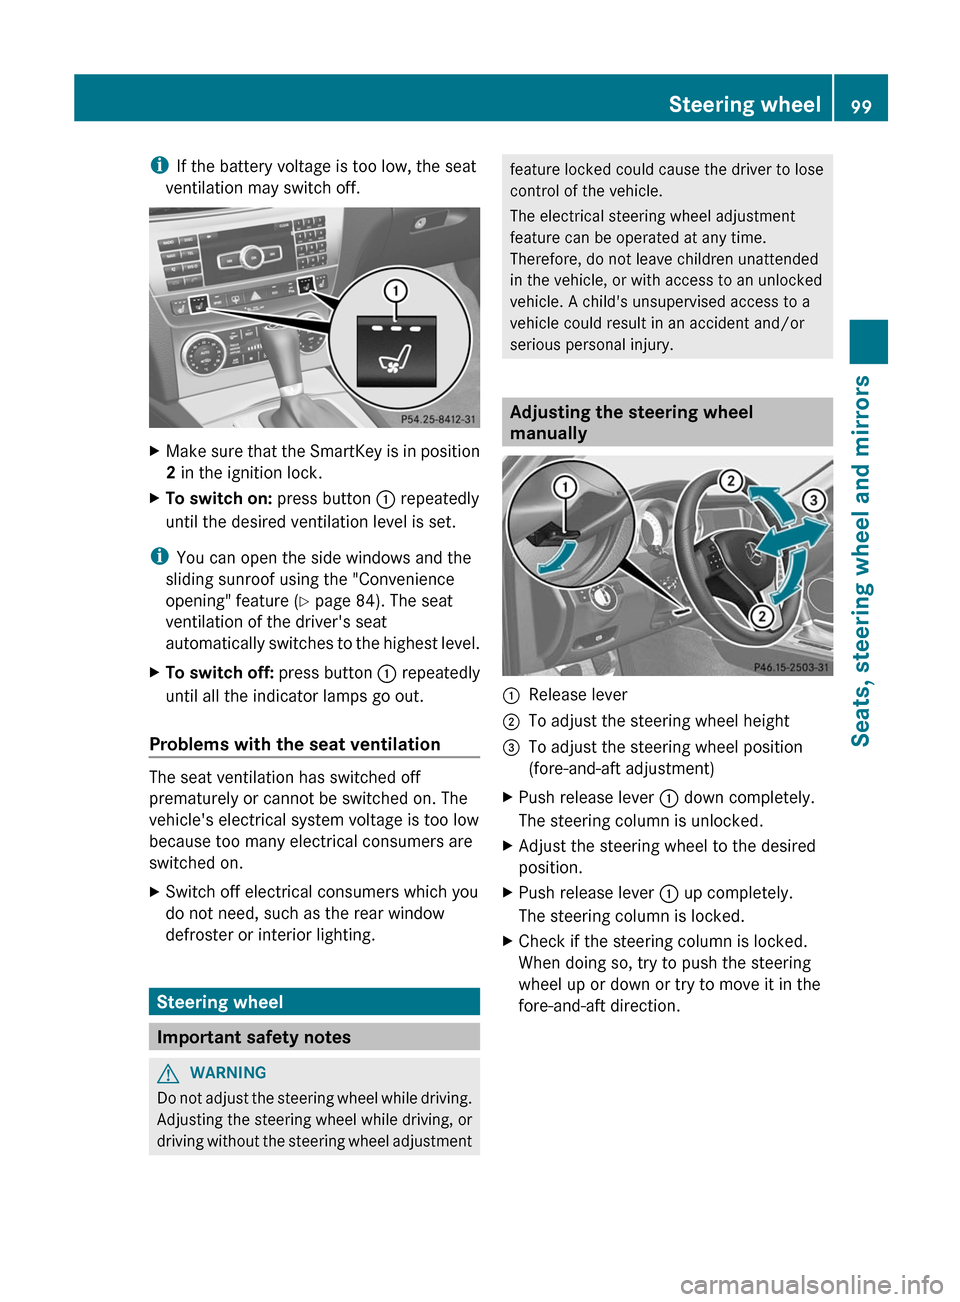
Adjusting the steering wheel
manually
:Release lever;To adjust the steering wheel height=To adjust the steering wheel position
(fore-and-aft adjustment)XPush release lever : down completely.
The steering column is unlocked.XAdjust the steering wheel to the desired
position.XPush release lever : up completely.
The steering column is locked.XCheck if the steering column is locked.
When doing so, try to push the steering
wheel up or down or try to move it in the
fore-and-aft direction.Steering wheel99Seats, steering wheel and mirrorsZ
Page 102 of 356

Adjusting the steering wheel
electrically:To adjust the steering wheel height;To adjust the steering wheel position
(fore-and-aft adjustment)
i Other topics:
R EASY-ENTRY/EXIT feature
( Y page 100)
R storing settings ( Y page 103)
EASY-ENTRY/EXIT system
Important safety notes
The EASY-ENTRY/EXIT feature makes getting
in and out of your vehicle easier.
You can activate and deactivate the EASY-
ENTRY/EXIT feature in the on-board
computer ( Y page 209).
GWARNING
You must make sure no one can become
trapped or injured by the moving steering
wheel when the easy-entry/exit feature is
activated.
To stop steering wheel movement, move
steering wheel adjustment stalk or press the
memory position switch.
Do not leave children unattended in the
vehicle, or with access to an unlocked vehicle.
Children could open the driver's door and
unintentionally activate the easy-entry/exit
feature, which could result in an accident
and/or serious personal injury.
GWARNING
Let the system complete the adjustment
procedure before setting the vehicle in
motion. All steering wheel adjustment must
be completed before setting the vehicle in
motion. Driving off with the steering wheel
still adjusting could cause the driver to lose
control of the vehicle.
Position of the steering wheel when the
EASY-ENTRY/EXIT feature is active
The steering wheel swings upwards when
you:
R remove the SmartKey from the ignition lock
R open the driver's door and KEYLESS-GO is
in position 1
R open the driver's door and the SmartKey is
in position 0 or 1 in the ignition lock
i The steering wheel only moves upwards if
it has not already reached the upper end
stop.
Position of the steering wheel for
driving
The steering wheel is moved to the last
selected position when:
R the driver's door is closed.
R you insert the SmartKey into the ignition
lock.
or
R you press the Start/Stop button once on
vehicles with KEYLESS-GO.
When you close the driver's door with the
ignition switched on, the steering wheel is
also automatically moved to the previously
set position.
The last position of the steering wheel is
stored after each manual setting or when you
store the setting with the memory function
( Y page 103).
100Steering wheelSeats, steering wheel and mirrors