2012 MERCEDES-BENZ C-Class turn signal
[x] Cancel search: turn signalPage 63 of 234

X
To start route calculati on:sel ect Start and
pressW toconfi rm. En
teri ngadesti nation from thelist of
last dest inations
X To switch onnav igat ionmod e:pres sth e
Ø function butt on.
X To show themen u:pres sW theCOMA ND
con troller .
X Sele ctDes tin ation in
thenav igat ion
syst emmen ubar byturnin gcVd the
COMA NDcontroller andpres singW to
con firm.
X Sele ctFro mLas tDes tinations and
pres sW tocon firm. X
Sele ctthedesir eddest inationbyturnin g
cVd theCOMA NDcontroller andpres sing
W tocon firm.
The addres sent rymen uappears again.The
destination addressselected hasbeen
entered.
X To star troute calculation: selectStart and
press Wtoconfirm .
Once theroute hasbeen calculated, route
guida ncebegins (Ypage 77).
i Further information onthe "Last
destinations" memorycanbefound on
(Y page 97). Entering
adesti nation usin gthe map
Call ingupthe map X
To swi tch onnavig ation mode: pressthe
Ø function button.
X To show themenu: pressWthe COMAND
controlle r.
X Select Destin ation in
the navig ation
sys tem menu barbyturning cVdthe
COMAND controllerand pre ssing W to
confi rm.
X Sel ect Usi ng Map and
pressW toconfi rm.
Yo usee themapwi th the cros shair. :
Curre ntveh iclepo sitio n
; Cross hair
= Deta ils of the cros shairpo sitio n
? Mapsca lesel ecte d
Dis play = depends onthe setti ngsselecte d
in "M ap info rma tionint he displa y"
(Y page 102). Thecurrent streetnamecan
be shown, provided thedigital mapcontains
the necessary data,orthe coordinates ofthe
crosshair ifthe geo-coordinate displayis
switched onand theGPS signal isstron g
enough.
Moving themap andselec tingthe
destination X
To scroll themap :slide XVY, ZVÆor
aVb theCOMAND controller. Des
tination entry
61Navigat ion Z
Page 104 of 234

Map
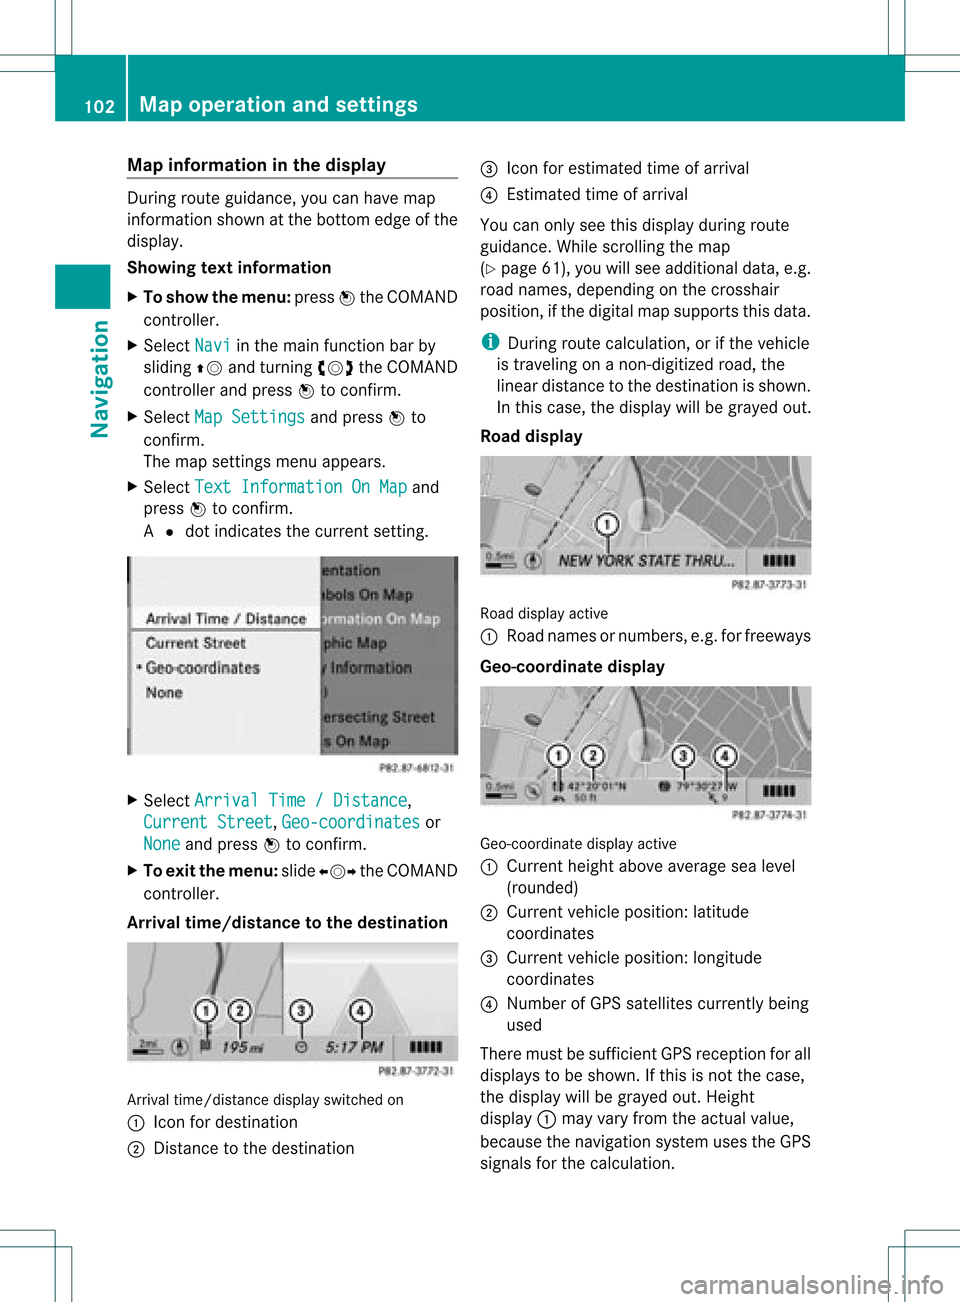
information inthe display During
routeguidance, youcan have map
informati onshow natthe bottom edgeofthe
displa y.
Showing textinformat ion
X To show themenu: pressWthe COMAND
cont roller.
X Select Navi in
the main functionbar by
sliding ZVandturning cVdtheCOMAND
cont roller andpress Wtoconfirm .
X Select MapSettings and
press Wto
confirm .
The map settin gsmenu appears.
X Select TextInformation OnMap and
press Wtoconfirm .
A # dot indicates thecurrent setting. X
Select Arrival Time/Distance ,
Current Street ,
Geo-coordinates or
None and
press Wtoconfirm .
X To exit themenu: slideXVY theCOMAND
cont roller.
Arrival time/distance tothe destination Arrival
time/distanc edisplay switched on
: Icon fordestination
; Distanc eto the destination =
Icon forestimated timeofarrival
? Estimated timeofarrival
You canonly seethis displa yduring route
guida nce.While scrolling themap
(Y page 61),youwillsee additional data,e.g.
road names, depending onthe crosshair
position, ifthe digital mapsupports thisdata.
i During routecalculation, orifthe vehicle
is traveling onanon- digitized road,the
linear distance tothe destination isshown.
In this case, thedispla ywill begrayed out.
Road display Road
display active
: Road names ornumbers, e.g.forfreeways
Geo-coo rdinatedisplay Geo-coordinate
displayactive
: Current heightaboveaverage sealevel
(rounded)
; Current vehicleposition: latitude
coordinates
= Current vehicleposition: longitude
coordinates
? Number ofGPS satellites currentlybeing
used
There mustbesufficient GPSreception forall
displa ystobe shown. Ifthis isnot thecase,
the displa ywill begrayed out.Height
displa y: may varyfrom theactual value,
because thenavigation systemusestheGPS
signals forthe calculation. 102
Map
operat ionand settingsNavigat ion
Page 121 of 234

Disp
laying details
X Press the% function buttonon
COM AND.
X Se lec tPho ne in
thete leph onebasi cmenu
by sliding VÆandturningcVd the
COMAND controller andpress Wto
con firm.
X Select Bluetoo th Phones and
press Wto
con firm.
X Select thedesired mobilephoneinthe
Bluetoot h®
telephon eslist.
X Select thelistsymbol tothe right ofthe
ent ryby sliding VYtheCOMAND
con troller andpress Wtocon firm.
X Select Details and
press Wtocon firm.
The following information concern ingthe
select edmobile phoneisshown:
R Bluetoot h®
name
R Bluetoot h®
address
R availabili tystat us(shown afteranew
search)
R authoriz ationstatus
X To close thedeta iledview: turncVd or
slide XVY theCOMAND controller. De-register
ing(de-au thorizing) a
mobile phone
i Mercedes- BenzUSA,LLC recom mends
de-author izationonboth COMAND andon
the mobile phone. Subsequent
authoriz ationmayother wisefail.
X Press the% function button on
COMAND .
X Select Phone in
the telephon ebasic menu
by sliding VÆandturningcVd the
COMAND controller andpress Wto
con firm.
X Select Bluetoo th Phones and
press Wto
con firm.
X Select thedesired mobilephoneinthe
Bluetoot h®
telephon eslist. X
Select thelistsymbol tothe right ofthe
ent ryby sliding VYtheCOMAND
con troller andpress Wtocon firm.
X Select Delete and
press Wtocon firm.
Ap rompt appears asking whethe ryou
really wishtode-authorize thisdevice.
X Select Yes or
No .
If you select Yes ,
the device willbedeleted
from theBluetooth ®
telephones list.
If you select No ,
the process willbe
canceled.
i Before re-authoriz ingthe mobile phone,
you should alsodelete thedevice nameMB Bluetooth from
yourmobile phone's
Bluetooth ®
list. Telephone
basicmenu (Bluetooth ®
interfa ce)
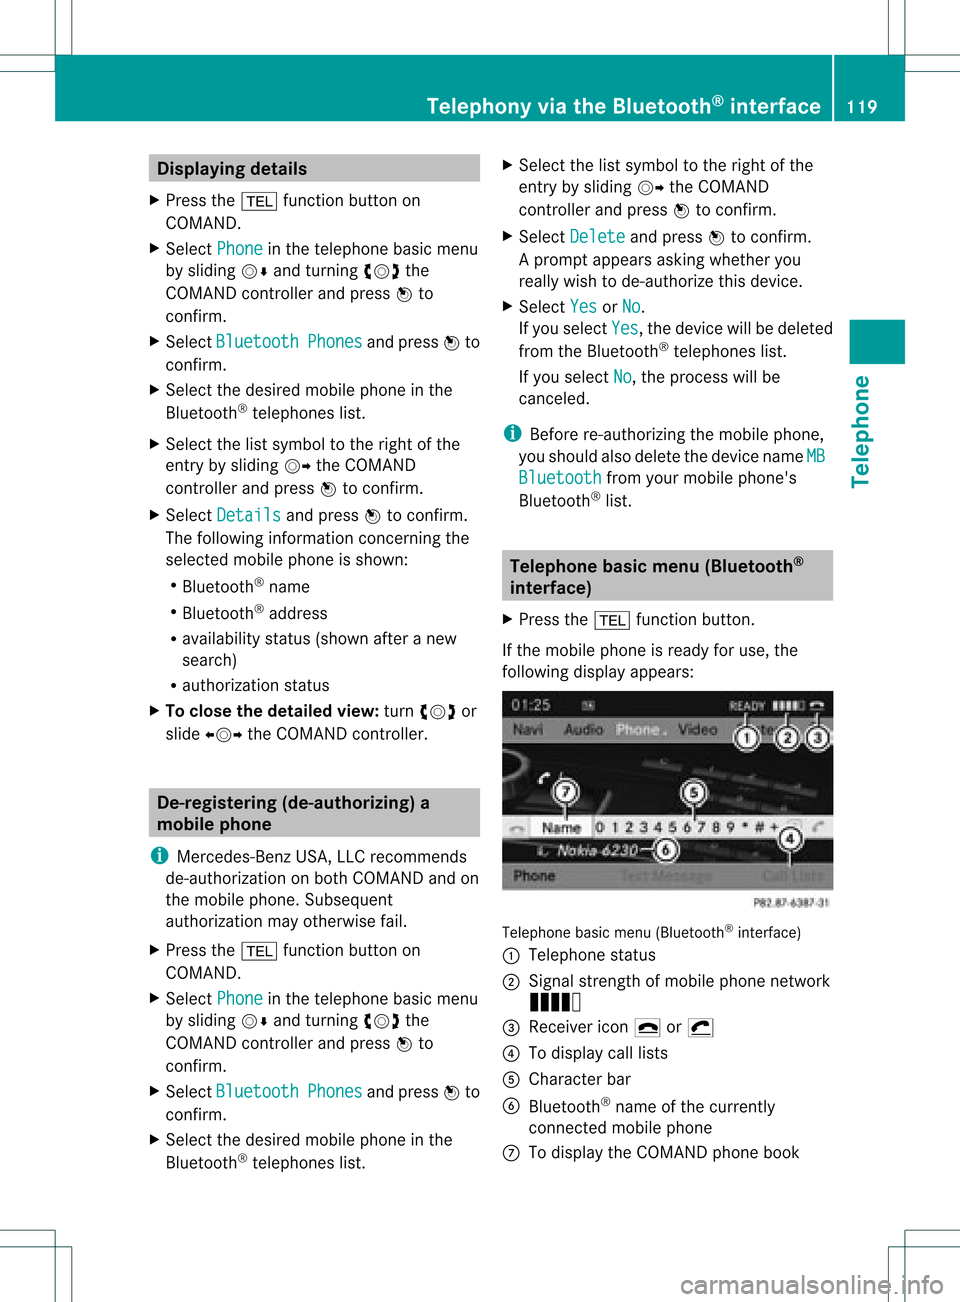
X Press the% functionbutton .
If the mobile phoneisready foruse, the
following displayappears: Telephone
basicmenu (Bluetooth ®
interf ace)
: Telephone status
; Signal strengthofmobile phonenetwork
Ä
= Receiver icon¢or¡
? Todisplay calllists
A Character bar
B Bluetooth ®
name ofthe current ly
conn ected mobile phone
C Todisplay theCOMAND phonebook Telephony
viathe Bluetooth ®
interfa ce119Telephone Z
Page 152 of 234

switches
onthe satellite radio.Pressing the
button againtake syou back toFM radio
mod e.
Opt ion 2 X
Sel ect Audio in
themain function bar by
slidin gZV andturnin gcVd theCOMA ND
co ntroll erand pres sW toconfirm .
If sat ellit eradio modewas thelast mod e
selec ted, itwill nowbe act ive.
If ano ther audio modeis swit ched on,you
can nowswit chtosat ellit eradio modein
th eaudio menu.
X Sel ect Audio by
slidin gZV theCOMA ND
co ntroll erand pres sW toconfirm .
The audio menuappear s.
X Sel ect Sat Rad
io and
pres sW toconfirm .
The NoService mes
sage appear swhen
st art ing uporifno sign alisbein grec eive d.
If th esat ellit erec eive risnot installed oris
not installed correctly,the Device Unavailable message
willappea r. Once
COMAND receivesthesignal, the
satellite radiodispla yappea rs.The station
last selected isplay ed. Satellite
radiomainmenu
1 Satellite radiomaindispla y
2 Channel name
3 Preset
4 Selected category/channel number
5 Channel information (inbrief)
6 Sound settings
7 Category list
8 Channel information (indetail)
9 Channel presetlist
a Satellite radiomenu
Channel information Acan beviewed in
detail (Ypage 153).
Changing thecategory Satellite
radiostations aresorted intovarious
categories. Youcanchoose between the
different categories, suchasnews/talk
shows, sportsorcountry, ifthey areavail able.
The category listissorted alphabetically .
Selec tingacatego ry
X To callup the categ orylist:sel ect
Catego ry by
turning cVdtheCOM AND
controlle rand pre ssW toconfi rm.
The cate gorylist appe ars.
X To select ac atego ry:select acatego ryby
turning cVdtheCOM AND controll erand
pres sing Wtoconfirm.
The catego rysel ected isshow nint he
displa y.You hear thestation lastselected
for this category.
The All Channels category
isat the top
of the category list.This category issorted 150
Satellite
radioAudio
Page 212 of 234

A
Con firms asele ction orset ting
B Swit ches soun don /o ff(fo rcorded
headphones)
C Adjust sthe volume (forcorded
headphones)
D Skips toatrack, fast-forwa rd/fast-rew ind
E Selects atrack; directentry
F Exits amenu (back)
Sel ecting thescre enfor the remote
co ntrol You
canusetheremote controltoopera te
one ofthe two rear screens atatime. Todo
so, you must switch the remote controltothe
desi redscreen.
X To sele ctthe left-hand screen:turn
thumbw heel=until "LREAR" is
high lighted inthe windo w.
X To sele ctthe right-hand screen:turn
thumbw heel=until "REAR R"is
high lighted inthe windo w.
Swi tching thescre enon/ off If
the SmartKey isin posi tion 0or 1in the
ignitio nlock (see thevehicle Operator's
Manual), orthe Smart Keyisnot insert ed,the
screen sin the rear willswitch offafter 30
minutes. Beforethescreen sswitch off,they
show amessage tothis effect .
You canswitch thescreen sback on.
How ever,this will disc harg eth est art er
bat tery.
X Poin tth erem oteco ntrol attherear -
co mpar tments cree nwhich hasbeen
selected forremote operation.
X Press button :onthe remote control.
The respective rearscreen switches onor
off.
i You canonly switch thescreens onusing
the remote controlifthe ignition is
switched on. Switching
thebutt onlighting on/off X
Press button ;onthe remote control.
Depending onthe previous status,the
button lighting isswitched onoroff.
i Ifyou donot use theremote controlfor
about 15seconds, thebutton lighting
switches offautomatically .
Switching thesound on/off(corded
headph onesonly) X
Press button Bonthe remote control.
The sound isswitched on/off.
Selec tingamenu/m enuitem and
confir mingyour select ion X
Sele ctamen u/m enuitemusin gth e
=;9 :buttonson the
rem otecon trol and pres sth e9 butt onto
con firm. CD/DVD
drive and AUX jacks :
CD/ DVDslot
; AUX,righ t-han d(R) jackfor audio signal
(red)
= AUX, left-hand (L)jack foraudio signal
(white)
? AUX, video (V)jack (yellow )
A CD/D VDeject button
The AUX jacksshown areforthe AUX drive.
Ident icaljack scan befound onthe right- hand
side ofthe rear-com partmentscreen s(AUX
display ),(Y page 209). 210
General
informationRearSeatEntert ainment System
Page 213 of 234

Cord
lessheadphones
Over view :
Volum eco ntrol
; Select sa sc ree nfor the headphones
= Batt erycompart mentcover
? Switches thecordless headphones on/off
A Indicat orlamp withvarious displays(Y page 211)
X Open bothsides ofthe headphones andadjust thefitofthe headphones bypulling the
headphone bandinthe direction ofthe arrow.
Switching thecordless headphones
on/off X
Press button ?.
Dependin gon the previous status,the
headphones areswitched onoroff. Tosave
the battery, theheadphones areswitched
off automatically ifthey donot receive an
audio signal within threeminutes.
Adjust ingthe volume ofthe
headp hones X
Turn volume control: until thedesired
volume hasbeen set. i
Ifyou have connected corded
headphones toarear-com partment
screen ,you can adjust thevolume by
pressing buttonsC onthe remote control
(Y page 209).
Selecting ascree nfor thehea dphones X
Mov epush slider; toL(lef t-han dsc ree n)
or R(rig ht-hand scree n).
Ind icat orlam pdis pla ys The
color oftheind icat orlamp shows
whet hertheheadp honesare swit ched on or
off and indicat esthech arge levelof the
bat teries inserted. Gener
alinfor mation
211RearSe at Ent ertai nme ntSyste m Z