Page 247 of 340

X
To install: set cargo compartment
cover : on the right or left-hand side in
anchorage ;.
X Push in the opposite end cap of cargo
compartment cover : in the direction of
the arrow and insert cargo compartment
cover : into opposite anchorage ;. Cargo net
Important safety notes G
WARNING
On its own, the cargo net cannot secure or
restrain heavy objects, items of luggage and
heavy loads. You
could be hit by an unsecured
load during sudden changes in direction,
braking or in the event of an accident. There
is an increased risk of injury or even fatal
injury.
Always store objects so that they cannot be
flung around. Secure objects, luggage or
loads against slipping or tipping over, e.g. by
using tie downs, even if you are using the
cargo net.
It is important to use a cargo net if you load
the vehicle with small objects above the seat
backrests. For safety reasons, always use a
cargo net when transporting loads.
The cargo net is located in the stowage space
under the cargo compartment floor
(Y page 245).
X Open both Velcro fasteners and remove the
cargo net.
X Unroll and unfold the cargo net.
The joints on
the upper and lower guide rod
should engage audibly.
The corresponding cargo tie down rings for
tightening the cargo net are in the cargo
compartment (Y
page 243). Attaching and tightening the cargo net
X
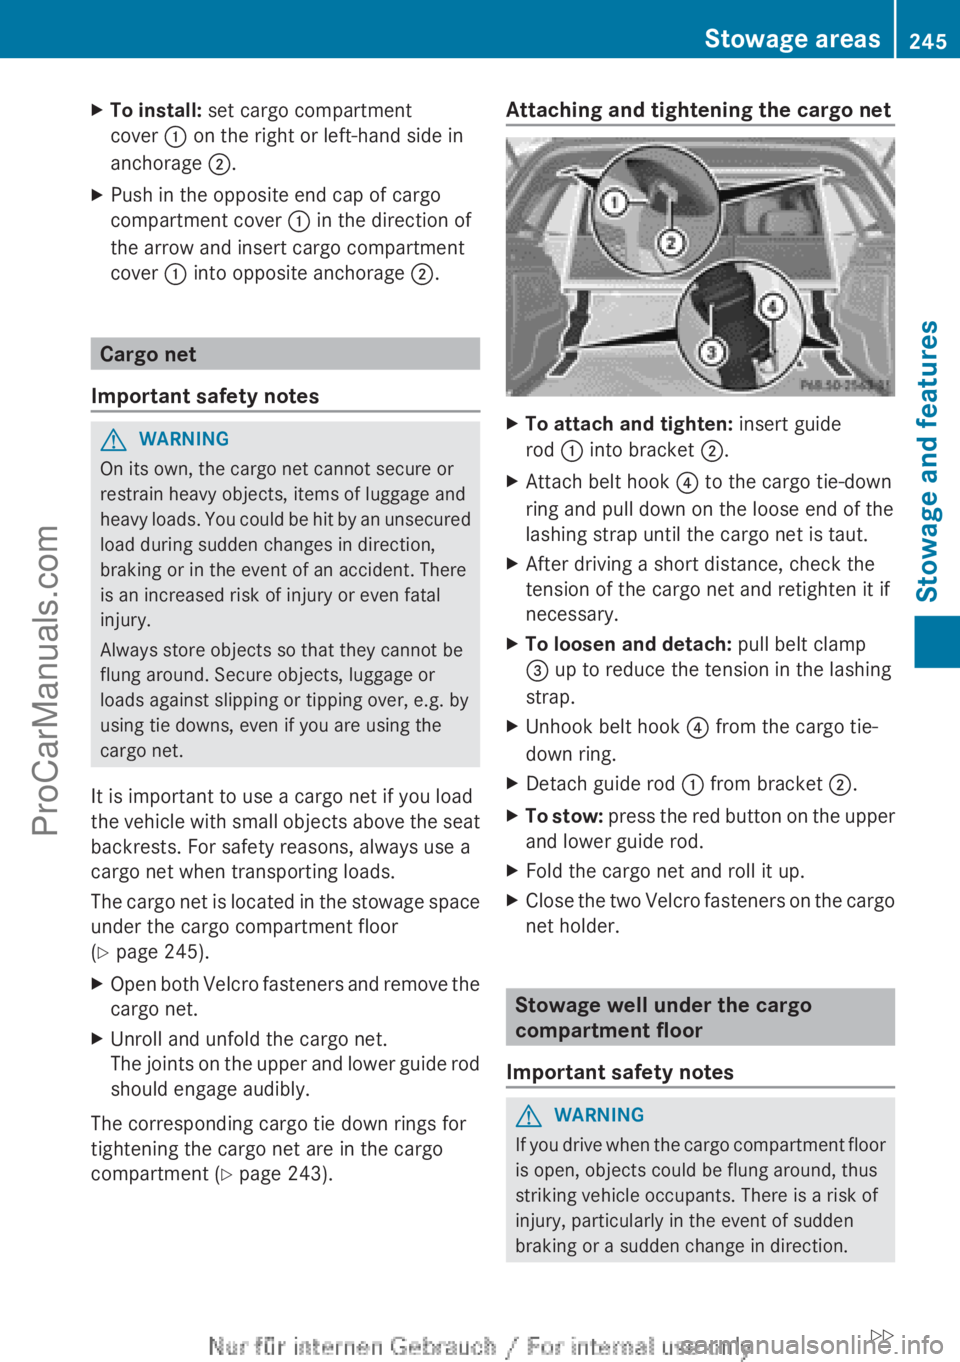
To attach and tighten: insert guide
rod : into bracket ;.
X Attach belt hook ? to the cargo tie-down
ring and pull down on the loose end of the
lashing strap until the cargo net is taut.
X After driving a short distance, check the
tension of the cargo net and retighten it if
necessary.
X To loosen and detach: pull belt clamp
= up to reduce the tension in the lashing
strap.
X Unhook belt hook ? from the cargo tie-
down ring.
X Detach guide rod : from bracket ;.
X To stow: press the red
button on the upper
and lower guide rod.
X Fold the cargo net and roll it up.
X Close the two Velcro fasteners on the cargo
net holder. Stowage well under the cargo
compartment floor
Important safety notes G
WARNING
If you drive when the cargo compartment floor
is open, objects could be flung around, thus
striking vehicle occupants. There is a risk of
injury, particularly in the event of sudden
braking or a sudden change in direction. Stowage areas
245
Stowage and features
ZProCarManuals.com
Page 279 of 340

!
To retain the natural appearance of the
leather, observe the following cleaning
instructions:
R Clean genuine leather covers carefully
with a damp cloth and then wipe the
covers down with a dry cloth.
R Make sure that the leather does not
become soaked. It may otherwise
become rough and cracked.
R Only use leather care agents that have
been tested and
approved by Mercedes-
Benz. You can obtain these from a
qualified specialist workshop.
Seat covers of other materials
! Observe the following when cleaning:
R Clean artificial leather covers with a cloth
moistened with a solution containing
1% detergent (e.g. dish washing liquid).
R Clean cloth covers with a microfiber
cloth moistened with a solution
containing 1% detergent (e.g. dish
washing liquid). Rub carefully and always
wipe entire seat sections to avoid leaving
visible lines. Leave the seat to dry
afterwards. Cleaning results depend on
the type of dirt and how long it has been
there.
R Clean Alcantara® covers with a damp
cloth. Make sure that you wipe entire
seat sections to avoid leaving visible
lines.
Cleaning the seat belts G
WARNING
Seat belts can become severely weakened if
bleached or dyed. This could cause the seat
belts to tear or fail, for instance, in the event
of an accident. This poses an increased risk
of injury or fatal injury.
Never bleach or dye the seat belts.
! Do not clean
the seat belts using chemical
cleaning agents. Do not dry the seat belts by heating at temperatures above 176 ‡
(80 †) or in direct sunlight.
X Use clean, lukewarm water and soap
solution.
Cleaning the headliner and carpets X
Headliner: if it is very dirty, use a soft brush
or a cleaning agent recommended and
approved by Mercedes-Benz.
X Carpets: use the carpet and textile
cleaning agents recommended and
approved by Mercedes-Benz. Care
277
Maintenance and care Z
ProCarManuals.com
Page 292 of 340

shorter. The starting characteristics can be impaired, particularly at low temperatures. Have
the thawed-out battery checked at a qualified specialist workshop.
Do not
start
the vehicle using a rapid charging device. If your vehicle's battery is discharged,
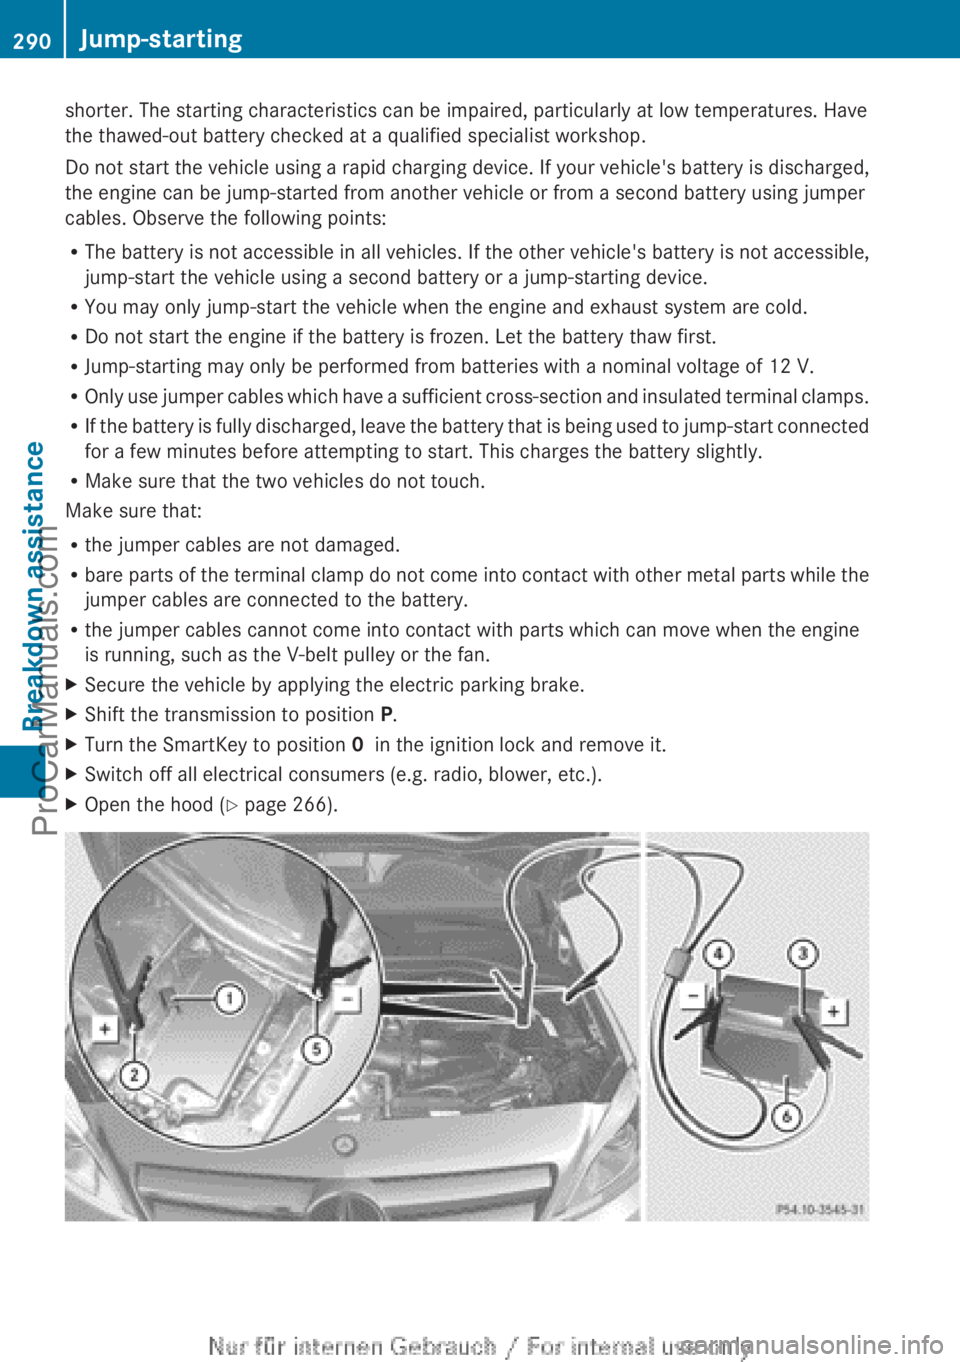
the engine can be jump-started from another vehicle or from a second battery using jumper
cables. Observe the following points:
R The battery is not accessible in all vehicles. If the other vehicle's battery is not accessible,
jump-start the vehicle using a second battery or a jump-starting device.
R You may only jump-start the vehicle when the engine and exhaust system are cold.
R Do not start the engine if the battery is frozen. Let the battery thaw first.
R Jump-starting may only be performed from batteries with a nominal voltage of 12 V.
R Only use jumper cables which have a sufficient cross-section and insulated terminal clamps.
R If the battery is fully discharged, leave the battery that is being used to jump-start connected
for a few minutes before attempting to start. This charges the battery slightly.
R Make sure that the two vehicles do not touch.
Make sure that:
R the jumper cables are not damaged.
R bare parts of the terminal clamp do not come into contact with other metal parts while the
jumper cables are connected to the battery.
R the jumper cables cannot come into contact with parts which can move when the engine
is running, such as the V-belt pulley or the fan.
X Secure the vehicle by applying the electric parking brake.
X Shift the transmission to position P.
X Turn the SmartKey to position 0 in the ignition lock and remove it.
X Switch off all electrical consumers (e.g. radio, blower, etc.).
X Open the hood (Y page 266).290
Jump-starting
Breakdown assistance
ProCarManuals.com