2012 MERCEDES-BENZ B-CLASS steering
[x] Cancel search: steeringPage 92 of 340

Rear seat head restraints
Adjusting the rear seat head restraint
height
X
To raise: pull the head restraint up to the
desired position.
X To lower: press release catch : and push
the head restraint down until it is in the
desired position.
Removing and installing the rear seat
head restraints G
WARNING
If head restraints are not installed and
adjusted correctly, they cannot provide
protection as intended.
There is an increased
risk of injury in the head and neck area, e.g.
in the event of an accident or when braking.
Always drive with the head restraints
installed. Before driving off, make sure for
every vehicle occupant that the center of the
head restraint supports the back of the head
at about eye level.
The rear head restraints on the outer seats
can be removed and re-installed. X
Fold the seat backrest slightly forwards in
order to remove the head restraint
(Y page 240).
X To remove: pull the head restraint up to
the stop.
X Press release catch : and pull the head
restraint out of the guides.
X To re-install: insert the head restraint so
that the notches on the bar are on the left
when viewed in the direction of travel.
X Push the head restraint down until you hear
it engage in position. Adjusting the 4-way lumbar support
You can adjust the contour of the front seat
backrests individually to provide optimum
support for your back. :
To raise the backrest contour
; To soften the backrest contour
= To lower the backrest contour
? To harden the backrest contour90
Seats
Seats, steering wheel and mirrors
ProCarManuals.com
Page 93 of 340
Switching the seat heating on/off
Activating/deactivating G
WARNING
Repeatedly switching on the seat heating can
cause the seat cushion and backrest pads to
become very hot. The health of persons with
limited temperature sensitivity or a limited
ability to react to excessively high
temperatures may be affected or they may
even suffer burn-like injuries. There is a risk
of injury.
Therefore, do not switch the seat heating on
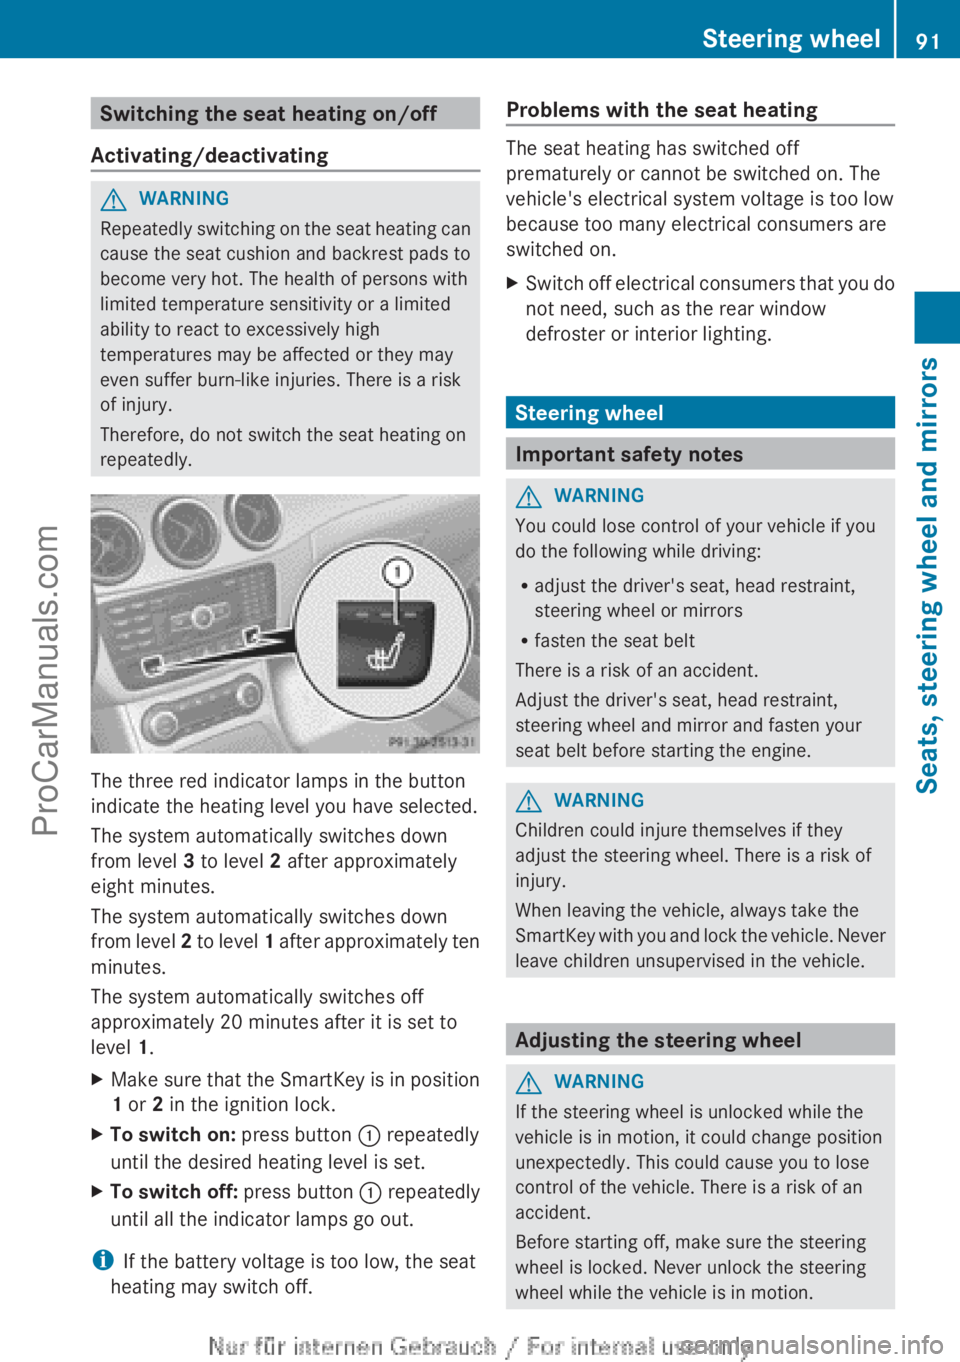
repeatedly. The three red indicator lamps in the button
indicate the heating level you have selected.
The system automatically switches down
from level 3 to level 2 after approximately
eight minutes.
The system automatically switches down
from level
2
to level 1 after approximately ten
minutes.
The system automatically switches off
approximately 20 minutes after it is set to
level 1.
X Make sure that the SmartKey is in position
1 or 2 in the ignition lock.
X To switch on: press button : repeatedly
until the desired heating level is set.
X To switch off: press button : repeatedly
until all the indicator lamps go out.
i If the battery voltage is too low, the seat
heating may switch off. Problems with the seat heating The seat heating has switched off
prematurely or cannot be switched on. The
vehicle's electrical system voltage is too low
because too many electrical consumers are
switched on.
X
Switch off electrical consumers that you do
not need, such as the rear window
defroster or interior lighting. Steering wheel
Important safety notes
G
WARNING
You could lose control of your vehicle if you
do the following while driving:
R adjust the driver's seat, head restraint,
steering wheel or mirrors
R fasten the seat belt
There is a risk of an accident.
Adjust the driver's seat, head restraint,
steering wheel and mirror and fasten your
seat belt before starting the engine. G
WARNING
Children could injure themselves if they
adjust the steering wheel. There is a risk of
injury.
When leaving the vehicle, always take the
SmartKey with you
and lock the vehicle. Never
leave children unsupervised in the vehicle. Adjusting the steering wheel
G
WARNING
If the steering wheel is unlocked while the
vehicle is in motion, it could change position
unexpectedly. This could cause you to lose
control of the vehicle. There is a risk of an
accident.
Before starting off, make sure the steering
wheel is locked. Never unlock the steering
wheel while the vehicle is in motion. Steering wheel
91
Seats, steering wheel and mirrors Z
ProCarManuals.com
Page 94 of 340
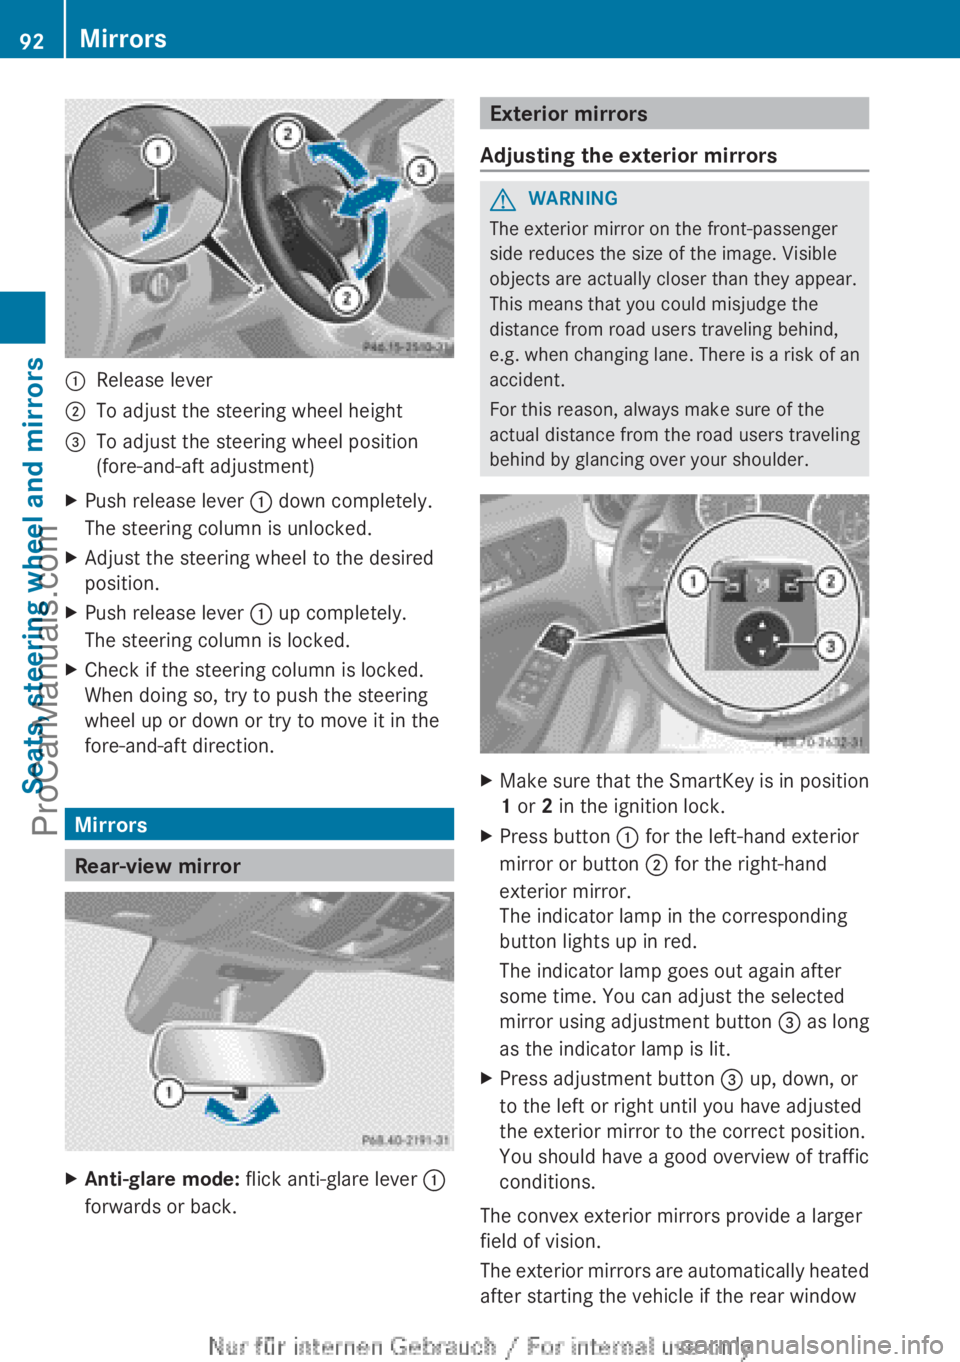
:
Release lever
; To adjust the steering wheel height
= To adjust the steering wheel position
(fore-and-aft adjustment)
X Push release lever : down completely.
The steering column is unlocked.
X Adjust the steering wheel to the desired
position.
X Push release lever : up completely.
The steering column is locked.
X Check if the steering column is locked.
When doing so, try to push the steering
wheel up or down or try to move it in the
fore-and-aft direction. Mirrors
Rear-view mirror
X
Anti-glare mode: flick anti-glare lever :
forwards or back. Exterior mirrors
Adjusting the exterior mirrors G
WARNING
The exterior mirror on the front-passenger
side reduces the size of the image. Visible
objects are actually closer than they appear.
This means that you could misjudge the
distance from road users traveling behind,
e.g. when changing
lane. There is a risk of an
accident.
For this reason, always make sure of the
actual distance from the road users traveling
behind by glancing over your shoulder. X
Make sure that the SmartKey is in position
1 or 2 in the ignition lock.
X Press button : for the left-hand exterior
mirror or button ; for the right-hand
exterior mirror.
The indicator lamp in the corresponding
button lights up in red.
The indicator lamp goes out again after
some time. You can adjust the selected
mirror using adjustment button = as long
as the indicator lamp is lit.
X Press adjustment button = up, down, or
to the left or right until you have adjusted
the exterior mirror to the correct position.
You should have a good overview of traffic
conditions.
The convex exterior mirrors provide a larger
field of vision.
The exterior
mirrors
are automatically heated
after starting the vehicle if the rear window 92
Mirrors
Seats, steering wheel and mirrors
ProCarManuals.com
Page 95 of 340

defroster is switched on and the outside
temperature is
low.
Mirror heating lasts up to
10 minutes.
i You can also heat up the exterior mirrors
manually by switching on the rear window
defroster.
Folding the exterior mirrors in or out
electrically X
Make sure that the SmartKey is in position
1 or 2 in the ignition lock.
X Briefly press button :.
Both exterior mirrors fold in or out.
i Make sure that the exterior mirrors are
always folded out fully while driving. They
could otherwise vibrate.
i If you are driving faster than
30 mph (47 km/h ), you can no longer fold
in the exterior mirrors.
Setting the exterior mirrors If the battery has been disconnected or
completely discharged, the exterior mirrors
must be reset. The exterior mirrors will
otherwise not fold in when you select the
"Fold in
mirrors
when locking" function in the
on-board computer (Y page 199).
X Make sure that the SmartKey is in
position 1 in the ignition lock.
X Briefly press button :. Folding the exterior mirrors in or out
automatically If the "Fold in mirrors when locking" function
is activated in the on-board computer
(Y page 199):
R
the exterior mirrors
fold in automatically as
soon as you lock the vehicle from the
outside.
R the exterior mirrors fold out again
automatically as soon as you unlock the
vehicle and then open the driver's or front-
passenger door.
i If the exterior mirrors have been folded in
manually, they do not fold out.
Exterior mirror pushed out of position If an exterior mirror has been pushed out of
position, proceed as follows:
X
Vehicles without electrically folding
exterior mirrors:
move
the exterior mirror
into the correct position manually.
X Vehicles with electrically folding
exterior mirrors: press and hold mirror-
folding button ( Y page
93) until you hear a
click and then the mirrors engage in
position.
The mirror housing is engaged again and
you can adjust the exterior mirrors as usual
(Y page 92). Automatic anti-glare mirrors
The "Automatic anti-glare
mirrors" function is
only available if the vehicle is equipped with
the "Mirrors package".
The rear-view mirror and the exterior mirror
on the driver's side automatically go into anti-
glare mode if:
R the ignition is switched on and
R incident light from headlamps strikes the
sensor in the rear-view mirror.
The mirrors do not go into anti-glare mode if
reverse gear is engaged or the interior lighting
is switched on. Mirrors
93
Seats, steering wheel and mirrors Z
ProCarManuals.com
Page 96 of 340
Parking position for the exterior
mirror on the front-passenger side
General notes The "Parking position of the exterior mirror on
the front-passenger side" function is only
available if the vehicle is equipped with the
"Mirrors package".
Setting and
storing
the parking positionUsing reverse gear
You can position the front-passenger side
exterior mirror
in
such a way that you can see
the rear wheel on that side as soon as you
engage reverse gear. You can store this
position. X
Make sure that the vehicle is stationary and
that the SmartKey is in position 2 in the
ignition lock.
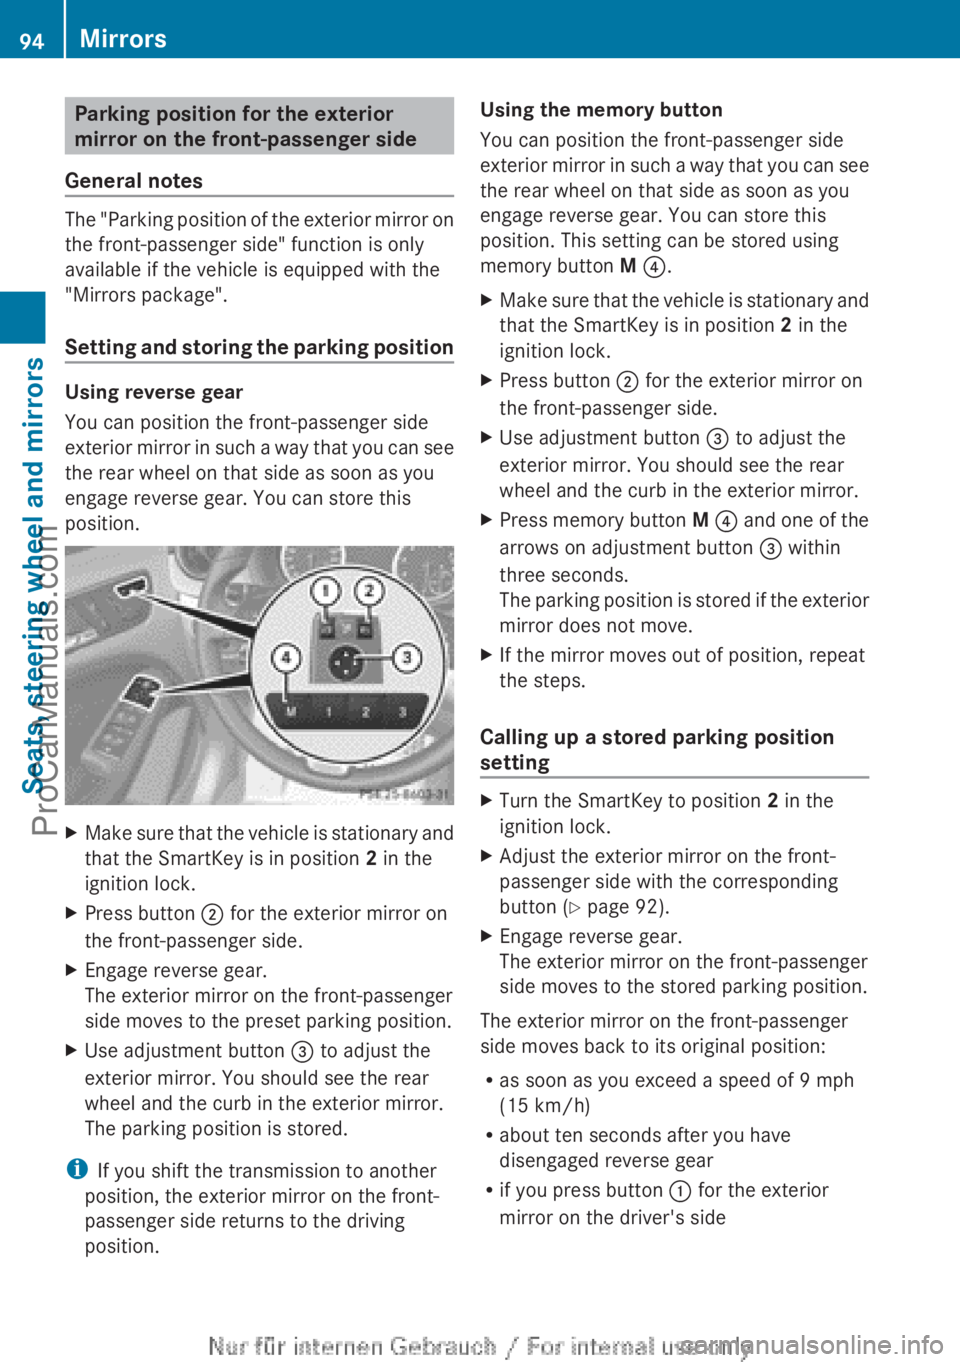
X Press button ; for the exterior mirror on
the front-passenger side.
X Engage reverse gear.
The exterior mirror on the front-passenger
side moves to the preset parking position.
X Use adjustment button = to adjust the
exterior mirror. You should see the rear
wheel and the curb in the exterior mirror.
The parking position is stored.
i If you shift the transmission to another
position, the exterior mirror on the front-
passenger side returns to the driving
position. Using the memory button
You can position the front-passenger side
exterior mirror
in
such a way that you can see
the rear wheel on that side as soon as you
engage reverse gear. You can store this
position. This setting can be stored using
memory button M ?.
X Make sure that the vehicle is stationary and
that the SmartKey is in position 2 in the
ignition lock.
X Press button ; for the exterior mirror on
the front-passenger side.
X Use adjustment button = to adjust the
exterior mirror. You should see the rear
wheel and the curb in the exterior mirror.
X Press memory button M ? and
one
of the
arrows on adjustment button = within
three seconds.
The parking position is stored if the exterior
mirror does not move.
X If the mirror moves out of position, repeat
the steps.
Calling up a stored parking position
setting X
Turn the SmartKey to position 2 in the
ignition lock.
X Adjust the exterior mirror on the front-
passenger side with the corresponding
button ( Y page 92).
X Engage reverse gear.
The exterior mirror on the front-passenger
side moves to the stored parking position.
The exterior mirror on the front-passenger
side moves back to its original position:
R as soon as you exceed a speed of 9 mph
(15 km/h)
R about ten seconds after you have
disengaged reverse gear
R if you press button : for the exterior
mirror on the driver's side 94
Mirrors
Seats, steering wheel and mirrors
ProCarManuals.com
Page 97 of 340
Memory functions
Storing settings
G
WARNING
If you use the memory function on the driver's
side while driving, you could lose control of
the vehicle as a result of the adjustments
being made. There is a risk of an accident.
Only use the
memory function on the driver's
side when the vehicle is stationary. G
WARNING
When the memory function adjusts the seat,
you and other
vehicle occupants – particularly
children – could become trapped. There is a
risk of injury.
While the memory function is making
adjustments, make sure that no one has any
body parts in the sweep of the seat. If
somebody becomes trapped, immediately
release the memory function position button.
The adjustment process is stopped. G
WARNING
Children could become trapped if they
activate the memory function, particularly
when unattended. There is a risk of injury.
When leaving the vehicle, always take the
SmartKey with you
and lock the vehicle. Never
leave children unsupervised in the vehicle.
With the memory function, you can store up
to three different settings, e.g. for three
different people.
The following settings are stored as a single
memory preset:
R position of the seat, backrest and head
restraint
R driver's side: position of the exterior
mirrors on the driver's and front-passenger
sides X
Adjust the seat ( Y page 88).
X Adjust the exterior mirror on the driver's
side ( Y page 92).
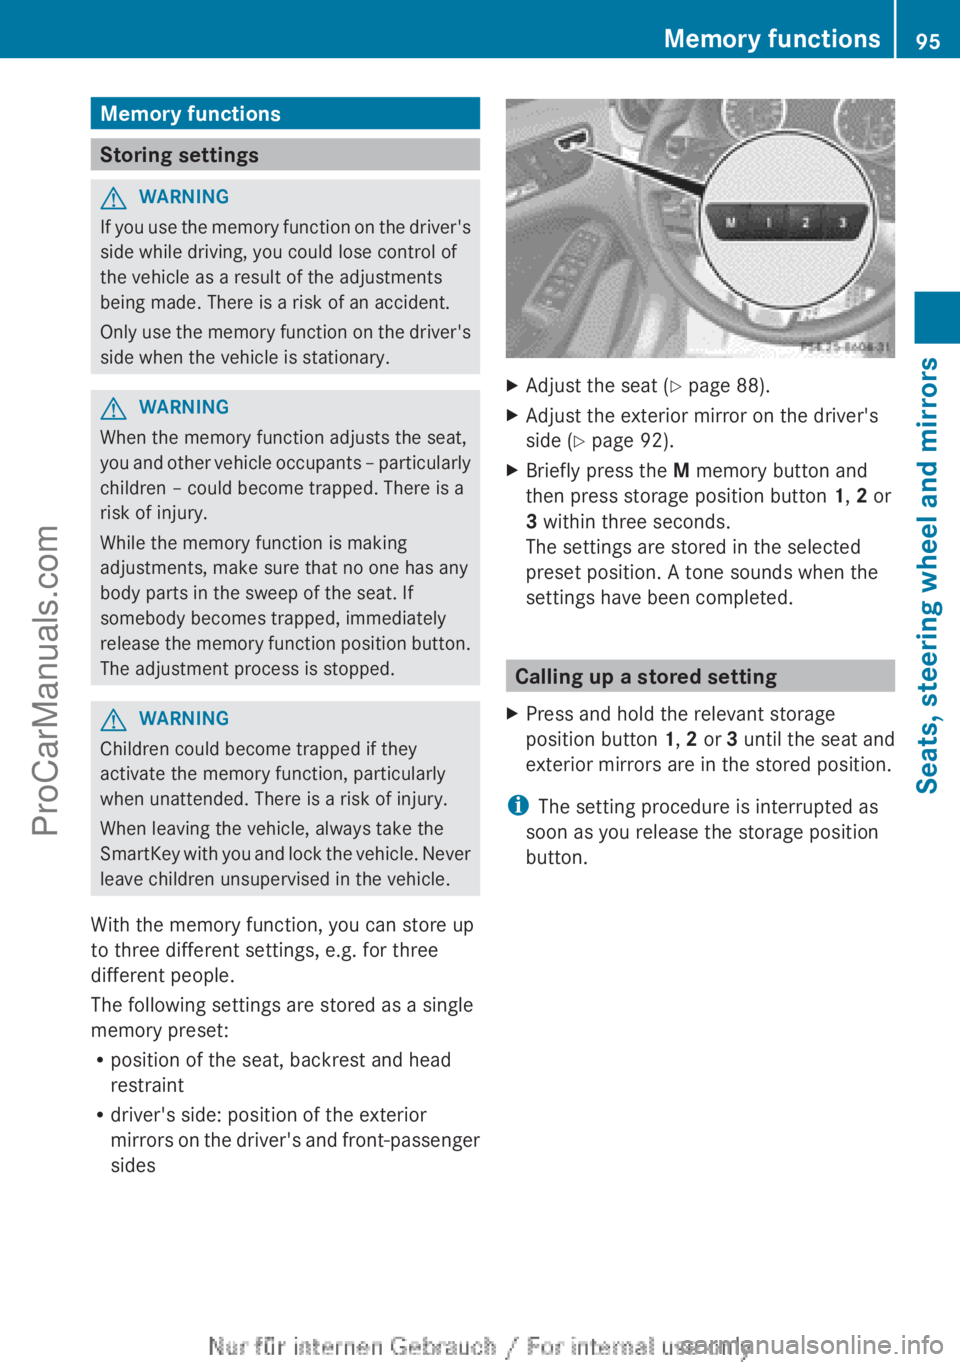
X Briefly press the M memory button and
then press storage position button 1, 2 or
3 within three seconds.
The settings are stored in the selected
preset position. A tone sounds when the
settings have been completed. Calling up a stored setting
X Press and hold the relevant storage
position button 1, 2 or 3
until the
seat and
exterior mirrors are in the stored position.
i The setting procedure is interrupted as
soon as you release the storage position
button. Memory functions
95
Seats, steering wheel and mirrors Z
ProCarManuals.com
Page 104 of 340

Active:
R
if you are driving at speeds below 25 mph
(40 km/h )
and switch on the turn signal or
turn the steering wheel.
R if you are driving at speeds between
25 mph (40 km/h) and 45 mph (70 km/h)
and turn the steering wheel.
Not active: if you are driving at speeds above
25 mph (40 km/h) or switch off the turn
signal or turn the steering wheel to the
straight-ahead position.
The cornering lamp may remain lit for a short
time, but is automatically switched off after
no more than three minutes. Extended range fog lamps
The extended range fog lamps reduce the
glare experienced by the driver and improve
the illumination of the edge of the road.
Active:
if you are driving at speeds below
40 mph (70
km/h) and you switch on the rear
fog lamp.
Not active: if, following activation, you are
driving at speeds above 60 mph (100 km/h)
or if you switch off the rear fog lamp. Adaptive Highbeam Assist
G
WARNING
Adaptive Highbeam Assist does not recognize
road users:
R who have no lights, e.g. pedestrians
R who have poor lighting, e.g. cyclists
R whose lighting is blocked, e.g. by a barrier
In very rare
cases, Adaptive Highbeam Assist
may fail to recognize other road users that
have lights, or may recognize them too late.
In this or similar situations, the automatic
high-beam headlamps will not be deactivated
or activated regardless. There is a risk of an
accident.
Always carefully observe the traffic conditions
and switch off the high-beam headlamps in
good time.
You can use this function to set the
headlamps to change between low beam and
high beam automatically. The system
recognizes vehicles with their lights on, either
approaching from the opposite direction or
traveling in front of your vehicle, and
consequently switches the headlamps from
high beam to low beam.
The system automatically adapts the low-
beam headlamp range depending on the
distance to the other vehicle. Once the
system no longer detects any other vehicles,
it reactivates the high-beam headlamps.
The system's optical sensor is located behind
the windshield near the overhead control
panel. 102
Exterior lighting
Lights and windshield wipers
ProCarManuals.com
Page 136 of 340
Useful information
i This Operator's Manual describes all
models and all standard and optional
equipment of your vehicle available at the
time of publication of the Operator's
Manual. Country-specific differences are
possible. Please note
that your vehicle may
not be equipped with all features
described. This also applies to safety-
related systems and functions.
i Read the information on qualified
specialist workshops: ( Y page 24).Notes on breaking-in a new vehicle
Important safety notes
New and replaced brake pads and discs only
reach their optimum braking effect after
several hundred kilometers of driving.
Compensate for this
by applying greater force
to the brake pedal. The first 1,000miles (1,500 km)
The more you
look after the engine when it is
new, the more satisfied you will be with its
performance in the future.
R You should therefore drive at varying
vehicle and engine speeds for the first
1,000 miles (1,500 km).
R Avoid heavy loads, e.g. driving at full
throttle, during this period.
R Change gear in good time, before the
tachometer needle is Ô of the way to the
red area of the tachometer.
R Do not manually shift to a lower gear to
brake the vehicle.
R If possible, do not depress the accelerator
pedal past the point of resistance
(kickdown).
R Ideally, for the first 1,000 miles (1,500 km),
drive in program E. After 1,000 miles (1,500km), you can
increase the
engine
speed gradually and bring
the vehicle up to full speed.
i You should also observe these notes on
breaking-in if the engine or parts of the
drive train on your vehicle have been
replaced.
i Always observe the respective speed
limits. Driving
Important safety notes
G
WARNING
Objects in the driver's footwell can restrict the
pedal travel or obstruct a depressed pedal.
The operating and road safety of the vehicle
is jeopardized. There is a risk of an accident.
Make sure that all objects in the vehicle are
stowed correctly, and that they cannot enter
the driver's footwell. Install the floormats
securely and as specified in order to ensure
sufficient clearance for
the pedals. Do not use
loose floormats. G
WARNING
Unsuitable footwear can hinder correct usage
of the pedals, e.g.:
R shoes with thick soles
R shoes with high heels
R slippers
There is a risk of an accident.
Wear suitable footwear to ensure correct
usage of the pedals. G
WARNING
If you switch off the ignition while driving,
safety-relevant functions are only available
with limitations, or
not at all. This could affect,
for example, the power steering and the brake
boosting effect. You will require considerably
more effort to steer and brake. There is a risk
of an accident. 134
Driving
Driving and parking
ProCarManuals.com