2012 MERCEDES-BENZ B-CLASS window
[x] Cancel search: windowPage 79 of 340

You can reach the emergency release via the
cargo compartment. Fold the rear backrests
forward (
Y page 240).
X Take the mechanical key out of the
SmartKey (Y page 69). X
Insert mechanical key ; into the opening
in paneling :.
X Turn mechanical key ; 90° clockwise.
X Push mechanical key ; in the
direction of
the arrow and open the tailgate. Side windows
Important safety notes
G
WARNING
While opening the side windows, body parts
in the closing area could become trapped.
There is a risk of injury.
Make sure that no body parts are in close
proximity during the closing procedure. If
somebody becomes trapped, release the
switch or press the switch to open the side
window again. G
WARNING
If children operate the side windows they
could become trapped,
particularly if they are
left unsupervised. There is a risk of injury.
Activate the override feature for the rear side
windows. When leaving the vehicle, always
take the SmartKey with you and lock the
vehicle. Never leave children unsupervised in
the vehicle. Side window reversing feature
The side windows are equipped with an
automatic reversing feature. If a solid object
blocks or restricts a side window during the
closing process, the
side window opens again
automatically. However, the automatic
reversing feature is only an aid and does not
relieve you of the responsibility of paying
attention when closing a side window. G
WARNING
The reversing feature does not react:
R to soft, light and thin objects, e.g. small
fingers
R over the last
4 mm of the closing movement
R during resetting
R when closing the side window again
manually immediately after automatic
reversing
This means that the reversing feature cannot
prevent someone being trapped in these
situations. There is a risk of injury.
Make sure that no body parts are in close
proximity during the closing procedure. If
someone becomes trapped, press the switch
to open the side window again. Opening and closing the side
windows
The switches for
all side windows are located
on the driver's door. There is also a switch on
each door for the corresponding side window.
The switches on the driver's door take
precedence. Side windows
77
Opening and closing Z
ProCarManuals.com
Page 80 of 340

:
Front left
; Front right
= Rear right
? Rear left
i When the override feature for the side
windows is activated (
Y page 58), the side
windows
cannot be operated from the rear.
X Turn the SmartKey to position 1 or 2
in the
ignition lock.
X To open: press the corresponding switch.
X To open fully: press the corresponding
switch beyond the point of resistance.
Automatic closing is started.
X To close: pull the corresponding switch.
X To close fully: pull the corresponding
switch beyond the pressure point.
Automatic closing is started.
X To interrupt the automatic opening/
closing: press/pull the corresponding
switch again.
i If you press the switch beyond the point
of resistance, an automatic opening/
closing process is started in the
corresponding direction. You can stop
automatic operation by operating the
switch again.
i You can continue to operate the side
windows after you
switch off the engine or
remove the SmartKey. This function is
available for up to five minutes or until the
driver's or front-passenger door is opened. Convenience opening
You can ventilate
the vehicle before you start
driving. To do this, the SmartKey is used to
carry out the following functions
simultaneously:
R unlock the vehicle
R open the side windows
R open the panorama roof with power tilt/
sliding panel and the roller sunblinds
i The convenience opening feature can
only be operated using the SmartKey. The
SmartKey must be close to the driver's
door handle.
X Point the tip of the SmartKey at the driver's
door handle.
X Press and hold the % button until the
side windows and the panorama roof with
power tilt/sliding panel are in the desired
position.
If the roller
sunblinds of the panorama roof
with power tilt/sliding panel are closed, the
roller sunblinds are opened first.
X Press and hold the % button again
until
the panorama roof with power tilt/sliding
panel is in the desired position.
X To interrupt convenience opening:
release the % button. Convenience closing feature
G
WARNING
When the convenience closing feature is
operating, parts of the body could become
trapped in the
closing area of the side window
and the sliding sunroof. There is a risk of
injury.
Observe the complete closing procedure
when the convenience closing feature is
operating. Make sure that no body parts are
in close proximity during the closing
procedure. 78
Side windows
Opening and closing
ProCarManuals.com
Page 81 of 340
When you lock the vehicle, you can
simultaneously:
R
close the side windows
R close the panorama roof with power tilt/
sliding panel
On vehicles with
a panorama roof with power
tilt/sliding panel, you can then close the
roller sunblinds.
i The SmartKey must be close to the
driver's door handle.
X Point the tip of the SmartKey at the driver's
door handle.
X Press and hold the & button until the
side windows and the panorama roof with
power tilt/sliding panel are fully closed.
X Make sure that all the side windows and the
panorama roof with power tilt/sliding
panel are closed.
On vehicles with a panorama roof with power
tilt/sliding panel:
X Press and hold the & button again
until
the roller sunblinds of the panorama roof
with power tilt/sliding panel close.
X To interrupt convenience closing:
release the & button.Resetting the side windows
You must reset each side window if:
R the side window opens again slightly after
being closed fully.
R the side window can no longer be fully
opened or closed.
X Close all the doors.
X Turn the SmartKey to position 1
or 2
in the
ignition lock.
X Pull the corresponding switch on the door
control panel until the side window is
completely closed ( Y page 77).
X Hold the switch for an additional second. If the side window opens again slightly:
X
Immediately
pull the corresponding switch
on the door control panel until the side
window is completely closed ( Y page 77).
X Hold the switch for an additional second.
X If the corresponding side window remains
closed after the button has been released,
the side window has been reset correctly.
If this is not the case, repeat the steps
above again. Problems with the side windows
G
WARNING
If you close a side window again immediately
after it has been blocked or reset, the side
window closes with increased or maximum
force. The reversing
feature is then not active.
Parts of the body could be trapped in the
closing area in the process. This poses an
increased risk of injury or even fatal injury.
Make sure that no parts of the body are in the
closing area. To stop the closing process,
release the switch or push the switch again to
reopen the side window.
Problem: a side window cannot be closed
because it is blocked by objects, e.g.
leaves in the window guide.
X Remove the objects.
X Close the side window.
Problem: a side window cannot be closed
and you cannot see the cause. If a side
window is obstructed during closing and
reopens again slightly:
X Immediately after the window blocks, pull
the corresponding switch again until the
side window has closed.
The side window is closed with increased
force. Side windows
79
Opening and closing Z
ProCarManuals.com
Page 82 of 340
If a side window is obstructed again during
closing and reopens again slightly:
X
Immediately after the window blocks, pull
the corresponding switch again until the
side window has closed.
The side window
is closed without the anti-
entrapment feature. Panorama roof with power tilt/sliding
panel
Important safety notes
In the following section, the term "sliding
sunroof" refers to the panorama roof with
power tilt/sliding panel. G
WARNING
While opening and closing the sliding sunroof,
body parts in close proximity could become
trapped. There is a risk of injury.
Make sure that no body parts are in close
proximity during the opening and closing
procedures.
If somebody becomes trapped:
R release the switch immediately, or
R during automatic operation, push the
switch briefly in any direction
The opening or closing procedure will be
stopped. G
WARNING
If children operate the sliding sunroof they
could become trapped,
particularly if they are
left unsupervised. There is a risk of injury.
When leaving the vehicle, always take the
SmartKey with you and lock the vehicle. Never
leave children unsupervised in the vehicle.
! Only open the sliding sunroof if it is free
of snow and ice. Otherwise, malfunctions
may occur.
Do not allow anything to protrude from the
sliding sunroof. Otherwise, the seals could
be damaged. !
The weather can
change abruptly. It could
start to rain or snow. Make sure that the
sliding sunroof is closed when you leave the
vehicle. The vehicle electronics can be
damaged if water enters the vehicle
interior.
i Resonance noises can occur in addition
to the usual airflow noises when the sliding
sunroof is open. They are caused by minor
pressure fluctuations in the vehicle interior.
Change the position of the sliding sunroof
or open a side window slightly to reduce or
eliminate these noises. Sliding sunroof reversing feature
The sliding sunroof is equipped with an
automatic reversing feature. If a solid object
blocks or restricts the sliding sunroof during
the closing process,
the sliding sunroof opens
again automatically. However, the automatic
reversing feature is only an aid and does not
relieve you of the responsibility of paying
attention when closing the sliding sunroof. G
WARNING
The reversing feature does not react:
R to soft, light and thin objects, e.g. small
fingers
R over the last
4 mm of the closing movement
R during resetting
R when closing the sliding sunroof again
manually immediately after automatic
reversing
This means that the reversing feature cannot
prevent someone being trapped in these
situations. There is a risk of injury.
Make sure that no body parts are in close
proximity during the closing procedure.
If somebody becomes trapped:
R release the switch immediately, or
R during automatic operation, push the
switch briefly in any direction
The closing process is stopped. 80
Panorama roof with power tilt/sliding panel
Opening and closing
ProCarManuals.com
Page 93 of 340
Switching the seat heating on/off
Activating/deactivating G
WARNING
Repeatedly switching on the seat heating can
cause the seat cushion and backrest pads to
become very hot. The health of persons with
limited temperature sensitivity or a limited
ability to react to excessively high
temperatures may be affected or they may
even suffer burn-like injuries. There is a risk
of injury.
Therefore, do not switch the seat heating on
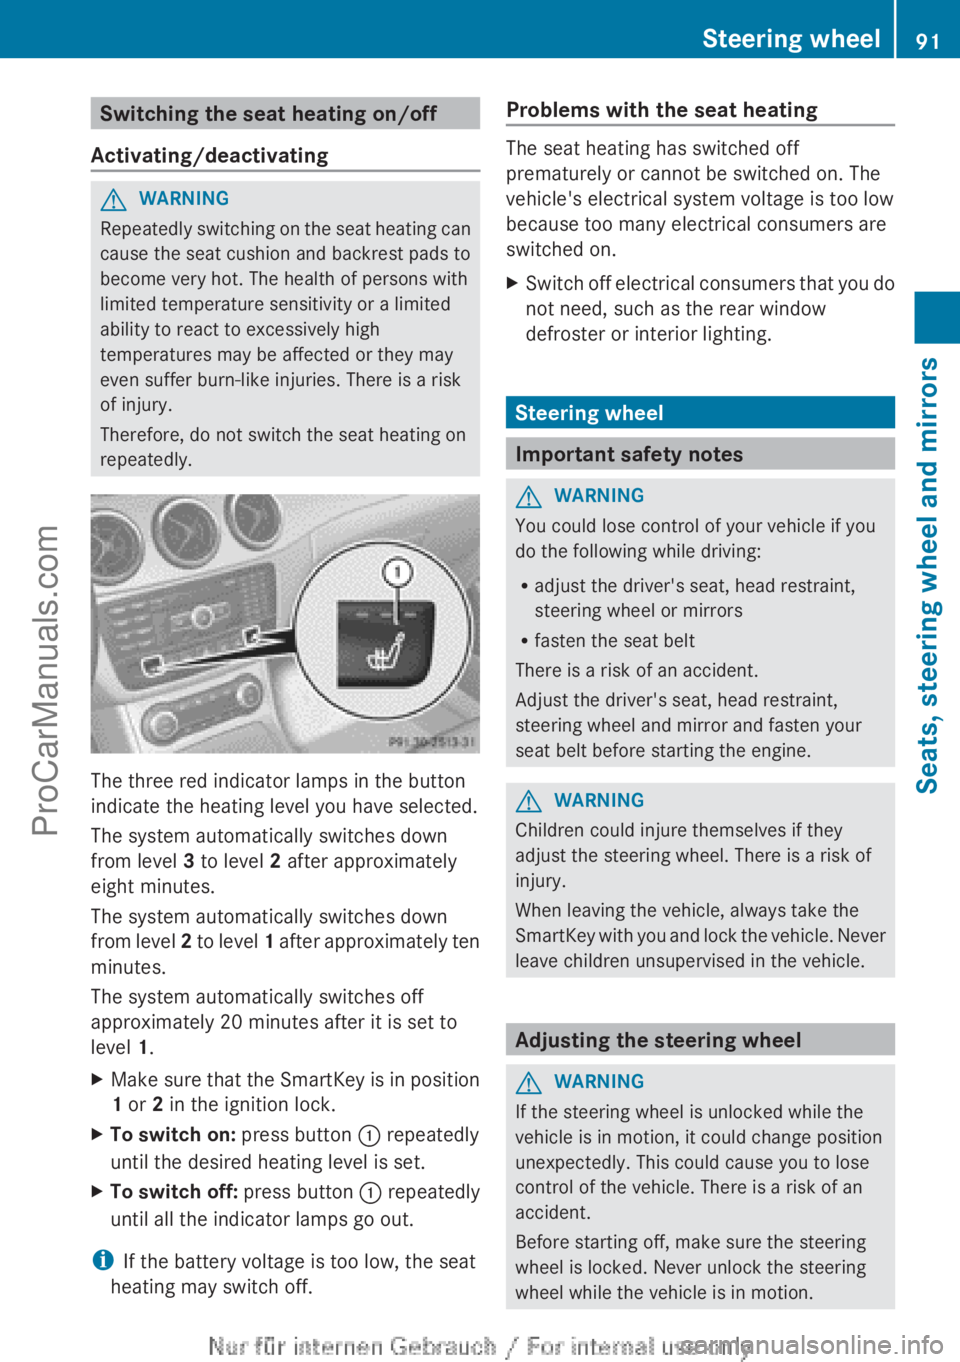
repeatedly. The three red indicator lamps in the button
indicate the heating level you have selected.
The system automatically switches down
from level 3 to level 2 after approximately
eight minutes.
The system automatically switches down
from level
2
to level 1 after approximately ten
minutes.
The system automatically switches off
approximately 20 minutes after it is set to
level 1.
X Make sure that the SmartKey is in position
1 or 2 in the ignition lock.
X To switch on: press button : repeatedly
until the desired heating level is set.
X To switch off: press button : repeatedly
until all the indicator lamps go out.
i If the battery voltage is too low, the seat
heating may switch off. Problems with the seat heating The seat heating has switched off
prematurely or cannot be switched on. The
vehicle's electrical system voltage is too low
because too many electrical consumers are
switched on.
X
Switch off electrical consumers that you do
not need, such as the rear window
defroster or interior lighting. Steering wheel
Important safety notes
G
WARNING
You could lose control of your vehicle if you
do the following while driving:
R adjust the driver's seat, head restraint,
steering wheel or mirrors
R fasten the seat belt
There is a risk of an accident.
Adjust the driver's seat, head restraint,
steering wheel and mirror and fasten your
seat belt before starting the engine. G
WARNING
Children could injure themselves if they
adjust the steering wheel. There is a risk of
injury.
When leaving the vehicle, always take the
SmartKey with you
and lock the vehicle. Never
leave children unsupervised in the vehicle. Adjusting the steering wheel
G
WARNING
If the steering wheel is unlocked while the
vehicle is in motion, it could change position
unexpectedly. This could cause you to lose
control of the vehicle. There is a risk of an
accident.
Before starting off, make sure the steering
wheel is locked. Never unlock the steering
wheel while the vehicle is in motion. Steering wheel
91
Seats, steering wheel and mirrors Z
ProCarManuals.com
Page 94 of 340
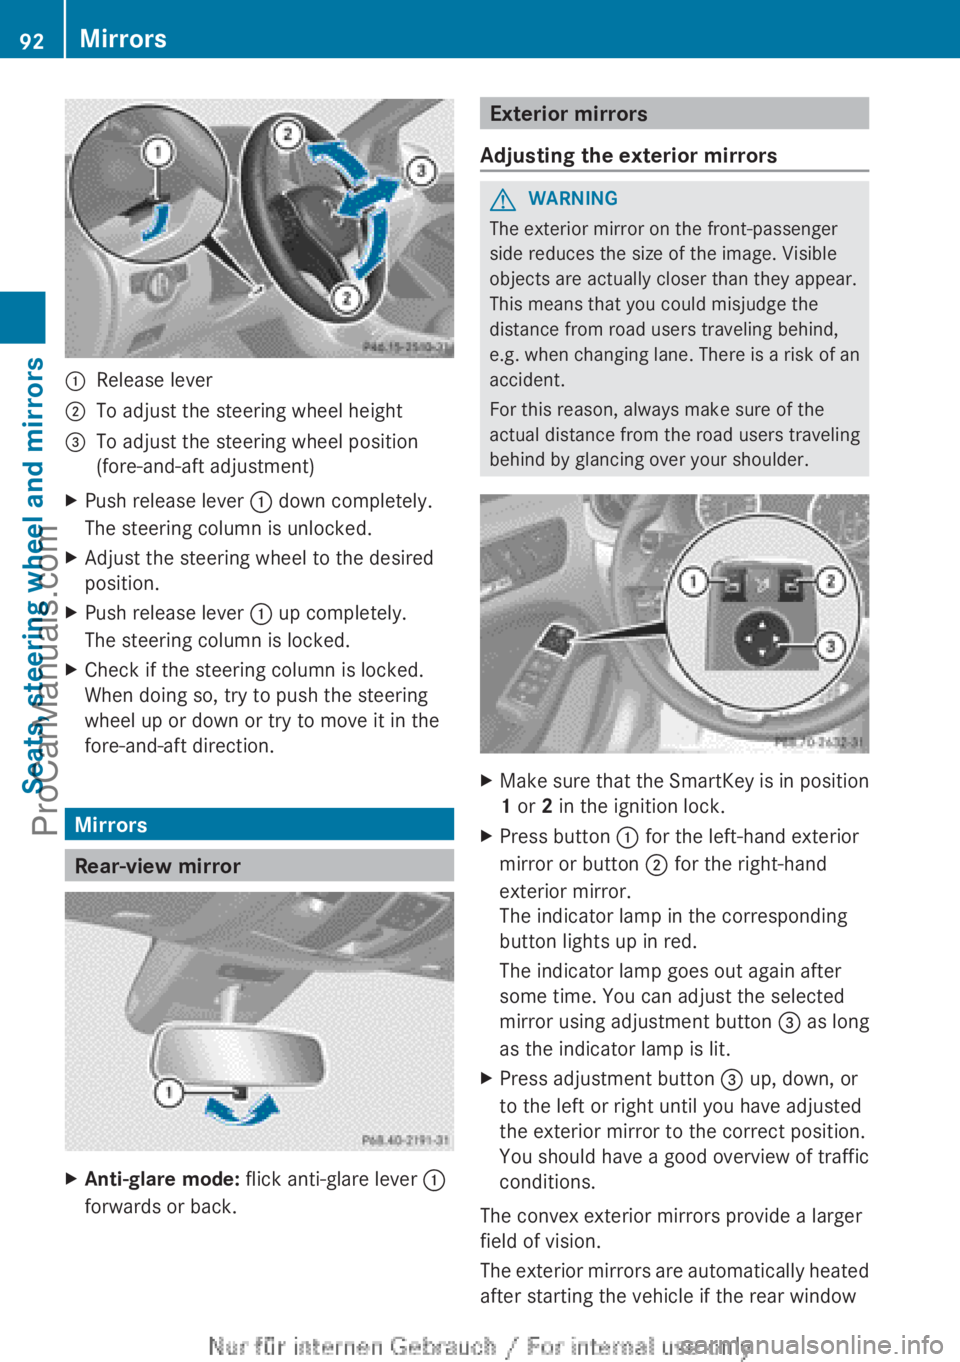
:
Release lever
; To adjust the steering wheel height
= To adjust the steering wheel position
(fore-and-aft adjustment)
X Push release lever : down completely.
The steering column is unlocked.
X Adjust the steering wheel to the desired
position.
X Push release lever : up completely.
The steering column is locked.
X Check if the steering column is locked.
When doing so, try to push the steering
wheel up or down or try to move it in the
fore-and-aft direction. Mirrors
Rear-view mirror
X
Anti-glare mode: flick anti-glare lever :
forwards or back. Exterior mirrors
Adjusting the exterior mirrors G
WARNING
The exterior mirror on the front-passenger
side reduces the size of the image. Visible
objects are actually closer than they appear.
This means that you could misjudge the
distance from road users traveling behind,
e.g. when changing
lane. There is a risk of an
accident.
For this reason, always make sure of the
actual distance from the road users traveling
behind by glancing over your shoulder. X
Make sure that the SmartKey is in position
1 or 2 in the ignition lock.
X Press button : for the left-hand exterior
mirror or button ; for the right-hand
exterior mirror.
The indicator lamp in the corresponding
button lights up in red.
The indicator lamp goes out again after
some time. You can adjust the selected
mirror using adjustment button = as long
as the indicator lamp is lit.
X Press adjustment button = up, down, or
to the left or right until you have adjusted
the exterior mirror to the correct position.
You should have a good overview of traffic
conditions.
The convex exterior mirrors provide a larger
field of vision.
The exterior
mirrors
are automatically heated
after starting the vehicle if the rear window 92
Mirrors
Seats, steering wheel and mirrors
ProCarManuals.com
Page 95 of 340

defroster is switched on and the outside
temperature is
low.
Mirror heating lasts up to
10 minutes.
i You can also heat up the exterior mirrors
manually by switching on the rear window
defroster.
Folding the exterior mirrors in or out
electrically X
Make sure that the SmartKey is in position
1 or 2 in the ignition lock.
X Briefly press button :.
Both exterior mirrors fold in or out.
i Make sure that the exterior mirrors are
always folded out fully while driving. They
could otherwise vibrate.
i If you are driving faster than
30 mph (47 km/h ), you can no longer fold
in the exterior mirrors.
Setting the exterior mirrors If the battery has been disconnected or
completely discharged, the exterior mirrors
must be reset. The exterior mirrors will
otherwise not fold in when you select the
"Fold in
mirrors
when locking" function in the
on-board computer (Y page 199).
X Make sure that the SmartKey is in
position 1 in the ignition lock.
X Briefly press button :. Folding the exterior mirrors in or out
automatically If the "Fold in mirrors when locking" function
is activated in the on-board computer
(Y page 199):
R
the exterior mirrors
fold in automatically as
soon as you lock the vehicle from the
outside.
R the exterior mirrors fold out again
automatically as soon as you unlock the
vehicle and then open the driver's or front-
passenger door.
i If the exterior mirrors have been folded in
manually, they do not fold out.
Exterior mirror pushed out of position If an exterior mirror has been pushed out of
position, proceed as follows:
X
Vehicles without electrically folding
exterior mirrors:
move
the exterior mirror
into the correct position manually.
X Vehicles with electrically folding
exterior mirrors: press and hold mirror-
folding button ( Y page
93) until you hear a
click and then the mirrors engage in
position.
The mirror housing is engaged again and
you can adjust the exterior mirrors as usual
(Y page 92). Automatic anti-glare mirrors
The "Automatic anti-glare
mirrors" function is
only available if the vehicle is equipped with
the "Mirrors package".
The rear-view mirror and the exterior mirror
on the driver's side automatically go into anti-
glare mode if:
R the ignition is switched on and
R incident light from headlamps strikes the
sensor in the rear-view mirror.
The mirrors do not go into anti-glare mode if
reverse gear is engaged or the interior lighting
is switched on. Mirrors
93
Seats, steering wheel and mirrors Z
ProCarManuals.com
Page 114 of 340
!
If the windshield wipers leave smears on
the windshield after the vehicle has been
washed in an automatic car wash, wax or
other residues may be the reason for this.
Clean the windshield using washer fluid
after washing the vehicle in an automatic
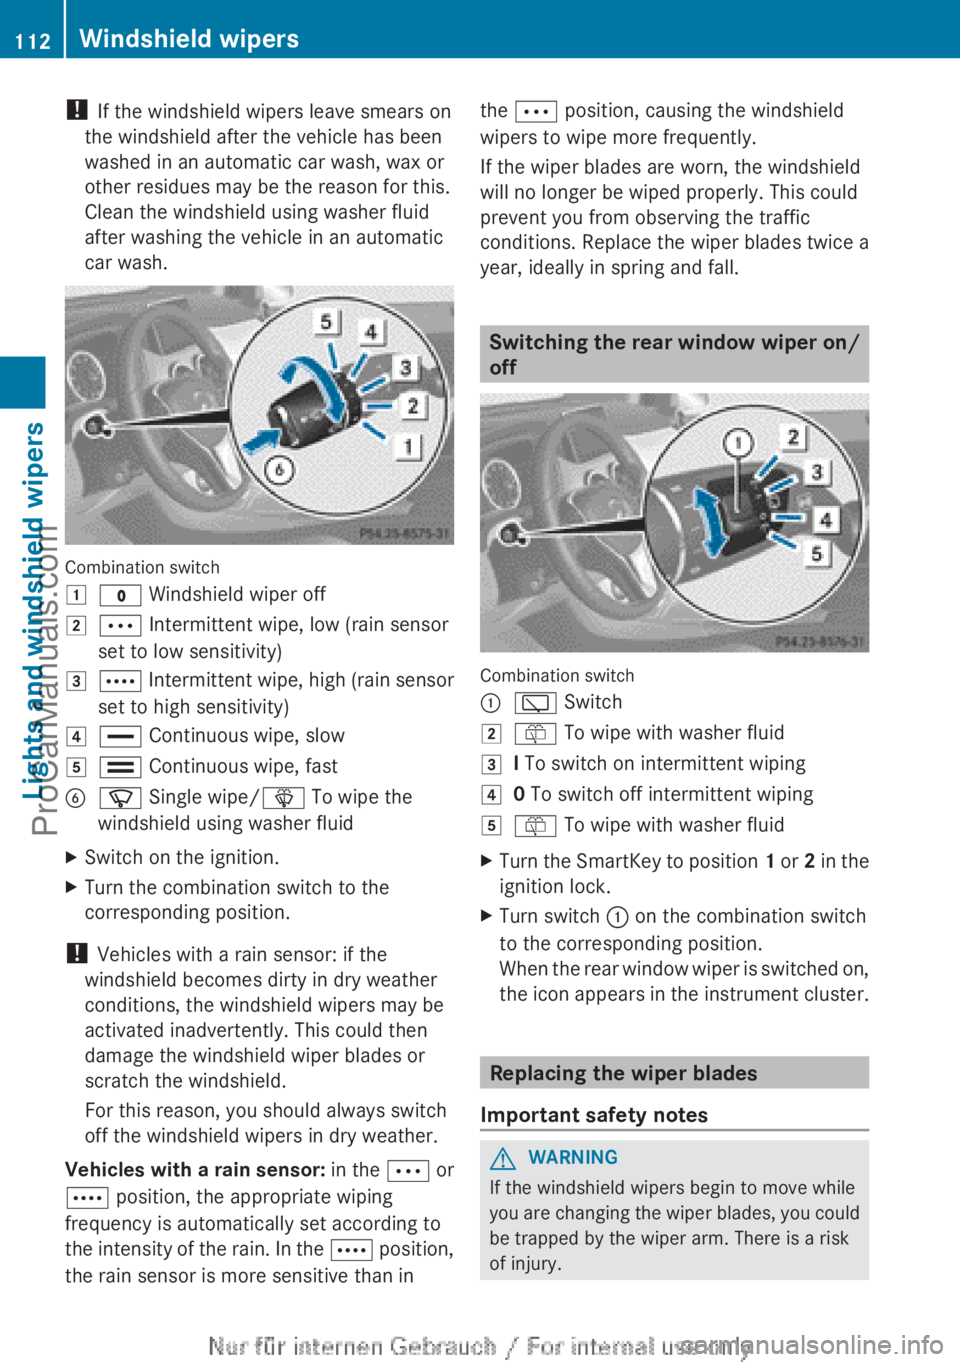
car wash. Combination switch
1
$ Windshield wiper off
2 Ä Intermittent wipe, low (rain sensor
set to low sensitivity)
3 Å Intermittent wipe, high (rain sensor
set to high sensitivity)
4 ° Continuous wipe, slow
5 ¯
Continuous wipe, fast
B í Single wipe/ î To wipe the
windshield using washer fluid
X Switch on the ignition.
X Turn the combination switch to the
corresponding position.
! Vehicles with a rain sensor: if the
windshield becomes dirty in dry weather
conditions, the windshield wipers may be
activated inadvertently. This could then
damage the windshield wiper blades or
scratch the windshield.
For this reason, you should always switch
off the windshield wipers in dry weather.
Vehicles with
a
rain sensor: in the Ä or
Å position, the appropriate wiping
frequency is automatically set according to
the intensity of the rain. In the Å position,
the rain sensor is more sensitive than in the Ä position, causing the windshield
wipers to wipe more frequently.
If the wiper blades are worn, the windshield
will no longer be wiped properly. This could
prevent you from observing the traffic
conditions. Replace the wiper blades twice a
year, ideally in spring and fall.
Switching the rear window wiper on/
off
Combination switch
:
è Switch
2 ô To wipe with washer fluid
3 I To switch on intermittent wiping
4 0 To switch off intermittent wiping
5 ô To wipe with washer fluid
X Turn the SmartKey to position 1 or
2
in the
ignition lock.
X Turn switch : on the combination switch
to the corresponding position.
When the rear
window wiper is switched on,
the icon appears in the instrument cluster. Replacing the wiper blades
Important safety notes G
WARNING
If the windshield wipers begin to move while
you are changing
the wiper blades, you could
be trapped by the wiper arm. There is a risk
of injury. 112
Windshield wipers
Lights and windshield wipers
ProCarManuals.com