2012 MERCEDES-BENZ B-CLASS tailgate
[x] Cancel search: tailgatePage 79 of 340

You can reach the emergency release via the
cargo compartment. Fold the rear backrests
forward (
Y page 240).
X Take the mechanical key out of the
SmartKey (Y page 69). X
Insert mechanical key ; into the opening
in paneling :.
X Turn mechanical key ; 90° clockwise.
X Push mechanical key ; in the
direction of
the arrow and open the tailgate. Side windows
Important safety notes
G
WARNING
While opening the side windows, body parts
in the closing area could become trapped.
There is a risk of injury.
Make sure that no body parts are in close
proximity during the closing procedure. If
somebody becomes trapped, release the
switch or press the switch to open the side
window again. G
WARNING
If children operate the side windows they
could become trapped,
particularly if they are
left unsupervised. There is a risk of injury.
Activate the override feature for the rear side
windows. When leaving the vehicle, always
take the SmartKey with you and lock the
vehicle. Never leave children unsupervised in
the vehicle. Side window reversing feature
The side windows are equipped with an
automatic reversing feature. If a solid object
blocks or restricts a side window during the
closing process, the
side window opens again
automatically. However, the automatic
reversing feature is only an aid and does not
relieve you of the responsibility of paying
attention when closing a side window. G
WARNING
The reversing feature does not react:
R to soft, light and thin objects, e.g. small
fingers
R over the last
4 mm of the closing movement
R during resetting
R when closing the side window again
manually immediately after automatic
reversing
This means that the reversing feature cannot
prevent someone being trapped in these
situations. There is a risk of injury.
Make sure that no body parts are in close
proximity during the closing procedure. If
someone becomes trapped, press the switch
to open the side window again. Opening and closing the side
windows
The switches for
all side windows are located
on the driver's door. There is also a switch on
each door for the corresponding side window.
The switches on the driver's door take
precedence. Side windows
77
Opening and closing Z
ProCarManuals.com
Page 112 of 340

X
Attach the bulb holder and press firmly.
The retaining lugs on the bulb holder
engage audibly.
X Close the side trim panel ( Y page 109).
Backup lamp and rear fog lamp
Due to their location, have the bulbs in the
backup lamp and
rear fog lamp in the tailgate
changed at a qualified specialist workshop.
X Switch off the lights.
X Open the tailgate. X
In recess ? on the inside of the closing
handle, pry off and remove the upper
section of handle =
with a flat and smooth
object, e.g. a screwdriver.
X Pull the lower section of handle : using a
sharp, sudden
movement
to remove it from
the trim and then place it to one side. X
Reach under the right-hand side of trim
B and apply
a gentle jolting force along the
entire length of the trim in order to unclip
it. X
Pull out connector C of the surround
lighting by releasing the latches.
X Place trim B to one side. X
On the side where the bulb is to be
changed, unclip the remaining part of trim
D from the assembly using a sudden,
sharp movements, until bulb holder E is
accessible. X
Remove bulb holder E
using both
sides of
lever F. 110
Replacing bulbs
Lights and windshield wipers
ProCarManuals.com
Page 113 of 340

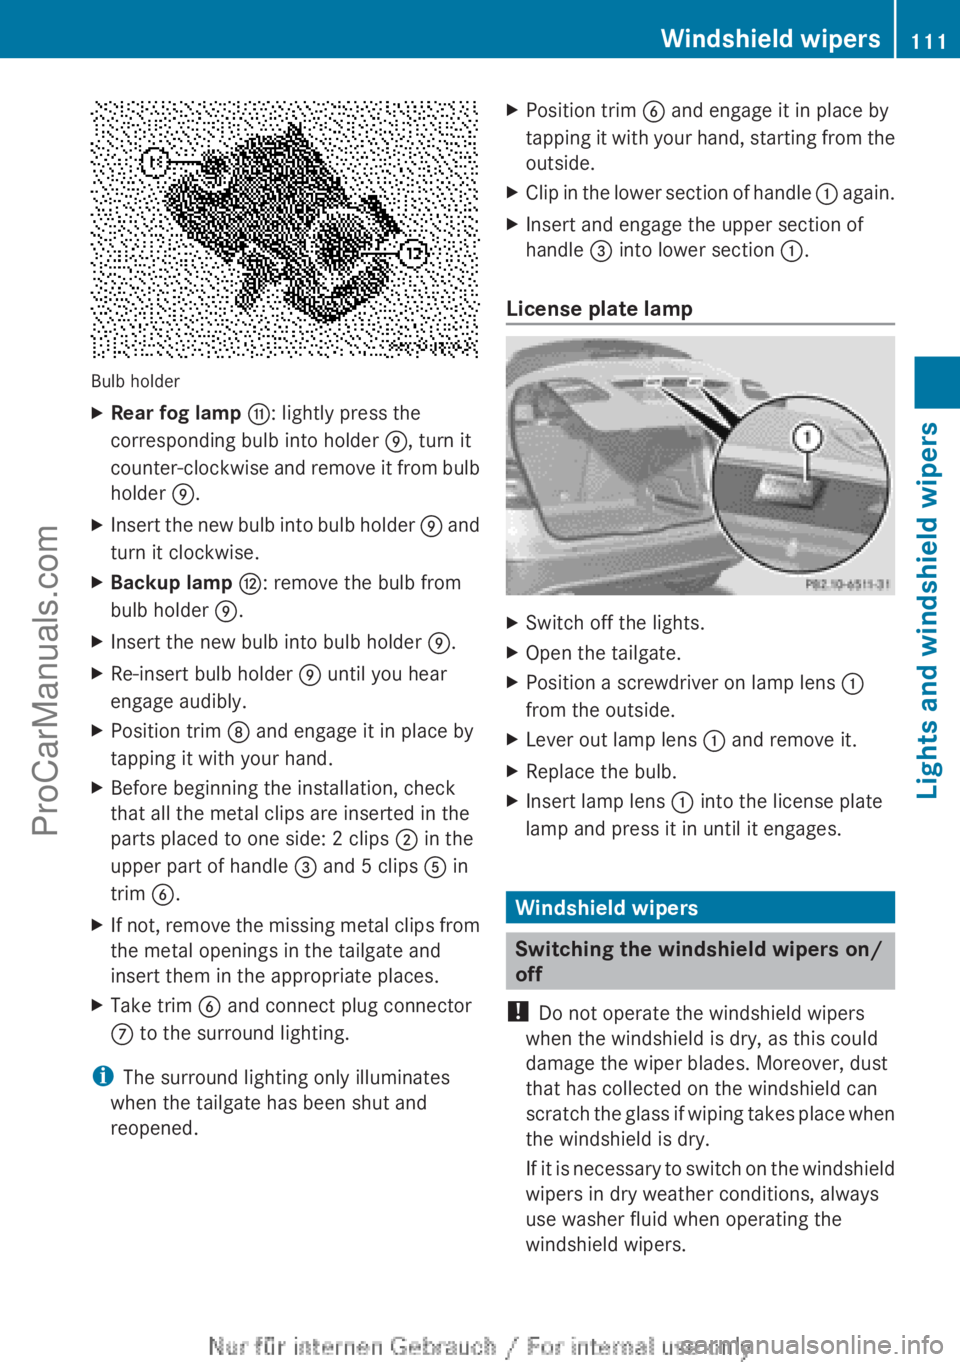
Bulb holder
X
Rear fog lamp G: lightly press the
corresponding bulb into holder E, turn it
counter-clockwise and
remove
it from bulb
holder E.
X Insert the new bulb into bulb holder E and
turn it clockwise.
X Backup lamp H: remove the bulb from
bulb holder E
.
X Insert the new bulb into bulb holder E.
X Re-insert bulb holder E until you hear
engage audibly.
X Position trim D and engage it in place by
tapping it with your hand.
X Before beginning the installation, check
that all the metal clips are inserted in the
parts placed to one side: 2 clips ; in the
upper part of handle = and 5 clips A in
trim B.
X If not, remove the missing metal clips from
the metal openings in the tailgate and
insert them in the appropriate places.
X Take trim B and connect plug connector
C to the surround lighting.
i The surround lighting only illuminates
when the tailgate has been shut and
reopened. X
Position trim B and engage it in place by
tapping it
with
your hand, starting from the
outside.
X Clip in the lower section of handle : again.
X Insert and engage the upper section of
handle = into lower section
:.
License plate lamp X
Switch off the lights.
X Open the tailgate.
X Position a screwdriver on lamp lens :
from the outside.
X Lever out lamp lens : and remove it.
X Replace the bulb.
X Insert lamp lens : into the license plate
lamp and press it in until it engages. Windshield wipers
Switching the windshield wipers on/
off
! Do not operate the windshield wipers
when the windshield is dry, as this could
damage the wiper blades. Moreover, dust
that has collected on the windshield can
scratch the glass
if wiping takes place when
the windshield is dry.
If it is necessary to switch on the windshield
wipers in dry weather conditions, always
use washer fluid when operating the
windshield wipers. Windshield wipers
111
Lights and windshield wipers Z
ProCarManuals.com
Page 115 of 340

Always switch off the windshield wipers and
ignition before changing the wiper blades.
! To avoid damaging the wiper blades,
make sure that you touch only the wiper
arm of the wiper.
! Never open the hood/tailgate if a wiper
arm has been folded away from the
windshield/rear window.
Never fold a windshield wiper arm without
a wiper blade back onto the windshield/
rear window.
Hold the windshield
wiper arm firmly when
you change the wiper blade. If you release
the wiper arm without a wiper blade and it
falls onto the windshield/rear window, the
windshield/rear window may be damaged
by the force of the impact.
Mercedes-Benz recommends that you have
the wiper blades changed at a qualified
specialist workshop.
Changing the windshield wiper blades Removing the wiper blades
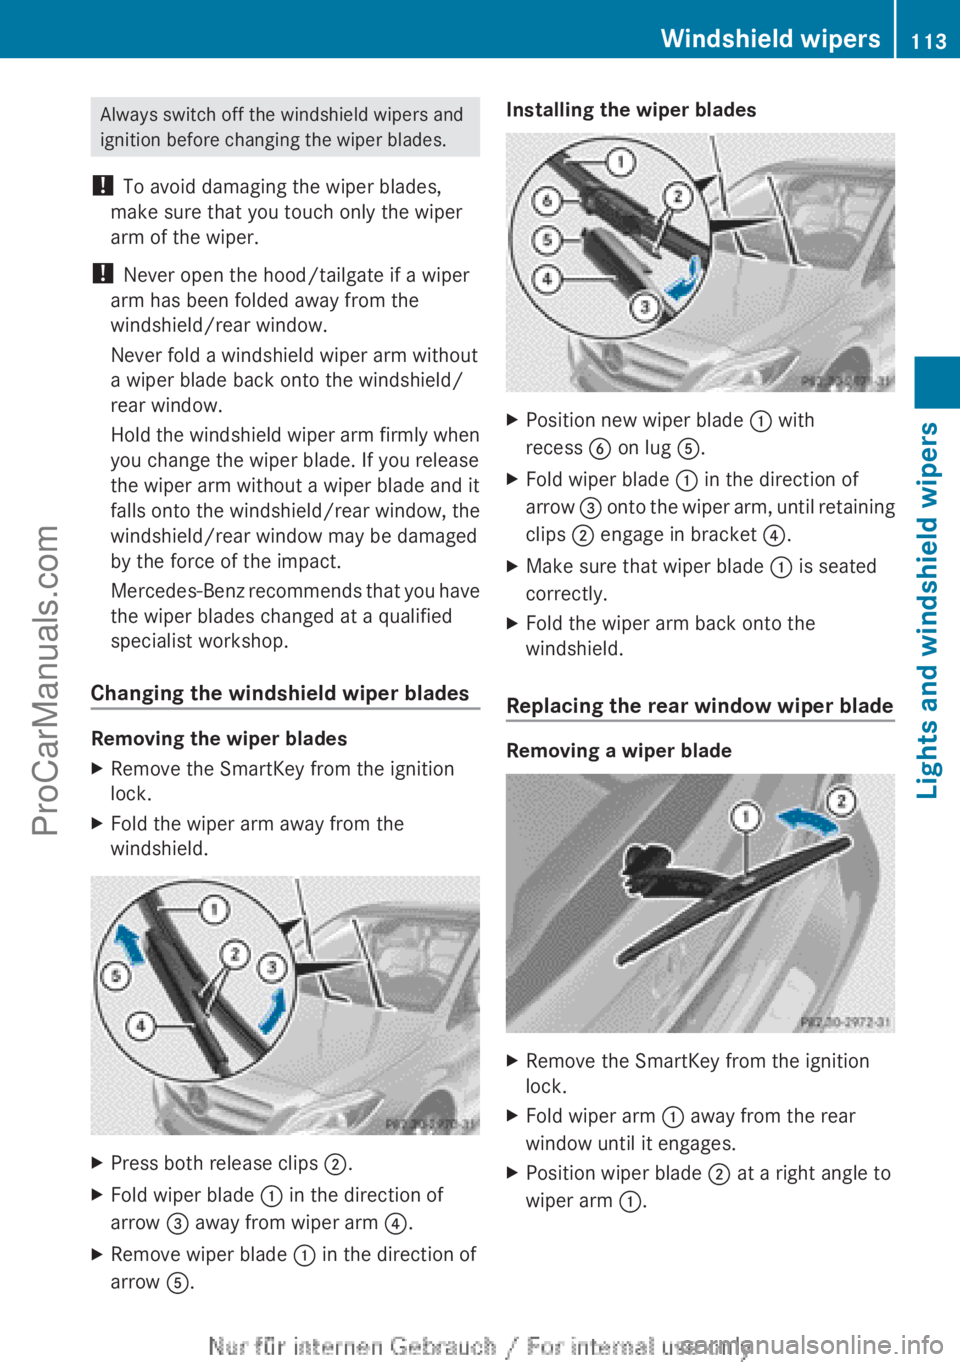
X
Remove the SmartKey from the ignition
lock.
X Fold the wiper arm away from the
windshield. X
Press both release clips ;.
X Fold wiper blade : in the direction of
arrow = away from wiper arm ?.
X Remove wiper blade : in the direction of
arrow A. Installing the wiper blades
X
Position new wiper blade : with
recess B on lug A.
X Fold wiper blade : in the direction of
arrow = onto
the
wiper arm, until retaining
clips ; engage in bracket ?.
X Make sure that wiper blade : is seated
correctly.
X Fold the wiper arm back onto the
windshield.
Replacing the rear window wiper blade Removing a wiper blade
X
Remove the SmartKey from the ignition
lock.
X Fold wiper arm : away from the rear
window until it engages.
X Position wiper blade ; at a right angle to
wiper arm :. Windshield wipers
113
Lights and windshield wipers Z
ProCarManuals.com
Page 153 of 340

engine is switched off. The sounds that can
be heard
while
this is occurring are normal.
Applying/releasing manually Applying
X
Push handle :.
When the electric parking brake is
engaged, the !
red indicator lamp lights
up in the instrument cluster.
i The electric parking brake can also be
applied when the SmartKey is removed.
Releasing
X Pull handle :.
The red ! indicator lamp in the
instrument cluster goes out.
i You can only release the electric parking
brake when the key is in position 1 or 2 in
the ignition lock.
Applying automatically The electric parking brake is applied
automatically:
R
if DISTRONIC PLUS brings the vehicle to a
standstill or
R if the HOLD
function is keeping the vehicle
stationary
In addition, at least one of the following
conditions must be fulfilled:
R the engine is switched off.
R the driver's door is open and the seat belt
is not fastened.
R there is a system malfunction.
R the power supply is insufficient.
R the vehicle is stationary for a lengthy
period.
The red ! indicator lamp in the instrument
cluster lights up.
i The electric parking brake is not
automatically engaged if the engine is
switched off by the ECO start/stop
function. Releasing automatically Your vehicle's electric parking brake is
automatically released if all of the following
conditions are met:
R
the engine is running.
R the transmission is in position D or R.
R the seat belt has been fastened.
R you depress the accelerator pedal.
If the transmission
is in position R, the tailgate
must be closed.
If your seat belt is not fastened, the following
conditions must be fulfilled to automatically
release the electric parking brake:
R the driver's door is closed.
R you have shifted out of transmission
position P or you have previously driven
faster than 2 mph (3 km/h).
Emergency braking The vehicle can also be braked during an
emergency by using the electric parking
brake.
X
While driving, push handle : of the
electric
parking brake ( Y page 150).
i The vehicle is braked for as long as
handle : of the electric parking brake is
pressed. The longer electric parking brake
handle : is depressed, the greater the
braking force.
During braking:
R a warning tone sounds
R the Release Park. Brake message
appears
R the red ! indicator lamp in the
instrument cluster flashes
When the vehicle has been braked to a
standstill, the electric parking brake is
engaged. Parking
151
Driving and parking Z
ProCarManuals.com
Page 178 of 340

If you back up after activation, the steering
wheel is moved to the straight-ahead
position.
X Drive forwards or back up the vehicle, being
ready to brake at all times.
X Stop as soon as PARKTRONIC sounds the
continuous warning tone, if not before.
X Drive forwards and reverse as prompted by
the PARKTRONIC warning
displays, several
times if necessary.
Once you have exited the parking space
completely, the steering wheel is moved to
the straight-ahead position. You hear a tone
and the Park Assist Finished message
appears in the
multifunction display. You will
then have to steer and merge into traffic on
your own. PARKTRONIC is still available.
Canceling Active Parking Assist You can cancel Active Parking Assist at any
time.
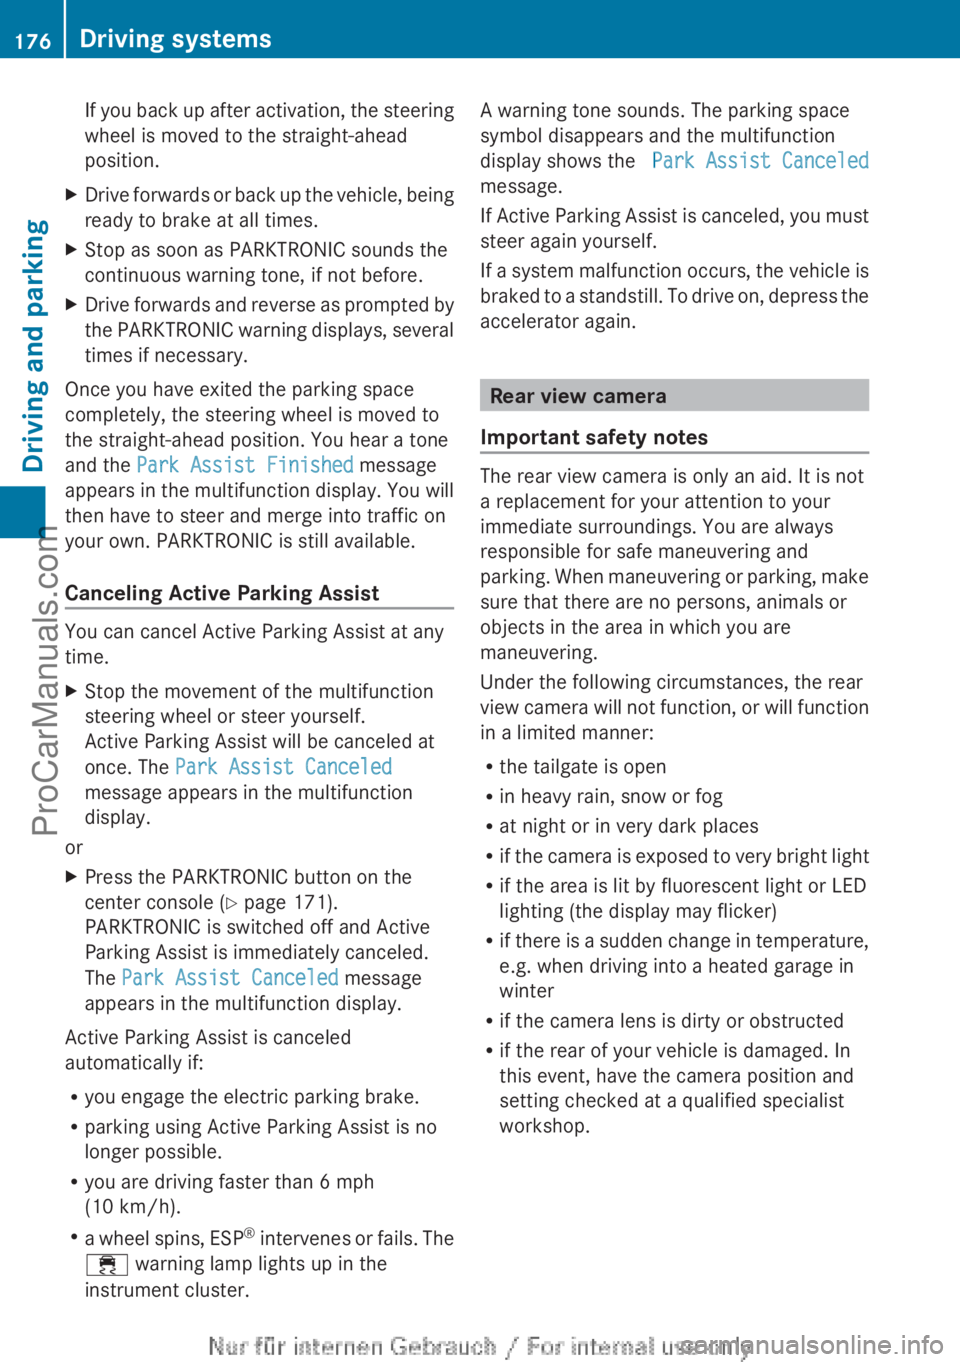
X
Stop the movement of the multifunction
steering wheel or steer yourself.
Active Parking Assist will be canceled at
once. The Park Assist Canceled
message appears in the multifunction
display.
or
X Press the PARKTRONIC button on the
center console (
Y
page 171).
PARKTRONIC is switched off and Active
Parking Assist is immediately canceled.
The Park Assist Canceled message
appears in the multifunction display.
Active Parking Assist is canceled
automatically if:
R you engage the electric parking brake.
R parking using Active Parking Assist is no
longer possible.
R you are driving faster than 6 mph
(10 km/h).
R a wheel
spins, ESP®
intervenes or fails. The
÷ warning lamp lights up in the
instrument cluster. A warning tone sounds. The parking space
symbol disappears and the multifunction
display shows the
Park Assist Canceled
message.
If Active
Parking
Assist is canceled, you must
steer again yourself.
If a system malfunction occurs, the vehicle is
braked to a standstill. To drive on, depress the
accelerator again. Rear view camera
Important safety notes The rear view camera is only an aid. It is not
a replacement for your attention to your
immediate surroundings. You are always
responsible for safe maneuvering and
parking.
When
maneuvering
or parking, make
sure that there are no persons, animals or
objects in the area in which you are
maneuvering.
Under the following circumstances, the rear
view camera will not function, or will function
in a limited manner:
R the tailgate is open
R in heavy rain, snow or fog
R at night or in very dark places
R if the camera is exposed to very bright light
R if the area is lit by fluorescent light or LED
lighting (the display may flicker)
R if there is a sudden change in temperature,
e.g. when driving into a heated garage in
winter
R if the camera lens is dirty or obstructed
R if the rear of your vehicle is damaged. In
this event, have the camera position and
setting checked at a qualified specialist
workshop.176
Driving systemsDriving and parking
ProCarManuals.com
Page 179 of 340

General notes
Rear view camera
: is in the trunk lid handle.
The rear view camera extends, when it is
activated.
The rear view camera is an optical parking and
maneuvering aid. It uses guide lines to show
the area behind your vehicle in the Audio/
COMAND display.
The area behind the vehicle is displayed as a
mirror image, as in the rear view mirror.
i The text of messages shown in the
COMAND display depends on the language
setting. The following are examples of rear
view camera messages in the COMAND
display.
Activating/deactivating the rear view
camera X
To activate: make sure
that the SmartKey
is in position 2 in the ignition lock.
X Make sure that in the audio system/
COMAND, the "Activation by R gear"
function is selected; see the separate
operating instructions for the audio
system/COMAND.
X Engage reverse gear.
Guide lines are used to show the area
behind the vehicle in the Audio/COMAND
display. To deactivate:
the rear view camera is
deactivated if you:
R select transmission position P (vehicles
with automatic transmission)
R drive forward ten meters
R shift the transmission from R to another
position (after 15 seconds)
R drive forwards at a speed of over 5 mph
(10km/h)
Displays in
the Audio/COMAND display The rear view camera may show a distorted
view of obstacles, show them incorrectly or
not at
all.
The rear view camera does not show
objects in the following positions:
R very close to the rear bumper
R under the rear bumper
R in the area immediately above the tailgate
handle
! Objects not at ground level may appear to
be further away than they actually are, e.g.:
R the bumper of a parked vehicle
R the drawbar of a trailer
R the ball coupling of a trailer tow hitch
R the rear section of an HGV
R a slanted post
Use the guidelines only for orientation.
Approach objects no further than the
bottom-most guideline. Driving systems
177
Driving and parking Z
ProCarManuals.com
Page 224 of 340

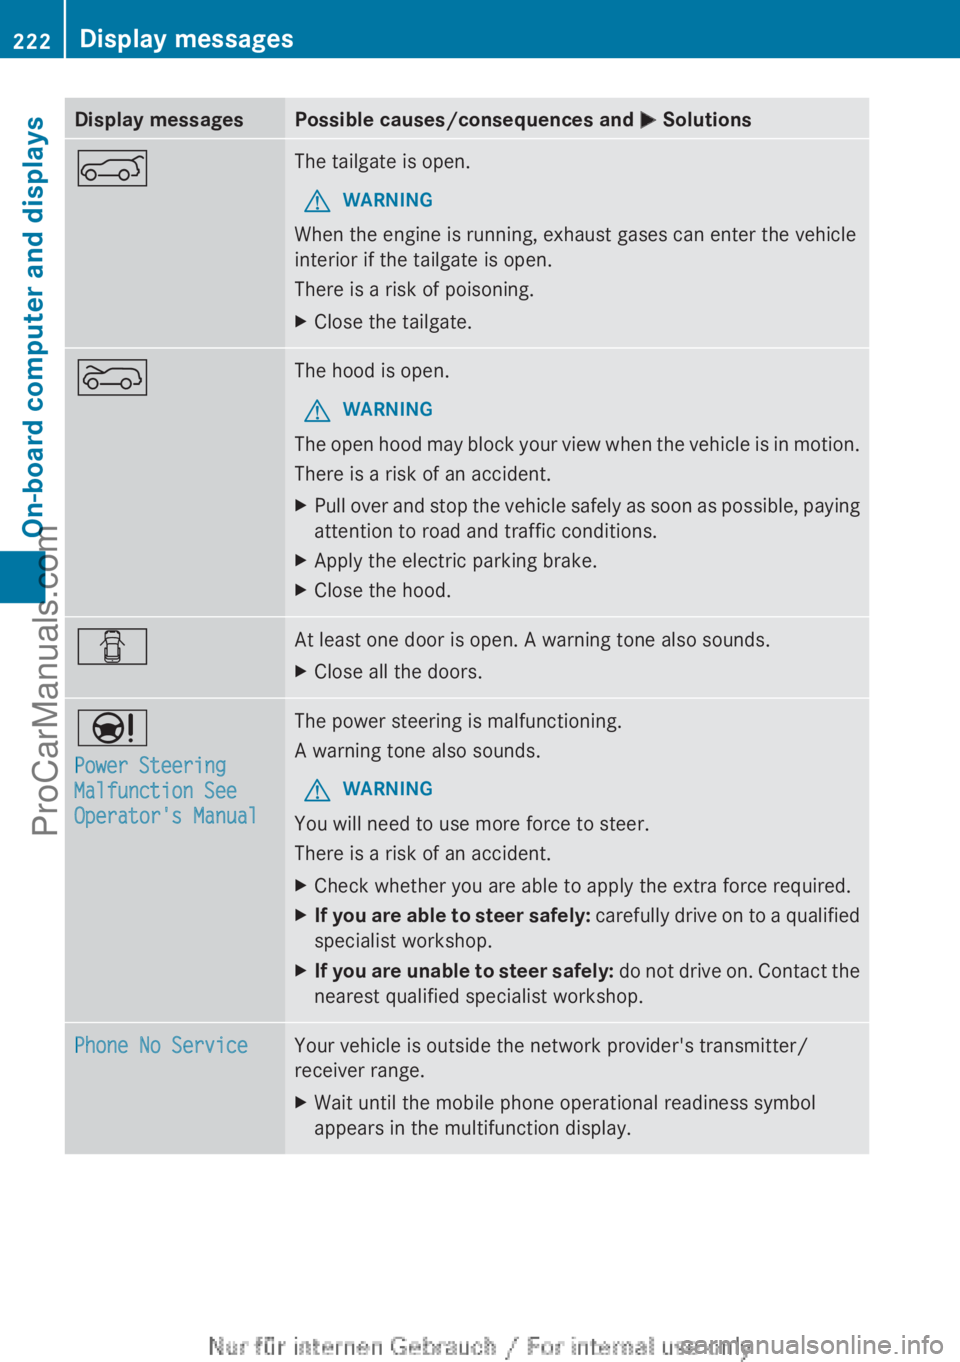
Display messages Possible causes/consequences and
M SolutionsA The tailgate is open.
G WARNING
When the engine is running, exhaust gases can enter the vehicle
interior if the tailgate is open.
There is a risk of poisoning.
X Close the tailgate. ? The hood is open.
G WARNING
The open hood may block your view when the vehicle is in motion.
There is a risk of an accident.
X Pull over and stop the vehicle safely as soon as possible, paying
attention to road and traffic conditions.
X Apply the electric parking brake.
X Close the hood. C At least one door is open. A warning tone also sounds.
X
Close all the doors. Ð
Power Steering
Malfunction See
Operator's Manual The power steering is malfunctioning.
A warning tone also sounds.
G WARNING
You will need to use more force to steer.
There is a risk of an accident.
X Check whether you are able to apply the extra force required.
X If you are able to steer safely:
carefully drive
on to a qualified
specialist workshop.
X If you are unable to steer safely: do not
drive on. Contact the
nearest qualified specialist workshop. Phone No Service Your vehicle is outside the network provider's transmitter/
receiver range.
X
Wait until the mobile phone operational readiness symbol
appears in the multifunction display.222
Display messages
On-board computer and displays
ProCarManuals.com