Page 1 of 32
Page 2 of 32
Page 3 of 32
3
REVOLUTION
SERIES
Rear Seat Entertainment System
Owner’s Manual
Page 4 of 32
Page 5 of 32

5
EN
REVOLUTION LT Owner’s Manual
© 2010 INVISION Automotive Systems, Inc. All rights reserved.
This manual, or any portion thereof, may not be reproduced
without the express written permission of INVISION Automotive Systems, Inc.
Contents
Welcome ...................................................................... 6
Control Description of the Front Panel ............. 8
Functional Verifcation .......................................... 10
Remote Control Operations ............................... 11
Button Function Descriptions ............................ 12
General Operating Instructions......................... 15
How to use the DVD OSD Menu ....................... 17
How to use the Device OSD Menu ................... 20
Playing an Audio CD .............................................. 21
Playing a MP3 Disc ................................................. 22
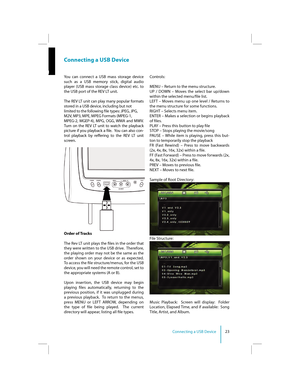
Connecting a USB Device .................................... 23
Connecting a MP3 Device ................................... 24
Troubleshooting ..................................................... 25
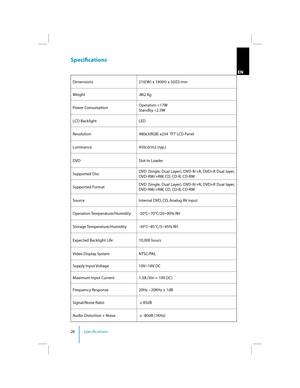
Specifcations ........................................................... 26
Compliance Information ...................................... 28
Warranty .................................................................... 29
Notes ........................................................................... 30
Page 6 of 32

6Welcome
Welcome
Thank you for purchasing this REVOLUTION
headrest video monitor with built-in DVD player.
Before operating this system, read this manual
thoroughly and retain it for future reference.
Important Notice
It is unlawful in most jurisdictions for a person
to drive a motor vehicle which is equipped with
a television viewer or screen that is located in
the motor vehicle at any point forward of the
back of the driver’s seat, or that is visible, dire
ct-
ly or indirectly, to the driver while operating the
vehicle. In the interest of safety, the unit should
never be installed where it will be visible, direct -
ly or indirectly, by the operator of the motor
vehicle. If your vehicle is equipped with a wire-
less rear seat audio system or any other wireless
IR device, power system of in order to operate
the DVD headrest system. If system is powered
on, the two systems may interfere with each
other canceling out or creating undesirable
audio through the wireless headphones.
Safety Precaution
For safety reasons, when changing video disc
it is recommended that the vehicle not be in
motion, and that you do not allow children
to unfasten safety belts to change disc or
make any adjustments to the system. System
adjustments can be accomplished using the
remote control unit, while safety belts remain
fastened. Enjoy your entertainment system
but remember that safety of all passengers
remains the number one priority.
Product Features
�t�� 7-inch Color TFT-LCD Panel
(480x234) with 16:9 aspect
�t�� Built-in Top-Loading Slot load DVD Player
�t�� Infrared Transmitters for IR Wireless Head-
phones
�t�� Audio/Video Source Input- 3 RCA Jacks
�t�� USB 2.0 (optional)
�t�� 1/8-inch Stereo Headphone Jack
�t�� Forward Remote Sensor on the Front Panel �t��
Full Function Remote Control
�t�� 5 Control Buttons on the Front Panel-
POWER, SOURCE, STOP, PLAY, EJECT
�t�� OSD (On Screen Display) Control
�t�� 12V DC Power Input
�t�� FM Transmitter (may be optional)
Caution:
�t��Do not touch the inner pins of the jacks on
the front panel. Electrostatic discharge may
cause permanent damage to the device.
�t�� Be sure to run the vehicle engine while us-
ing the device. Using this device without
running the engine can result in battery
drainage. To avoid the risk of battery
drainage, please remember to turn of the
device when the vehicle is not in use for
long periods of time.
Page 7 of 32

7Welcome
ENWireless Headphones
This unit includes a built-in dual channel infra-
red transmitter for use with a wireless head-
phone. The volume can then be adjusted with
the controls on each headset. The wireless
headphone must be used within a line of sight
from the transmitter as infrared transmission,
like visible light, travels only in a straight line.
Wired Headphones
There is a 1/8-inch headphone jack on the de-
vice that can be used with any standard stereo
headphone. Remove and save the protective
plastic cover to access the jacks. Remember
to replace the cover when the jacks are not in
use.
AV Input
An external AV device such as a DVD player,
video game device, or other audio/video
device may be connected to the unit by using
the “AV INPUT” port consisting of 3 RCA jacks
(Yellow: Video, Red: Audio-R, White: Audio-L).
To display and listen to the video/audio sig-
nal of this external source, connect the video
source RCA cables to the AV inputs on the
monitor. The video source will overide any
other video source for that monitor.
Wireless FM Transmitter
Your device may be equipped with an external
FM transmitter, which allows you to listen to
the audio signal by tuning your vehicle’s FM
radio to the selected frequency and turning
SOUND AROUND on with the remote. When-
ever the SOUND AROUND is on, broadcast
radio reception may be poor. Performance will
vary based on geographic location. Turning
SOUND AROUND of will allow normal radio
reception.
How to use the FM Transmitter
Power up your system and place a disc in
monitor “A”. While pointing your remote at
the monitor press the “DVD A” button directly under the red “POWER” button on your remote
control. Next press the “Sound Around ON/
OFF” button to turn FM transmission on or of
as desired. Three buttons to right is the “Sound
Around SELECT” button which will cycle
through 6 possible stations (88.3, 88.7, 89.1,
89.5, 89.9, and 90.3MHz) for broadcasting au-
dio to your radio. Once you’ve selected a fre-
quency, you must then tune your radio to the
corresponding frequency. Try each station fre-
quency until you achieve a clear audio signal.
Page 8 of 32
8Control Description of the Front Panel
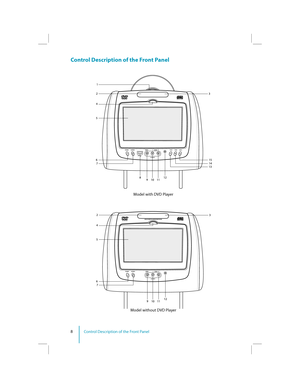
Control Description of the Front Panel
POWER SOURCE VIDEO L AUDIO R
AV INPUTPLAY STOP EJECT
POWER SOURCE VIDEO L AUDIO R
AV INPUT
DVD/CD/MP3 PLAYER MONITOR BX
Model with DVD Player
Model without DVD Player