2012 LINCOLN MKT transmission fluid
[x] Cancel search: transmission fluidPage 13 of 437

Engine coolant temperature
(RTT):Illuminates when the engine
coolant temperature is high. Stop
the vehicle as soon as possible, switch off the engine and let cool. Refer
toEngine coolantin theMaintenance and Specificationschapter.
WARNING:Never remove the coolant reservoir cap while the
engine is running or hot.
Low fuel (RTT):Illuminates when
the fuel level in the fuel tank is at
or near empty. Refer toFuel gauge
in this chapter.
Low washer fluid (RTT):
Illuminates when the washer level in
the washer fluid reservoir is low.
Door ajar (RTT):Illuminates when
the ignition is in the run position
and any door is not completely
closed.
Throttle control/transmission
(RTT):Illuminates when a
powertrain or an AWD fault has
been detected. Contact your
authorized dealer as soon as possible.
Service engine soon:Theservice
engine soonindicator light
illuminates when the ignition is first
turned on to check the bulb and to
indicate whether the vehicle is ready for Inspection/Maintenance (I/M)
testing. Normally, the service engine soon light will stay on until the
engine is cranked, then turn itself off if no malfunctions are present.
However, if after 15 seconds the service engine soon light blinks eight
times, it means that the vehicle is not ready for I/M testing. See the
Readiness for Inspection/Maintenance (I/M) testingin the
Maintenance and Specificationschapter.
Instrument Cluster
13
2012 MKT(mkt)
Owners Guide, 1st Printing
USA(fus)
Page 311 of 437

•If the vehicle goes from one type of surface to another (i.e., from
concrete to gravel) there will be a change in the way the vehicle
responds to a maneuver (steering, acceleration or braking). Again,
avoid these abrupt inputs.
AWD systems (if equipped)
AWD uses all four wheels to power the vehicle. This increases traction,
enabling you to drive over terrain and road conditions that a
conventional two-wheel drive vehicle cannot.
Sand
When driving over sand, try to keep all four wheels on the most solid
area of the trail. Avoid reducing the tire pressures but shift to a lower
gear and drive steadily through the terrain. Apply the accelerator slowly
and avoid spinning the wheels.
When driving at slow speeds in deep sand under high outside
temperatures, use a low gear when possible. Lower gear operation will
maximize the engine and transmission cooling capability.
Under severe operating conditions, the A/C may cycle on and off to
protect overheating of the engine.
Avoid excessive speed because vehicle momentum can work against you
and cause the vehicle to become stuck to the point that assistance may
be required from another vehicle. Remember, you may be able to back
out the way you came if you proceed with caution.
Mud and water
If you must drive through high water, drive slowly. Traction or brake
capability may be limited.
When driving through water, determine the depth; avoid water higher
than the bottom of the wheel rims (if possible) and proceed slowly. If the
ignition system gets wet, the vehicle may stall.
Once through water, always try the brakes. Wet brakes do not stop the
vehicle as effectively as dry brakes. Drying can be improved by moving
your vehicle slowly while applying light pressure on the brake pedal.
Be cautious of sudden changes in vehicle speed or direction when you
are driving in mud. Even AWD vehicles can lose traction in slick mud. As
when you are driving over sand, apply the accelerator slowly and avoid
spinning your wheels. If the vehicle does slide, steer in the direction of
the slide until you regain control of the vehicle.
If the engine, transmission, AWD system components or axles are
submerged in water, their fluids should be checked and changed, if
necessary.
Driving
311
2012 MKT(mkt)
Owners Guide, 1st Printing
USA(fus)
Page 357 of 437

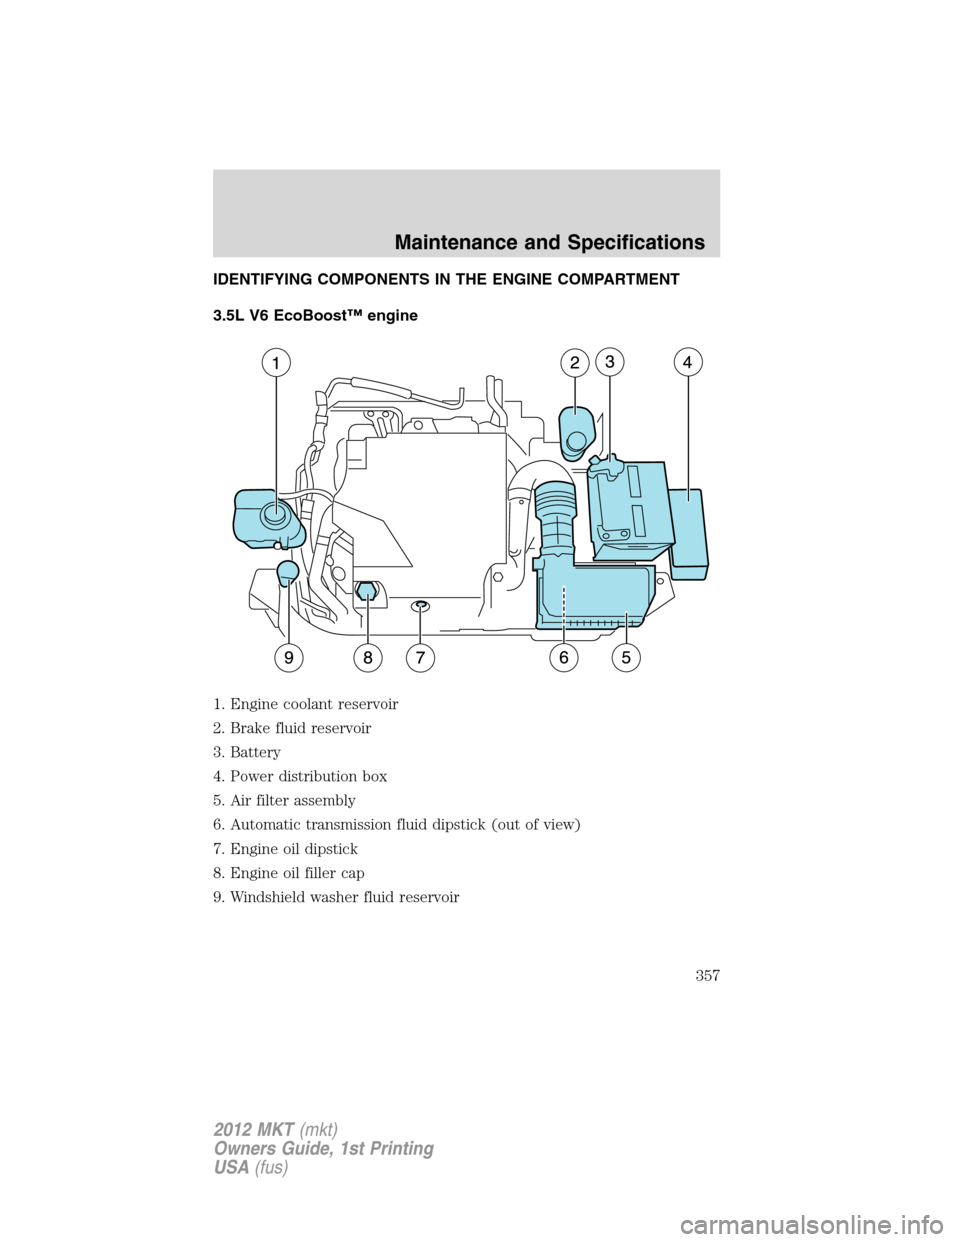
IDENTIFYING COMPONENTS IN THE ENGINE COMPARTMENT
3.5L V6 EcoBoost™ engine
1. Engine coolant reservoir
2. Brake fluid reservoir
3. Battery
4. Power distribution box
5. Air filter assembly
6. Automatic transmission fluid dipstick (out of view)
7. Engine oil dipstick
8. Engine oil filler cap
9. Windshield washer fluid reservoir
Maintenance and Specifications
357
2012 MKT(mkt)
Owners Guide, 1st Printing
USA(fus)
Page 359 of 437

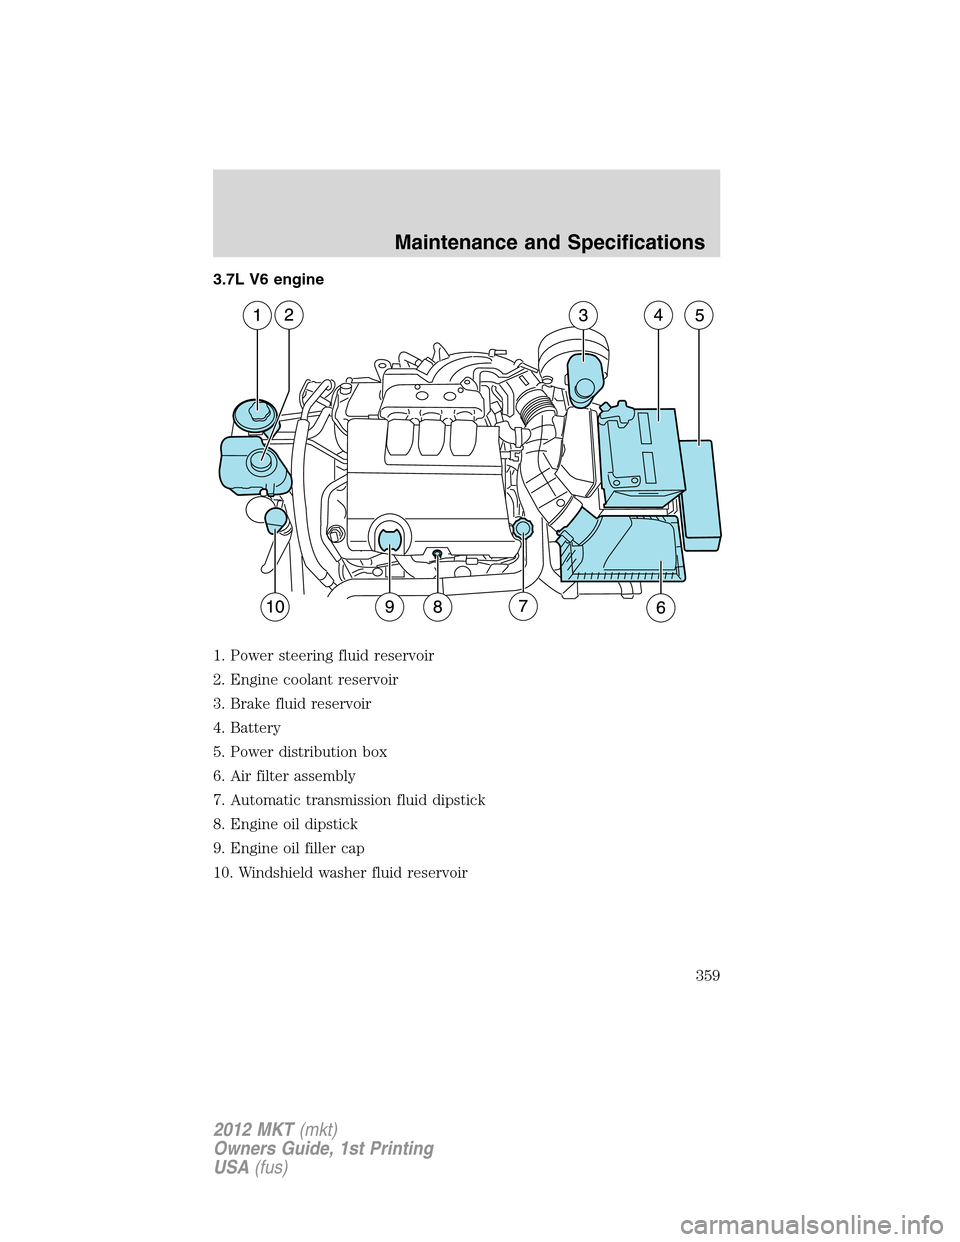
3.7L V6 engine
1. Power steering fluid reservoir
2. Engine coolant reservoir
3. Brake fluid reservoir
4. Battery
5. Power distribution box
6. Air filter assembly
7. Automatic transmission fluid dipstick
8. Engine oil dipstick
9. Engine oil filler cap
10. Windshield washer fluid reservoir
Maintenance and Specifications
359
2012 MKT(mkt)
Owners Guide, 1st Printing
USA(fus)
Page 388 of 437

BRAKE FLUID
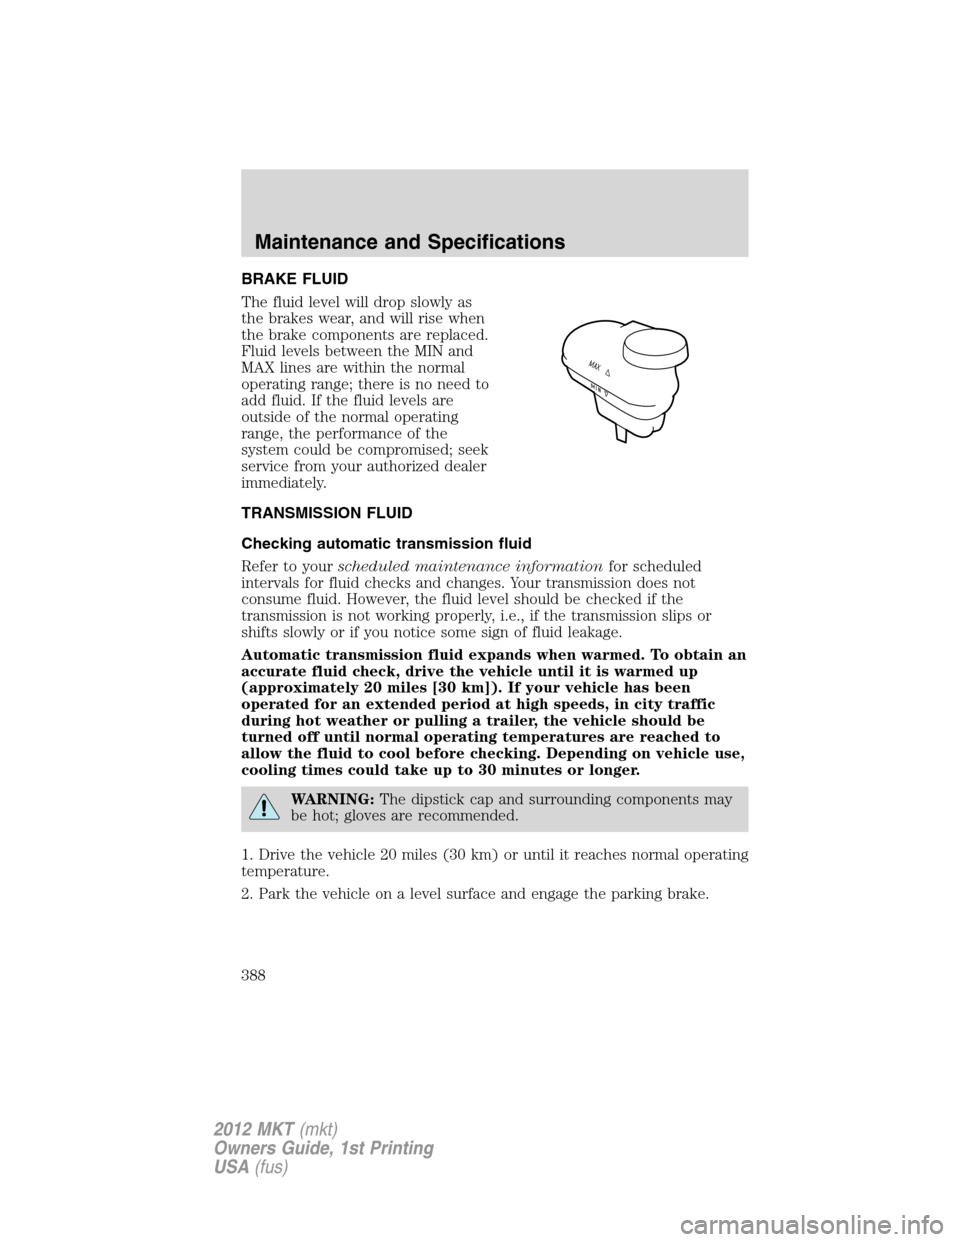
The fluid level will drop slowly as
the brakes wear, and will rise when
the brake components are replaced.
Fluid levels between the MIN and
MAX lines are within the normal
operating range; there is no need to
add fluid. If the fluid levels are
outside of the normal operating
range, the performance of the
system could be compromised; seek
service from your authorized dealer
immediately.
TRANSMISSION FLUID
Checking automatic transmission fluid
Refer to yourscheduled maintenance informationfor scheduled
intervals for fluid checks and changes. Your transmission does not
consume fluid. However, the fluid level should be checked if the
transmission is not working properly, i.e., if the transmission slips or
shifts slowly or if you notice some sign of fluid leakage.
Automatic transmission fluid expands when warmed. To obtain an
accurate fluid check, drive the vehicle until it is warmed up
(approximately 20 miles [30 km]). If your vehicle has been
operated for an extended period at high speeds, in city traffic
during hot weather or pulling a trailer, the vehicle should be
turned off until normal operating temperatures are reached to
allow the fluid to cool before checking. Depending on vehicle use,
cooling times could take up to 30 minutes or longer.
WARNING:The dipstick cap and surrounding components may
be hot; gloves are recommended.
1. Drive the vehicle 20 miles (30 km) or until it reaches normal operating
temperature.
2. Park the vehicle on a level surface and engage the parking brake.
Maintenance and Specifications
388
2012 MKT(mkt)
Owners Guide, 1st Printing
USA(fus)
Page 390 of 437

C. Remove the bolt cover (if
equipped).
D. Remove two bolts that attach the air filter assembly to the front of
the vehicle (2).
E. Loosen the clamp holding the air filter assembly to the rubber hose
(1).
F. Remove the harness retaining clip by pulling up (3). Do not
disconnect the sensor (4).
G. Without disconnecting the sensor (4), pull the air filter assembly up
to disconnect the air filter assembly from the seated grommets located
underneath the air filter assembly.
H. Rotate the air filter assembly 90
degrees counterclockwise and
reinstall into the rubber hose.
I. Tighten the clamp (1).
J. The transmission fluid level indicator can now be accessed.
Maintenance and Specifications
390
2012 MKT(mkt)
Owners Guide, 1st Printing
USA(fus)
Page 391 of 437

WARNING:Do not run engine with the air filter disconnected.
Start the engine and continue with Step 6.
6. Install the dipstick making sure it is fully seated in the filler tube by
turning it to the locked position.
7. Remove the dipstick and inspect the fluid level. The fluid should be in
the designated areas for normal operating temperature.
Low fluid level
If the fluid level is below the MIN
range of the dipstick, add fluid to
reach the hash mark level.Note:If
the fluid level is below the MIN
level, do not drive the vehicle. An underfill condition may cause shift
and/or engagement concerns and/or possible damage.
Correct fluid level
The transmission fluid should be checked at normal operating
temperature 180°F-200°F (82°C-93°C) on a level surface. The normal
operating temperature can be reached after approximately 20 miles
(30 km) of driving.
The transmission fluid level should
be targeted within the cross-hatch
area if at normal operating
temperature 180°F-200°F
(82°C-93°C).
High fluid level
If the fluid level is above the MAX
range of the dipstick, remove fluid
to reach the hashmark level.Note:
Fluid level above the MAX level may
cause shift and/or engagement concerns and/or possible damage.
High fluid levels can be caused by an overheating condition. If your
vehicle has been operated for an extended period at high speeds, in city
traffic during hot weather or pulling a trailer, the vehicle should be
turned off until normal operating temperatures are reached. Depending
on vehicle use, cooling times could take up to 30 minutes or longer.
MAX MIN
MAX MIN
Maintenance and Specifications
391
2012 MKT(mkt)
Owners Guide, 1st Printing
USA(fus)
Page 392 of 437

Adjusting automatic transmission fluid levels
Before adding any fluid, make sure the correct type is used. The type of
fluid used is normally indicated on the dipstick and also in the
Maintenance product specifications and capacitiessection in this
chapter.
Use of a non-approved automatic transmission fluid may cause
internal transmission component damage.
If necessary, add fluid in 1/2 pint
(250 ml) increments through the
filler tube until the level is correct.
If an overfill occurs, excess fluid
should be removed by an authorized
dealer.
An overfill condition of
transmission fluid may cause shift and/or engagement concerns
and/or possible damage.
Do not use supplemental transmission fluid additives, treatments or
cleaning agents. The use of these materials may affect transmission
operation and result in damage to internal transmission components.
For vehicles equipped with the EcoBoost engine, reinstall the air
filter assembly.
After the fluid level has been checked and adjusted as necessary, do the
following:
A. Shut the engine off.
B. Loosen the clamp holding the air filter assembly to the rubber hose.
C. Rotate the air filter assembly 90 degrees clockwise without
disconnecting the sensor.
D. Seat the air filter assembly back into the grommets by pushing down
on the air filter assembly.
E. Tighten the clamp.
F. Install and tighten two bolts that attach air filter assembly to the front
of the vehicle.
G. Install the bolt cover (if equipped).
H. Reinstall the harness retaining clip into the front of the air filter
assembly.
MAX MIN
Maintenance and Specifications
392
2012 MKT(mkt)
Owners Guide, 1st Printing
USA(fus)