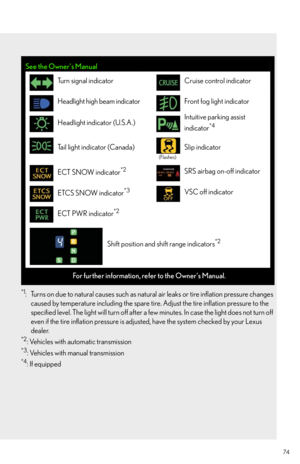
Page 17 of 82
17
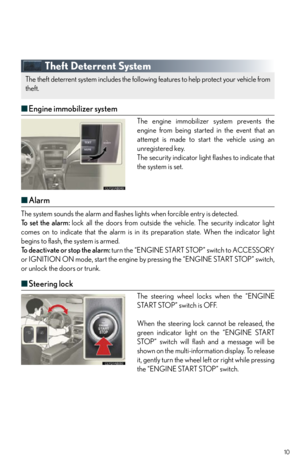
■Changing shift ranges in the S position
Operating the shift lever or shift paddle switches allows shift ranges to be selected to suit the
driving conditions.
Shift the shift lever to S.The indicator in the meter cluster will dis-
play the selected shift range.
Higher shift range:
Move the shift lever in the “+” direction, or
pull the “+” shift paddle switch toward you.
Lower shift range:
Move the shift lever in the “-” direction, or
pull the “-” shift paddle switch toward you.
Manual Transmission (If Equipped)
To operate the shift lever, the clutch pedal must be
fully depressed.
To shift into R, the ring on the shift lever must be
pulled up.
Shift the shift lever to R only when the vehicle is
stationary.
Page 18 of 82
18
Multi-information Display
■Display information
● Trip information
Outside temperature
Driving range
Average fuel consumption
Average fuel consumption after refueling
Current fuel consumption
Average vehicle speed
Gear position display (automatic transmis-
sion only)
● Satellite switch mode display
● Intuitive parking assist display
(if equipped)
● Wa r n i n g m e s s a g e s
■Changing the display of trip information
Trip information items can be switched by press-
ing the DISP switch.
The multi-information display shows information about your vehicle, including the items
shown below.
■ When using intuitive parking assist, the a ppropriate display is shown on the screen.
■ In the event that a problem is detected in any of the vehicle's systems, a warning message is
shown on the multi-information display.
Page 19 of 82
19
Satellite Switches
The satellite switches can be used to change the
settings of the following items.
● Intuitive parking assist (if equipped)
● Tire pressure warning system initialization
● ID code selection for the tire pressure warning
system
● Vehicle speed indicator
● Tacho indicator
■Changing the ON/OFF settings
To cycle through the functions, press either the
left or right selector switch.
To change the settings, press the ON/OFF
button.
The satellite switches can be used to change the settings of various functions. Settings
are shown on the multi-information display.
For detailed information of changing the settings, see the Owner’s Manual.
Page 20 of 82
20
Tu r n S i g n a l L e v e r
Right turn signal
Left turn signal
ECT Switch (Automatic Transmission)
Po w e r m o d e
For more powerful acceleration and uphill
driving.
Normal mode
Snow mode For starting or accelerating on snow-covered
roads or other slippery surfaces.
An indicator comes on when in power or snow
mode.
1
2
To signal a lane change, move the lever partway and hold.
Use the ECT switch to select the driving mode that best suits the driving and road condi-
tions.
1
2
3
Page 21 of 82
21
ETCS Switch (Manual Transmission)
An indicator comes on when in snow mode.
Press again to return to normal mode.
Intuitive Parking Assist (If Equipped)
Owners of models equipped with a navigation system should refer to the “Navigation System
Owner's Manual”.
■Turning the system on and off
The system can be turned on an d off using the satellite switch. ( P.1 9 )
■Multi-information display
Sensors are used to detect obstacles near the
vehicle. The distance to a detected obstacle is
shown by the number of indicator bars.
Indicates obstacles detected by the corner
sensors
Indicates obstacles dete cted by the back sen-
sors
Use the ETCS switch to change to snow mode when starting or accelerating on snow-
covered roads or other slippery surfaces.
The system uses a screen display and buzzer to inform the driver of obstacles near the
vehicle when parking or driving at low speed.
1
2
Page 22 of 82
22
Cruise Control
Indicator
Cruise control switch
■Setting the speed
Press the ON-OFF button.
The system will turn on.
Accelerate or decelerate to the desired
speed, and then push the lever down. This sets the speed in the cruise control
memory.
■Canceling
To temporarily cancel the cruise control, pull
the lever toward you. To resume the cruise
control, push the lever up.
To turn the system off, press the ON-OFF but-
ton.
■Adjusting the speed setting
To i n c r e a s e s p e e d : push the lever up.
To decrease speed : push the lever down.
Release the lever when the desired speed is
reached.
Cruise control allows the driver to maintain a constant speed without having to operate the
accelerator pedal.
Use for highway driving or when traveling at a constant speed for long periods of time.
1
2
1
2
Page 23 of 82
23
Headlights
Ty p e AThe daytime running lights turn on.
The side marker, parking (vehicles with
halogen headlights), daytime running
lights, tail, license plate and instrument
panel lights turn on.
The headlights and all lights listed above
(except daytime running lights) turn on.
The headlights, par king lights, daytime
running lights and other lights turn on/
off automatically in accordance with
ambient light levels.
Ty p e B The daytime running lights turn on.
The side marker, parking (vehicles with
halogen headlights), daytime running
lights, tail, license plate and instrument
panel lights turn on.
The headlights and all lights listed above
(except daytime running lights) turn on.
The headlights, par king lights, daytime
running lights and other lights turn on/
off automatically in accordance with
ambient light levels.
To engage the high beams, push the lever forward.
To flash the high beams, pull the lever and hold.
U.S.A.Canada
1
2
3
4
1
2
3
4
Page 24 of 82
24
Fog Lights
Ty p e AThe fog lights can be used only when the head-
lights (low beam) are on.
Turns the front fog lights off
Turns the front fog lights on
Ty p e B The fog lights can be used only when the head-
lights (low beam) are on.
Turns the front fog lights off
Turns the front fog lights on
1
2
1
2


 17
■Changing shift ranges in the S position
Operating the shift lever or shift paddle switches allows shift ranges to be selected to suit the
driving conditions.
Shift the shift lever to S.The indi")
 18
Multi-information Display
■Display information
● Trip information
Outside temperature
Driving range
Average fuel consumption
Average fuel consumption after refueling
Current")
 19
Satellite Switches
The satellite switches can be used to change the
settings of the following items.
● Intuitive parking assist (if equipped)
● Tire pressure warning system initialization
● I")
 20
Tu r n S i g n a l L e v e r
Right turn signal
Left turn signal
ECT Switch (Automatic Transmission)
Po w e r m o d e
For more powerful acceleration and uphill
driving.
Normal mode
Snow mode")
 21
ETCS Switch (Manual Transmission)
An indicator comes on when in snow mode.
Press again to return to normal mode.
Intuitive Parking Assist (If Equipped)
Owners of models equipped with a navigation s")
 22
Cruise Control
Indicator
Cruise control switch
■Setting the speed
Press the ON-OFF button.
The system will turn on.
Accelerate or decelerate to the desired
speed, and then push the lever down. Th")
 23
Headlights
Ty p e AThe daytime running lights turn on.
The side marker, parking (vehicles with
halogen headlights), daytime running
lights, tail, license plate and instrument
panel lights turn on")
 24
Fog Lights
Ty p e AThe fog lights can be used only when the head-
lights (low beam) are on.
Turns the front fog lights off
Turns the front fog lights on
Ty p e B The fog lights can be used on")