2012 Lexus GS450h change time
[x] Cancel search: change timePage 2 of 257
2
GS450h/250 (EE) NAVI 30C48E
13.12.17 15:42
Introduction
This manual explains the operation of the Navigation System. Please read this
manual carefully to ensure proper use. Keep this manual in your vehicle at all
times.
The screen shots in this document and the actual screens of the navigation sys-
tem differ depending on whether the functions and/or a contract existed and the
map data available at the time of producing this document.
The Navigation System is one of the most technologically advanced vehicle ac-
cessories ever developed. The system receives satellite signals from the Global
Positioning System (GPS) operated by the U.S. Department of Defense. Using
these signals and other vehicle sensors, the system indicates your present posi-
tion and assists in locating a desired destination.
The navigation system is designed to select efficient routes from your present
starting location to your destination. The system is also designed to direct you
to a destination that is unfamiliar to you in an efficient manner. Map database
is made based on AISIN AW maps, whose information source comes from
NAVTEQ maps. The calculated routes may not be the shortest nor the least
traffic congested. Your own personal local knowledge or “short cut” may at
times be faster than the calculated routes.
The navigation system’s database includes Point of Interest categories to allow
you to easily select destinations such as restaurants and hotels. If a destination
is not in the database, you can enter the street address or a major intersection
close to it and the system will guide you there.
The system will provide both a visual map and audio instructions. The audio
instructions will announce the distance remaining and the direction to turn
when approaching an intersection. These voice instructions will help you keep
your eyes on the road and are timed to provide enough time to allow you to ma-
neuver, change lanes or slow down.
Please be aware that all current vehicle navigation systems have certain limita-
tions that may affect their ability to perform properly. The accuracy of the ve-
hicle’s position depends on satellite conditions, road configuration, vehicle
condition or other circumstances. For more information on the limitations of
the system, refer to pages 157 through 158.
NAVIGATION SYSTEM OWNER’S MANUAL
NAVIGATION SYSTEM
Page 36 of 257
36
GS450h/250 (EE) NAVI 30C48E
13.12.17 15:42
1. BASIC INFORMATION BEFORE OPERATION
1. INITIAL SCREEN
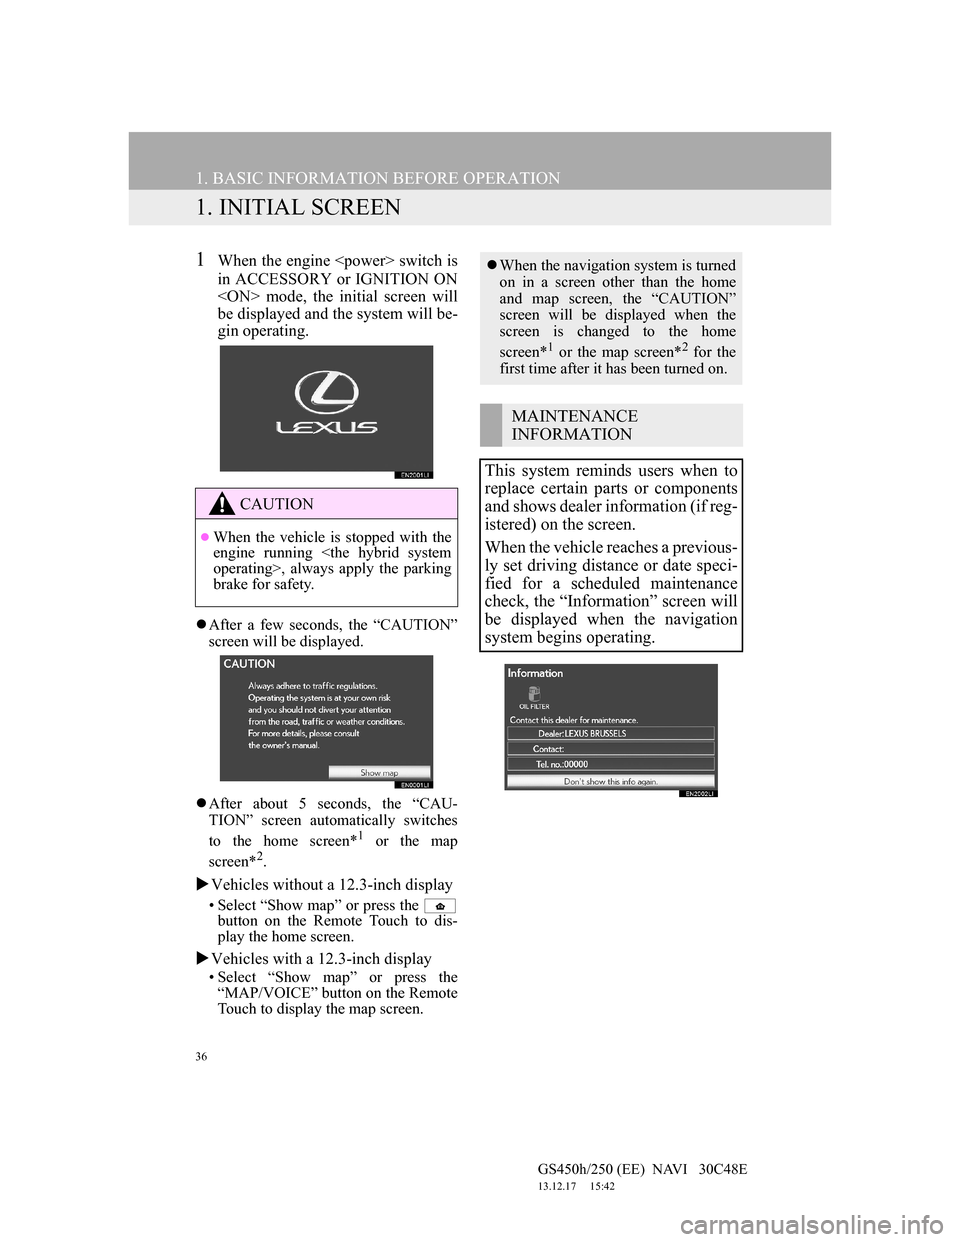
1When the engine
in ACCESSORY or IGNITION ON
be displayed and the system will be-
gin operating.
After a few seconds, the “CAUTION”
screen will be displayed.
After about 5 seconds, the “CAU-
TION” screen automatically switches
to the home screen*
1 or the map
screen*2.
Vehicles without a 12.3-inch display
• Select “Show map” or press the
button on the Remote Touch to dis-
play the home screen.
Vehicles with a 12.3-inch display
• Select “Show map” or press the
“MAP/VOICE” button on the Remote
Touch to display the map screen.
CAUTION
When the vehicle is stopped with the
engine running
brake for safety.
When the navigation system is turned
on in a screen other than the home
and map screen, the “CAUTION”
screen will be displayed when the
screen is changed to the home
screen*
1 or the map screen*2 for the
first time after it has been turned on.
MAINTENANCE
INFORMATION
This system reminds users when to
replace certain parts or components
and shows dealer information (if reg-
istered) on the screen.
When the vehicle reaches a previous-
ly set driving distance or date speci-
fied for a scheduled maintenance
check, the “Information” screen will
be displayed when the navigation
system begins operating.
Page 46 of 257
46
1. BASIC INFORMATION BEFORE OPERATION
GS450h/250 (EE) NAVI 30C48E
13.12.17 15:42
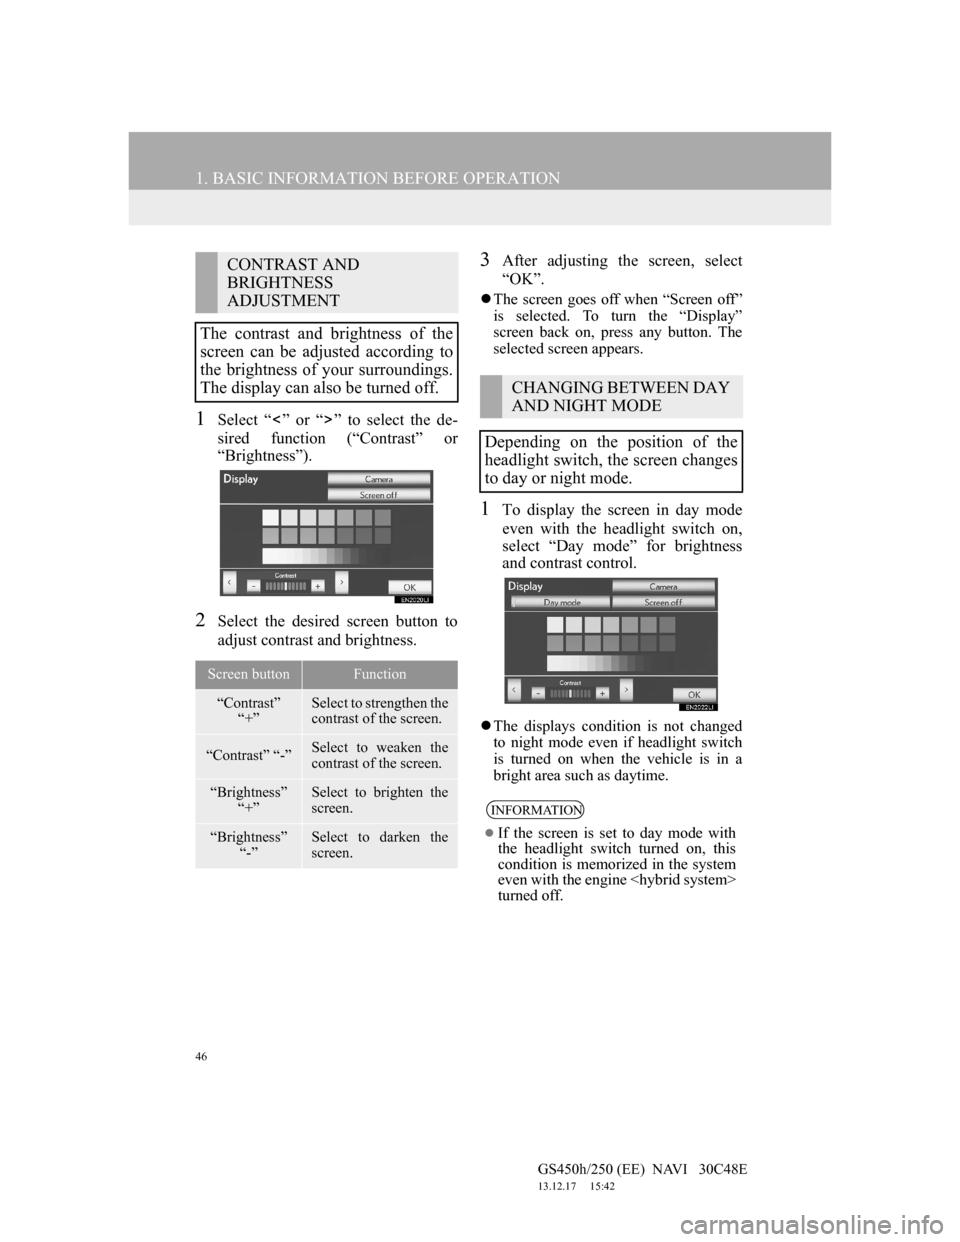
1Select “ ” or “ ” to select the de-
sired function (“Contrast” or
“Brightness”).
2Select the desired screen button to
adjust contrast and brightness.
3After adjusting the screen, select
“OK”.
The screen goes off when “Screen off”
is selected. To turn the “Display”
screen back on, press any button. The
selected screen appears.
1To display the screen in day mode
even with the headlight switch on,
select “Day mode” for brightness
and contrast control.
The displays condition is not changed
to night mode even if headlight switch
is turned on when the vehicle is in a
bright area such as daytime.
CONTRAST AND
BRIGHTNESS
ADJUSTMENT
The contrast and brightness of the
screen can be adjusted according to
the brightness of your surroundings.
The display can also be turned off.
Screen buttonFunction
“Contrast”
“+”Select to strengthen the
contrast of the screen.
“Contrast” “-”Select to weaken the
contrast of the screen.
“Brightness”
“+”Select to brighten the
screen.
“Brightness”
“-”Select to darken the
screen.
CHANGING BETWEEN DAY
AND NIGHT MODE
Depending on the position of the
headlight switch, the screen changes
to day or night mode.
INFORMATION
If the screen is set to day mode with
the headlight switch turned on, this
condition is memorized in the system
even with the engine
turned off.
Page 61 of 257
60
2. SETUP
GS450h/250 (EE) NAVI 30C48E
13.12.17 15:42
*: Vehicles without a 12.3-inch display
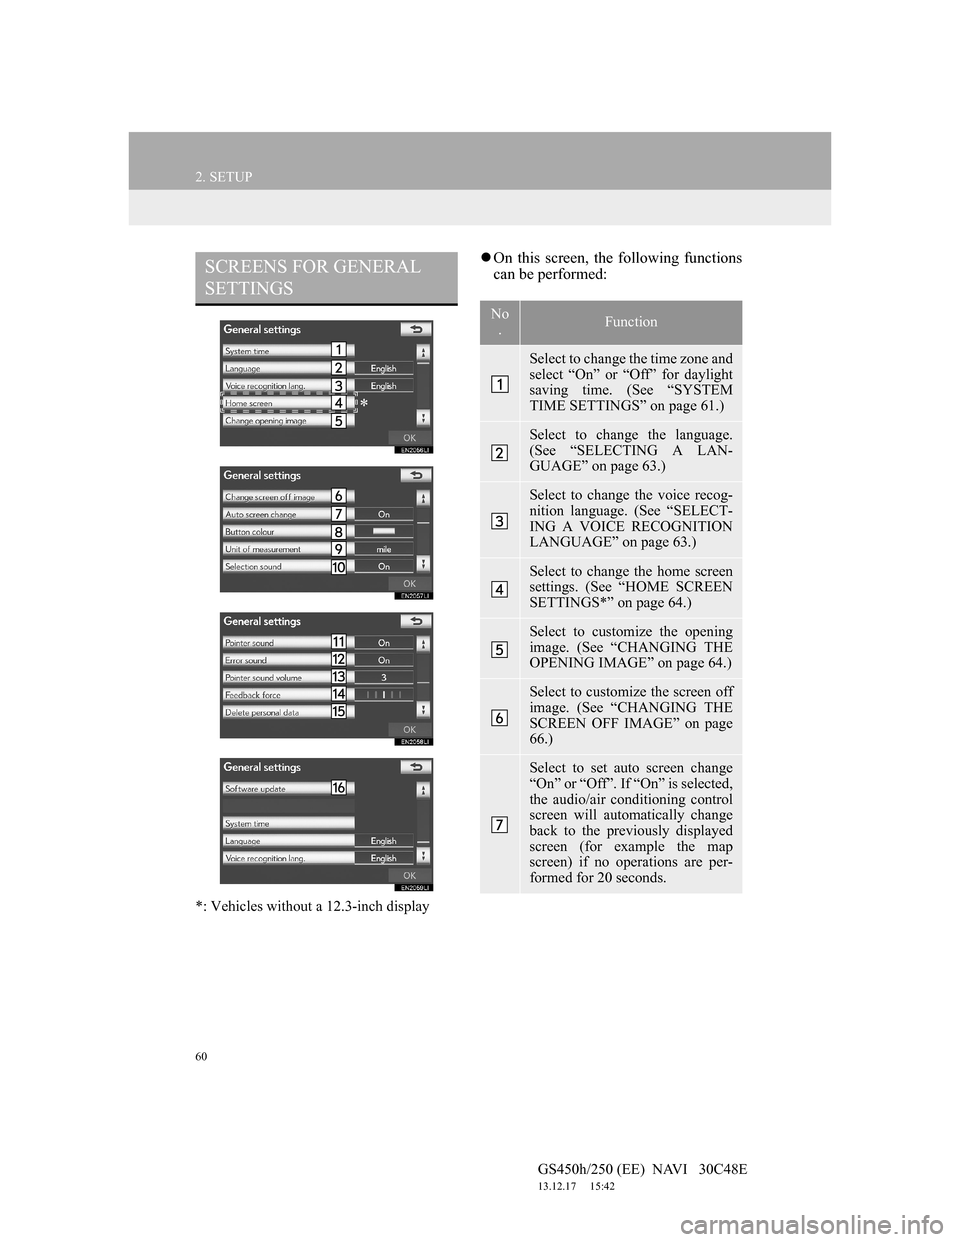
On this screen, the following functions
can be performed:SCREENS FOR GENERAL
SETTINGS
*
No
.Function
Select to change the time zone and
select “On” or “Off” for daylight
saving time. (See “SYSTEM
TIME SETTINGS” on page 61.)
Select to change the language.
(See “SELECTING A LAN-
GUAGE” on page 63.)
Select to change the voice recog-
nition language. (See “SELECT-
ING A VOICE RECOGNITION
LANGUAGE” on page 63.)
Select to change the home screen
settings. (See “HOME SCREEN
SETTINGS*” on page 64.)
Select to customize the opening
image. (See “CHANGING THE
OPENING IMAGE” on page 64.)
Select to customize the screen off
image. (See “CHANGING THE
SCREEN OFF IMAGE” on page
66.)
Select to set auto screen change
“On” or “Off”. If “On” is selected,
the audio/air conditioning control
screen will automatically change
back to the previously displayed
screen (for example the map
screen) if no operations are per-
formed for 20 seconds.
Page 62 of 257
61
2. SETUP
GS450h/250 (EE) NAVI 30C48E
13.12.17 15:42
2
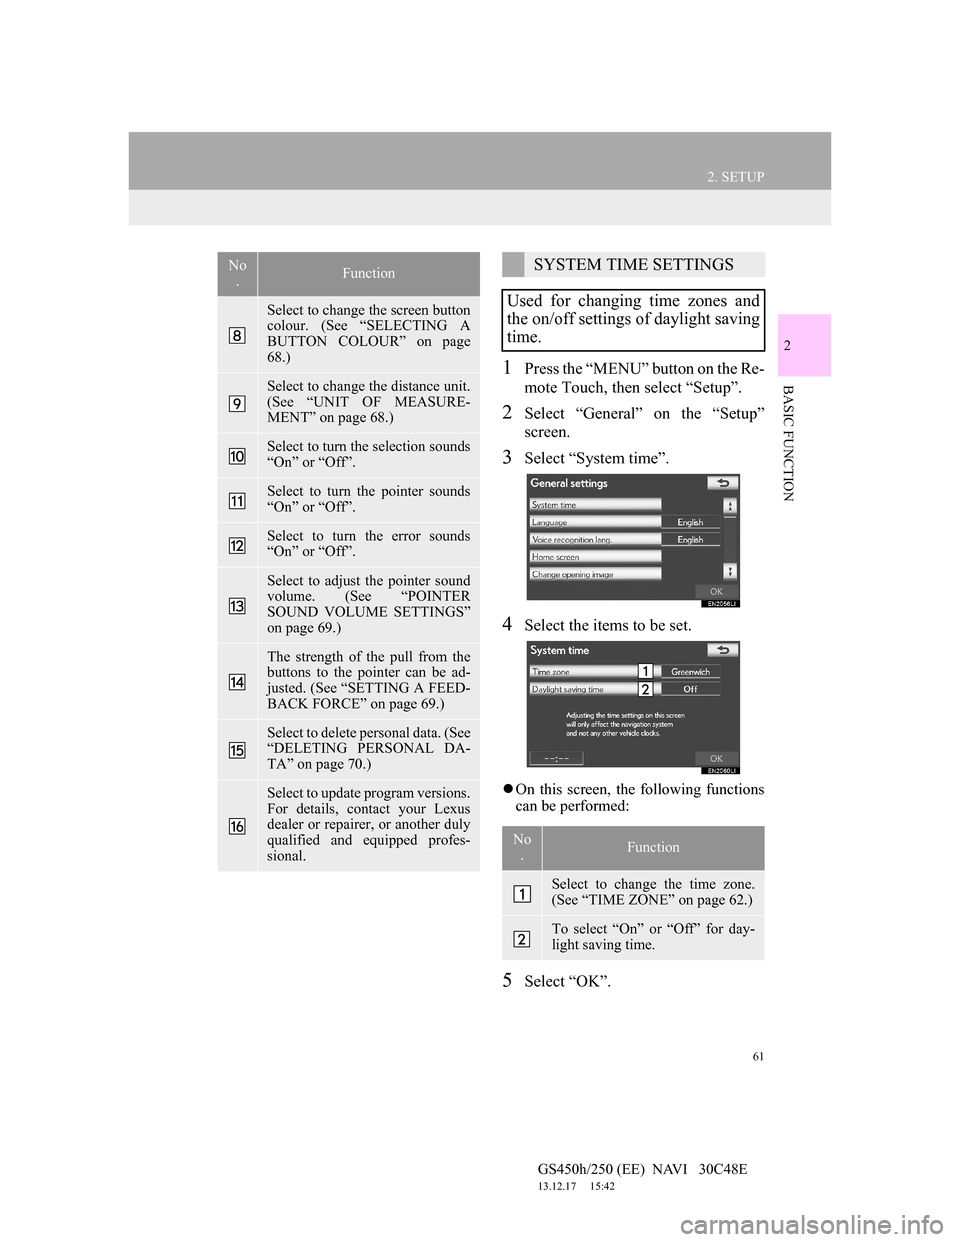
BASIC FUNCTION1Press the “MENU” button on the Re-
mote Touch, then select “Setup”.
2Select “General” on the “Setup”
screen.
3Select “System time”.
4Select the items to be set.
On this screen, the following functions
can be performed:
5Select “OK”.
Select to change the screen button
colour. (See “SELECTING A
BUTTON COLOUR” on page
68.)
Select to change the distance unit.
(See “UNIT OF MEASURE-
MENT” on page 68.)
Select to turn the selection sounds
“On” or “Off”.
Select to turn the pointer sounds
“On” or “Off”.
Select to turn the error sounds
“On” or “Off”.
Select to adjust the pointer sound
volume. (See “POINTER
SOUND VOLUME SETTINGS”
on page 69.)
The strength of the pull from the
buttons to the pointer can be ad-
justed. (See “SETTING A FEED-
BACK FORCE” on page 69.)
Select to delete personal data. (See
“DELETING PERSONAL DA-
TA” on page 70.)
Select to update program versions.
For details, contact your Lexus
dealer or repairer, or another duly
qualified and equipped profes-
sional.
No
.FunctionSYSTEM TIME SETTINGS
Used for changing time zones and
the on/off settings of daylight saving
time.
No
.Function
Select to change the time zone.
(See “TIME ZONE” on page 62.)
To select “On” or “Off” for day-
light saving time.
Page 78 of 257
77
1. DESTINATION SEARCH
3
NAVIGATION SYSTEM
GS450h/250 (EE) NAVI 30C48E
13.12.17 15:42
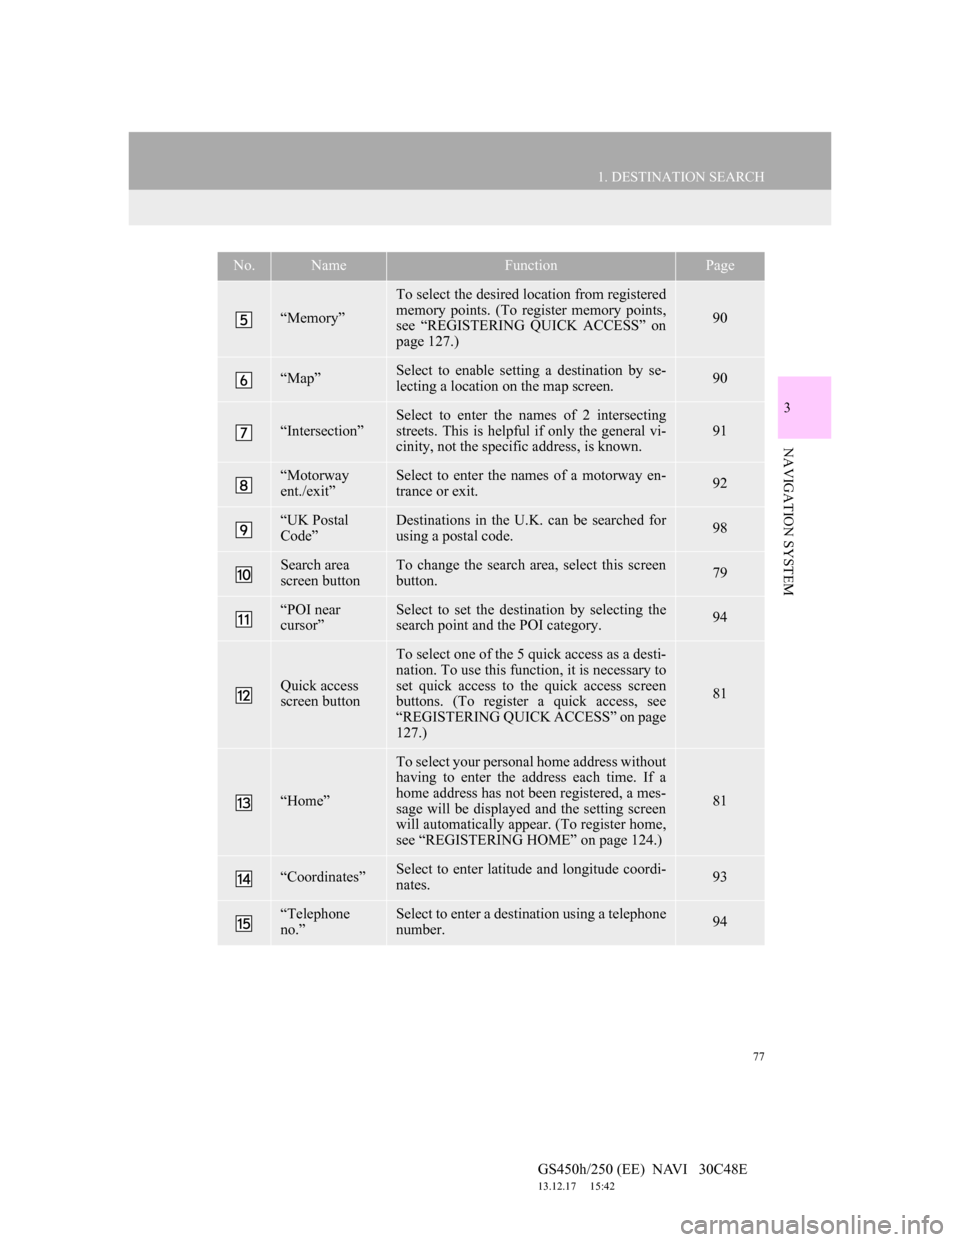
“Memory”
To select the desired location from registered
memory points. (To register memory points,
see “REGISTERING QUICK ACCESS” on
page 127.)
90
“Map”Select to enable setting a destination by se-
lecting a location on the map screen.90
“Intersection”
Select to enter the names of 2 intersecting
streets. This is helpful if only the general vi-
cinity, not the specific address, is known.
91
“Motorway
ent./exit”Select to enter the names of a motorway en-
trance or exit.92
“UK Postal
Code”Destinations in the U.K. can be searched for
using a postal code.98
Search area
screen buttonTo change the search area, select this screen
button.79
“POI near
cursor”Select to set the destination by selecting the
search point and the POI category.94
Quick access
screen button
To select one of the 5 quick access as a desti-
nation. To use this function, it is necessary to
set quick access to the quick access screen
buttons. (To register a quick access, see
“REGISTERING QUICK ACCESS” on page
127.)
81
“Home”
To select your personal home address without
having to enter the address each time. If a
home address has not been registered, a mes-
sage will be displayed and the setting screen
will automatically appear. (To register home,
see “REGISTERING HOME” on page 124.)
81
“Coordinates”Select to enter latitude and longitude coordi-
nates.93
“Telephone
no.”Select to enter a destination using a telephone
number.94
No.NameFunctionPage
Page 123 of 257
122
2. ROUTE GUIDANCE
GS450h/250 (EE) NAVI 30C48E
13.12.17 15:42
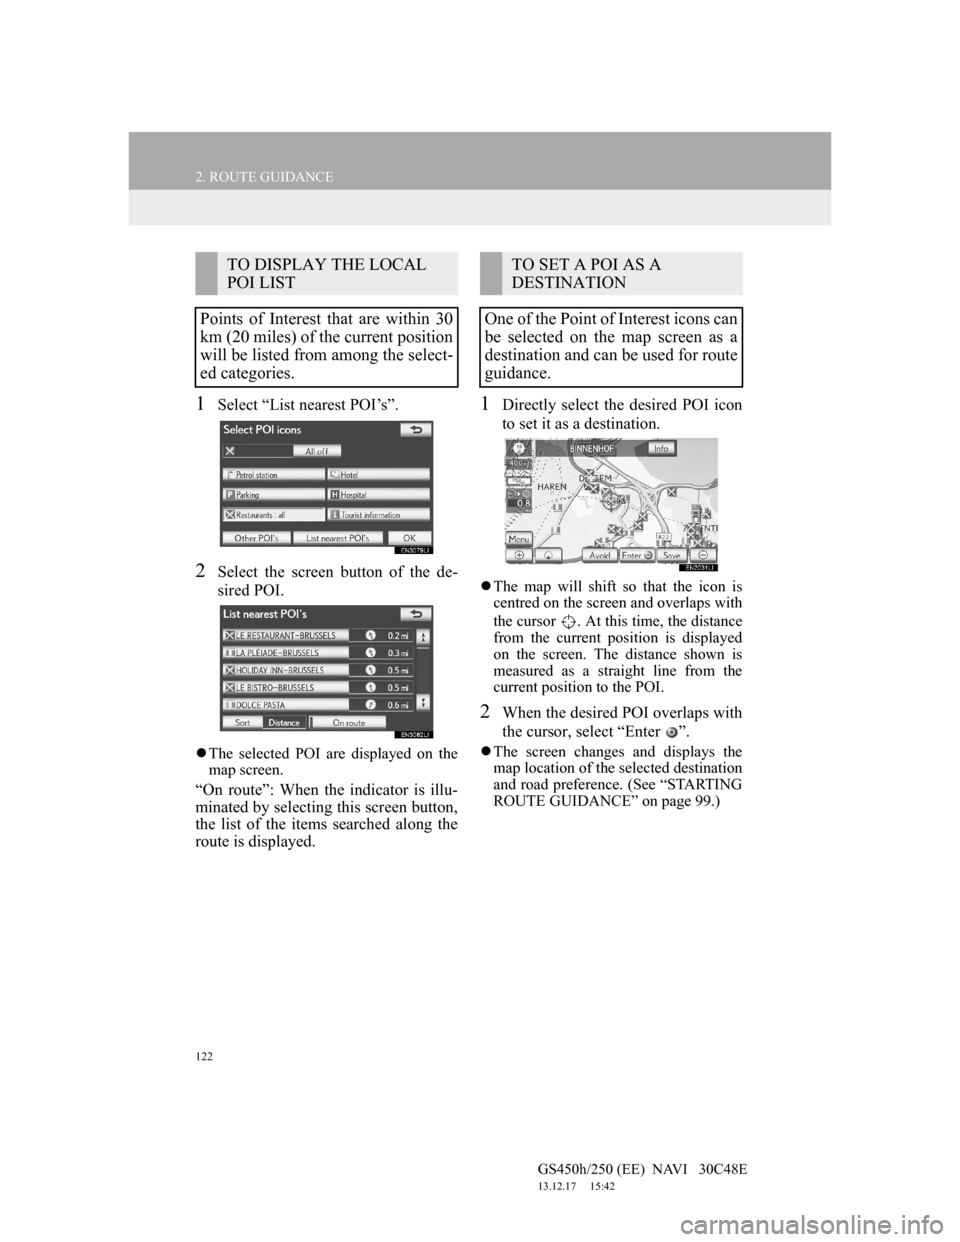
1Select “List nearest POI’s”.
2Select the screen button of the de-
sired POI.
The selected POI are displayed on the
map screen.
“On route”: When the indicator is illu-
minated by selecting this screen button,
the list of the items searched along the
route is displayed.
1Directly select the desired POI icon
to set it as a destination.
The map will shift so that the icon is
centred on the screen and overlaps with
the cursor . At this time, the distance
from the current position is displayed
on the screen. The distance shown is
measured as a straight line from the
current position to the POI.
2When the desired POI overlaps with
the cursor, select “Enter ”.
The screen changes and displays the
map location of the selected destination
and road preference. (See “STARTING
ROUTE GUIDANCE” on page 99.)
TO DISPLAY THE LOCAL
POI LIST
Points of Interest that are within 30
km (20 miles) of the current position
will be listed from among the select-
ed categories.TO SET A POI AS A
DESTINATION
One of the Point of Interest icons can
be selected on the map screen as a
destination and can be used for route
guidance.
Page 148 of 257
146
4. SETUP
GS450h/250 (EE) NAVI 30C48E
13.12.17 15:42
To reset all setup items, select
“Default”.
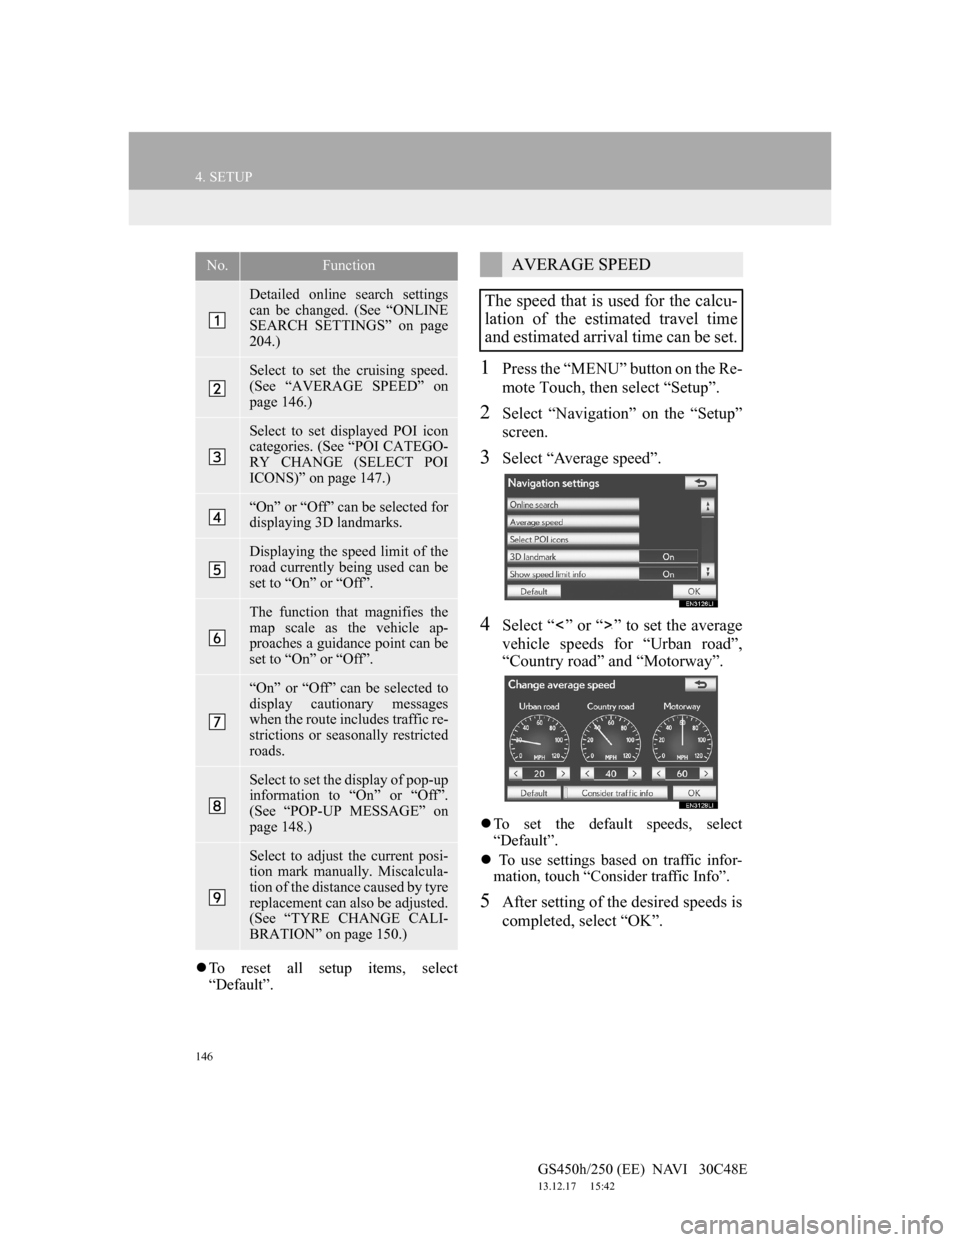
1Press the “MENU” button on the Re-
mote Touch, then select “Setup”.
2Select “Navigation” on the “Setup”
screen.
3Select “Average speed”.
4Select “ ” or “ ” to set the average
vehicle speeds for “Urban road”,
“Country road” and “Motorway”.
To set the default speeds, select
“Default”.
To use settings based on traffic infor-
mation, touch “Consider traffic Info”.
5After setting of the desired speeds is
completed, select “OK”.
No.Function
Detailed online search settings
can be changed. (See “ONLINE
SEARCH SETTINGS” on page
204.)
Select to set the cruising speed.
(See “AVERAGE SPEED” on
page 146.)
Select to set displayed POI icon
categories. (See “POI CATEGO-
RY CHANGE (SELECT POI
ICONS)” on page 147.)
“On” or “Off” can be selected for
displaying 3D landmarks.
Displaying the speed limit of the
road currently being used can be
set to “On” or “Off”.
The function that magnifies the
map scale as the vehicle ap-
proaches a guidance point can be
set to “On” or “Off”.
“On” or “Off” can be selected to
display cautionary messages
when the route includes traffic re-
strictions or seasonally restricted
roads.
Select to set the display of pop-up
information to “On” or “Off”.
(See “POP-UP MESSAGE” on
page 148.)
Select to adjust the current posi-
tion mark manually. Miscalcula-
tion of the distance caused by tyre
replacement can also be adjusted.
(See “TYRE CHANGE CALI-
BRATION” on page 150.)
AVERAGE SPEED
The speed that is used for the calcu-
lation of the estimated travel time
and estimated arrival time can be set.