Page 191 of 257
189
1. CONNECTED SERVICES
GS450h/250 (EE) NAVI 30C48E
13.12.17 15:42
6
CONNECTED SERVICES
2. SETTINGS REQUIRED FOR USING THE SERVICE
1Press the “MENU” button on the Re-
mote Touch.
2Select “Setup”.
3Select “Navigation”.
4Select “Online search”.
5“Navigation Identification” is dis-
played at the bottom of the second
page on the “Online search settings”
screen.
OBTAINING A PORTAL SITE
ACCOUNT
Before using connected services, it is
necessary to first access Lexus’s por-
tal site (www.my.lex
us.eu) via a per-
sonal computer and create an
account.
“Navigation Identification” is re-
quired to obtain an account. Check
the identification before accessing
Lexus’s portal site.
CHECKING NAVIGATION
IDENTIFICATION
Page 196 of 257
194
1. CONNECTED SERVICES
GS450h/250 (EE) NAVI 30C48E
13.12.17 15:42
“Detail settings” SCREEN
Enter or select Username (for APN set-
ting), Password (for APN setting),
APN, DNS1, DNS2, Dial Number and
Script.
If there is only one DNS, set it in DNS
1.
If more than one item needs to be
entered into “Script”, separate the first
and second items with a semi-colon (;).
ENTERING USERNAME AND
PASSWORD OF THE PORTAL
SITE
1Select “Username” and enter the
name.
2Select “Password” and enter the
password.
3Select “OK”.
If the navigation system does not
have mobile network provider set-
ting information for the country or
mobile network provider that has
been selected, or if you select “Oth-
er” for either country or mobile net-
work provider, the “Detail settings”
screen will be displayed. Contact
your mobile network provider to ob-
tain the contract information to be in-
put in the “Detail settings” screen.
Page 197 of 257
195
1. CONNECTED SERVICES
GS450h/250 (EE) NAVI 30C48E
13.12.17 15:42
6
CONNECTED SERVICES
3. USING CONNECTED SERVICES
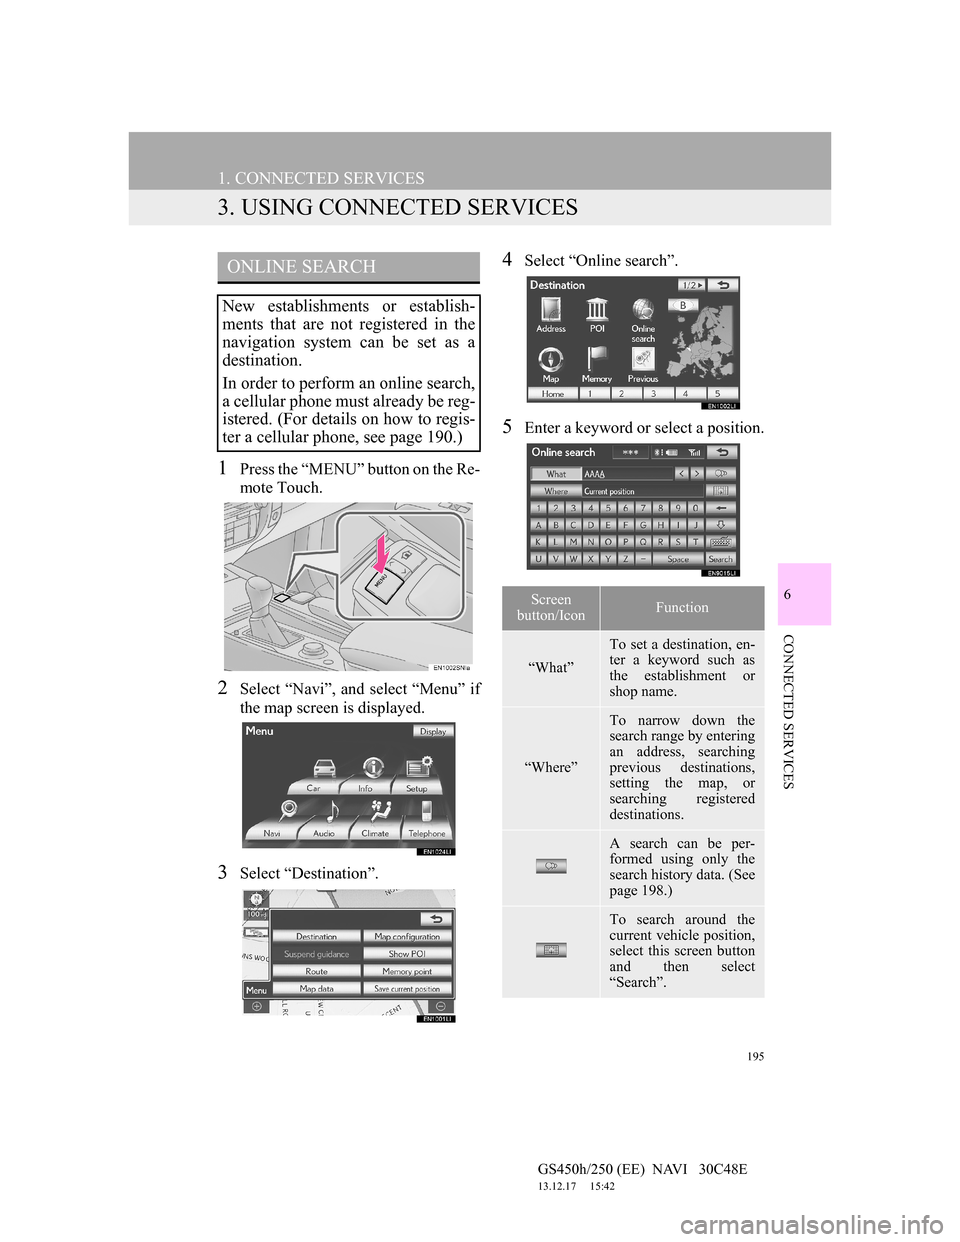
1Press the “MENU” button on the Re-
mote Touch.
2Select “Navi”, and select “Menu” if
the map screen is displayed.
3Select “Destination”.
4Select “Online search”.
5Enter a keyword or select a position.
ONLINE SEARCH
New establishments or establish-
ments that are not registered in the
navigation system can be set as a
destination.
In order to perform an online search,
a cellular phone must already be reg-
istered. (For details on how to regis-
ter a cellular phone, see page 190.)
Screen
button/IconFunction
“What”
To set a destination, en-
ter a keyword such as
the establishment or
shop name.
“Where”
To narrow down the
search range by entering
an address, searching
previous destinations,
setting the map, or
searching registered
destinations.
A search can be per-
formed using only the
search history data. (See
page 198.)
To search around the
current vehicle position,
select this screen button
and then select
“Search”.
Page 198 of 257
196
1. CONNECTED SERVICES
GS450h/250 (EE) NAVI 30C48E
13.12.17 15:42
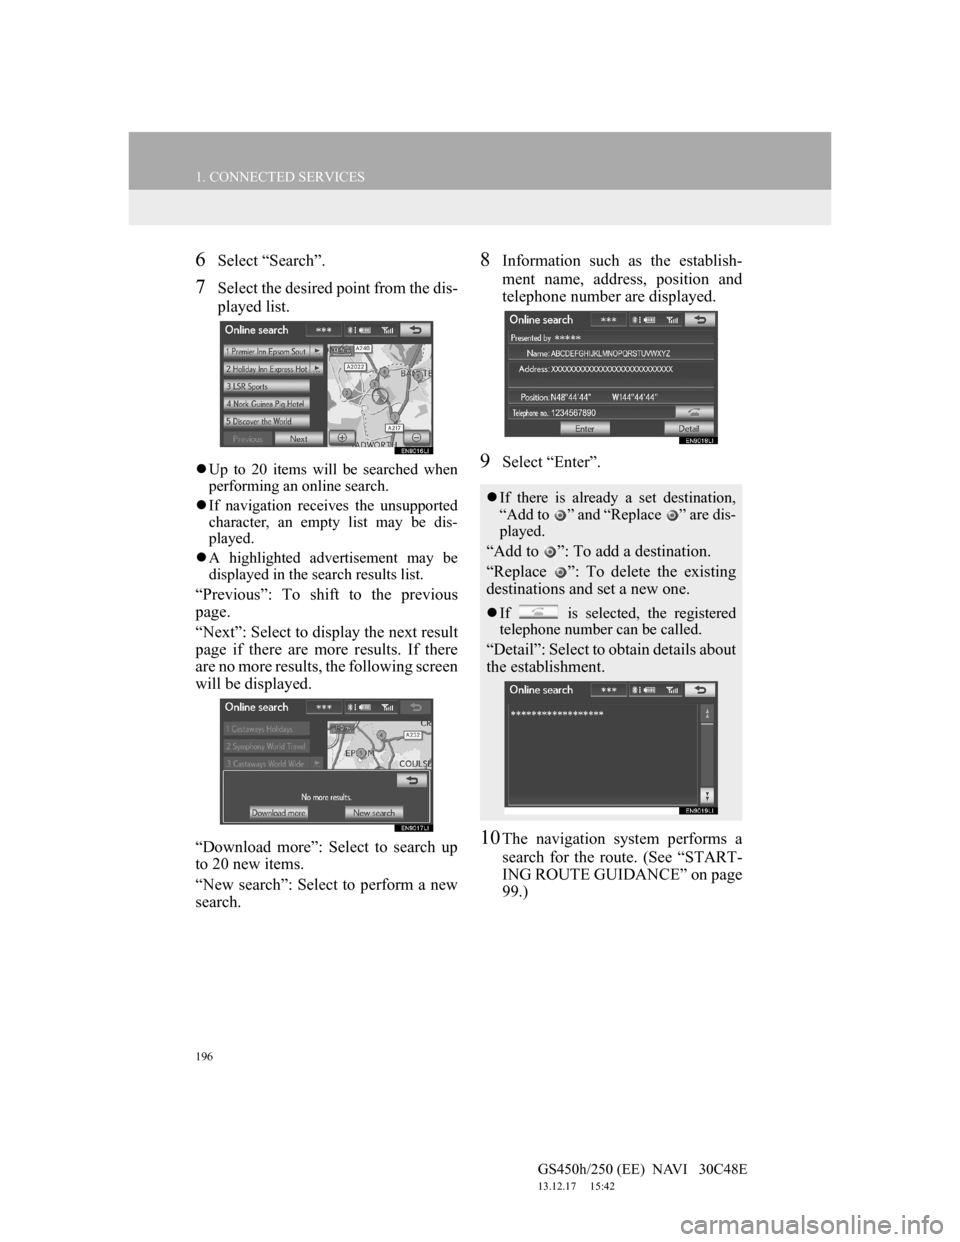
6Select “Search”.
7Select the desired point from the dis-
played list.
Up to 20 items will be searched when
performing an online search.
If navigation receives the unsupported
character, an empty list may be dis-
played.
A highlighted advertisement may be
displayed in the search results list.
“Previous”: To shift to the previous
page.
“Next”: Select to display the next result
page if there are more results. If there
are no more results, the following screen
will be displayed.
“Download more”: Select to search up
to 20 new items.
“New search”: Select to perform a new
search.
8Information such as the establish-
ment name, address, position and
telephone number are displayed.
9Select “Enter”.
10The navigation system performs a
search for the route. (See “START-
ING ROUTE GUIDANCE” on page
99.)
If there is already a set destination,
“Add to ” and “Replace ” are dis-
played.
“Add to ”: To add a destination.
“Replace ”: To delete the existing
destinations and set a new one.
If is selected, the registered
telephone number can be called.
“Detail”: Select to obtain details about
the establishment.
Page 201 of 257
199
1. CONNECTED SERVICES
6
CONNECTED SERVICES
GS450h/250 (EE) NAVI 30C48E
13.12.17 15:42
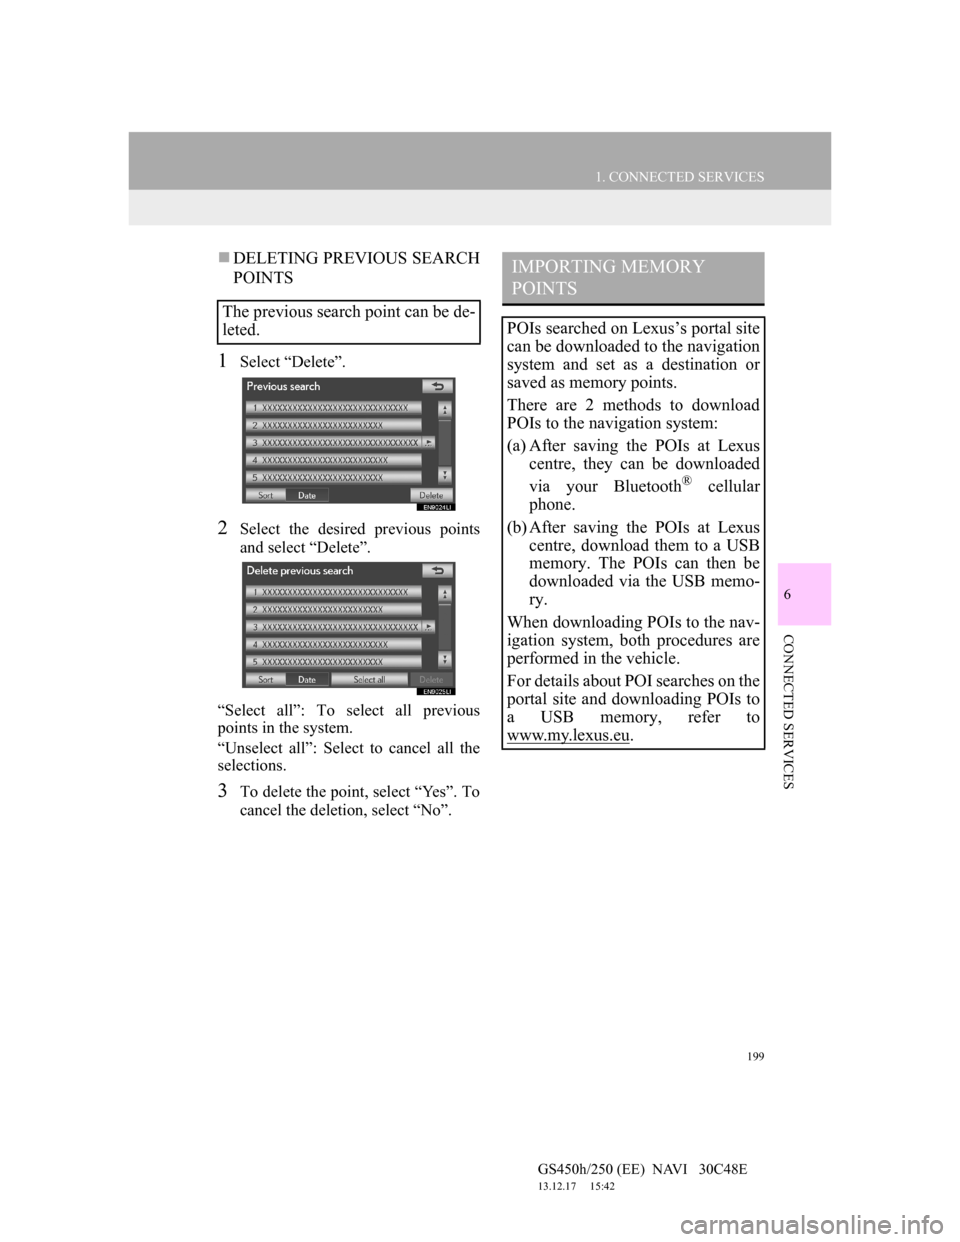
DELETING PREVIOUS SEARCH
POINTS
1Select “Delete”.
2Select the desired previous points
and select “Delete”.
“Select all”: To select all previous
points in the system.
“Unselect all”: Select to cancel all the
selections.
3To delete the point, select “Yes”. To
cancel the deletion, select “No”.
The previous search point can be de-
leted.
IMPORTING MEMORY
POINTS
POIs searched on Lexus’s portal site
can be downloaded to the navigation
system and set as a destination or
saved as memory points.
There are 2 methods to download
POIs to the navigation system:
(a) After saving the POIs at Lexus
centre, they can be downloaded
via your Bluetooth
® cellular
phone.
(b) After saving the POIs at Lexus
centre, download them to a USB
memory. The POIs can then be
downloaded via the USB memo-
ry.
When downloading POIs to the nav-
igation system, both procedures are
performed in the vehicle.
For details about POI searches on the
portal site and downloading POIs to
a USB memory, refer to
www.my.lex
us.eu.
Page 202 of 257
200
1. CONNECTED SERVICES
GS450h/250 (EE) NAVI 30C48E
13.12.17 15:42
SETTING AN EXTERNAL
POINT AS A DESTINATION
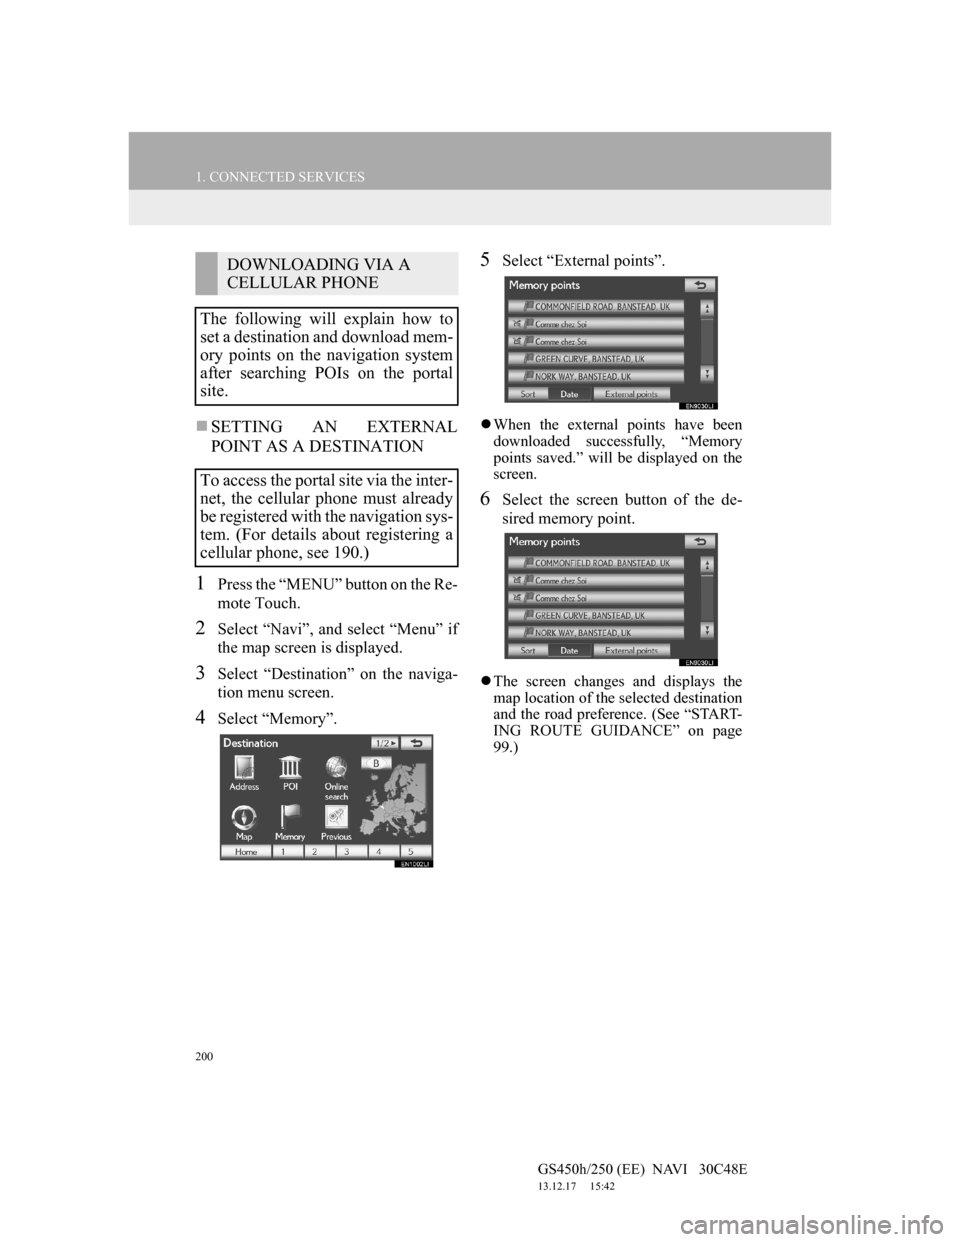
1Press the “MENU” button on the Re-
mote Touch.
2Select “Navi”, and select “Menu” if
the map screen is displayed.
3Select “Destination” on the naviga-
tion menu screen.
4Select “Memory”.
5Select “External points”.
When the external points have been
downloaded successfully, “Memory
points saved.” will be displayed on the
screen.
6Select the screen button of the de-
sired memory point.
The screen changes and displays the
map location of the selected destination
and the road preference. (See “START-
ING ROUTE GUIDANCE” on page
99.)
DOWNLOADING VIA A
CELLULAR PHONE
The following will explain how to
set a destination and download mem-
ory points on the navigation system
after searching POIs on the portal
site.
To access the portal site via the inter-
net, the cellular phone must already
be registered with the navigation sys-
tem. (For details about registering a
cellular phone, see 190.)
Page 203 of 257
201
1. CONNECTED SERVICES
6
CONNECTED SERVICES
GS450h/250 (EE) NAVI 30C48E
13.12.17 15:42
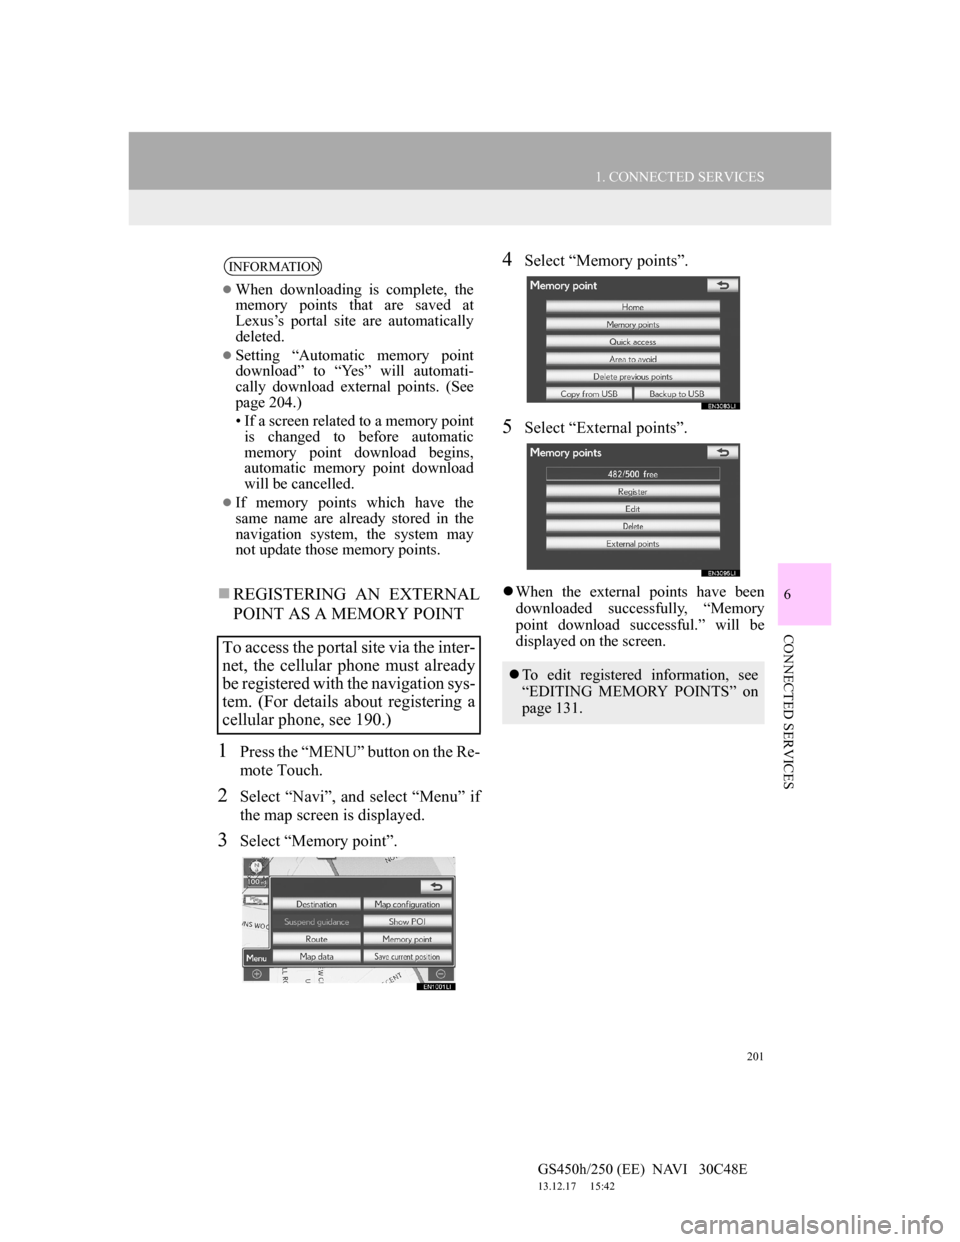
REGISTERING AN EXTERNAL
POINT AS A MEMORY POINT
1Press the “MENU” button on the Re-
mote Touch.
2Select “Navi”, and select “Menu” if
the map screen is displayed.
3Select “Memory point”.
4Select “Memory points”.
5Select “External points”.
When the external points have been
downloaded successfully, “Memory
point download successful.” will be
displayed on the screen.
INFORMATION
When downloading is complete, the
memory points that are saved at
Lexus’s portal site are automatically
deleted.
Setting “Automatic memory point
download” to “Yes” will automati-
cally download external points. (See
page 204.)
• If a screen related to a memory point
is changed to before automatic
memory point download begins,
automatic memory point download
will be cancelled.
If memory points which have the
same name are already stored in the
navigation system, the system may
not update those memory points.
To access the portal site via the inter-
net, the cellular phone must already
be registered with the navigation sys-
tem. (For details about registering a
cellular phone, see 190.)
To edit registered information, see
“EDITING MEMORY POINTS” on
page 131.
Page 204 of 257
202
1. CONNECTED SERVICES
GS450h/250 (EE) NAVI 30C48E
13.12.17 15:42
1Open the console box.
2Open the cover and connect a USB
memory.
Turn on the power of the USB memory
if it is not turned on.
3Close the console box.
4Press the “MENU” button on the Re-
mote Touch.
5Select “Navi”, and select “Menu” if
the map screen is displayed.
6Select “Memory point” on the navi-
gation menu screen.
INFORMATION
When downloading is complete, the
memory points that are saved at
Lexus’s portal site are automatically
deleted.
Setting “Automatic memory point
download” to “Yes” will automati-
cally download external points. (See
page 204.)
• If a screen related to a memory point
is changed to before automatic
memory point download begins,
automatic memory point download
will be cancelled.
If memory points which have the
same name are already stored in the
navigation system, the system may
not update those memory points.
PROCEDURE FOR
DOWNLOADING MEMORY
POINTS FROM A USB
MEMORY