2012 Lexus GS450h remote start
[x] Cancel search: remote startPage 6 of 257

TABLE OF CONTENTS
6
GS450h/250 (EE) NAVI 30C48E
13.12.17 15:42
1. NAVIGATION OPERATION............. 10
Remote Touch ........................................10
HOME SCREEN ...................................12
REGISTERING HOME.........................14
REGISTERING QUICK ACCESS........16
OPERATION FLOW:
GUIDING THE ROUTE .....................18
SETTING HOME AS THE
DESTINATION ..................................20
2. FUNCTION INDEX ............................ 22
NAVIGATION SYSTEM
FUNCTION INDEX ...........................22
3. QUICK REFERENCE ......................... 24
MAP SCREEN.......................................24
NAVIGATION MENU SCREEN .........26
“Menu” SCREEN ..................................28
“Setup” SCREEN...................................30
“Information” SCREEN.........................32
1. BASIC INFORMATION BEFORE
OPERATION ..................................... 36
INITIAL SCREEN.................................36
Remote Touch OPERATION ................37
INPUTTING LETTERS AND
NUMBERS/LIST SCREEN
OPERATION ......................................39
SCREEN ADJUSTMENT .....................44
MAP SCREEN OPERATION ...............46
2. SETUP ................................................. 59
GENERAL SETTINGS .........................59
VOICE SETTINGS ...............................71
1. DESTINATION SEARCH.................. 76
QUICK REFERENCE .......................... 76
DESTINATION SEARCH ................... 78
STARTING ROUTE GUIDANCE ....... 99
2. ROUTE GUIDANCE ........................ 103
ROUTE GUIDANCE SCREEN ......... 103
TYPICAL VOICE GUIDANCE
PROMPTS ........................................ 107
DISTANCE AND TIME TO
DESTINATION................................ 110
SUSPENDING AND RESUMING
GUIDANCE ..................................... 111
SETTING ROUTE .............................. 112
DISPLAY POI* ICONS...................... 120
3. MEMORY POINTS .......................... 123
MEMORY POINT SETTINGS .......... 123
4. SETUP ............................................... 145
NAVIGATION SETTINGS................ 145
VEHICLE SETTINGS ........................ 151
5. GPS (GLOBAL POSITIONING
SYSTEM) ........................................ 157
LIMITATIONS OF THE
NAVIGATION SYSTEM ................ 157
MAP DATABASE VERSION AND
COVERED AREA............................ 160
1. SPEECH COMMAND SYSTEM
OPERATION .................................. 164
SPEECH COMMAND SYSTEM ....... 164
COMMAND LIST .............................. 170
1QUICK GUIDE
2BASIC FUNCTION
3NAVIGATION SYSTEM
4SPEECH COMMAND
*: Point of Interest
Page 11 of 257

11
1. NAVIGATION OPERATION
1
QUICK GUIDE
GS450h/250 (EE) NAVI 30C48E
13.12.17 15:42
No.NameFunctionPage
“MENU” but-
tonPress to display the “Menu” screen.28
“·” buttonPress to change the scale of the map and to
scroll the list screen.37, 42, 56
“ ” but-
ton*1Press to display the home screen.12
Remote Touch
knob
Move in the desired direction to select a func-
tion, letter and map screen button.
Press to enter the selected function, letter or
map screen button.
37
“MAP/VOICE”
button*2
Press to repeat a voice guidance, cancel the
map scroll, start guidance or display the cur-
rent position.24, 26, 46
*1:Vehicles without a 12.3-inch display.
*2:Vehicles with a 12.3-inch display.
Page 65 of 257
64
2. SETUP
GS450h/250 (EE) NAVI 30C48E
13.12.17 15:42
*: Vehicles without a 12.3-inch display
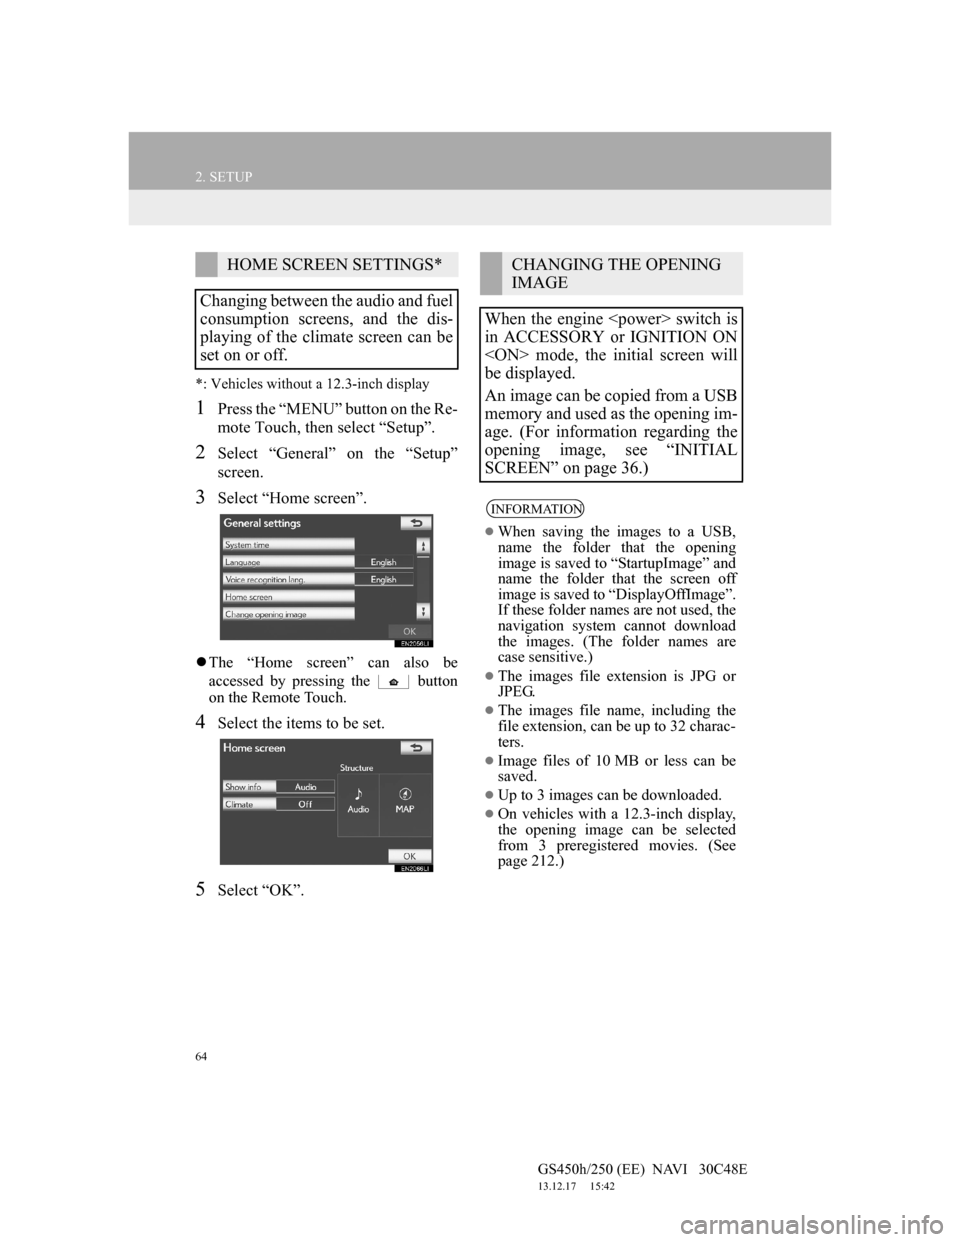
1Press the “MENU” button on the Re-
mote Touch, then select “Setup”.
2Select “General” on the “Setup”
screen.
3Select “Home screen”.
The “Home screen” can also be
accessed by pressing the button
on the Remote Touch.
4Select the items to be set.
5Select “OK”.
HOME SCREEN SETTINGS*
Changing between the audio and fuel
consumption screens, and the dis-
playing of the climate screen can be
set on or off.CHANGING THE OPENING
IMAGE
When the engine
in ACCESSORY or IGNITION ON
be displayed.
An image can be copied from a USB
memory and used as the opening im-
age. (For information regarding the
opening image, see “INITIAL
SCREEN” on page 36.)
INFORMATION
When saving the images to a USB,
name the folder that the opening
image is saved to “StartupImage” and
name the folder that the screen off
image is saved to “DisplayOffImage”.
If these folder names are not used, the
navigation system cannot download
the images. (The folder names are
case sensitive.)
The images file extension is JPG or
JPEG.
The images file name, including the
file extension, can be up to 32 charac-
ters.
Image files of 10 MB or less can be
saved.
Up to 3 images can be downloaded.
On vehicles with a 12.3-inch display,
the opening image can be selected
from 3 preregistered movies. (See
page 212.)
Page 77 of 257

76
GS450h/250 (EE) NAVI 30C48E
13.12.17 15:42
1. DESTINATION SEARCH
1. QUICK REFERENCE
The “Destination” screen enables a destination search. Press the “MENU” but-
ton on the Remote Touch, then select “Setup”, and select “Menu” if the map
screen is displayed, to display the navigation menu screen. Then select “Desti-
nation” to display the “Destination” screen.
No.NameFunctionPage
“Address”Select to input a house number and the street
address using the input keys.82
“POI”To select one of the Points of Interest that
have already been stored in the system’s data-
base.86
“Online search”
The navigation system can use an internet
search engine to set a destination using the
most up to date information.
195
“Previous”
To select a destination from any of the last
100 previously set destinations and from the
previous starting point.
91
Page 82 of 257
81
1. DESTINATION SEARCH
3
NAVIGATION SYSTEM
GS450h/250 (EE) NAVI 30C48E
13.12.17 15:42
1Press the “MENU” button on the Re-
mote Touch. (See “Remote Touch”
on page 10.)
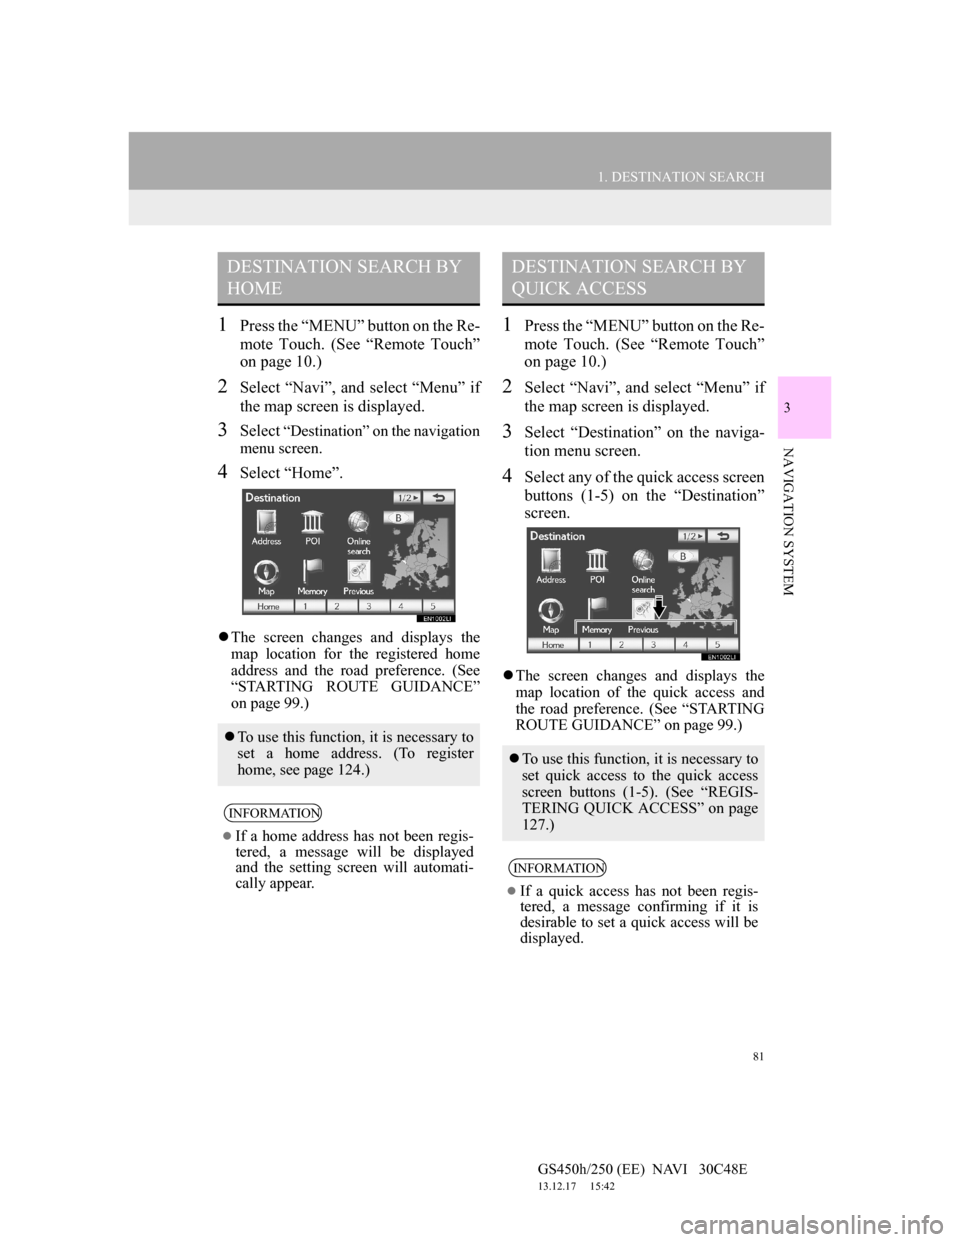
2Select “Navi”, and select “Menu” if
the map screen is displayed.
3Select “Destination” on the navigation
menu screen.
4Select “Home”.
The screen changes and displays the
map location for the registered home
address and the road preference. (See
“STARTING ROUTE GUIDANCE”
on page 99.)
1Press the “MENU” button on the Re-
mote Touch. (See “Remote Touch”
on page 10.)
2Select “Navi”, and select “Menu” if
the map screen is displayed.
3Select “Destination” on the naviga-
tion menu screen.
4Select any of the quick access screen
buttons (1-5) on the “Destination”
screen.
The screen changes and displays the
map location of the quick access and
the road preference. (See “STARTING
ROUTE GUIDANCE” on page 99.)
DESTINATION SEARCH BY
HOME
To use this function, it is necessary to
set a home address. (To register
home, see page 124.)
INFORMATION
If a home address has not been regis-
tered, a message will be displayed
and the setting screen will automati-
cally appear.
DESTINATION SEARCH BY
QUICK ACCESS
To use this function, it is necessary to
set quick access to the quick access
screen buttons (1-5). (See “REGIS-
TERING QUICK ACCESS” on page
127.)
INFORMATION
If a quick access has not been regis-
tered, a message confirming if it is
desirable to set a quick access will be
displayed.
Page 87 of 257
86
1. DESTINATION SEARCH
GS450h/250 (EE) NAVI 30C48E
13.12.17 15:42
1Press the “MENU” button on the Re-
mote Touch. (See “Remote Touch”
on page 10.)
2Select “Navi”, and select “Menu” if
the map screen is displayed.
3Select “Destination” on the naviga-
tion menu screen.
4Select “POI” on the “Destination”
screen.
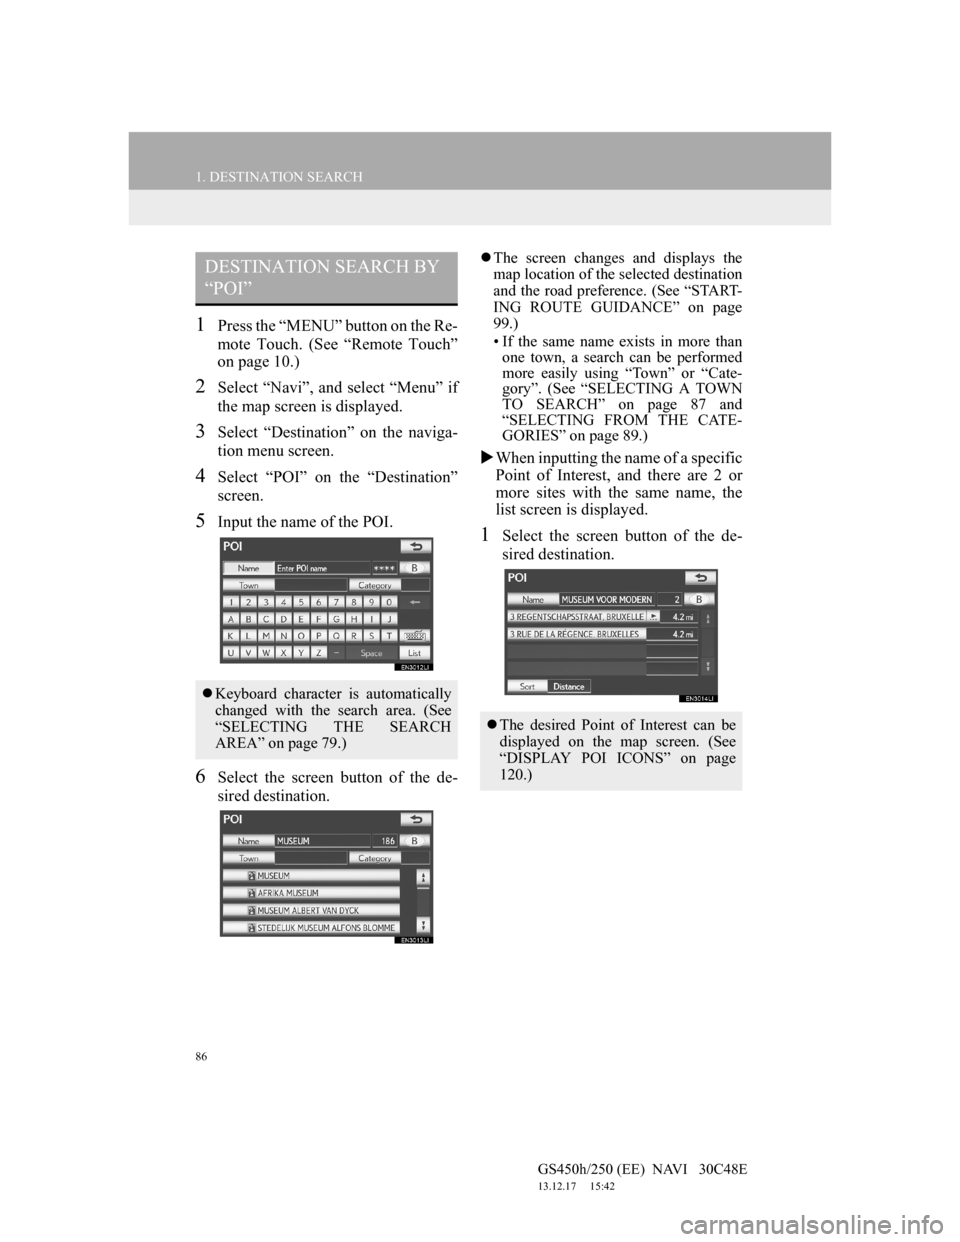
5Input the name of the POI.
6Select the screen button of the de-
sired destination.
The screen changes and displays the
map location of the selected destination
and the road preference. (See “START-
ING ROUTE GUIDANCE” on page
99.)
• If the same name exists in more than
one town, a search can be performed
more easily using “Town” or “Cate-
gory”. (See “SELECTING A TOWN
TO SEARCH” on page 87 and
“SELECTING FROM THE CATE-
GORIES” on page 89.)
When inputting the name of a specific
Point of Interest, and there are 2 or
more sites with the same name, the
list screen is displayed.
1Select the screen button of the de-
sired destination.
DESTINATION SEARCH BY
“POI”
Keyboard character is automatically
changed with the search area. (See
“SELECTING THE SEARCH
AREA” on page 79.)
The desired Point of Interest can be
displayed on the map screen. (See
“DISPLAY POI ICONS” on page
120.)
Page 91 of 257
90
1. DESTINATION SEARCH
GS450h/250 (EE) NAVI 30C48E
13.12.17 15:42
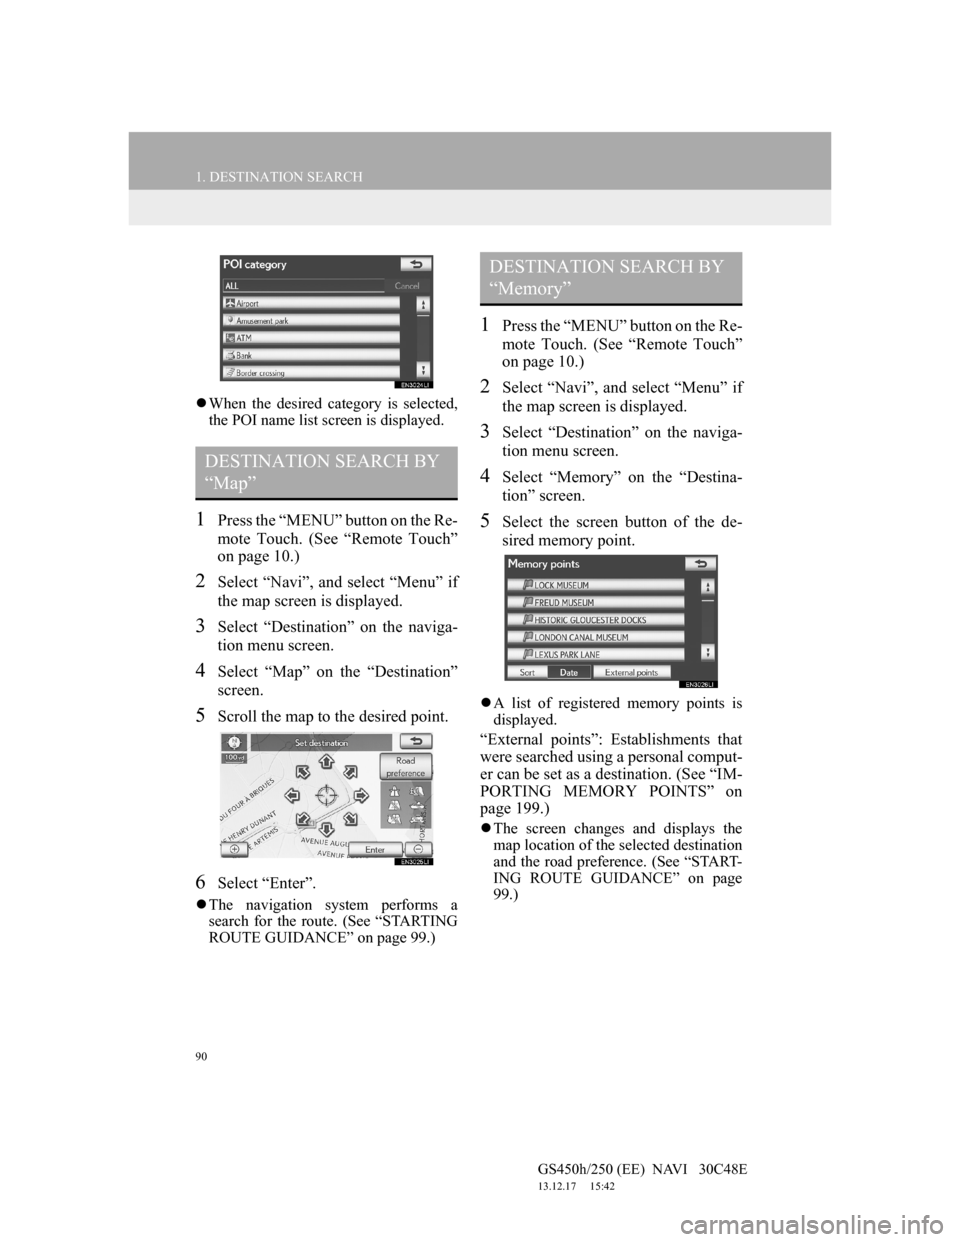
When the desired category is selected,
the POI name list screen is displayed.
1Press the “MENU” button on the Re-
mote Touch. (See “Remote Touch”
on page 10.)
2Select “Navi”, and select “Menu” if
the map screen is displayed.
3Select “Destination” on the naviga-
tion menu screen.
4Select “Map” on the “Destination”
screen.
5Scroll the map to the desired point.
6Select “Enter”.
The navigation system performs a
search for the route. (See “STARTING
ROUTE GUIDANCE” on page 99.)
1Press the “MENU” button on the Re-
mote Touch. (See “Remote Touch”
on page 10.)
2Select “Navi”, and select “Menu” if
the map screen is displayed.
3Select “Destination” on the naviga-
tion menu screen.
4Select “Memory” on the “Destina-
tion” screen.
5Select the screen button of the de-
sired memory point.
A list of registered memory points is
displayed.
“External points”: Establishments that
were searched using a personal comput-
er can be set as a destination. (See “IM-
PORTING MEMORY POINTS” on
page 199.)
The screen changes and displays the
map location of the selected destination
and the road preference. (See “START-
ING ROUTE GUIDANCE” on page
99.)
DESTINATION SEARCH BY
“Map”
DESTINATION SEARCH BY
“Memory”
Page 92 of 257
91
1. DESTINATION SEARCH
3
NAVIGATION SYSTEM
GS450h/250 (EE) NAVI 30C48E
13.12.17 15:42
1Press the “MENU” button on the Re-
mote Touch. (See “Remote Touch”
on page 10.)
2Select “Navi”, and select “Menu” if
the map screen is displayed.
3Select “Destination” on the naviga-
tion menu screen.
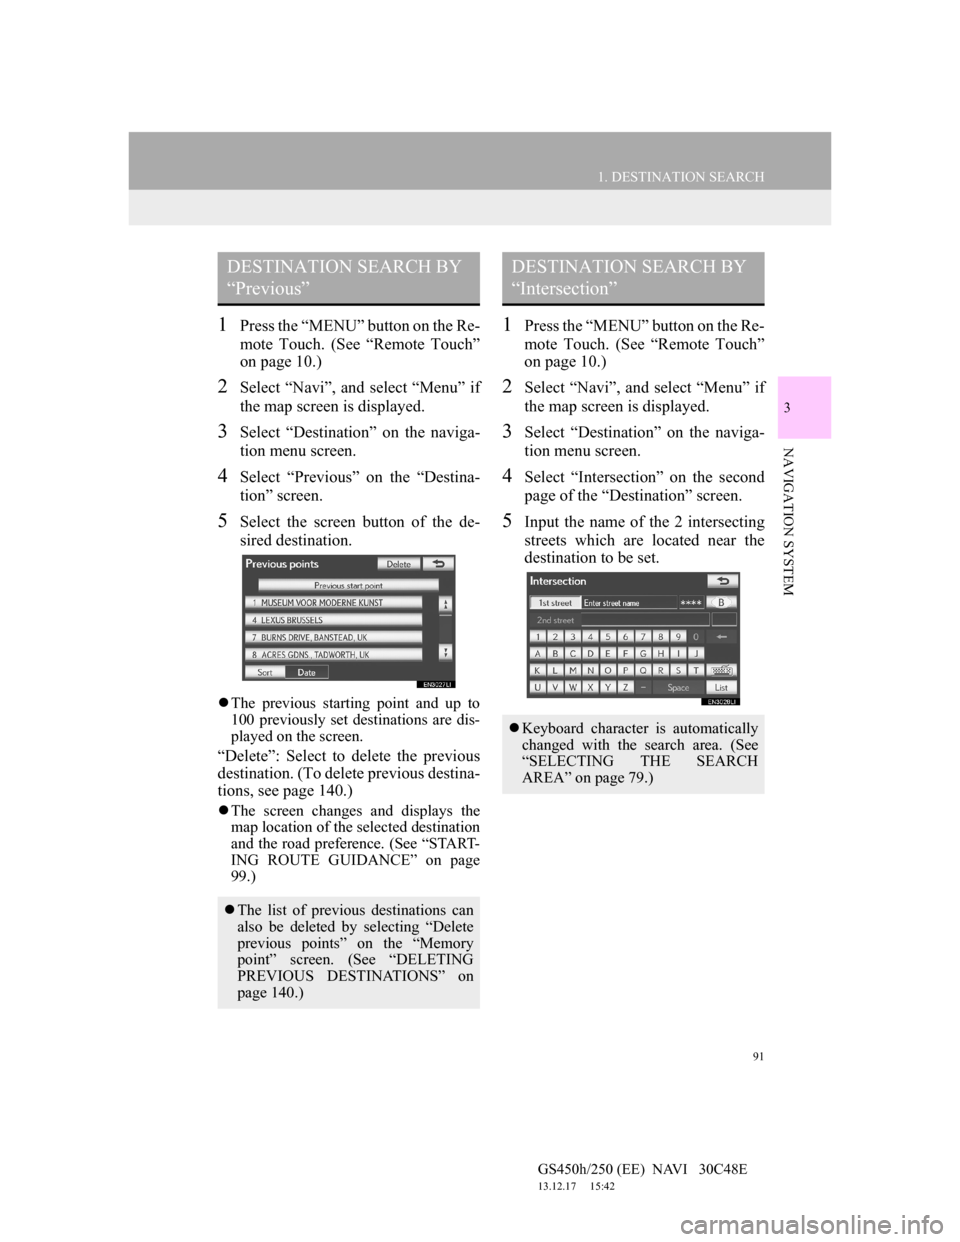
4Select “Previous” on the “Destina-
tion” screen.
5Select the screen button of the de-
sired destination.
The previous starting point and up to
100 previously set destinations are dis-
played on the screen.
“Delete”: Select to delete the previous
destination. (To delete previous destina-
tions, see page 140.)
The screen changes and displays the
map location of the selected destination
and the road preference. (See “START-
ING ROUTE GUIDANCE” on page
99.)
1Press the “MENU” button on the Re-
mote Touch. (See “Remote Touch”
on page 10.)
2Select “Navi”, and select “Menu” if
the map screen is displayed.
3Select “Destination” on the naviga-
tion menu screen.
4Select “Intersection” on the second
page of the “Destination” screen.
5Input the name of the 2 intersecting
streets which are located near the
destination to be set.
DESTINATION SEARCH BY
“Previous”
The list of previous destinations can
also be deleted by selecting “Delete
previous points” on the “Memory
point” screen. (See “DELETING
PREVIOUS DESTINATIONS” on
page 140.)
DESTINATION SEARCH BY
“Intersection”
Keyboard character is automatically
changed with the search area. (See
“SELECTING THE SEARCH
AREA” on page 79.)