2012 Lexus CT200h remote control
[x] Cancel search: remote controlPage 9 of 436

1
2
3
4
5
6
7
9
CT200h_Navi_OM76078E_(EE)
14.02.06 12:29
8
9
10
1. TELEPHONE OPERATION ............. 170
QUICK REFERENCE ......................... 170
TELEPHONE (HANDS-FREE SYSTEM
FOR CELLULAR PHONE) ............. 172
REGISTER A Bluetooth
® PHONE ..... 176
CALL ON THE Bluetooth® PHONE .. 181
RECEIVE ON THE Bluetooth®
PHONE ............................................. 188
TALK ON THE Bluetooth
® PHONE.. 189
Bluetooth® PHONE MESSAGE
FUNCTION....................................... 192
2. SETUP ............................................... 195
TELEPHONE SETTINGS .................. 195
Bluetooth® SETTINGS ....................... 218
1. AUDIO/VIDEO SYSTEM
OPERATION ................................... 232
QUICK REFERENCE ......................... 232
SOME BASICS ................................... 234
RADIO OPERATION ......................... 240
DVD PLAYER OPERATION ............ 246
USB MEMORY OPERATION ........... 268
iPod OPERATION .............................. 274
Bluetooth
® AUDIO OPERATION...... 279
AUDIO/VIDEO REMOTE
CONTROLS
(STEERING SWITCHES) ................ 288
AUDIO/VIDEO SYSTEM
OPERATING HINTS ....................... 290
2. SETUP ............................................... 299
AUDIO SETTINGS ............................ 299
1. AIR CONDITIONING SYSTEM
OPERATION .................................. 306
QUICK REFERENCE .........................306
SOME BASICS ...................................308
AUTOMATIC AIR CONDITIONING
SYSTEM ...........................................309
1. SPEECH COMMAND SYSTEM
OPERATION .................................. 322
SPEECH COMMAND SYSTEM........322
COMMAND LIST ...............................328
1. INFORMATION DISPLAY ............. 332
TRAFFIC .............................................332
2. SETUP ............................................... 338
TRAFFIC AND PARKING
SETTINGS ........................................338
1. CONNECTED SERVICES ............... 344
CONNECTED SERVICES
OVERVIEW......................................344
SETTINGS REQUIRED FOR USING
THE SERVICE..................................347
USING CONNECTED SERVICES ....353
2. SETUP ............................................... 363
ONLINE SEARCH SETTINGS ..........363
4TELEPHONE
5AUDIO/VIDEO SYSTEM
6AIR CONDITIONING
7SPEECH COMMAND
8INFORMATION
9CONNECTED SERVICES
Page 46 of 436

46
1. BASIC INFORMATION BEFORE OPERATION
CT200h_Navi_OM76078E_(EE)
14.02.06 12:29
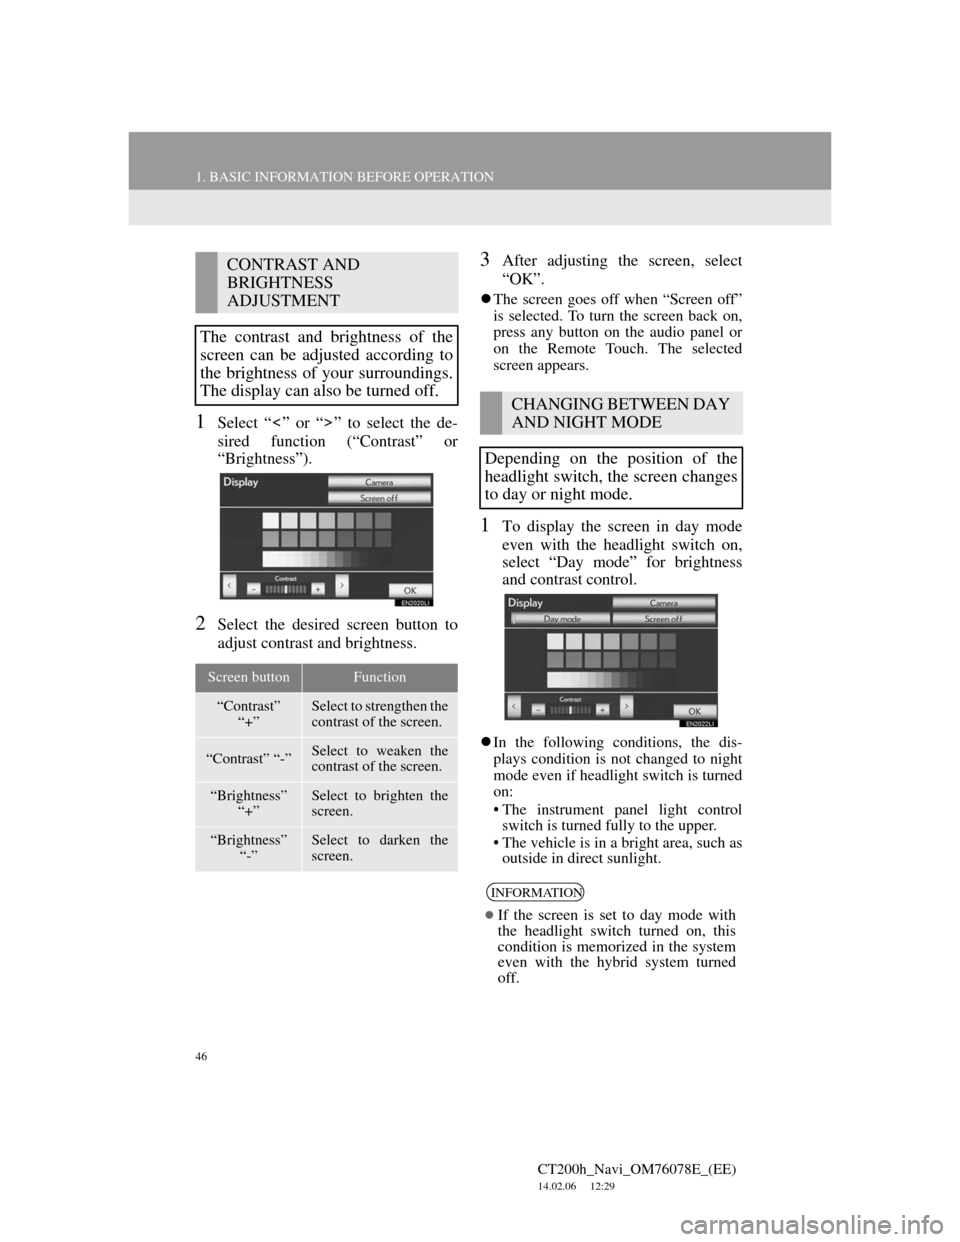
1Select “ ” or “ ” to select the de-
sired function (“Contrast” or
“Brightness”).
2Select the desired screen button to
adjust contrast and brightness.
3After adjusting the screen, select
“OK”.
The screen goes off when “Screen off”
is selected. To turn the screen back on,
press any button on the audio panel or
on the Remote Touch. The selected
screen appears.
1To display the screen in day mode
even with the headlight switch on,
select “Day mode” for brightness
and contrast control.
In the following conditions, the dis-
plays condition is not changed to night
mode even if headlight switch is turned
on:
• The instrument panel light control
switch is turned fully to the upper.
• The vehicle is in a bright area, such as
outside in direct sunlight.
CONTRAST AND
BRIGHTNESS
ADJUSTMENT
The contrast and brightness of the
screen can be adjusted according to
the brightness of your surroundings.
The display can also be turned off.
Screen buttonFunction
“Contrast”
“+”Select to strengthen the
contrast of the screen.
“Contrast” “-”Select to weaken the
contrast of the screen.
“Brightness”
“+”Select to brighten the
screen.
“Brightness”
“-”Select to darken the
screen.
CHANGING BETWEEN DAY
AND NIGHT MODE
Depending on the position of the
headlight switch, the screen changes
to day or night mode.
INFORMATION
If the screen is set to day mode with
the headlight switch turned on, this
condition is memorized in the system
even with the hybrid system turned
off.
Page 231 of 436

5
231
1
2
3
4
5
6
7
CT200h_Navi_OM76078E_(EE)
14.02.06 12:30
8
9
10
4. DVD PLAYER OPERATION ......... 246
INSERTING A DISC ............................. 246
EJECTING A DISC ............................... 246
PLAYING A DISC ................................ 247
PLAYING AN AUDIO DISC............... 247
PLAYING AN MP3/WMA DISC ......... 250
OPERATING A DVD DISC ................. 254
PLAYING A DVD DISC....................... 255
DVD OPTIONS ..................................... 257
IF THE PLAYER MALFUNCTIONS... 265
DVD PLAYER AND DVD VIDEO
DISC INFORMATION ....................... 266
5. USB MEMORY OPERATION ....... 268
CONNECTING A USB MEMORY ...... 268
PLAYING A USB MEMORY............... 269
6. iPod OPERATION........................... 274
CONNECTING iPod ............................. 274
PLAYING iPod ...................................... 275
7. Bluetooth® AUDIO
OPERATION................................. 279
CONNECTING A Bluetooth®
AUDIO PLAYER ................................ 281
PLAYING Bluetooth
® AUDIO ............. 283
8. AUDIO/VIDEO REMOTE
CONTROLS
(STEERING SWITCHES) ............ 288
9. AUDIO/VIDEO SYSTEM
OPERATING HINTS ................... 290
RADIO RECEPTION ............................. 290
iPod ......................................................... 291
USB MEMORY...................................... 292
CARING FOR YOUR DVD PLAYER
AND DISC ........................................... 292
MP3/WMA FILES.................................. 295
CD-R AND CD-RW DISCS................... 297
TERMS ................................................... 297
1. AUDIO SETTINGS ........................ 299
AUDIO SETTINGS................................ 299
SOUND SETTINGS ............................... 300
RADIO SETTINGS ................................ 302
iPod SETTINGS ..................................... 303
2SETUP
For vehicles sold outside Europe, some of the functions cannot be operated while
AUDIO/VIDEO SYSTEM
Page 235 of 436

235
1. AUDIO/VIDEO SYSTEM OPERATION
5
AUDIO/VIDEO SYSTEM
CT200h_Navi_OM76078E_(EE)
14.02.06 12:30
Power/Volume knob: Press to turn the
audio/video system on and off. Turn this
knob to adjust the volume. The system
turns on in the last mode used.
“RADIO”, “MEDIA” button: Press to
display screen buttons for the audio/vid-
eo system. Using the instrument panel
1Every time the “RADIO” or “ME-
DIA” button is pressed, the audio
control mode changes.
The audio control mode changes in the
following order:
“RADIO” button: To display the
“AM”, “FM” and “DAB” tabs on the
screen. (Radio mode)
“MEDIA” button: To display the
“DISC”, “BT audio”, “AUX”, “USB”
and “iPod” tabs on the screen. (Media
mode)
Using the Remote Touch
1Press the “MENU” button on the
Remote Touch.
TURNING THE SYSTEM ON
AND OFF
A function that enables automatic
return to the previous screen from the
audio/video screen can be selected.
See page 60 for details.
SWITCHING BETWEEN
FUNCTIONS
Page 236 of 436

236
1. AUDIO/VIDEO SYSTEM OPERATION
CT200h_Navi_OM76078E_(EE)
14.02.06 12:30
2Select “Audio”.
3Select the desired tab.
1Press the “MEDIA” button. (Using
the instrument panel)
Press the “MENU” button on the
Remote Touch, then select “Audio”.
(Using the Remote Touch)
2Select the “DISC” tab.
3Select “Options”.
4Select “Wide”.
Up to 3 tabs can be displayed on the
screen. Select or , located
either side of the screen tabs, to dis-
play tabs from the previous or next
page.
The desired audio mode can be found
by selecting or and then
selecting that audio mode tab.
INFORMATION
If a disc is not inserted, the DVD
player cannot be turned on.
The DVD player can be turned off by
ejecting a disc.
When the audio control mode is
selected, the respective screen buttons
are displayed on the screen.
Dimmed screen buttons cannot be
operated.
SELECTING SCREEN SIZE
Before selecting screen size, it is
necessary to insert a DVD disc and
select DISC mode.
Page 238 of 436

238
1. AUDIO/VIDEO SYSTEM OPERATION
CT200h_Navi_OM76078E_(EE)
14.02.06 12:30
1Press the “MEDIA” button to dis-
play the media control screen and se-
lect the “AUX” tab or press the
“MEDIA” button repeatedly to
change to AUX mode.
For the Remote Touch operation
method, see “SWITCHING
BETWEEN FUNCTIONS” on page
235.
AUX PORT
The sound of portable audio players
connected to the AUX port can be
enjoyed. For details, refer to “Own-
er’s Manual”.
CAUTION
Do not connect portable audio device
or operate the controls.
NOTICE
Depending on the size and shape of
the portable audio device that is con-
nected to the system, the lid may not
close fully. In this case, do not forci-
bly close the lid as this may damage
the portable audio device or the termi-
nal, etc.
Do not leave portable audio device in
the vehicle. The temperature inside
the vehicle may become high, result-
ing in damage to the player.
Do not push down on or apply unnec-
essary pressure to the portable audio
device while it is connected as this
may damage the portable audio
device or its terminal.
Do not insert foreign objects into the
port as this may damage the portable
audio device or its terminal.
INFORMATION
When the portable audio player is not
connected to the AUX port, the tab
will be dimmed.
Page 239 of 436

239
1. AUDIO/VIDEO SYSTEM OPERATION
5
AUDIO/VIDEO SYSTEM
CT200h_Navi_OM76078E_(EE)
14.02.06 12:30
1Press the “MEDIA” button to
display the media control screen and
select the “USB” or “iPod” tab or
press the “MEDIA” button
repeatedly to change to USB
memory or iPod mode.
For the Remote Touch operation
method, see “SWITCHING
BETWEEN FUNCTIONS” on page
235.
USB PORT
A USB memory/iPod can be con-
nected to the USB port. For details,
see “CONNECTING A USB MEM-
ORY” on page 268 and “CON-
NECTING iPod” on page 274.
INFORMATION
When a USB memory/iPod is not
connected with the USB port, the tab
will be dimmed.
PORTABLE AUDIO DEVICE
HOLDER*
A portable audio device can be
placed using the portable audio de-
vice holder. Depending on the size
and shape of the portable audio de-
vice, the device may not be placed in
the holder.
*: If equipped
Page 255 of 436

255
1. AUDIO/VIDEO SYSTEM OPERATION
5
AUDIO/VIDEO SYSTEM
CT200h_Navi_OM76078E_(EE)
14.02.06 12:30
1Press the “MEDIA” button if a disc
has already been loaded in the disc
slot.
2Select the “DISC” tab or press the
“MEDIA” button repeatedly until
the “DISC” tab is selected.
For the Remote Touch operation
method, see “SWITCHING
BETWEEN FUNCTIONS” on page
235.
Select “Options” on the “DVD” screen,
then select “Wide” on the “DVD
options” screen. The screen mode can
be changed.
If “Full screen” is selected when the
vehicle is completely stopped and the
parking brake is applied, the video
screen returns.If is selected, while watching a
DVD, the DVD controls will appear.
PLAYING A DVD DISCDISPLAYING DVD
CONTROLS
INFORMATION
If appears on the screen when a
control is selected, the operation rele-
vant to the control is not permitted.