Page 143 of 387
453
Features of your vehicle
D150301AAM-EU
ECOMINDERTMindicator
(if equipped)
The ECOMINDERTMindicator is a system
that illuminates “ECO” when the driver
has reached optimum fuel efficiency.
The ECOMINDER
TMindicator will turn
the ECO light green on the instrument
panel when you are driving fuel effi-
ciently in the ECO ON mode.
If you don't want the indicator dis-
played, you can turn the ECO ON
mode to OFF mode by pressing the
TRIP and RESET button.
For ECO ON/OFF Mode operation,
please refer to the previous page.
Fuel efficient driving can be influenced by driving habits and road conditions.
The indicator will not display while in P (Park), N (Neutral) or R (Reverse).
D150302AUN
Air bag warning light
This warning light will illuminate for
approximately 6 seconds each time you
turn the ignition switch to the ON posi-
tion.
This light also comes on when the
Supplemental Restraint System (SRS) is
not working properly. If the AIR BAG
warning light does not come on, or con-
tinuously remains on after operating for
about 6 seconds when you turned the
ignition switch to the ON position or start-
ed the engine, or if it comes on while
driving, have the SRS inspected by an
authorized Kia dealer.
For passenger air bag OFF indicator on
the center facia, refer to ‘air bag’ in sec-
tion 3.
ECOECOMINDERTM WARNING
Don't keep watching the “ECO”
ECOMINDERTM indicator while driv-
ing. It may distract you while driv-
ing and cause an accident that
could result in severe personal
injury.
Page 182 of 387
Features of your vehicle
92
4
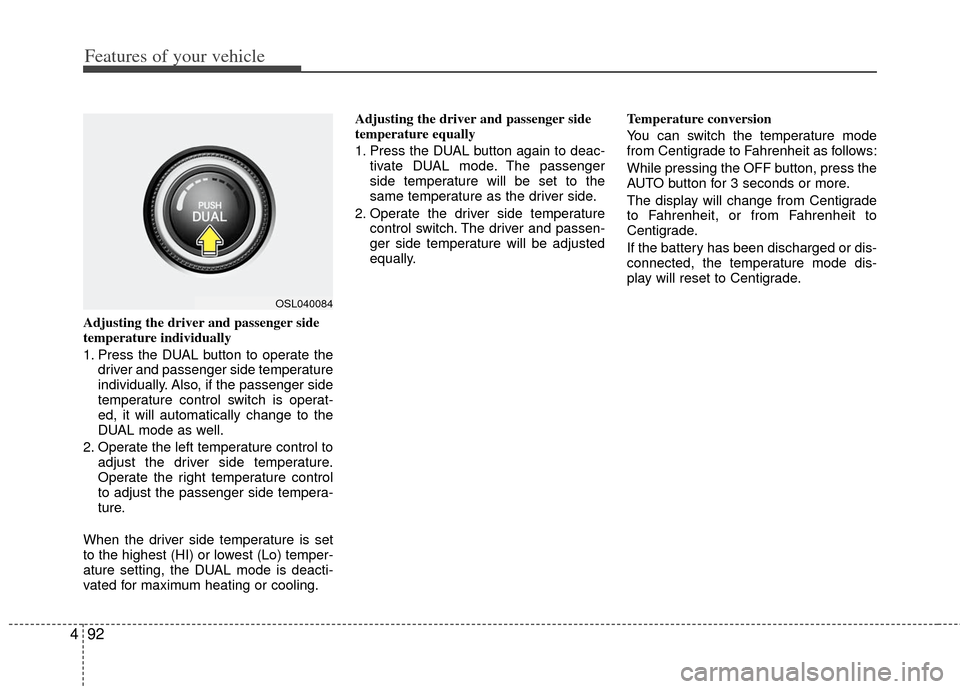
Adjusting the driver and passenger side
temperature individually
1. Press the DUAL button to operate the
driver and passenger side temperature
individually. Also, if the passenger side
temperature control switch is operat-
ed, it will automatically change to the
DUAL mode as well.
2. Operate the left temperature control to adjust the driver side temperature.
Operate the right temperature control
to adjust the passenger side tempera-
ture.
When the driver side temperature is set
to the highest (HI) or lowest (Lo) temper-
ature setting, the DUAL mode is deacti-
vated for maximum heating or cooling. Adjusting the driver and passenger side
temperature equally
1. Press the DUAL button again to deac-
tivate DUAL mode. The passenger
side temperature will be set to the
same temperature as the driver side.
2. Operate the driver side temperature control switch. The driver and passen-
ger side temperature will be adjusted
equally. Temperature conversion
You can switch the temperature mode
from Centigrade to Fahrenheit as follows:
While pressing the OFF button, press the
AUTO button for 3 seconds or more.
The display will change from Centigrade
to Fahrenheit, or from Fahrenheit to
Centigrade.
If the battery has been discharged or dis-
connected, the temperature mode dis-
play will reset to Centigrade.
OSL040084
Page 187 of 387
497
Features of your vehicle
Defogging logic
To reduce the possibility of fogging up
the inside of the windshield, the air intake
or air conditioning is controlled automati-
cally according to certain conditions such
as or position. To cancel or
return to the defogging logic, do the fol-
lowing.
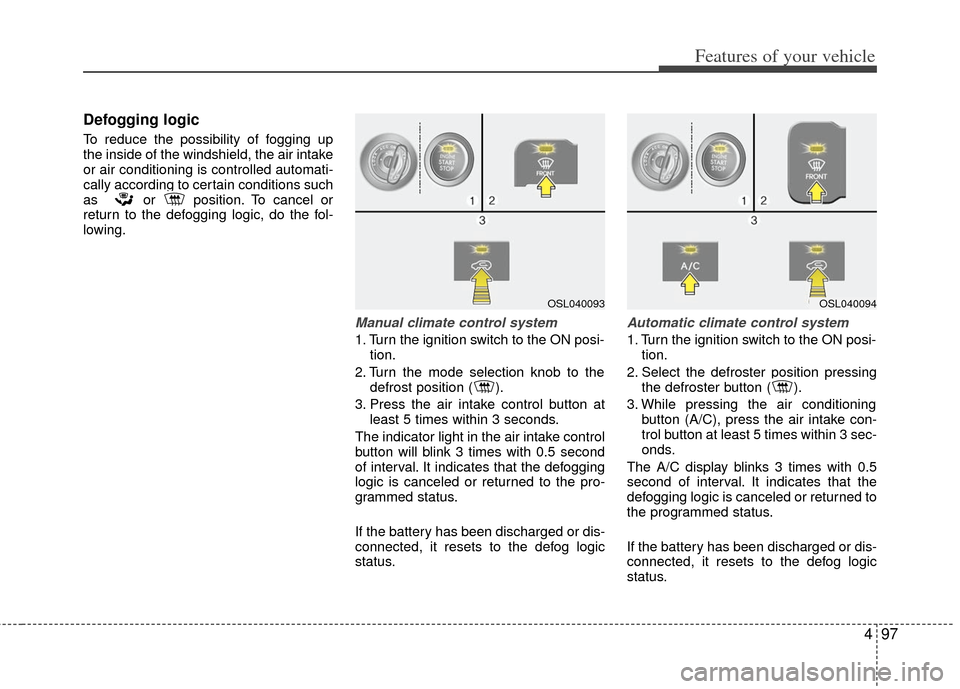
Manual climate control system
1. Turn the ignition switch to the ON posi-tion.
2. Turn the mode selection knob to the defrost position ( ).
3. Press the air intake control button at least 5 times within 3 seconds.
The indicator light in the air intake control
button will blink 3 times with 0.5 second
of interval. It indicates that the defogging
logic is canceled or returned to the pro-
grammed status.
If the battery has been discharged or dis-
connected, it resets to the defog logic
status.
Automatic climate control system
1. Turn the ignition switch to the ON posi- tion.
2. Select the defroster position pressing the defroster button ( ).
3. While pressing the air conditioning button (A/C), press the air intake con-
trol button at least 5 times within 3 sec-
onds.
The A/C display blinks 3 times with 0.5
second of interval. It indicates that the
defogging logic is canceled or returned to
the programmed status.
If the battery has been discharged or dis-
connected, it resets to the defog logic
status.
OSL040093OSL040094
Page 193 of 387
4103
Features of your vehicle
Digital clock (if equipped)
Whenever the battery terminals or relat-
ed fuses are disconnected, you must
reset the time.
For details, refer to the audio in the end
of this section.
❈The actual feature may differ from the illus-
tration.
Clothes hanger (if equipped)
WARNING
Do not put a finger or a foreign ele-
ment (pen, etc.) into a power outlet
and do not touch with a wet hand.
You may get an electric shock.
SL_USA_RADIO/Q
WARNING
Do not adjust the clock while driv-
ing. You may lose your steering
control and cause an accident that
results in severe personal injury or
death.
OSL040112
CAUTION
Do not hang heavy clothes, since those may damage the hook.
WARNING
To reduce the risk of injury in an
accident or sudden stop, do not
hang sharp or dangerous things
except clothes.
Page 199 of 387
4109
Features of your vehicle
❈The actual feature may differ from the
illustration.
D300200AEN
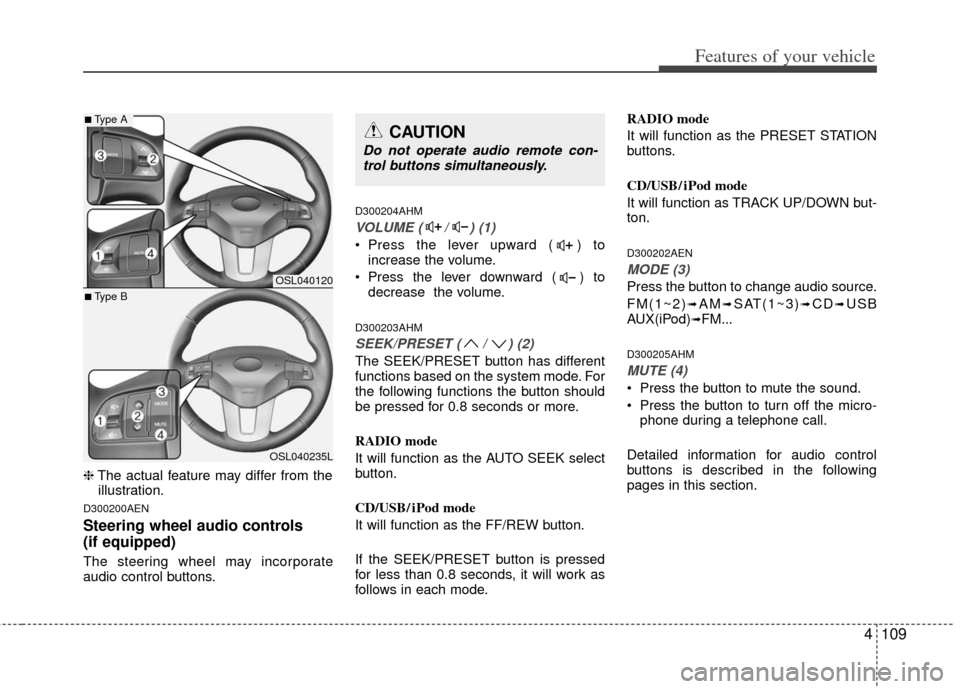
Steering wheel audio controls
(if equipped)
The steering wheel may incorporate
audio control buttons.
D300204AHM
VOLUME ( / ) (1)
• Press the lever upward ( ) to increase the volume.
Press the lever downward ( ) to decrease the volume.
D300203AHM
SEEK/PRESET ( / ) (2)
The SEEK/PRESET button has different
functions based on the system mode. For
the following functions the button should
be pressed for 0.8 seconds or more.
RADIO mode
It will function as the AUTO SEEK select
button.
CD/USB/ iPod mode
It will function as the FF/REW button.
If the SEEK/PRESET button is pressed
for less than 0.8 seconds, it will work as
follows in each mode. RADIO mode
It will function as the PRESET STATION
buttons.
CD/USB/ iPod mode
It will function as TRACK UP/DOWN but-
ton.
D300202AEN
MODE (3)
Press the button to change audio source.
FM(1~2)
➟AM➟SAT(1~3)➟CD➟USB
AUX(iPod)➟FM...
D300205AHM
MUTE (4)
Press the button to mute the sound.
Press the button to turn off the micro- phone during a telephone call.
Detailed information for audio control
buttons is described in the following
pages in this section.
OSL040120
OSL040235L
■Type A
■Type B
CAUTION
Do not operate audio remote con- trol buttons simultaneously.
Page 205 of 387
4115
Features of your vehicle
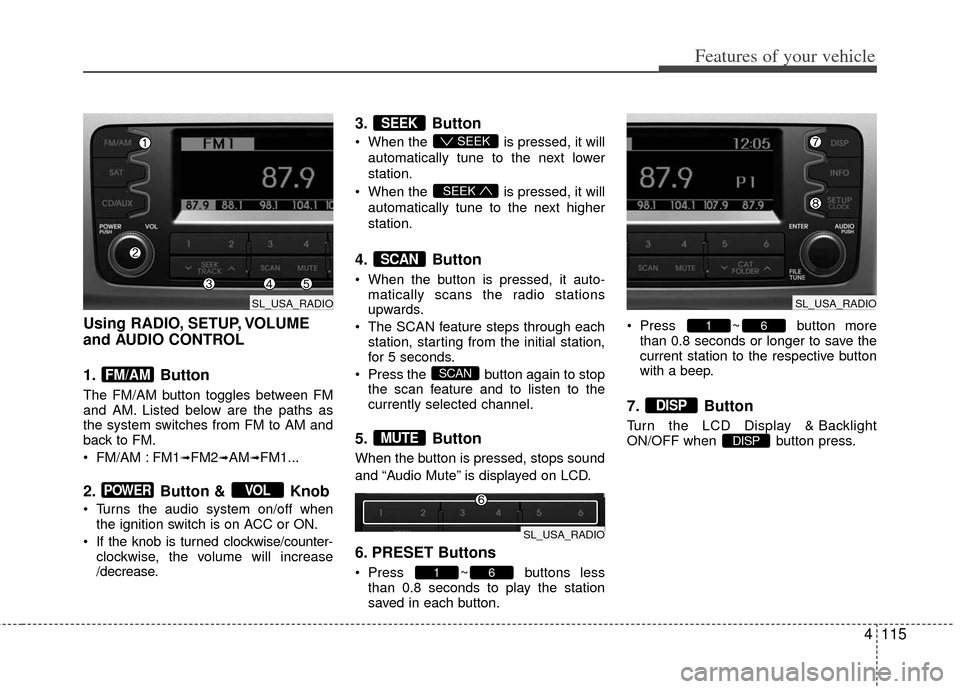
Using RADIO, SETUP, VOLUME
and AUDIO CONTROL
1. Button
The FM/AM button toggles between FM
and AM. Listed below are the paths as
the system switches from FM to AM and
back to FM.
FM/AM : FM1
➟FM2➟AM➟FM1...
2. Button & Knob
Turns the audio system on/off whenthe ignition switch is on ACC or ON.
If the knob is turned clockwise/counter- clockwise, the volume will increase
/decrease.
3. Button
When the is pressed, it will
automatically tune to the next lower
station.
When the is pressed, it will
automatically tune to the next higher
station.
4. Button
When the button is pressed, it auto- matically scans the radio stations
upwards.
The SCAN feature steps through each station, starting from the initial station,
for 5 seconds.
Press the button again to stop the scan feature and to listen to the
currently selected channel.
5. Button
When the button is pressed, stops sound
and “Audio Mute” is displayed on LCD.
6. PRESET Buttons
Press ~ buttons lessthan 0.8 seconds to play the station
saved in each button. Press ~ button more
than 0.8 seconds or longer to save the
current station to the respective button
with a beep.
7. Button
Turn the LCD Display & Backlight
ON/OFF when button press.DISP
DISP
61
61
MUTE
SCAN
SCAN
SEEK
SEEK
SEEK
VOLPOWER
FM/AM
SL_USA_RADIO
SL_USA_RADIO
SL_USA_RADIO
Page 215 of 387
4125
Features of your vehicle
✽
✽NOTICE FOR USING THE
iPod®DEVICE
• Some iPod models might not sup-
port the communication protocol
and the files will not be played.
Supported iPod models:
- iPod Mini
- iPod 4th(Photo) ~ 6th(Classic)
generation
- iPod Nano 1st~4th generation
- iPod Touch 1st~2nd generation
• The order of search or playback of songs in the iPod can be different
from the order searched in the
audio system.
• If the iPod disabled due to its own malfunction, reset the iPod. (Reset:
Refer to iPod manual)
• An iPod may not operate normally on low battery.
• Some iPod devices, such as the iPhone, can be connected through the
Bluetooth
®interface. The device
must have audio Bluetooth®capabili-
ty (such as for stereo headphone
Bluetooth
®). The device can play, but
it will not be controlled by the audio
system.
CAUTION IN USING THE
iPod®DEVICE
The Kia iPod Power Cable is
needed in order to operate iPodwith the audio buttons on theaudio system. The USB cable pro-vided by Apple may cause mal-function and should not be usedfor Kia vehicles.
❋ The Kia iPod Power Cable maybe purchased through your KiaDealership.
When connecting iPod with the iPod Power Cable, insert the con-nector to the multimedia socket completely. If not inserted com-pletely, communications betweeniPod and audio may be interrupted.
When adjusting the sound effects of the iPod and the audio system, thesound effects of both devices willoverlap and might reduce or distort the quality of the sound.
Deactivate (turn off) the equalizer function of an iPod when adjust-ing the audio system’s volume,and turn off the equalizer of theaudio system when using theequalizer of an iPod.
(Continued)
(Continued) When the iPod cable is connected, the system can be switched to AUXmode even without iPod deviceand may cause noise. Disconnect
the iPod cable when you are not using the iPod device.
When not using iPod with car audio, detach the iPod cable fromiPod. Otherwise, iPod may remainin accessory mode, and may notwork properly.
Page 220 of 387
Features of your vehicle
130
4
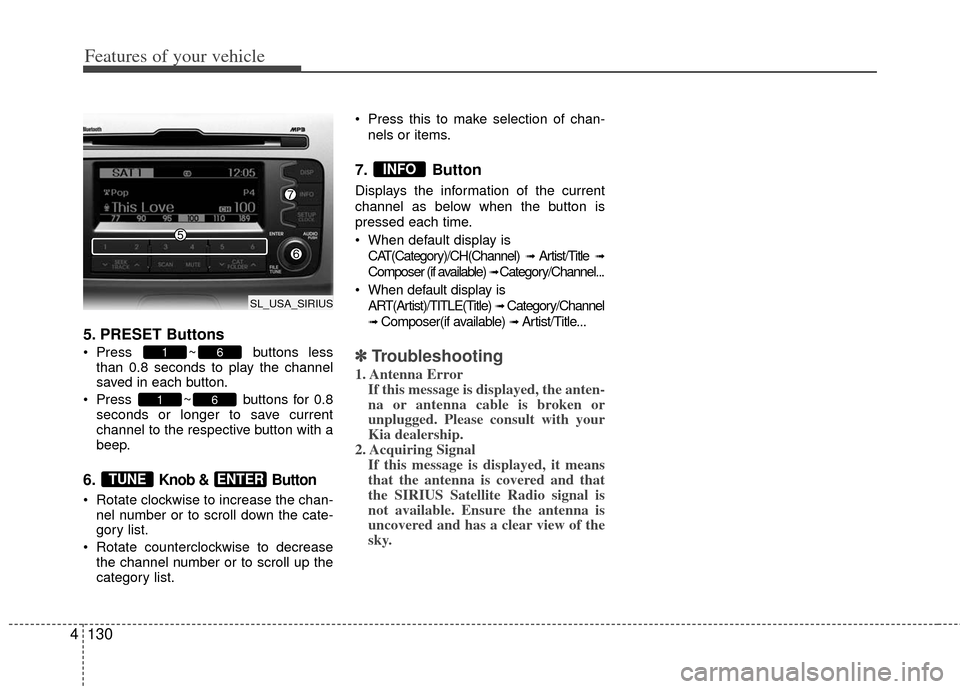
5. PRESET Buttons
Press ~ buttons less
than 0.8 seconds to play the channel
saved in each button.
Press ~ buttons for 0.8 seconds or longer to save current
channel to the respective button with a
beep.
6. Knob & Button
Rotate clockwise to increase the chan-nel number or to scroll down the cate-
gory list.
Rotate counterclockwise to decrease the channel number or to scroll up the
category list. Press this to make selection of chan-
nels or items.
7. Button
Displays the information of the current
channel as below when the button is
pressed each time.
When default display isCAT(Category)/CH(Channel)
➟ Artist/Title ➟
Composer (if available) ➟ Category/Channel...
When default display is ART(Artist)/TITLE(Title)
➟ Category/Channel
➟ Composer(if available) ➟ Artist/Title...
✽ ✽ Troubleshooting
1. Antenna Error
If this message is displayed, the anten-
na or antenna cable is broken or
unplugged. Please consult with your
Kia dealership.
2. Acquiring Signal If this message is displayed, it means
that the antenna is covered and that
the SIRIUS Satellite Radio signal is
not available. Ensure the antenna is
uncovered and has a clear view of the
sky.
INFO
ENTERTUNE
61
61
SL_USA_SIRIUS